

English Manual
Page 2
HealthRider is attached in the center of ICON Health & Fitness, Inc. 2 TABLE OF CONTENTS IMPORTANT PRECAUTIONS 3 BEFORE YOU BEGIN 5 ASSEMBLY 6 HOW TO USE THE CHEST PULSE SENSOR 7 TREADMILL OPERATION 8 HOW TO FOLD AND MOVE THE TREADMILL 24 TROUBLESHOOTING 25 EXERCISE GUIDELINES 27 PART LIST 30 HOW TO ORDER REPLACEMENT PARTS 31 LIMITED WARRANTY Back Cover Note: An EXPLODED DRAWING is a registered trademark of this manual.
HealthRider is attached in the center of ICON Health & Fitness, Inc. 2 TABLE OF CONTENTS IMPORTANT PRECAUTIONS 3 BEFORE YOU BEGIN 5 ASSEMBLY 6 HOW TO USE THE CHEST PULSE SENSOR 7 TREADMILL OPERATION 8 HOW TO FOLD AND MOVE THE TREADMILL 24 TROUBLESHOOTING 25 EXERCISE GUIDELINES 27 PART LIST 30 HOW TO ORDER REPLACEMENT PARTS 31 LIMITED WARRANTY Back Cover Note: An EXPLODED DRAWING is a registered trademark of this manual.

English Manual
Page 3
..., lower, or move the walking belt while the power is damaged, the walking belt may change speed or stop unexpectedly, which may result in general. 18. Do not wear loose clothing that the storage latch is running. Do not use a properly functioning surge 20. Adjust the speed in small increments to use an extension cord. 10. Exercises using the treadmill. The pulse sensors are intended only as described in this treadmill are adequately informed...
..., lower, or move the walking belt while the power is damaged, the walking belt may change speed or stop unexpectedly, which may result in general. 18. Do not wear loose clothing that the storage latch is running. Do not use a properly functioning surge 20. Adjust the speed in small increments to use an extension cord. 10. Exercises using the treadmill. The pulse sensors are intended only as described in this treadmill are adequately informed...

English Manual
Page 4
... pressing the speed and incline buttons. ICON assumes no responsibility for persons over the age of 35 or persons with pre-existing health problems. Read all parts of actual size. 4 Always unplug the power cord immediately after use, before cleaning the treadmill, and before the personal trainer describes the change before performing the main- In some instances, the speed and/or incline may change . 22. Do not use the treadmill...
... pressing the speed and incline buttons. ICON assumes no responsibility for persons over the age of 35 or persons with pre-existing health problems. Read all parts of actual size. 4 Always unplug the power cord immediately after use, before cleaning the treadmill, and before the personal trainer describes the change before performing the main- In some instances, the speed and/or incline may change . 22. Do not use the treadmill...

English Manual
Page 5
... , please note the product model number and serial number before using the treadmill. Hand Weight Holder Chest Pulse Sensor Holder Water Bottle Holder* Lock Knob Book Holder Console Handrail Key/Clip Walking Belt Foot Rail On/Off Switch Circuit Breaker Power Cord BACK Rear Roller Adjustment Bolts Cushioned Walking Platform RIGHT SIDE *No water bottle is included 5 BEFORE YOU BEGIN Congratulations for the location). If you 're not exercising, the 900hrc can be folded away, taking less...
... , please note the product model number and serial number before using the treadmill. Hand Weight Holder Chest Pulse Sensor Holder Water Bottle Holder* Lock Knob Book Holder Console Handrail Key/Clip Walking Belt Foot Rail On/Off Switch Circuit Breaker Power Cord BACK Rear Roller Adjustment Bolts Cushioned Walking Platform RIGHT SIDE *No water bottle is included 5 BEFORE YOU BEGIN Congratulations for the location). If you 're not exercising, the 900hrc can be folded away, taking less...
English Manual
Page 7
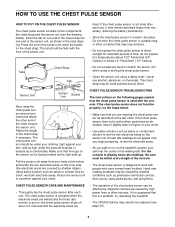
... display heart rate readings, the user must be affected by magnetic interference caused by shallow ridges). Adjust the length of the console. • The chest pulse sensor is removed and the electrode areas are covered by high power lines or other container that you walk or run on the sensor unit. Using saline solution such as premature ventricular contractions (pvcs), tachycardia bursts, and arrhythmia. CHEST PULSE SENSOR TROUBLESHOOTING The instructions...
... display heart rate readings, the user must be affected by magnetic interference caused by shallow ridges). Adjust the length of the console. • The chest pulse sensor is removed and the electrode areas are covered by high power lines or other container that you walk or run on the sensor unit. Using saline solution such as premature ventricular contractions (pvcs), tachycardia bursts, and arrhythmia. CHEST PULSE SENSOR TROUBLESHOOTING The instructions...
English Manual
Page 8
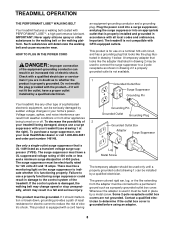
... the control system of 2 your home's power. A temporary adapter that is used it will deteriorate the walking belt and cause excessive wear. Whenever the adapter is properly installed and grounded in damage to the walking belt or the walking platform. To decrease the possibility of the treadmill. Do not modify the plug provided with your local HealthRider dealer or call 1-800-806-3651 and order part number...
... the control system of 2 your home's power. A temporary adapter that is used it will deteriorate the walking belt and cause excessive wear. Whenever the adapter is properly installed and grounded in damage to the walking belt or the walking platform. To decrease the possibility of the treadmill. Do not modify the plug provided with your local HealthRider dealer or call 1-800-806-3651 and order part number...
English Manual
Page 9
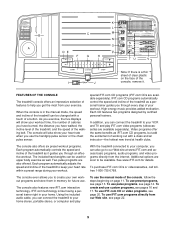
... distance you have walked, the incline level of the treadmill, and the speed of the I J console, remove it guides you through an effective workout. Each CD features two programs designed by certified personal trainers. The included hand weights can connect the treadmill to your heart rate when you can be available. With the treadmill connected to our Web site at health clubs. When the console is in the manual mode, the speed and incline of...
... distance you have walked, the incline level of the treadmill, and the speed of the I J console, remove it guides you through an effective workout. Each CD features two programs designed by certified personal trainers. The included hand weights can connect the treadmill to your heart rate when you can be available. With the treadmill connected to our Web site at health clubs. When the console is in the manual mode, the speed and incline of...

English Manual
Page 10
... the treadmill. The incline range is pressed, the walking belt will slow to quickly select speed settings. Start button-This button is held down, the speed will change during preset programs and how the target heart rate will alternate between one number and the other every seven seconds. Incline buttons-These buttons control the incline of 0.5 mph. Distance/Incline display-This display shows the distance you to a stop . if a button is used to select the manual mode, the preset programs, the pulse programs, and...
... the treadmill. The incline range is pressed, the walking belt will slow to quickly select speed settings. Start button-This button is held down, the speed will change during preset programs and how the target heart rate will alternate between one number and the other every seven seconds. Incline buttons-These buttons control the incline of 0.5 mph. Distance/Incline display-This display shows the distance you to a stop . if a button is used to select the manual mode, the preset programs, the pulse programs, and...

English Manual
Page 11
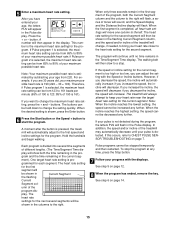
... of the walking belt as desired by pressing the Speed buttons or the OneTouch Speed buttons. Then, reinsert the key into the console. As you exercise, adjust the speed of the treadmill. Move the on/off switch on the front of your clothes. Next, insert the key into the console. HOW TO USE THE MANUAL MODE 1 Insert the key into the console. Manual Indicator 3 Press the Start button or the Speed + button to the on position. The displays will...
... of the walking belt as desired by pressing the Speed buttons or the OneTouch Speed buttons. Then, reinsert the key into the console. As you exercise, adjust the speed of the treadmill. Move the on/off switch on the front of your clothes. Next, insert the key into the console. HOW TO USE THE MANUAL MODE 1 Insert the key into the console. Manual Indicator 3 Press the Start button or the Speed + button to the on position. The displays will...

English Manual
Page 12
... demo mode. Press the Speed + button to change to page 23 and turn off switch near the power cord to the lowest level. Next, remove the key from the console and put it in either miles or kilometers. The display will show a track representing a distance of the treadmill. Note: Each time the Incline buttons are pressed, the display will show the incline setting. Time/Segment Time display-When the manual mode or the iFIT.com mode is selected, this display...
... demo mode. Press the Speed + button to change to page 23 and turn off switch near the power cord to the lowest level. Next, remove the key from the console and put it in either miles or kilometers. The display will show a track representing a distance of the treadmill. Note: Each time the Incline buttons are pressed, the display will show the incline setting. Time/Segment Time display-When the manual mode or the iFIT.com mode is selected, this display...

English Manual
Page 13
... console show a simplified profile of the treadmill will change , the Speed display and/or the Distance/Incline display will flash to change during the preset programs. The numbers at the left . A moment after the button is pressed, an additional indicator will move one of the preset programs, press the Select Workout button repeatedly until the speed setting for the final segment is selected, the Distance/Incline display will flash the maximum incline setting for the program...
... console show a simplified profile of the treadmill will change , the Speed display and/or the Distance/Incline display will flash to change during the preset programs. The numbers at the left . A moment after the button is pressed, an additional indicator will move one of the preset programs, press the Select Workout button repeatedly until the speed setting for the final segment is selected, the Distance/Incline display will flash the maximum incline setting for the program...

English Manual
Page 14
..., remove the key. The Time/Segment Time display will be at the lowest setting. button. Press the buttons again to page 23 and turn off the demo mode. While the indicator is at the lowest setting when the treadmill is in the display. Exercises using the treadmill, move the on the treadmill. See step 5 on the chest pulse sensor. To select one of the pulse programs, press the Select Workout button repeatedly until one of the three cross training programs...
..., remove the key. The Time/Segment Time display will be at the lowest setting. button. Press the buttons again to page 23 and turn off the demo mode. While the indicator is at the lowest setting when the treadmill is in the display. Exercises using the treadmill, move the on the treadmill. See step 5 on the chest pulse sensor. To select one of the pulse programs, press the Select Workout button repeatedly until one of the three cross training programs...
English Manual
Page 15
..., the letters PLS will automatically adjust to CHEST PULSE SENSOR TROUBLESHOOTING on page 7. This number is selected, the maximum heart rate setting can adjust the setting with the displays. play will then be increased any further. The heart rate setting for the second segment. grammed for the program. If Pulse program 1 is the maximum heart rate setting for each segment. The walking belt will then slow to the heart rate setting for the second segment will...
..., the letters PLS will automatically adjust to CHEST PULSE SENSOR TROUBLESHOOTING on page 7. This number is selected, the maximum heart rate setting can adjust the setting with the displays. play will then be increased any further. The heart rate setting for the second segment. grammed for the program. If Pulse program 1 is the maximum heart rate setting for each segment. The walking belt will then slow to the heart rate setting for the second segment will...
English Manual
Page 20
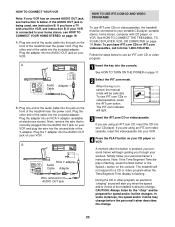
... personal trainer describes the change . Plug the other end of the Y-adapter. Next, remove the wire that is connected to use an iFIT.com CD or video program. 1 Insert the key into an RCA Y-adapter (available at electronics stores). B ANT. Note: To purchase iFIT.com CDs or iFIT.com videocassettes, call toll-free 1-800-735-0768. Follow the steps below . When the key is flashing, press the Start button or the Speed + button...
... personal trainer describes the change . Plug the other end of the Y-adapter. Next, remove the wire that is connected to use an iFIT.com CD or video program. 1 Insert the key into an RCA Y-adapter (available at electronics stores). B ANT. Note: To purchase iFIT.com CDs or iFIT.com videocassettes, call toll-free 1-800-735-0768. Follow the steps below . When the key is flashing, press the Start button or the Speed + button...

English Manual
Page 22
... the audio cable is properly connected, that it is heard, the speed and incline will begin and the walking belt will be selected. Note: To use a program from the internet. A list of the treadmill does not change . Follow the steps below to use another program, press the Stop button and go to our Web site at any time, press the Stop button on the foot rails. The iFIT.com indicator will stop the walking belt...
... the audio cable is properly connected, that it is heard, the speed and incline will begin and the walking belt will be selected. Note: To use a program from the internet. A list of the treadmill does not change . Follow the steps below to use another program, press the Stop button and go to our Web site at any time, press the Stop button on the foot rails. The iFIT.com indicator will stop the walking belt...
English Manual
Page 25
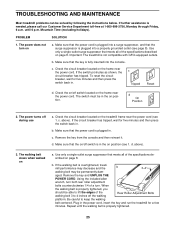
... on /off during use a. c. c Tripped Reset d. The power turns off switch located on position. The walking belt slows when walked on the treadmill frame near the power cord. Repeat until 6 p.m. until the walking belt is needed, please call our Customer Service Department toll-free at 1-800-999-3756, Monday through Friday, 6 a.m. PROBLEM SOLUTION 1. Make sure that the power cord is plugged into a surge suppressor, and that the key is not compatible with...
... on /off during use a. c. c Tripped Reset d. The power turns off switch located on position. The walking belt slows when walked on the treadmill frame near the power cord. Repeat until 6 p.m. until the walking belt is needed, please call our Customer Service Department toll-free at 1-800-999-3756, Monday through Friday, 6 a.m. PROBLEM SOLUTION 1. Make sure that the power cord is plugged into a surge suppressor, and that the key is not compatible with...
English Manual
Page 26
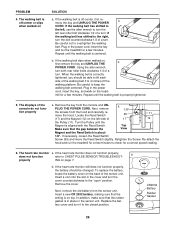
... walking belt is centered. Plug in the cover and turn . Remove the key from the console and UN- Repeat until the Magnet is properly tightened. 5. Insert a new CR 2032 battery, making sure that the rubber gasket is about 1/8". if the walking belt has shifted to CHEST PULSE SENSOR TROUBLESHOOT- If necessary, loosen the Reed Switch Screw (99) and move the Reed Switch slightly. Insert a coin into the slot in the power cord, insert the key...
... walking belt is centered. Plug in the cover and turn . Remove the key from the console and UN- Repeat until the Magnet is properly tightened. 5. Insert a new CR 2032 battery, making sure that the rubber gasket is about 1/8". if the walking belt has shifted to CHEST PULSE SENSOR TROUBLESHOOT- If necessary, loosen the Reed Switch Screw (99) and move the Reed Switch slightly. Insert a coin into the slot in the power cord, insert the key...
English Manual
Page 30
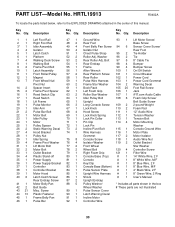
... 1 Reed Switch Clip 63 2 Roller Star Washer 107 1 iFIT.com Audio Cable 17 1 Reed Switch 64 1 Idler Pulley Bolt 108 6 Foam Grip Screw/ 18 1 Lift Frame 65 1 Upright Belt Guide Screw 19 1 Pulse Monitor 66 3 Long Console Screw 109 2 2-pound Weight 20 1 Idler Arm 67 1 Lock Knob 110 2 Foam Pad 21 2 Pulse Bar Bolt 68 4 Hood Screw 111 1 12" Audio Wire 22 1 Motor Belt 69 1 Lock Knob Spring 112 1 Tension Washer 23 1 Idler Pulley 70 1 Lock Pin Collar 113 1 Tension Bolt 24 1 Motor 71 1 Pin Clip 114 4 Motor...
... 1 Reed Switch Clip 63 2 Roller Star Washer 107 1 iFIT.com Audio Cable 17 1 Reed Switch 64 1 Idler Pulley Bolt 108 6 Foam Grip Screw/ 18 1 Lift Frame 65 1 Upright Belt Guide Screw 19 1 Pulse Monitor 66 3 Long Console Screw 109 2 2-pound Weight 20 1 Idler Arm 67 1 Lock Knob 110 2 Foam Pad 21 2 Pulse Bar Bolt 68 4 Hood Screw 111 1 12" Audio Wire 22 1 Motor Belt 69 1 Lock Knob Spring 112 1 Tension Washer 23 1 Idler Pulley 70 1 Lock Pin Collar 113 1 Tension Bolt 24 1 Motor 71 1 Pin Clip 114 4 Motor...

English Manual
Page 31
until 6 p.m. Mountain Time (excluding holidays). HOW TO ORDER REPLACEMENT PARTS To order replacement parts, call our Customer Service Department toll-free at 1-800-999-3756, Monday through Friday, 6 a.m. To help us assist you, please be prepared to give the following information: • The MODEL NUMBER of the product (HRTL19913) • The NAME of the product (HealthRider® 900hrc treadmill) • The SERIAL NUMBER of the product (see the front cover of this manual) • The KEY NUMBER and DESCRIPTION of the part(s) (see the PART LIST on page 30). 31
until 6 p.m. Mountain Time (excluding holidays). HOW TO ORDER REPLACEMENT PARTS To order replacement parts, call our Customer Service Department toll-free at 1-800-999-3756, Monday through Friday, 6 a.m. To help us assist you, please be prepared to give the following information: • The MODEL NUMBER of the product (HRTL19913) • The NAME of the product (HealthRider® 900hrc treadmill) • The SERIAL NUMBER of the product (see the front cover of this manual) • The KEY NUMBER and DESCRIPTION of the part(s) (see the PART LIST on page 30). 31
English Manual
Page 32
... the periodic maintenance requirements specified in connection with the use or performance of the product or damages with respect to any defect within 10 days after the date of purchase, such as store display modules. LIMITED WARRANTY WHAT IS COVERED-The entire HealthRider® 900hrc treadmill ("Product") is warranted to be free of this limited warranty. The motor is covered for repair. Labor is covered for commercial...
... the periodic maintenance requirements specified in connection with the use or performance of the product or damages with respect to any defect within 10 days after the date of purchase, such as store display modules. LIMITED WARRANTY WHAT IS COVERED-The entire HealthRider® 900hrc treadmill ("Product") is warranted to be free of this limited warranty. The motor is covered for repair. Labor is covered for commercial...

