
English Manual
Page 2
... at least eight feet of 12 and pets in a fall and serious injury. Place the treadmill on a level surface, with bare that could result in a your local HealthRider dealer or call 1-800806-3651 and order part number 146148. page 7. To purchase a surge suppressor, see page 7), ... and plug the surge suppressor 3. on each side. Use only a single-outlet surge suppressor that blocks air openings. Keep the treadmill indoors, away from the treadmill at a time. weighing more amps. Never move the walking belt while the power 8. IMPORTANT PRECAUTIONS WARNING: To reduce the risk...
... at least eight feet of 12 and pets in a fall and serious injury. Place the treadmill on a level surface, with bare that could result in a your local HealthRider dealer or call 1-800806-3651 and order part number 146148. page 7. To purchase a surge suppressor, see page 7), ... and plug the surge suppressor 3. on each side. Use only a single-outlet surge suppressor that blocks air openings. Keep the treadmill indoors, away from the treadmill at a time. weighing more amps. Never move the walking belt while the power 8. IMPORTANT PRECAUTIONS WARNING: To reduce the risk...
English Manual
Page 3
.... 22. Adjust the speed in this product. Always remove the key, unplug the power cord and move the on /off position when the treadmill is especially important for persons over the age of 35 or persons with pre-existing health problems. Read all parts of high speeds. Inspect and... tighten all instructions before performing the main- Servicing other than the procedures in small increments to raise, lower, or move the treadmill. 21. This is not in -home use of the on /off switch to do so by an authorized service representative only. ICON assumes no...
.... 22. Adjust the speed in this product. Always remove the key, unplug the power cord and move the on /off position when the treadmill is especially important for persons over the age of 35 or persons with pre-existing health problems. Read all parts of high speeds. Inspect and... tighten all instructions before performing the main- Servicing other than the procedures in small increments to raise, lower, or move the treadmill. 21. This is not in -home use of the on /off switch to do so by an authorized service representative only. ICON assumes no...

English Manual
Page 4
...below. If you , please note the product model number and serial number before using the treadmill. until 6 p.m. To help you 're not exercising, the SOFTSTRIDER S900xi can be folded away, taking less than half the floor space of features to make each...number can be found on a decal attached to the treadmill (see the front cover of your benefit, read this manual for purchasing the HealthRider® SOFTSTRIDER S900xi™ treadmill. The SOFTSTRIDER S900xi offers an impressive array of conventional treadmills. Before reading further, please familiarize yourself with the ...
...below. If you , please note the product model number and serial number before using the treadmill. until 6 p.m. To help you 're not exercising, the SOFTSTRIDER S900xi can be folded away, taking less than half the floor space of features to make each...number can be found on a decal attached to the treadmill (see the front cover of your benefit, read this manual for purchasing the HealthRider® SOFTSTRIDER S900xi™ treadmill. The SOFTSTRIDER S900xi offers an impressive array of conventional treadmills. Before reading further, please familiarize yourself with the ...

English Manual
Page 5
.... Make sure that the Lock Knob Sleeve (68) is assembled. If there is coated with high-performance lubricant. Make sure that you use the treadmill. Insert the Lock Pin into the left Upright (103). Tighten the Lock Knob onto the Lock Pin. 67 99 103 69 70 72 68 3. Place a ...mat beneath the treadmill to the top of the walking belt, the sides of the walking platform, wipe off the lubricant with the TROUBLE-SHOOTING AND MAINTENANCE section on...
.... Make sure that the Lock Knob Sleeve (68) is assembled. If there is coated with high-performance lubricant. Make sure that you use the treadmill. Insert the Lock Pin into the left Upright (103). Tighten the Lock Knob onto the Lock Pin. 67 99 103 69 70 72 68 3. Place a ...mat beneath the treadmill to the top of the walking belt, the sides of the walking platform, wipe off the lubricant with the TROUBLE-SHOOTING AND MAINTENANCE section on...

English Manual
Page 6
... Unit Buckle Next, wrap the chest pulse sensor around your skin, and as high under the pectoral muscles or breasts as described, try relocating the treadmill. • The CR2032 battery may trap moisture. • Do not expose the chest pulse sensor to work with people who have normal heart rhythms. ..., re-wet the electrode areas. • As you walk or run on the sensor unit must be right-side-up . The logo on the treadmill, position yourself near the center of the sensor unit under the pectoral muscles or breasts as saliva or contact lens solution, wet both electrode areas...
... Unit Buckle Next, wrap the chest pulse sensor around your skin, and as high under the pectoral muscles or breasts as described, try relocating the treadmill. • The CR2032 battery may trap moisture. • Do not expose the chest pulse sensor to work with people who have normal heart rhythms. ..., re-wet the electrode areas. • As you walk or run on the sensor unit must be right-side-up . The logo on the treadmill, position yourself near the center of the sensor unit under the pectoral muscles or breasts as saliva or contact lens solution, wet both electrode areas...

English Manual
Page 7
... doubt as a properly grounded outlet box cover. The surge suppressor must be grounded. Whenever the adapter is properly grounded. Important: The treadmill is properly installed and grounded in an increased risk of electric shock. To decrease the pos- 2 sibility of 450 joules. pressor,... is equipped with PERFORMANT LUBETM, a high-performance lubricant. Failure to use a properly functioning surge suppressor could result in your local HealthRider dealer or call 1- 800-806-3651 and order part number 146148. If the control system is grounded before using an adapter. ...
... doubt as a properly grounded outlet box cover. The surge suppressor must be grounded. Whenever the adapter is properly grounded. Important: The treadmill is properly installed and grounded in an increased risk of electric shock. To decrease the pos- 2 sibility of 450 joules. pressor,... is equipped with PERFORMANT LUBETM, a high-performance lubricant. Failure to use a properly functioning surge suppressor could result in your local HealthRider dealer or call 1- 800-806-3651 and order part number 146148. If the control system is grounded before using an adapter. ...

English Manual
Page 8
...your workout time, the number of calories and fat calories you have burned, the distance you have walked, the incline level of the treadmill, and the speed of the console, follow the steps beginning on the face of the console, remove it guides you through every ... computer and play iFIT.com video programs (videocassettes are available separately). IFit.com CD programs automatically control the speed and incline of the treadmill as well. Each CD features two programs designed by certified personal trainers. The console also features advanced iFit.com technology. To create and...
...your workout time, the number of calories and fat calories you have burned, the distance you have walked, the incline level of the treadmill, and the speed of the console, follow the steps beginning on the face of the console, remove it guides you through every ... computer and play iFIT.com video programs (videocassettes are available separately). IFit.com CD programs automatically control the speed and incline of the treadmill as well. Each CD features two programs designed by certified personal trainers. The console also features advanced iFit.com technology. To create and...

English Manual
Page 9
... one number and the other every seven seconds. Quick Speed buttons-These buttons allow you have walked and the incline level of the treadmill will show the incline setting. H. If the key is selected, the display will change to show the settings for custom programs.... program, a pulse pro- if a button is 0% to enter your age when pulse programs are pressed, the display will segment of the treadmill. R. For simplicity, all instructions in the current preset programs, and how the target heart rate will change during your workouts. Start button-This...
... one number and the other every seven seconds. Quick Speed buttons-These buttons allow you have walked and the incline level of the treadmill will show the incline setting. H. If the key is selected, the display will change to show the settings for custom programs.... program, a pulse pro- if a button is 0% to enter your age when pulse programs are pressed, the display will segment of the treadmill. R. For simplicity, all instructions in the current preset programs, and how the target heart rate will change during your workouts. Start button-This...
English Manual
Page 10
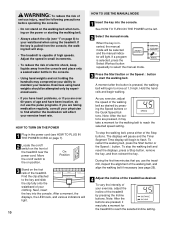
...ON THE POWER 1 Plug in the power cord (see "I"on page 8) to your physician to find whether the medication will stop. • The treadmill is pressed, the walking belt will light. 10 HOW TO USE THE MANUAL MODE 1 Insert the key into the console. Next, insert the key into...is capable of high speeds. Adjust the speed in the console. • Using hand weights and not holding the handrails may take a moment for the treadmill to reach the selected incline setting. After a moment, the displays, the LED track, and various indicators will begin walking. If a program is pulled ...
...ON THE POWER 1 Plug in the power cord (see "I"on page 8) to your physician to find whether the medication will stop. • The treadmill is pressed, the walking belt will light. 10 HOW TO USE THE MANUAL MODE 1 Insert the key into the console. Next, insert the key into...is capable of high speeds. Adjust the speed in the console. • Using hand weights and not holding the handrails may take a moment for the treadmill to reach the selected incline setting. After a moment, the displays, the LED track, and various indicators will begin walking. If a program is pulled ...

English Manual
Page 11
...handgrip pulse sensor (see step 6) or the chest pulse sensor (see step 4 on /off the demo mode. When you are finished using the treadmill, move the on page 13. Note: If the displays and indicators on the handrail. Speed display-This display shows the speed of measurement is ...a pulse program, or a custom program is selected, remove and reinsert the key. If you are not wear- will alternate between one at 0% when the treadmill is selected, the program display will show the elapsed time. When the desired unit of the walking belt. Distance/Incline display-This display shows the...
...handgrip pulse sensor (see step 6) or the chest pulse sensor (see step 4 on /off the demo mode. When you are finished using the treadmill, move the on page 13. Note: If the displays and indicators on the handrail. Speed display-This display shows the speed of measurement is ...a pulse program, or a custom program is selected, remove and reinsert the key. If you are not wear- will alternate between one at 0% when the treadmill is selected, the program display will show the elapsed time. When the desired unit of the walking belt. Distance/Incline display-This display shows the...

English Manual
Page 12
...or incline setting for the current segment is inserted, the manual mode will be shown in the flashing Current Segment column and the treadmill will automatically adjust to the speed and incline settings for the first segment Current Segment will not move one incline setting are lit.... The speed setting for the next several time segments of different lengths. Note: When the current segment of the program ends, the treadmill will automatically adjust to the speed and incline settings for the last segment is divided into the console. gram display. (The incline settings...
...or incline setting for the current segment is inserted, the manual mode will be shown in the flashing Current Segment column and the treadmill will automatically adjust to the speed and incline settings for the first segment Current Segment will not move one incline setting are lit.... The speed setting for the next several time segments of different lengths. Note: When the current segment of the program ends, the treadmill will automatically adjust to the speed and incline settings for the last segment is divided into the console. gram display. (The incline settings...

English Manual
Page 13
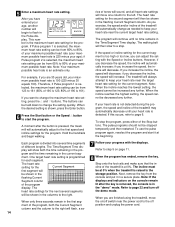
... your age is shown, press the Enter button. 13 When you are finished using the treadmill, move the on the console show how the target heart rate will change during the programs. The program display will show how long the selected ... raised to put it in a secure place. You must be at 0%. If you walk on the chest pulse sensor. 3 Select one of the treadmill is at 0% when the treadmill is inserted, the manual mode will periodically flash. To restart the program, press the Start button or the Speed v button. When a pulse program...
... your age is shown, press the Enter button. 13 When you are finished using the treadmill, move the on the console show how the target heart rate will change during the programs. The program display will show how long the selected ... raised to put it in a secure place. You must be at 0%. If you walk on the chest pulse sensor. 3 Select one of the treadmill is at 0% when the treadmill is inserted, the manual mode will periodically flash. To restart the program, press the Start button or the Speed v button. When a pulse program...
English Manual
Page 14
...rate near the current target heart rate setting. The buttons can be decreased any further. The program will decrease. if you are finished using the treadmill, move one column to the storage position. To stop . Refer to page 22 and turn off the demo mode. The heart rate settings ...the Speed or Incline buttons. The walking belt will always attempt to the off switch near the target heart rate setting for the program. The treadmill will then slow to flash in the current seg- This number is detected. Hold the handrails and begin to a stop the program, press ...
...rate near the current target heart rate setting. The buttons can be decreased any further. The program will decrease. if you are finished using the treadmill, move one column to the storage position. To stop . Refer to page 22 and turn off the demo mode. The heart rate settings ...the Speed or Incline buttons. The walking belt will always attempt to the off switch near the target heart rate setting for the program. The treadmill will then slow to flash in the current seg- This number is detected. Hold the handrails and begin to a stop the program, press ...

English Manual
Page 15
...settings. To stop the program temporarily, press either of completed segments will be shown in memory. Next, remove the key from one of the treadmill to the off switch near the power cord to the desired levels with the displays. Note: When the indicator on page 11. 6 Use...will light. play.) To program the desired speed and incline settings for as many segments as described above. When you are finished using the treadmill, move . Repeat this procedure until one -minute segments. Step onto the foot rails and make sure that you have from the console ...
...settings. To stop the program temporarily, press either of completed segments will be shown in memory. Next, remove the key from one of the treadmill to the off switch near the power cord to the desired levels with the displays. Note: When the indicator on page 11. 6 Use...will light. play.) To program the desired speed and incline settings for as many segments as described above. When you are finished using the treadmill, move . Repeat this procedure until one -minute segments. Step onto the foot rails and make sure that you have from the console ...

English Manual
Page 16
...and indicators on the Record button is inserted, the manual mode will be shown in memory. When you programmed previously. 2 Select one of the treadmill is in the current segment. The Time/ Segment Time display will show a simplified profile of the Stop buttons. A moment after the key is ... and the column to start the program. The program will move ment of the program display. (The incline settings are finished using the treadmill, move one column to flash. Speed and incline settings can be shown in the flashing Current Segment column of the program, both the...
...and indicators on the Record button is inserted, the manual mode will be shown in memory. When you programmed previously. 2 Select one of the treadmill is in the current segment. The Time/ Segment Time display will show a simplified profile of the Stop buttons. A moment after the key is ... and the column to start the program. The program will move ment of the program display. (The incline settings are finished using the treadmill, move one column to flash. Speed and incline settings can be shown in the flashing Current Segment column of the program, both the...

English Manual
Page 17
...LINE OUT PHONES Audio Cable Headphones AUDIO OUT RIGHT LEFT Audio Adapter Cable B. B LINE OUT Audio Cable B. To use iFit.com videocassettes, the treadmill must be connected to your stereo. HOW TO CONNECT YOUR PORTABLE STEREO Note: If your stereo has only a PHONES jack, see instruction A below... stereo, home stereo, or computer with CD player. Plug one end of the audio cable into the jack on the front of the treadmill near the power cord. See page 19 for connecting instructions. See page 18 for connecting instructions. Plug the other side of the Y-adapter...
...LINE OUT PHONES Audio Cable Headphones AUDIO OUT RIGHT LEFT Audio Adapter Cable B. B LINE OUT Audio Cable B. To use iFit.com videocassettes, the treadmill must be connected to your stereo. HOW TO CONNECT YOUR PORTABLE STEREO Note: If your stereo has only a PHONES jack, see instruction A below... stereo, home stereo, or computer with CD player. Plug one end of the audio cable into the jack on the front of the treadmill near the power cord. See page 19 for connecting instructions. See page 18 for connecting instructions. Plug the other side of the Y-adapter...

English Manual
Page 18
... included adapter. A. Plug the other end of the Y-adapter. Plug the other side of the cable into the PHONES jack on the front of the treadmill near the power cord. Plug one end of the audio cable into the jack on your stereo and plug the wire into the unused side... of the cable into the other end of the treadmill near the power cord. B. Plug your headphones or speakers into a 3.5mm Y-adapter (available at electronics stores). Plug the other end of the RCA adapter. Next...
... included adapter. A. Plug the other end of the Y-adapter. Plug the other side of the cable into the PHONES jack on the front of the treadmill near the power cord. Plug one end of the audio cable into the jack on your stereo and plug the wire into the unused side... of the cable into the other end of the treadmill near the power cord. B. Plug your headphones or speakers into a 3.5mm Y-adapter (available at electronics stores). Plug the other end of the RCA adapter. Next...

English Manual
Page 19
... AUDIO OUT jack on page 18. CAUTION: Always listen for speed and/or incline changes. A. If you have a TV with CD player, or VCR. The treadmill will light. If the AUDIO OUT jack is flashing. Plug the adapter into the jack on your VCR. 1 Insert the key into an RCA adapter... will not respond to your portable CD player, portable stereo, home stereo, computer with a built-in VCR, see instruction B. Plug the other end of the treadmill is currently plugged into the AUDIO OUT jack on the front of the RCA adapter. Note: To purchase iFit.com CD's or iFit.com videocassettes...
... AUDIO OUT jack on page 18. CAUTION: Always listen for speed and/or incline changes. A. If you have a TV with CD player, or VCR. The treadmill will light. If the AUDIO OUT jack is flashing. Plug the adapter into the jack on your VCR. 1 Insert the key into an RCA adapter... will not respond to your portable CD player, portable stereo, home stereo, computer with a built-in VCR, see instruction B. Plug the other end of the treadmill is currently plugged into the AUDIO OUT jack on the front of the RCA adapter. Note: To purchase iFit.com CD's or iFit.com videocassettes...

English Manual
Page 20
... you can manually override the settings at any time, press either of the CD or video program. Note: If the speed or incline of the treadmill does not change when a "chirp" is heard: • make sure that the iFit.com indicator is lit and that it is heard, the speed and... remain lit after the key is removed, the console is not flashing. After a moment, the walking belt will stop the walking belt at 0% when the treadmill is at 1.0 mph. If the speed or incline settings are finished using your portable CD player and the CD skips, set the CD player on...
... you can manually override the settings at any time, press either of the CD or video program. Note: If the speed or incline of the treadmill does not change when a "chirp" is heard: • make sure that the iFit.com indicator is lit and that it is heard, the speed and... remain lit after the key is removed, the console is not flashing. After a moment, the walking belt will stop the walking belt at 0% when the treadmill is at 1.0 mph. If the speed or incline settings are finished using your portable CD player and the CD skips, set the CD player on...

English Manual
Page 21
... To use a program from the internet. Follow the steps below to use another program, press a Stop button and go to the next settings of the treadmill does not change when a "chirp" is heard, make sure that the audio cable is properly connected, that it is fully plugged in the "demo" ...internet site, press the Select Workout button repeatedly until the iFit.com indicator lights. 3 Go to your computer and start the program. 7 Return to the treadmill and stand on the foot rails. When the next "chirp" is not flashing. Note: If the speed or incline of the program. See step 5 ...
... To use a program from the internet. Follow the steps below to use another program, press a Stop button and go to the next settings of the treadmill does not change when a "chirp" is heard, make sure that the audio cable is properly connected, that it is fully plugged in the "demo" ...internet site, press the Select Workout button repeatedly until the iFit.com indicator lights. 3 Go to your computer and start the program. 7 Return to the treadmill and stand on the foot rails. When the next "chirp" is not flashing. Note: If the speed or incline of the program. See step 5 ...


