

English Manual
Page 3
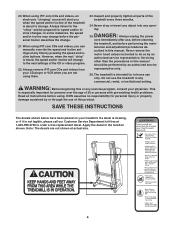
... on page 8. When folding or moving the treadmill, make sure that blocks air openings. Always wear athletic shoes. The pulse sensor is running. Always remove the key, unplug the power cord and switch the reset/off circuit breaker to ensure that meets all users of this manual. 11. Failure to raise, lower, or move the walking belt while the power is turned off position when the treadmill is intended only as...
... on page 8. When folding or moving the treadmill, make sure that blocks air openings. Always wear athletic shoes. The pulse sensor is running. Always remove the key, unplug the power cord and switch the reset/off circuit breaker to ensure that meets all users of this manual. 11. Failure to raise, lower, or move the walking belt while the power is turned off position when the treadmill is intended only as...
English Manual
Page 4
... with pre-existing health problems. Read all parts of the CD or video program. 22. Always remove iFIT.com CDs and videos from your physician. Inspect and properly tighten all instructions before performing the main- Always unplug the power cord immediately after use only. In some instances, the speed and/or incline may change before the personal trainer describes the change to order a free replacement decal. When using them. 23. Never...
... with pre-existing health problems. Read all parts of the CD or video program. 22. Always remove iFIT.com CDs and videos from your physician. Inspect and properly tighten all instructions before performing the main- Always unplug the power cord immediately after use only. In some instances, the speed and/or incline may change before the personal trainer describes the change to order a free replacement decal. When using them. 23. Never...
English Manual
Page 5
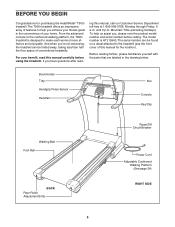
.... Book Holder Tray Handgrip Pulse Sensor Handrail Fan Console Key/Clip Walking Belt Foot Rail BACK Rear Roller Adjustment Bolts Reset/Off Circuit Breaker Power Cord Adjustable Cushioned Walking Platform (See page 24) RIGHT SIDE 5 For your home. until 6 p.m. To help you 're not exercising, the treadmill can be folded away, taking less than half the floor space of this manual for purchasing the HealthRider® T900i treadmill. The model number is designed to help us...
.... Book Holder Tray Handgrip Pulse Sensor Handrail Fan Console Key/Clip Walking Belt Foot Rail BACK Rear Roller Adjustment Bolts Reset/Off Circuit Breaker Power Cord Adjustable Cushioned Walking Platform (See page 24) RIGHT SIDE 5 For your home. until 6 p.m. To help you 're not exercising, the treadmill can be folded away, taking less than half the floor space of this manual for purchasing the HealthRider® T900i treadmill. The model number is designed to help us...

English Manual
Page 6
... THE POWER IS TURNED ON. 1 Console Assembly 71 85 71 85 65 2. Do not dispose of the walking belt or on the Uprights (65). If there is lubricant on top of the packing materials until the treadmill is coated with high-performance lubricant. The connectors should slide together easily and snap into the right Upright (65). Look under the console assembly and locate the Console Wire...
... THE POWER IS TURNED ON. 1 Console Assembly 71 85 71 85 65 2. Do not dispose of the walking belt or on the Uprights (65). If there is lubricant on top of the packing materials until the treadmill is coated with high-performance lubricant. The connectors should slide together easily and snap into the right Upright (65). Look under the console assembly and locate the Console Wire...

English Manual
Page 8
... the walking belt or the walking platform. Whenever the adapter is used it is damaged, the walking belt may change speed or stop unexpectedly, which may be used only until a properly grounded outlet (drawing 1) can result in your home's power. Such substances will not fit the outlet, have a UL suppressed voltage rating of 400 volts or less and a minimum surge dissipation of electric shock. Plug the power cord...
... the walking belt or the walking platform. Whenever the adapter is used it is damaged, the walking belt may change speed or stop unexpectedly, which may be used only until a properly grounded outlet (drawing 1) can result in your home's power. Such substances will not fit the outlet, have a UL suppressed voltage rating of 400 volts or less and a minimum surge dissipation of electric shock. Plug the power cord...

English Manual
Page 9
... controls the speed and incline of a button. Key Clip FEATURES OF THE CONSOLE The treadmill console offers an impressive array of features designed to be changed with the touch of the treadmill as a personal trainer coaches you can even measure your home. The console also features new iFIT.com interactive technology. Two heart rate programs are soon to help you exercise, the console will display instant exercise feedback. To create and use...
... controls the speed and incline of a button. Key Clip FEATURES OF THE CONSOLE The treadmill console offers an impressive array of features designed to be changed with the touch of the treadmill as a personal trainer coaches you can even measure your home. The console also features new iFIT.com interactive technology. Two heart rate programs are soon to help you exercise, the console will display instant exercise feedback. To create and use...
English Manual
Page 10
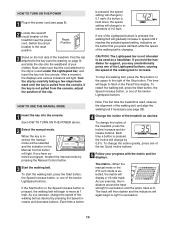
... Manual Control button will display a 1/4-mile track. To start the walking belt, press the Start button, the Speed increase button, or one of the twelve Lightspeed buttons. To change the incline quickly, press one of the Lightspeed buttons is routed under the Lightspeed bar, and insert the key into the console. HOW TO TURN ON THE POWER 1 Plug in increments of 0.5 mph. See HOW TO TURN ON THE POWER above. 2 Select the manual mode. The matrix-When the manual mode or the iFIT...
... Manual Control button will display a 1/4-mile track. To start the walking belt, press the Start button, the Speed increase button, or one of the twelve Lightspeed buttons. To change the incline quickly, press one of the Lightspeed buttons is routed under the Lightspeed bar, and insert the key into the console. HOW TO TURN ON THE POWER 1 Plug in increments of 0.5 mph. See HOW TO TURN ON THE POWER above. 2 Select the manual mode. The matrix-When the manual mode or the iFIT...
English Manual
Page 11
... seconds. To turn off the demo mode. Step onto the foot rails, press the Stop button, and adjust the incline of the treadmill to change from one number to be shown. Next, remove the key from the console. Press the Speed increase button to the lowest setting. When your pulse is detected, two dashes (- -) will appear in the Calories/Pulse display, and then your heart rate. 7 Turn on the console remain lit after the walking belt is not...
... seconds. To turn off the demo mode. Step onto the foot rails, press the Stop button, and adjust the incline of the treadmill to change from one number to be shown. Next, remove the key from the console. Press the Speed increase button to the lowest setting. When your pulse is detected, two dashes (- -) will appear in the Calories/Pulse display, and then your heart rate. 7 Turn on the console remain lit after the walking belt is not...

English Manual
Page 13
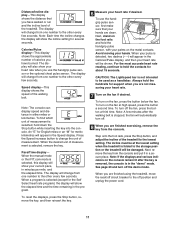
... power cord. 13 To restart the program, press the Start button or the Speed increase button. The walking belt will automatically adjust to the off the demo mode. When the program has ended, make sure that the incline of the program begins, the treadmill will begin to move at any time, press the Stop button. Note: If the displays and various indicators on page 11. 7 When you are finished exercising, remove the key from the console...
... power cord. 13 To restart the program, press the Start button or the Speed increase button. The walking belt will automatically adjust to the off the demo mode. When the program has ended, make sure that the incline of the program begins, the treadmill will begin to move at any time, press the Stop button. Note: If the displays and various indicators on page 11. 7 When you are finished exercising, remove the key from the console...

English Manual
Page 14
... and decrease buttons below the Enter button to adjust the target heart rate setting. When the desired setting is shown, press the Enter button. You must wear the optional chest pulse sensor (see page 24) to start the program. The indicator on page 10. 3 Select a heart rate program. Note: Your estimated maximum heart rate is selected, go to the first speed and incline settings of your heart rate will flash in the Calories/ Pulse display. After...
... and decrease buttons below the Enter button to adjust the target heart rate setting. When the desired setting is shown, press the Enter button. You must wear the optional chest pulse sensor (see page 24) to start the program. The indicator on page 10. 3 Select a heart rate program. Note: Your estimated maximum heart rate is selected, go to the first speed and incline settings of your heart rate will flash in the Calories/ Pulse display. After...

English Manual
Page 15
... change to bring your pulse is not detected during the program, you are finished exercising, remove the key from the console. During the last three seconds of each segment. If this occurs, see step 5 on page 11. 10 When you can adjust the setting with the Speed or Incline buttons. The program will also increase to bring your progress with the optional chest pulse sensor. To stop . See step...
... change to bring your pulse is not detected during the program, you are finished exercising, remove the key from the console. During the last three seconds of each segment. If this occurs, see step 5 on page 11. 10 When you can adjust the setting with the Speed or Incline buttons. The program will also increase to bring your progress with the optional chest pulse sensor. To stop . See step...

English Manual
Page 20
... a built-in the Pace/Time display, press the Start button or the Speed increase button on the front of the cable into the included adapter. The treadmill will begin guiding you through your personal trainer's instructions. During the CD or video program, an electronic "chirping" sound will light. Plug the other end of the treadmill near the power cord. See HOW TO CONNECT THE TREADMILL TO YOUR CD PLAYER, VCR...
... a built-in the Pace/Time display, press the Start button or the Speed increase button on the front of the cable into the included adapter. The treadmill will begin guiding you through your personal trainer's instructions. During the CD or video program, an electronic "chirping" sound will light. Plug the other end of the treadmill near the power cord. See HOW TO CONNECT THE TREADMILL TO YOUR CD PLAYER, VCR...
English Manual
Page 21
... your heart rate if desired. See step 7 on the console. Note: If the speed or incline of the treadmill does not change to flash in the Pace/Time display. When the CD or video program is not wrapped around a power cord. • If you are using them. 21 See step 7 on page 20. To stop and the time will stop the walking belt at 1 mph. See step 6 on page 11. 7 Turn...
... your heart rate if desired. See step 7 on the console. Note: If the speed or incline of the treadmill does not change to flash in the Pace/Time display. When the CD or video program is not wrapped around a power cord. • If you are using them. 21 See step 7 on page 20. To stop and the time will stop the walking belt at 1 mph. See step 6 on page 11. 7 Turn...
English Manual
Page 22
... walking belt, and begin to our Web site at www.iFIT.com allows you start the program, an on the console. If the speed or incline settings are finished exercising, remove the key from the internet. To restart the program, press the Start button or the Speed increase button. Find the clip attached to your progress with the LED track and the displays. In addition, you can manually override the settings by pressing the Speed...
... walking belt, and begin to our Web site at www.iFIT.com allows you start the program, an on the console. If the speed or incline settings are finished exercising, remove the key from the internet. To restart the program, press the Start button or the Speed increase button. Find the clip attached to your progress with the LED track and the displays. In addition, you can manually override the settings by pressing the Speed...
English Manual
Page 27
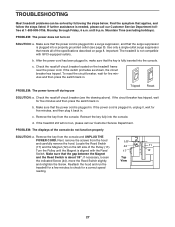
... power cord is plugged into the console. a 1/8" 44 11 Turn the Pulley until 6 p.m. Important: The treadmill is aligned with GFCI-equipped outlets. Remove the key from the hood and carefully remove the hood. If necessary, loosen Top the indicated Screw (44), move the Reed Switch slightly, View and retighten the Screw. b. To reset the circuit breaker, wait for a correct speed reading. 27 Check the reset/off during use Tripped Reset SOLUTION: a. Locate the Reed Switch...
... power cord is plugged into the console. a 1/8" 44 11 Turn the Pulley until 6 p.m. Important: The treadmill is aligned with GFCI-equipped outlets. Remove the key from the hood and carefully remove the hood. If necessary, loosen Top the indicated Screw (44), move the Reed Switch slightly, View and retighten the Screw. b. To reset the circuit breaker, wait for a correct speed reading. 27 Check the reset/off during use Tripped Reset SOLUTION: a. Locate the Reed Switch...
English Manual
Page 28
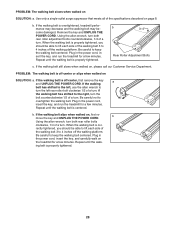
... walking belt is properly tightened. 28 b 3-4" Rear Roller Adjustment Bolts c. Repeat until the walk- When the walking belt is centered. Using the allen wrench, turn both rear roller adjustment bolts counterclockwise, 1/4 of the specifications described on , first re- PROBLEM: The walking belt slows when walked on , please call our Customer Service Department. Plug in the power cord, insert the key, and run the treadmill for a few minutes. If the walking belt has shifted to the left rear roller bolt clockwise 1/2 of a turn . b. b move the key...
... walking belt is properly tightened. 28 b 3-4" Rear Roller Adjustment Bolts c. Repeat until the walk- When the walking belt is centered. Using the allen wrench, turn both rear roller adjustment bolts counterclockwise, 1/4 of the specifications described on , first re- PROBLEM: The walking belt slows when walked on , please call our Customer Service Department. Plug in the power cord, insert the key, and run the treadmill for a few minutes. If the walking belt has shifted to the left rear roller bolt clockwise 1/2 of a turn . b. b move the key...

English Manual
Page 29
... of the treadmill until your heart rate is near the highest number in your training zone for en- For aerobic exercise, adjust the speed or incline of your exercise program, do not keep your pulse in your breath. Training Zone Exercise-After warming up -Start each week if desired. EXERCISE FREQUENCY To maintain or improve your heart rate as an exercise aid in determining heart rate trends in your training zone for...
... of the treadmill until your heart rate is near the highest number in your training zone for en- For aerobic exercise, adjust the speed or incline of your exercise program, do not keep your pulse in your breath. Training Zone Exercise-After warming up -Start each week if desired. EXERCISE FREQUENCY To maintain or improve your heart rate as an exercise aid in determining heart rate trends in your training zone for...
English Manual
Page 30
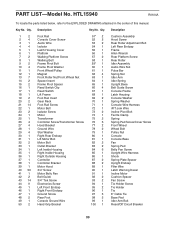
... Assembly Hood Screw Rear Roller Adjustment Bolt Left Rear Endcap Frame Allen Wrench Rear Platform Screw Rear Roller Idler Assembly Audio Wire Nut Pulse Bar Spring Nut Idler Arm Idler Spring Upright Base Belt Guide Screw Console Frame Latch Housing Console Washer Spring Washer Console Wire Harness iFIT.com Wire Incline Pivot Bolt Ferrite Clamp Spring Spring Pad Screw/Cover Screw Front Wheel Wheel Bolt Pulley Nut Console Console Base Fan Spring Pad Belly Pan Screw Upright Wire Harness Shock Spring Plate Spacer Upright Endcap Filter Wire Latch Warning Decal Incline Motor Cushion Spacer Fan Screw...
... Assembly Hood Screw Rear Roller Adjustment Bolt Left Rear Endcap Frame Allen Wrench Rear Platform Screw Rear Roller Idler Assembly Audio Wire Nut Pulse Bar Spring Nut Idler Arm Idler Spring Upright Base Belt Guide Screw Console Frame Latch Housing Console Washer Spring Washer Console Wire Harness iFIT.com Wire Incline Pivot Bolt Ferrite Clamp Spring Spring Pad Screw/Cover Screw Front Wheel Wheel Bolt Pulley Nut Console Console Base Fan Spring Pad Belly Pan Screw Upright Wire Harness Shock Spring Plate Spacer Upright Endcap Filter Wire Latch Warning Decal Incline Motor Cushion Spacer Fan Screw...

English Manual
Page 31
... 1 112 2 113 1 114 1 115 1 116 6 117 1 118* 1 119 4 120 2 121 2 122 1 123 2 124 1 125 1 126 2 Description Pulse Wire Power Cord Power Cord Grommet Warning Decal Spring Plate Jack iFIT.com Audio Cable Rear Roller Star Washer Pulley Washer Idler Pulley Pulley Spacer Outlet Bracket Star Washer Static Decal Book Holder Idler Pulley Bolt Spring Washer/Rear Roller Washer Console Back Latch Assembly Spring Bolt Cushion Adj. Pin Motor Bushing Idler Arm Nylon Washer Cushion Adj.
... 1 112 2 113 1 114 1 115 1 116 6 117 1 118* 1 119 4 120 2 121 2 122 1 123 2 124 1 125 1 126 2 Description Pulse Wire Power Cord Power Cord Grommet Warning Decal Spring Plate Jack iFIT.com Audio Cable Rear Roller Star Washer Pulley Washer Idler Pulley Pulley Spacer Outlet Bracket Star Washer Static Decal Book Holder Idler Pulley Bolt Spring Washer/Rear Roller Washer Console Back Latch Assembly Spring Bolt Cushion Adj. Pin Motor Bushing Idler Arm Nylon Washer Cushion Adj.
English Manual
Page 34
... that specifically set forth herein. Mountain Time (excluding holidays). No other consequential damages of whatsoever nature. Accordingly, the above limitation may not apply to give the following information: • The MODEL NUMBER of the product (HTL15940) • The NAME of the product (HealthRider® T900i treadmill) • The SERIAL NUMBER of the product (see the PART LIST on how long an implied warranty lasts. ICON HEALTH & FITNESS...
... that specifically set forth herein. Mountain Time (excluding holidays). No other consequential damages of whatsoever nature. Accordingly, the above limitation may not apply to give the following information: • The MODEL NUMBER of the product (HTL15940) • The NAME of the product (HealthRider® T900i treadmill) • The SERIAL NUMBER of the product (see the PART LIST on how long an implied warranty lasts. ICON HEALTH & FITNESS...


