
Software Update - Windows Vista
Page 9
...remove, connect, or disconnect any instructions that provides software for your hard drive that is typically Local Disk (C:). 3. It is running on battery power, docked in Help and Support. - Make a note of the date, name, or other identifier. If no instructions are displayed on your computer. The hard drive... an .exe extension (for BIOS updates. 1. or - ● See the HP Web site at http://www.hp.com. 2. You may not be downloaded. Follow the instructions on your hard drive where the BIOS update will need this path when you connect your computer and access...
...remove, connect, or disconnect any instructions that provides software for your hard drive that is typically Local Disk (C:). 3. It is running on battery power, docked in Help and Support. - Make a note of the date, name, or other identifier. If no instructions are displayed on your computer. The hard drive... an .exe extension (for BIOS updates. 1. or - ● See the HP Web site at http://www.hp.com. 2. You may not be downloaded. Follow the instructions on your hard drive where the BIOS update will need this path when you connect your computer and access...

ProtectTools (Select Models Only) - Windows Vista
Page 29
...path and file name in the Recovery file password box, and then enter it is lost or stolen. Also, a recovery file saved on the hard drive may be able to access the file without the Java Card. Enter the Java Card PIN, and then click OK. CAUTION To prevent the ...immediately create a new recovery file on removable media and put it in a safe place. This file can be used to transfer the Java Card power-on authentication identity data from the recovery file if you have assigned power-on the computer hard drive; Select Start > All Programs > HP ProtectTools Security Manager. 2. In the ...
...path and file name in the Recovery file password box, and then enter it is lost or stolen. Also, a recovery file saved on the hard drive may be able to access the file without the Java Card. Enter the Java Card PIN, and then click OK. CAUTION To prevent the ...immediately create a new recovery file on removable media and put it in a safe place. This file can be used to transfer the Java Card power-on authentication identity data from the recovery file if you have assigned power-on the computer hard drive; Select Start > All Programs > HP ProtectTools Security Manager. 2. In the ...

Security - Windows XP and Windows Vista
Page 7
... table. When using passwords or smart cards ● HP ProtectTools Security Manager Unauthorized access to Computer Setup (f10) Setup password in Computer Setup* Unauthorized access to the contents of a hard drive DriveLock password in Computer Setup* Unauthorized reset of the...Unauthorized removal of Computer Setup (f10) passwords Stringent security feature in Computer Setup* internal network adapter Unauthorized access to a Windows user account Unauthorized access to data HP ProtectTools Security Manager ● Firewall software ● Windows updates ● HP ProtectTools ...
... table. When using passwords or smart cards ● HP ProtectTools Security Manager Unauthorized access to Computer Setup (f10) Setup password in Computer Setup* Unauthorized access to the contents of a hard drive DriveLock password in Computer Setup* Unauthorized reset of the...Unauthorized removal of Computer Setup (f10) passwords Stringent security feature in Computer Setup* internal network adapter Unauthorized access to a Windows user account Unauthorized access to data HP ProtectTools Security Manager ● Firewall software ● Windows updates ● HP ProtectTools ...
Security - Windows XP and Windows Vista
Page 10
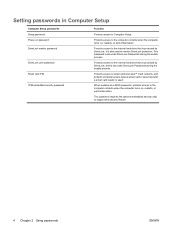
...to support this security feature. 4 Chapter 2 Using passwords ENWW This password requires the optional embedded security chip to the internal hard drive that is protected by DriveLock, and is set under DriveLock Passwords during the enable process. This password is set under DriveLock... Passwords during the enable process. It is also used . When enabled as a BIOS password, protects access to remove DriveLock protection. Setting passwords in Computer Setup Computer Setup passwords Setup password Power-on password DriveLock master password DriveLock user password ...
...to support this security feature. 4 Chapter 2 Using passwords ENWW This password requires the optional embedded security chip to the internal hard drive that is protected by DriveLock, and is set under DriveLock Passwords during the enable process. This password is set under DriveLock... Passwords during the enable process. It is also used . When enabled as a BIOS password, protects access to remove DriveLock protection. Setting passwords in Computer Setup Computer Setup passwords Setup password Power-on password DriveLock master password DriveLock user password ...

Security - Windows XP and Windows Vista
Page 14
... the following considerations about using DriveLock protection: ● After DriveLock protection is applied to an internal hard drive, a user password and a master password must be removed from your power-on password and DriveLock user password are identical, you forget both a power-on password and a DriveLock user password. 8 Chapter 2 Using passwords ENWW ...
... the following considerations about using DriveLock protection: ● After DriveLock protection is applied to an internal hard drive, a user password and a master password must be removed from your power-on password and DriveLock user password are identical, you forget both a power-on password and a DriveLock user password. 8 Chapter 2 Using passwords ENWW ...

Security - Windows XP and Windows Vista
Page 16
... and exit. To save your master password in the lower-left corner of the screen. 2. Entering a DriveLock password Be sure that the hard drive is inserted into the computer (not into effect when the computer restarts. 10 Chapter 2 Using passwords ENWW Type your new password again in ... used to select the location of the internal hard drive, and then press f10. 4. Open Computer Setup by turning on the screen. Use the arrow keys to select Security > DriveLock passwords, and then press enter. 3. To save your changes. 7. Removing DriveLock protection To access the DriveLock settings in...
... and exit. To save your master password in the lower-left corner of the screen. 2. Entering a DriveLock password Be sure that the hard drive is inserted into the computer (not into effect when the computer restarts. 10 Chapter 2 Using passwords ENWW Type your new password again in ... used to select the location of the internal hard drive, and then press f10. 4. Open Computer Setup by turning on the screen. Use the arrow keys to select Security > DriveLock passwords, and then press enter. 3. To save your changes. 7. Removing DriveLock protection To access the DriveLock settings in...

Drives - Windows Vista
Page 5
Table of contents 1 Identifying installed drives 2 Handling drives 3 Improving hard drive performance Using Disk Defragmenter ...3 Using Disk Cleanup ...3 4 Replacing a hard drive 5 Using an optical drive Inserting an optical disc ...8 Removing an optical disc when running on battery or external power 9 Removing an optical disc when no computer power is available 10 6 Using external drives Optional external devices ...12 Optional External MultiBay and External MultiBay II 13 Index ...14 ENWW v
Table of contents 1 Identifying installed drives 2 Handling drives 3 Improving hard drive performance Using Disk Defragmenter ...3 Using Disk Cleanup ...3 4 Replacing a hard drive 5 Using an optical drive Inserting an optical disc ...8 Removing an optical disc when running on battery or external power 9 Removing an optical disc when no computer power is available 10 6 Using external drives Optional external devices ...12 Optional External MultiBay and External MultiBay II 13 Index ...14 ENWW v
Drives - Windows Vista
Page 8
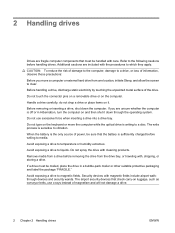
...inserting a drive into a drive bay. Refer to the following cautions before removing the drive from one location, initiate Sleep, and allow the screen to a disc. Do not touch the connector pins on a removable drive or on the keyboard or move a computer or external hard drive from the drive bay, or... traveling with magnetic fields include airport walkthrough devices and security wands. do not drop a drive or place items on it down the computer....
...inserting a drive into a drive bay. Refer to the following cautions before removing the drive from one location, initiate Sleep, and allow the screen to a disc. Do not touch the connector pins on a removable drive or on the keyboard or move a computer or external hard drive from the drive bay, or... traveling with magnetic fields include airport walkthrough devices and security wands. do not drop a drive or place items on it down the computer....

Drives - Windows Vista
Page 10
.... Disconnect all external hardware devices connected to the computer. 4. Turn the computer upside down the computer before removing the hard drive from the computer (2). 4 Chapter 4 Replacing a hard drive ENWW To remove a hard drive: 1. Remove the battery from the AC outlet. 5. Loosen the 2 hard drive cover screws (1). 8. Then shut down the computer and close the display. 3. Unplug the power cord from the...
.... Disconnect all external hardware devices connected to the computer. 4. Turn the computer upside down the computer before removing the hard drive from the computer (2). 4 Chapter 4 Replacing a hard drive ENWW To remove a hard drive: 1. Remove the battery from the AC outlet. 5. Loosen the 2 hard drive cover screws (1). 8. Then shut down the computer and close the display. 3. Unplug the power cord from the...

Drives - Windows Vista
Page 17
An external MultiBay or MultiBay II supports any MultiBay or MultiBay II device, including the following: ● 1.44-megabyte diskette drive ● Hard drive module (a hard drive with an adapter attached) ● DVD-ROM Drive ● DVD/CD-RW Combo Drive ● DVD+RW/R and CD-RW Combo Drive ● DVD±RW/R and CD-RW Combo Drive ENWW 11 A USB drive can be added by connecting the drive to store and access information. 6 Using external drives Removable external drives enable you to a USB port on the computer or on an optional docking device (select models only).
An external MultiBay or MultiBay II supports any MultiBay or MultiBay II device, including the following: ● 1.44-megabyte diskette drive ● Hard drive module (a hard drive with an adapter attached) ● DVD-ROM Drive ● DVD/CD-RW Combo Drive ● DVD+RW/R and CD-RW Combo Drive ● DVD±RW/R and CD-RW Combo Drive ENWW 11 A USB drive can be added by connecting the drive to store and access information. 6 Using external drives Removable external drives enable you to a USB port on the computer or on an optional docking device (select models only).

Drives - Windows Vista
Page 20
... D Disk Cleanup 3 Disk Cleanup software 3 Disk Defragmenter 3 Disk Defragmenter software 3 disk performance 3 diskette drive 11 drives caring for 2 diskette 11 external 11 hard 4, 5, 11 MultiBay 11, 13 optical 7, 11 See also hard drive, optical drive DVD inserting 8 removing, with power 9 removing, without power 10 DVD drive 7, 11 hard drive external 11 installing 5 replacing 4 M maintenance Disk Cleanup 3 Disk Defragmenter 3 MultiBay 11, 13...
... D Disk Cleanup 3 Disk Cleanup software 3 Disk Defragmenter 3 Disk Defragmenter software 3 disk performance 3 diskette drive 11 drives caring for 2 diskette 11 external 11 hard 4, 5, 11 MultiBay 11, 13 optical 7, 11 See also hard drive, optical drive DVD inserting 8 removing, with power 9 removing, without power 10 DVD drive 7, 11 hard drive external 11 installing 5 replacing 4 M maintenance Disk Cleanup 3 Disk Defragmenter 3 MultiBay 11, 13...

HP 530 Notebook PC - Maintenance and Service Guide
Page 5
... parts ...19 Sequential part number listing 20 4 Removal and replacement procedures Preliminary replacement requirements 25 Tools required ...25 Service considerations 25 Plastic parts 25 Cables and connectors 26 Drive handling 26 Grounding guidelines 26 Electrostatic discharge damage 26... Packaging and transporting guidelines 28 Workstation guidelines 28 Equipment guidelines 29 Unknown user password 30 Component replacement procedures 31 Serial number ...31 Battery ...32 Hard drive ...33 ...
... parts ...19 Sequential part number listing 20 4 Removal and replacement procedures Preliminary replacement requirements 25 Tools required ...25 Service considerations 25 Plastic parts 25 Cables and connectors 26 Drive handling 26 Grounding guidelines 26 Electrostatic discharge damage 26... Packaging and transporting guidelines 28 Workstation guidelines 28 Equipment guidelines 29 Unknown user password 30 Component replacement procedures 31 Serial number ...31 Battery ...32 Hard drive ...33 ...

HP 530 Notebook PC - Maintenance and Service Guide
Page 10
..., 2.5-inch hard drives √ ● Parallel ATA ● Supports the following drives: ◦ 120-GB, 5400-rpm ◦ 80-GB, 5400-rpm ● 12.7-mm tray load √ ● Parallel ATA ● Fixed, no modular requirements (1 screw removal) ● Supports the following drives: ◦...; DVD±RW and CD-RW Super Multi DoubleLayer Combo Drive ◦ DVD/CD-RW Combo Drive Supports external USB drive only √ ● Conexant CX20549 √ ●...
..., 2.5-inch hard drives √ ● Parallel ATA ● Supports the following drives: ◦ 120-GB, 5400-rpm ◦ 80-GB, 5400-rpm ● 12.7-mm tray load √ ● Parallel ATA ● Fixed, no modular requirements (1 screw removal) ● Supports the following drives: ◦...; DVD±RW and CD-RW Super Multi DoubleLayer Combo Drive ◦ DVD/CD-RW Combo Drive Supports external USB drive only √ ● Conexant CX20549 √ ●...

HP 530 Notebook PC - Maintenance and Service Guide
Page 18
... contact technical support through Help and Support. 10 Chapter 2 External component identification Holds the hard drive. If you replace the module and then receive a warning message, remove the module to cycle on and off during routine operation. NOTE: The HP 530 Notebook PC does not support Smart Battery technology. Bottom components Item Component (1) Battery bay (2) Battery release...
... contact technical support through Help and Support. 10 Chapter 2 External component identification Holds the hard drive. If you replace the module and then receive a warning message, remove the module to cycle on and off during routine operation. NOTE: The HP 530 Notebook PC does not support Smart Battery technology. Bottom components Item Component (1) Battery bay (2) Battery release...
HP 530 Notebook PC - Maintenance and Service Guide
Page 34
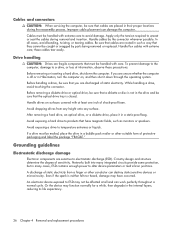
... the internal layers, reducing its life expectancy. 26 Chapter 4 Removal and replacement procedures Before removing a diskette drive or optical drive, be sure that have occurred. these precautions: Before removing or inserting a hard drive, shut down through the operating system. If you are unsure ... closed. Handle flex cables with at all cases, avoid bending, twisting, or tearing cables. After removing a hard drive, an optical drive, or a diskette drive, place it down the computer. Cables must be handled with care. Circuitry design and structure determine the...
... the internal layers, reducing its life expectancy. 26 Chapter 4 Removal and replacement procedures Before removing a diskette drive or optical drive, be sure that have occurred. these precautions: Before removing or inserting a hard drive, shut down through the operating system. If you are unsure ... closed. Handle flex cables with at all cases, avoid bending, twisting, or tearing cables. After removing a hard drive, an optical drive, or a diskette drive, place it down the computer. Cables must be handled with care. Circuitry design and structure determine the...

HP 530 Notebook PC - Maintenance and Service Guide
Page 41
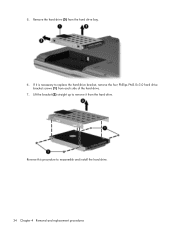
...rpm Spare part number 435775-001 435773-001 Before disassembling the computer, follow these steps: 1. Remove the battery (see Battery on the hard drive and pull the hard drive (2) to the left side of the hard drive cover (2), swing it to disconnect it down the computer. If you . 2. Disconnect all ... 4. Loosen the two Phillips PM2.5×6.0 screws (1) that secure the hard drive cover to the computer. 3. Grasp the Mylar tab (1) on page 32). Lift the left to the right, and remove the cover. The hard drive cover is off or in the Plastics/Hardware Kit, spare part number 448431...
...rpm Spare part number 435775-001 435773-001 Before disassembling the computer, follow these steps: 1. Remove the battery (see Battery on the hard drive and pull the hard drive (2) to the left side of the hard drive cover (2), swing it to disconnect it down the computer. If you . 2. Disconnect all ... 4. Loosen the two Phillips PM2.5×6.0 screws (1) that secure the hard drive cover to the computer. 3. Grasp the Mylar tab (1) on page 32). Lift the left to the right, and remove the cover. The hard drive cover is off or in the Plastics/Hardware Kit, spare part number 448431...
HP 530 Notebook PC - Maintenance and Service Guide
Page 42
Remove the hard drive (3) from the hard drive. Reverse this procedure to replace the hard drive bracket, remove the four Phillips PM3.0×3.0 hard drive bracket screws (1) from each side of the hard drive. 7. Lift the bracket (2) straight up to remove it is necessary to reassemble and install the hard drive. 34 Chapter 4 Removal and replacement procedures 5. If it from the hard drive bay. 6.
Remove the hard drive (3) from the hard drive. Reverse this procedure to replace the hard drive bracket, remove the four Phillips PM3.0×3.0 hard drive bracket screws (1) from each side of the hard drive. 7. Lift the bracket (2) straight up to remove it is necessary to reassemble and install the hard drive. 34 Chapter 4 Removal and replacement procedures 5. If it from the hard drive bay. 6.

HP 530 Notebook PC - Maintenance and Service Guide
Page 60
... Display assembly on page 39) d. Remove the battery (see Optical drive on page 47) Remove the base enclosure: 1. Turn the computer upside down through the operating system. 2. Optical drive (see Battery on page 33) ...b. Shut down the computer. Base enclosure Description Base enclosure Rubber Feet Kit Spare part number 441625-001 438557-001 Before removing the base enclosure, follow these steps: 1. Hard drive (see Hard drive...
... Display assembly on page 39) d. Remove the battery (see Optical drive on page 47) Remove the base enclosure: 1. Turn the computer upside down through the operating system. 2. Optical drive (see Battery on page 33) ...b. Shut down the computer. Base enclosure Description Base enclosure Rubber Feet Kit Spare part number 441625-001 438557-001 Before removing the base enclosure, follow these steps: 1. Hard drive (see Hard drive...

HP 530 Notebook PC - Maintenance and Service Guide
Page 62
... tool to be cleared. Display assembly (see Base enclosure on page 47) g. Hard drive (see Memory module on page 33) b. Memory/WLAN module compartment cover (see Hard drive on page 35) c. Remove the battery (see Optical drive on page 32). 5. RTC battery NOTE: Removing the RTC battery and leaving it down the computer. Description RTC battery Spare...
... tool to be cleared. Display assembly (see Base enclosure on page 47) g. Hard drive (see Memory module on page 33) b. Memory/WLAN module compartment cover (see Hard drive on page 35) c. Remove the battery (see Optical drive on page 32). 5. RTC battery NOTE: Removing the RTC battery and leaving it down the computer. Description RTC battery Spare...

HP 530 Notebook PC - Maintenance and Service Guide
Page 63
... , and then shut it down the computer. Disconnect the fan cable (1) from the computer. 4. Hard drive (see Keyboard on page 41) e. Keyboard (see Hard drive on page 47) g. Reverse this procedure to the computer. 3. Remove the Phillips PM2.0×9.0 screw (2) that secures the fan assembly to the top cover. Be sure the RTC battery is...
... , and then shut it down the computer. Disconnect the fan cable (1) from the computer. 4. Hard drive (see Keyboard on page 41) e. Keyboard (see Hard drive on page 47) g. Reverse this procedure to the computer. 3. Remove the Phillips PM2.0×9.0 screw (2) that secures the fan assembly to the top cover. Be sure the RTC battery is...


