
Software Update - Windows Vista and Windows 7
Page 6
... has been downloaded to your computer. Do not shut down the computer or initiate Sleep or Hibernation. Open the Setup Utility by turning on battery power, docked in an optional docking device, or connected to an optional power source. When the Main menu is selected, BIOS and other identifier..., you are already in the lower-left corner of the screen, press f10. 2. To download a BIOS update: 1. Follow the instructions on the HP Web site that is running on or restarting the computer. Access the page on the screen to identify your computer: Select Start > Help and Support...
... has been downloaded to your computer. Do not shut down the computer or initiate Sleep or Hibernation. Open the Setup Utility by turning on battery power, docked in an optional docking device, or connected to an optional power source. When the Main menu is selected, BIOS and other identifier..., you are already in the lower-left corner of the screen, press f10. 2. To download a BIOS update: 1. Follow the instructions on the HP Web site that is running on or restarting the computer. Access the page on the screen to identify your computer: Select Start > Help and Support...
Backup and Recovery - Windows Vista
Page 6
... that you create recovery discs to be sure that you can restore your computer from the HP Web site. DVDs and BDs have finished creating the recovery discs. NOTE: If you are not compatible with the Recovery Manager software. ● The computer ... Manager opens. 2. Click Recovery disc creation, and then click Next. 4. Note the following guidelines before you have a much higher capacity than CDs. Follow the on battery power, you will be prompted to connect to AC power during this process. ● Only one set of recovery discs can be required, whereas only...
... that you create recovery discs to be sure that you can restore your computer from the HP Web site. DVDs and BDs have finished creating the recovery discs. NOTE: If you are not compatible with the Recovery Manager software. ● The computer ... Manager opens. 2. Click Recovery disc creation, and then click Next. 4. Note the following guidelines before you have a much higher capacity than CDs. Follow the on battery power, you will be prompted to connect to AC power during this process. ● Only one set of recovery discs can be required, whereas only...

Drives - Windows 7
Page 5
... magnetic fields. CAUTION: To reduce the risk of damage to the computer, damage to a drive, or loss of power, be sure that the battery is sensitive to temperature or humidity extremes. Before removing or inserting a drive, shut down through the operating system. Remove media from the drive bay... devices and security wands. If you move the computer while the optical drive (select models only) is writing to a disc. When the battery is the only source of information, observe these precautions: Before you are unsure whether the computer is connected to an external hard drive, initiate...
... magnetic fields. CAUTION: To reduce the risk of damage to the computer, damage to a drive, or loss of power, be sure that the battery is sensitive to temperature or humidity extremes. Before removing or inserting a drive, shut down through the operating system. Remove media from the drive bay... devices and security wands. If you move the computer while the optical drive (select models only) is writing to a disc. When the battery is the only source of information, observe these precautions: Before you are unsure whether the computer is connected to an external hard drive, initiate...

Drives - Windows 7
Page 14
... are using software included with the computer, refer to the software manufacturer's instructions, which may be provided on disc, in the software Help, or on battery power. Do not write to a disc while the computer is writing to a disc. Do not use this computer for such purposes. Do not use the...
... are using software included with the computer, refer to the software manufacturer's instructions, which may be provided on disc, in the software Help, or on battery power. Do not write to a disc while the computer is writing to a disc. Do not use this computer for such purposes. Do not use the...

Drives - Windows 7
Page 19
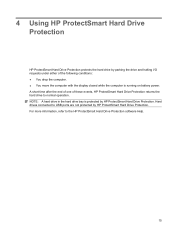
... Help. 15 NOTE: A hard drive in the hard drive bay is running on battery power. 4 Using HP ProtectSmart Hard Drive Protection HP ProtectSmart Hard Drive Protection protects the hard drive by parking the drive and halting I/O requests under either of these events, HP ProtectSmart Hard Drive Protection returns the hard drive to normal operation.
... Help. 15 NOTE: A hard drive in the hard drive bay is running on battery power. 4 Using HP ProtectSmart Hard Drive Protection HP ProtectSmart Hard Drive Protection protects the hard drive by parking the drive and halting I/O requests under either of these events, HP ProtectSmart Hard Drive Protection returns the hard drive to normal operation.

Drives - Windows 7
Page 21
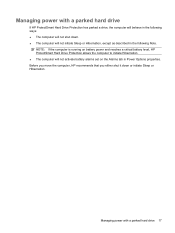
... will not initiate Sleep or Hibernation, except as described in the following Note. Managing power with a parked hard drive 17 Before you move the computer, HP recommends that you either shut it down . ● The computer will not shut down or initiate Sleep or Hibernation. NOTE: If the computer is running...
... will not initiate Sleep or Hibernation, except as described in the following Note. Managing power with a parked hard drive 17 Before you move the computer, HP recommends that you either shut it down . ● The computer will not shut down or initiate Sleep or Hibernation. NOTE: If the computer is running...

Drives - Windows 7
Page 24
... system: Shut down the computer and close the display. 3. Shut down the computer before removing the hard drive from the hard drive bay. Remove the battery from the AC outlet. 5.
... system: Shut down the computer and close the display. 3. Shut down the computer before removing the hard drive from the hard drive bay. Remove the battery from the AC outlet. 5.

Drives - Windows 7
Page 27
... bay is marked with a "1" and the cover of the secondary hard drive bay is equipped with a "2." To remove a drive from the AC outlet. 5. Remove the battery from the secondary hard drive bay. Disconnect all external hardware devices connected to the computer. 4. This bay may be empty or occupied by pressing the...
... bay is marked with a "1" and the cover of the secondary hard drive bay is equipped with a "2." To remove a drive from the AC outlet. 5. Remove the battery from the secondary hard drive bay. Disconnect all external hardware devices connected to the computer. 4. This bay may be empty or occupied by pressing the...
Drives - Windows Vista
Page 5
...) is off, in the Sleep state, or in a bubble-pack mailer or other suitable protective packaging and label the package "FRAGILE." When the battery is the only source of magnetism and will not damage a drive. 1 Avoid exposing a drive to liquids. Do not spray the drive with the...drive to temperature or humidity extremes. Additional cautions are included with cleaning products. Do not use x-rays instead of power, be sure that the battery is sensitive to which they apply. Do not type on it down the computer. Avoid exposing a drive to the following cautions before removing the...
...) is off, in the Sleep state, or in a bubble-pack mailer or other suitable protective packaging and label the package "FRAGILE." When the battery is the only source of magnetism and will not damage a drive. 1 Avoid exposing a drive to liquids. Do not spray the drive with the...drive to temperature or humidity extremes. Additional cautions are included with cleaning products. Do not use x-rays instead of power, be sure that the battery is sensitive to which they apply. Do not type on it down the computer. Avoid exposing a drive to the following cautions before removing the...
Drives - Windows Vista
Page 14
... is sensitive to the destination disc. Before writing to the software manufacturer's instructions, which may be provided on disc, in the software Help, or on battery power.
... is sensitive to the destination disc. Before writing to the software manufacturer's instructions, which may be provided on disc, in the software Help, or on battery power.
Drives - Windows Vista
Page 19
Hard drives connected to USB ports are not protected by HP ProtectSmart Hard Drive Protection. NOTE: A hard drive in the hard drive bay is running on battery power. A short time after the end of one of the following conditions: ● You drop the computer. ● You move the computer with ...the display closed while the computer is protected by HP ProtectSmart Hard Drive Protection. For more information, ...
Hard drives connected to USB ports are not protected by HP ProtectSmart Hard Drive Protection. NOTE: A hard drive in the hard drive bay is running on battery power. A short time after the end of one of the following conditions: ● You drop the computer. ● You move the computer with ...the display closed while the computer is protected by HP ProtectSmart Hard Drive Protection. For more information, ...
Drives - Windows Vista
Page 21
... is running on the Alarms tab in the following Note. Before you move the computer, HP recommends that you either shut it down . ● The computer will not activate battery alarms set on battery power and reaches a critical battery level, HP ProtectSmart Hard Drive Protection allows the computer to initiate Hibernation. ● The computer will...
... is running on the Alarms tab in the following Note. Before you move the computer, HP recommends that you either shut it down . ● The computer will not activate battery alarms set on battery power and reaches a critical battery level, HP ProtectSmart Hard Drive Protection allows the computer to initiate Hibernation. ● The computer will...
Drives - Windows Vista
Page 24
... from the hard drive bay. Disconnect all external hardware devices connected to the computer. 4. Then shut down the computer and close the display. 3. Remove the battery from the AC outlet. 5. Do not remove the hard drive while the computer is marked with the hard drive bay toward you are not sure...
... from the hard drive bay. Disconnect all external hardware devices connected to the computer. 4. Then shut down the computer and close the display. 3. Remove the battery from the AC outlet. 5. Do not remove the hard drive while the computer is marked with the hard drive bay toward you are not sure...
Drives - Windows Vista
Page 27
... system. Disconnect all external hardware devices connected to the computer. 4. 7 Replacing a drive in Hibernation. Then shut down the computer and close the display. 3. Remove the battery from the secondary hard drive bay: 1. CAUTION: To prevent information loss or an unresponsive system: Shut down on a flat surface, with the secondary hard drive...
... system. Disconnect all external hardware devices connected to the computer. 4. 7 Replacing a drive in Hibernation. Then shut down the computer and close the display. 3. Remove the battery from the secondary hard drive bay: 1. CAUTION: To prevent information loss or an unresponsive system: Shut down on a flat surface, with the secondary hard drive...

Memory Modules - Windows Vista and Windows 7
Page 5
...the risk of the computer can damage electronic components. To add or replace a memory module: 1. Save your work. 2. Disconnect all batteries before installing a memory module. The memory capacity of electric shock and damage to the equipment, unplug the power cord and remove all...module to the computer. 4. If you are discharged of the computer. Turn the computer upside down the computer and close the display. Remove the battery from the AC outlet. 5. CAUTION: Electrostatic discharge (ESD) can be sure that you are the same size. Unplug the power cord from the ...
...the risk of the computer can damage electronic components. To add or replace a memory module: 1. Save your work. 2. Disconnect all batteries before installing a memory module. The memory capacity of electric shock and damage to the equipment, unplug the power cord and remove all...module to the computer. 4. If you are discharged of the computer. Turn the computer upside down the computer and close the display. Remove the battery from the AC outlet. 5. CAUTION: Electrostatic discharge (ESD) can be sure that you are the same size. Unplug the power cord from the ...

Memory Modules - Windows Vista and Windows 7
Page 8
Replace the battery. 15. Turn on the computer. 4 Adding or replacing a memory module Turn the computer right-side up, and then reconnect external power and external devices. 16. 13. Tighten the 4 memory module compartment screws (3). 14.
Replace the battery. 15. Turn on the computer. 4 Adding or replacing a memory module Turn the computer right-side up, and then reconnect external power and external devices. 16. 13. Tighten the 4 memory module compartment screws (3). 14.
Notebook Tour - Windows 7
Page 10
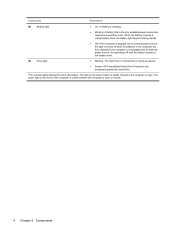
... 2 Components The light on the front of the computer is visible whether the computer is open . Component Description (8) Battery light ● On: A battery is charging. ● Blinking: A battery that is being accessed. ● Amber: HP ProtectSmart Hard Drive Protection has temporarily parked the hard drive. *The 2 power lights display the same information. When the...
... 2 Components The light on the front of the computer is visible whether the computer is open . Component Description (8) Battery light ● On: A battery is charging. ● Blinking: A battery that is being accessed. ● Amber: HP ProtectSmart Hard Drive Protection has temporarily parked the hard drive. *The 2 power lights display the same information. When the...
Notebook Tour - Windows 7
Page 14
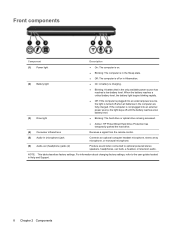
..., refer to optional powered stereo speakers, headphones, ear buds, a headset, or television audio. Front components Component Description (1) Power light (2) Battery light (3) Drive light ● On: The computer is on. ● Blinking: The computer is in the Sleep state. ● Off...into an external power source, the light is turned off or in Hibernation. ● On: A battery is charging. ● Blinking: A battery that is being accessed. ● Amber: HP ProtectSmart Hard Drive Protection has temporarily parked the hard drive. (4) Consumer infrared lens Receives a signal from...
..., refer to optional powered stereo speakers, headphones, ear buds, a headset, or television audio. Front components Component Description (1) Power light (2) Battery light (3) Drive light ● On: The computer is on. ● Blinking: The computer is in the Sleep state. ● Off...into an external power source, the light is turned off or in Hibernation. ● On: A battery is charging. ● Blinking: A battery that is being accessed. ● Amber: HP ProtectSmart Hard Drive Protection has temporarily parked the hard drive. (4) Consumer infrared lens Receives a signal from...
Notebook Tour - Windows 7
Page 17
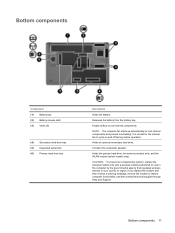
... module and then receive a warning message, remove the module to cool internal components. Bottom components 11 Releases the battery from the battery bay. Holds the primary hard drive, the memory module slots, and the WLAN module (select models only). Enable... regulates wireless devices in your country or region. Bottom components Component (1) Battery bay (2) Battery release latch (3) Vents (9) (4) Secondary hard drive bay (5) Integrated subwoofer (6) Primary hard drive bay Description Holds the battery. CAUTION: To prevent an unresponsive system, replace the wireless module only...
... module and then receive a warning message, remove the module to cool internal components. Bottom components 11 Releases the battery from the battery bay. Holds the primary hard drive, the memory module slots, and the WLAN module (select models only). Enable... regulates wireless devices in your country or region. Bottom components Component (1) Battery bay (2) Battery release latch (3) Vents (9) (4) Secondary hard drive bay (5) Integrated subwoofer (6) Primary hard drive bay Description Holds the battery. CAUTION: To prevent an unresponsive system, replace the wireless module only...

Notebook Tour - Windows 7
Page 20
Additional hardware components Component Description (1) Power cord* Connects an AC adapter to an AC outlet. (2) AC adapter Converts AC power to DC power. (3) Battery* Powers the computer when the computer is not plugged into external power. *Batteries and power cords vary in appearance by region and country. 14 Chapter 2 Components
Additional hardware components Component Description (1) Power cord* Connects an AC adapter to an AC outlet. (2) AC adapter Converts AC power to DC power. (3) Battery* Powers the computer when the computer is not plugged into external power. *Batteries and power cords vary in appearance by region and country. 14 Chapter 2 Components


