
User Guide
Page 2
... 4010 Cupertino, CA 95015-4010 USA © Copyright 2000-2009 Hewlett-Packard Development Company, L.P. Microsoft, the Windows logo, and Windows are draft specifications and not final. HP supports lawful use of technology and does not endorse or encourage the use or reliability of the 802.11n WLAN... (wireless local area network) are trademarks or registered trademarks of the Microsoft group of our products for home ...
... 4010 Cupertino, CA 95015-4010 USA © Copyright 2000-2009 Hewlett-Packard Development Company, L.P. Microsoft, the Windows logo, and Windows are draft specifications and not final. HP supports lawful use of technology and does not endorse or encourage the use or reliability of the 802.11n WLAN... (wireless local area network) are trademarks or registered trademarks of the Microsoft group of our products for home ...

User Guide
Page 6
... of the computer. Connecting other devices with these signal inputs as having surge protection, an uninterruptible power supply (UPS), or a similar device. Use a power strip specifically labeled as well. Keyboard (PS/2 connector). Power cord and devices Icon/label Description and function Power connector. Protect the monitor, computer, and connected accessories by...
... of the computer. Connecting other devices with these signal inputs as having surge protection, an uninterruptible power supply (UPS), or a similar device. Use a power strip specifically labeled as well. Keyboard (PS/2 connector). Power cord and devices Icon/label Description and function Power connector. Protect the monitor, computer, and connected accessories by...

User Guide
Page 7
... so it can connect to the computer. HDMI display output connector, to connect to a TV. Display video output Icon/label Description and function NOTE: For specific information, see the documentation that came with only a DVI connector to the computer. Digital video output connector (select models only), to connect to the computer...
... so it can connect to the computer. HDMI display output connector, to connect to a TV. Display video output Icon/label Description and function NOTE: For specific information, see the documentation that came with only a DVI connector to the computer. Digital video output connector (select models only), to connect to the computer...

User Guide
Page 18
...mode (available as an advanced power setting) saves the system memory to a temporary file on the hard disk and then turns off the power for specific information on the connection. 14 Getting Started (features vary by the ISP. 3 Purchase and install a wireless router (sold separately), if one is ...memory. Connecting to the Internet Connecting to the Internet requires that you restart the computer, the computer clears some settings and starts over using Windows 7, do not shut down the computer, you can set the power management timers to put it is the easiest and most effective way...
...mode (available as an advanced power setting) saves the system memory to a temporary file on the hard disk and then turns off the power for specific information on the connection. 14 Getting Started (features vary by the ISP. 3 Purchase and install a wireless router (sold separately), if one is ...memory. Connecting to the Internet Connecting to the Internet requires that you restart the computer, the computer clears some settings and starts over using Windows 7, do not shut down the computer, you can set the power management timers to put it is the easiest and most effective way...
User Guide
Page 24
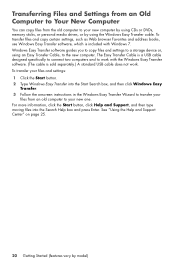
...into the Search Help box and press Enter. The Easy Transfer Cable is sold separately.) A standard USB cable does not work with Windows 7. Transferring Files and Settings from an Old Computer to Your New Computer You can copy files from an old computer to your new ...Easy Transfer Cable, to work . To transfer files and copy certain settings, such as Web browser Favorites and address books, use Windows Easy Transfer software, which is included with the Windows Easy Transfer software. (The cable is a USB cable designed specifically to connect two computers and to the new computer.
...into the Search Help box and press Enter. The Easy Transfer Cable is sold separately.) A standard USB cable does not work with Windows 7. Transferring Files and Settings from an Old Computer to Your New Computer You can copy files from an old computer to your new ...Easy Transfer Cable, to work . To transfer files and copy certain settings, such as Web browser Favorites and address books, use Windows Easy Transfer software, which is included with the Windows Easy Transfer software. (The cable is a USB cable designed specifically to connect two computers and to the new computer.

User Guide
Page 33
... "Software Troubleshooting" on page 44 Troubleshooting and Maintenance 29 For more information, refer to the documentation provided by the product manufacturer for information about peripheral-specific problems, such as issues with cable)" on page 32 "Wireless keyboard and mouse" on page 33 "Audio and speakers" on page 36 "Internet access" on...
... "Software Troubleshooting" on page 44 Troubleshooting and Maintenance 29 For more information, refer to the documentation provided by the product manufacturer for information about peripheral-specific problems, such as issues with cable)" on page 32 "Wireless keyboard and mouse" on page 33 "Audio and speakers" on page 36 "Internet access" on...

User Guide
Page 50
...records the computer settings at that enables you think may be due to software on your computer to a previous restore point. Microsoft System Restore Microsoft Windows 7 includes a feature that time and date. If you experience a problem that you to restore your problem: 1 Click the Start button. 2... Settings, select the disk for which you want to update or rollback. (For example, DVD/CD-ROM drives). 4 Double-click the specific item (for example, HP DVD Writer 640b). 5 Click the Driver tab. 6 To update a driver, click Update Driver, and then follow the onscreen instructions.
...records the computer settings at that enables you think may be due to software on your computer to a previous restore point. Microsoft System Restore Microsoft Windows 7 includes a feature that time and date. If you experience a problem that you to restore your problem: 1 Click the Start button. 2... Settings, select the disk for which you want to update or rollback. (For example, DVD/CD-ROM drives). 4 Double-click the specific item (for example, HP DVD Writer 640b). 5 Click the Driver tab. 6 To update a driver, click Update Driver, and then follow the onscreen instructions.

User Guide
Page 55
... the operating system and software program files that you create. 4 Through recovery discs purchased from the Windows 7 Start menu. 2 Through the hard disk drive, by pressing the F11 key on your discs... computer. The number of your computer at any time. The next time you the specific number of recovery discs for example, Recovery 1, Recovery 2). 4 Store the recovery discs in the following ...resumes where it (for your computer model. To purchase recovery discs, go to http://www.hp.com/support and visit the Software & Driver downloads page for the recovery disc creation process ...
... the operating system and software program files that you create. 4 Through recovery discs purchased from the Windows 7 Start menu. 2 Through the hard disk drive, by pressing the F11 key on your discs... computer. The number of your computer at any time. The next time you the specific number of recovery discs for example, Recovery 1, Recovery 2). 4 Store the recovery discs in the following ...resumes where it (for your computer model. To purchase recovery discs, go to http://www.hp.com/support and visit the Software & Driver downloads page for the recovery disc creation process ...

Upgrade and Service
Page 6
... of the panel toward the left side of the computer. 4 570987-001 - Hewlett-Packard always provides quality parts that meet or exceed your original computer specifications. 1 Hold the front panel over the side of the computer with the front edge of the panel about 2.5 cm (1 inch) from the front of the...
... of the panel toward the left side of the computer. 4 570987-001 - Hewlett-Packard always provides quality parts that meet or exceed your original computer specifications. 1 Hold the front panel over the side of the computer with the front edge of the panel about 2.5 cm (1 inch) from the front of the...

Upgrade and Service
Page 14
... of the computer. 1 2 6 537501-001 - Removing and Replacing an Optical Disc Drive Hewlett-Packard always provides quality parts that meet or exceed your original computer specifications. 1 Insert the drive partway into the computer bay. 4 Push the drive completely into the computer, until the optical drive latch locks it into place in...
... of the computer. 1 2 6 537501-001 - Removing and Replacing an Optical Disc Drive Hewlett-Packard always provides quality parts that meet or exceed your original computer specifications. 1 Insert the drive partway into the computer bay. 4 Push the drive completely into the computer, until the optical drive latch locks it into place in...
Upgrade and Service
Page 23
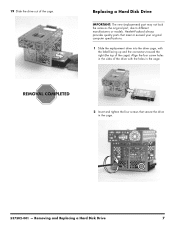
Hewlett-Packard always provides quality parts that meet or exceed your original computer specifications. 1 Slide the replacement drive into the drive cage, with the holes in the cage. 2 Insert and tighten the four screws that secure the drive in ...
Hewlett-Packard always provides quality parts that meet or exceed your original computer specifications. 1 Slide the replacement drive into the drive cage, with the holes in the cage. 2 Insert and tighten the four screws that secure the drive in ...

Upgrade and Service
Page 31
... the card from the socket. Removing and Replacing an Add-in Card 5 13 Remove the card: If there is a release latch, place your original computer specifications. 1 Align the edge of the add-in card with the open slot (1) in the computer, and then press the card straight down on the pad...
... the card from the socket. Removing and Replacing an Add-in Card 5 13 Remove the card: If there is a release latch, place your original computer specifications. 1 Align the edge of the add-in card with the open slot (1) in the computer, and then press the card straight down on the pad...
Upgrade and Service
Page 36
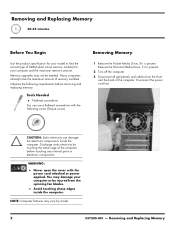
... cord attached or power applied. Discharge static electricity by model. 2 537500-001 - Removing and Replacing Memory 30-45 minutes Before You Begin Use the product specification for your model to find the correct type of DIMM (dual in-line memory module) for your computer or be needed. NOTE: Computer features may...
... cord attached or power applied. Discharge static electricity by model. 2 537500-001 - Removing and Replacing Memory 30-45 minutes Before You Begin Use the product specification for your model to find the correct type of DIMM (dual in-line memory module) for your computer or be needed. NOTE: Computer features may...

Upgrade and Service
Page 41
... the largest capacity module placed in the memory socket. 2 Look at the memory module socket for the tab that meet or exceed your original computer specifications. Removing and Replacing Memory 7 NOTE: Each type of the socket. Replacing Memory IMPORTANT: The new (replacement) part may not look the same as the original...
... the largest capacity module placed in the memory socket. 2 Look at the memory module socket for the tab that meet or exceed your original computer specifications. Removing and Replacing Memory 7 NOTE: Each type of the socket. Replacing Memory IMPORTANT: The new (replacement) part may not look the same as the original...

