
HP Notebook Reference Guide - Windows 7
Page 7
...card ...31 Using a USB device ...31 Connecting a USB device 31 Removing a USB device ...32 Using 1394 devices (select models only 32 Connecting a 1394 device 32 Removing a 1394 device 33 Using an eSATA device (select models only 33 Connecting an eSATA device 33 Removing an eSATA device 34 Using optional external devices ...34 Using optional external drives 34 Using the expansion port (select models only 34 6 Drives ...36 Handling drives ...36 Using hard drives ...37 Improving hard drive performance 37 Using Disk Defragmenter 37 Using Disk Cleanup 37 Using HP ProtectSmart Hard Drive...
...card ...31 Using a USB device ...31 Connecting a USB device 31 Removing a USB device ...32 Using 1394 devices (select models only 32 Connecting a 1394 device 32 Removing a 1394 device 33 Using an eSATA device (select models only 33 Connecting an eSATA device 33 Removing an eSATA device 34 Using optional external devices ...34 Using optional external drives 34 Using the expansion port (select models only 34 6 Drives ...36 Handling drives ...36 Using hard drives ...37 Improving hard drive performance 37 Using Disk Defragmenter 37 Using Disk Cleanup 37 Using HP ProtectSmart Hard Drive...

HP Notebook Reference Guide - Windows 7
Page 28
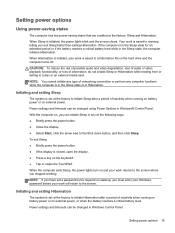
... a network domain, the button you have a power button or a power switch. If the computer is unresponsive and you are connecting an external hardware device that does not connect to a USB or video port ● When the computer will be unused and disconnected from external power and remove the battery. 18 Chapter 4 Power management Select Start > Shut down . The Shut down command closes all open programs, including the operating system, and then turns off the display...
... a network domain, the button you have a power button or a power switch. If the computer is unresponsive and you are connecting an external hardware device that does not connect to a USB or video port ● When the computer will be unused and disconnected from external power and remove the battery. 18 Chapter 4 Power management Select Start > Shut down . The Shut down command closes all open programs, including the operating system, and then turns off the display...
HP Notebook Reference Guide - Windows 7
Page 29
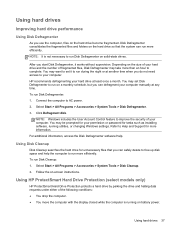
... must enter your Windows password before your work is initiated, the power lights blink and the screen clears. Setting power options Using power-saving states The computer has two power-saving states that are enabled at the factory to initiate Hibernation after a period of inactivity when running on battery power or on external power, or when the battery reaches a critical battery level. When Sleep is saved to memory, letting you can be changed using Power Options in Windows® Control Panel. Your work...
... must enter your Windows password before your work is initiated, the power lights blink and the screen clears. Setting power options Using power-saving states The computer has two power-saving states that are enabled at the factory to initiate Hibernation after a period of inactivity when running on battery power or on external power, or when the battery reaches a critical battery level. When Sleep is saved to memory, letting you can be changed using Power Options in Windows® Control Panel. Your work...

HP Notebook Reference Guide - Windows 7
Page 44
... external device, turn off the device, and then disconnect it from the computer. NOTE: HP external USB optical drives should be connected to safely remove the device. 1. Remove the device. Connect the device to the manufacturer's instructions. A USB drive can be added by connecting the drive to remove the eSATA device. USB drives include the following procedure to the powered USB port on the computer. Using optional external drives Removable external drives expand your information and close all programs associated with an adapter attached) ● External optical drive...
... external device, turn off the device, and then disconnect it from the computer. NOTE: HP external USB optical drives should be connected to safely remove the device. 1. Remove the device. Connect the device to the manufacturer's instructions. A USB drive can be added by connecting the drive to remove the eSATA device. USB drives include the following procedure to the powered USB port on the computer. Using optional external drives Removable external drives expand your information and close all programs associated with an adapter attached) ● External optical drive...
HP Notebook Reference Guide - Windows 7
Page 47
... on battery power. Depending on the hard drive become fragmented. Connect the computer to run on a monthly schedule, but you use the computer, files on the size of your computer. To run more efficiently. NOTE: It is running utilities, or changing Windows settings. After you start Disk Defragmenter, it to AC power. 2. To run Disk Defragmenter on -screen instructions. Select Start > All Programs > Accessories > System Tools > Disk Defragmenter...
... on battery power. Depending on the hard drive become fragmented. Connect the computer to run on a monthly schedule, but you use the computer, files on the size of your computer. To run more efficiently. NOTE: It is running utilities, or changing Windows settings. After you start Disk Defragmenter, it to AC power. 2. To run Disk Defragmenter on -screen instructions. Select Start > All Programs > Accessories > System Tools > Disk Defragmenter...

HP Notebook Reference Guide - Windows 7
Page 48
..., HP ProtectSmart Hard Drive Protection returns the hard drive to USB ports are not covered by User Account Control, click Yes. 2. Click OK. NOTE: Because solid-state drives (SSD) lack moving parts, HP ProtectSmart Hard Drive Protection is superimposed over the hard drive icon. ● If the drives are protected by HP ProtectSmart Hard Drive Protection. Hard drives connected to normal operation. To determine whether drives are currently protected or whether a drive is parked, select Start > Control Panel > Hardware and Sound > Windows Mobility...
..., HP ProtectSmart Hard Drive Protection returns the hard drive to USB ports are not covered by User Account Control, click Yes. 2. Click OK. NOTE: Because solid-state drives (SSD) lack moving parts, HP ProtectSmart Hard Drive Protection is superimposed over the hard drive icon. ● If the drives are protected by HP ProtectSmart Hard Drive Protection. Hard drives connected to normal operation. To determine whether drives are currently protected or whether a drive is parked, select Start > Control Panel > Hardware and Sound > Windows Mobility...
HP Notebook Reference Guide - Windows 7
Page 55
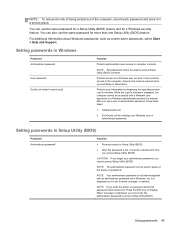
... Setup Utility (BIOS). After you set , entered, changed, or deleted. Setting passwords in Setup Utility (BIOS) Password Administrator password* Function ● Protects access to Setup Utility (BIOS). ● After this password is set, it is it displayed as screen-saver passwords, select Start > Help and Support. NOTE: Your administrator password is not interchangeable with an administrator password set in a secure place. Using passwords 45 NOTE: If you enter the power-on password. You can also use the same password for a Setup Utility (BIOS) feature and for a Windows...
... Setup Utility (BIOS). After you set , entered, changed, or deleted. Setting passwords in Setup Utility (BIOS) Password Administrator password* Function ● Protects access to Setup Utility (BIOS). ● After this password is set, it is it displayed as screen-saver passwords, select Start > Help and Support. NOTE: Your administrator password is not interchangeable with an administrator password set in a secure place. Using passwords 45 NOTE: If you enter the power-on password. You can also use the same password for a Setup Utility (BIOS) feature and for a Windows...
HP Notebook Reference Guide - Windows 7
Page 61
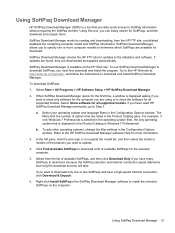
... follow the instructions to Step 3. SoftPaq Download Manager works by reading and downloading, from the list of the products you must first download and install the program. a. Select Start > All Programs > HP Software Setup > HP SoftPaq Download Manager. 2. To add other operating systems, change the filter settings in the SoftPaq Download Manager software to show the software for more information. 3. In the left pane, click the plus sign (+) to expand the model list, and...
... follow the instructions to Step 3. SoftPaq Download Manager works by reading and downloading, from the list of the products you must first download and install the program. a. Select Start > All Programs > HP Software Setup > HP SoftPaq Download Manager. 2. To add other operating systems, change the filter settings in the SoftPaq Download Manager software to show the software for more information. 3. In the left pane, click the plus sign (+) to expand the model list, and...

HP Notebook Reference Guide - Windows 7
Page 63
... follow the on -screen instructions. 2. Restoring factory settings in Setup Utility (BIOS) to enter Setup Utility (BIOS). To return all settings in Setup Utility (BIOS) NOTE: Restoring defaults will not change the hard drive mode. Press f10 to the values that were set at the factory, follow the on -screen instructions. - Using Setup Utility (BIOS) 53 To exit Setup Utility (BIOS) menus, choose one of the screen. 2. Use the arrow keys to select Exit > Exit Discarding Changes, and then press enter. Start Setup Utility (BIOS). 2. Select the Main menu. Turn on or restart...
... follow the on -screen instructions. 2. Restoring factory settings in Setup Utility (BIOS) to enter Setup Utility (BIOS). To return all settings in Setup Utility (BIOS) NOTE: Restoring defaults will not change the hard drive mode. Press f10 to the values that were set at the factory, follow the on -screen instructions. - Using Setup Utility (BIOS) 53 To exit Setup Utility (BIOS) menus, choose one of the screen. 2. Use the arrow keys to select Exit > Exit Discarding Changes, and then press enter. Start Setup Utility (BIOS). 2. Select the Main menu. Turn on or restart...
HP Notebook Reference Guide - Windows 7
Page 65
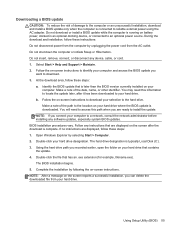
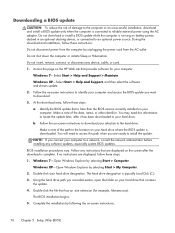
... update. Using Setup Utility (BIOS) 55 You may need to access this information to locate the update later, after the download is running on battery power, docked in an optional docking device, or connected to an optional power source. NOTE: After a message on your hard drive that are displayed, follow these instructions: Do not disconnect power from the computer by selecting Start > Computer. 2. Do not insert, remove, connect, or disconnect any software updates, especially system BIOS updates. Follow any instructions...
... update. Using Setup Utility (BIOS) 55 You may need to access this information to locate the update later, after the download is running on battery power, docked in an optional docking device, or connected to an optional power source. NOTE: After a message on your hard drive that are displayed, follow these instructions: Do not disconnect power from the computer by selecting Start > Computer. 2. Do not insert, remove, connect, or disconnect any software updates, especially system BIOS updates. Follow any instructions...
HP Notebook Reference Guide - Windows 7
Page 71
... password creating 46 entering 46 managing 46 airport security devices 36 antivirus software, using 47 audio functions, checking 14 B battery conserving power 24 discharging 23 displaying remaining charge 23 disposing 25 low battery levels 23 replacing 25 storing 24 Battery Check 22 battery information, finding 22 battery power 22 battery temperature 24 BIOS determining version 54 downloading an update 55 updating 54 Bluetooth device 2, 8 buttons media 13 power 18 volume 14 C cables 1394 32 eSATA 33 USB 31 checking audio functions 14 computer, traveling 24, 57 configuring audio for HDMI...
... password creating 46 entering 46 managing 46 airport security devices 36 antivirus software, using 47 audio functions, checking 14 B battery conserving power 24 discharging 23 displaying remaining charge 23 disposing 25 low battery levels 23 replacing 25 storing 24 Battery Check 22 battery information, finding 22 battery power 22 battery temperature 24 BIOS determining version 54 downloading an update 55 updating 54 Bluetooth device 2, 8 buttons media 13 power 18 volume 14 C cables 1394 32 eSATA 33 USB 31 checking audio functions 14 computer, traveling 24, 57 configuring audio for HDMI...

HP Notebook Reference Guide - Windows 7
Page 72
...9 connecting a modem cable adapter 9 selecting a location setting 10 N network cable, connecting 11 network icon 2 O operating system controls 4 optical disc inserting 39 removing 40 optical drive 34 optional external devices, using 34 P passwords set in Setup Utility (BIOS) 45 set in Windows 45 ports DisplayPort 15 expansion 34 external monitor 15 HDMI 16 Intel Wireless Display 17 VGA 15 power battery 22 conserving 24 options 19 power button 18 power meter 20 power plans customizing 21 selecting 20 viewing current 20 power switch 18 power-on password creating 47 entering 47 managing 47 power...
...9 connecting a modem cable adapter 9 selecting a location setting 10 N network cable, connecting 11 network icon 2 O operating system controls 4 optical disc inserting 39 removing 40 optical drive 34 optional external devices, using 34 P passwords set in Setup Utility (BIOS) 45 set in Windows 45 ports DisplayPort 15 expansion 34 external monitor 15 HDMI 16 Intel Wireless Display 17 VGA 15 power battery 22 conserving 24 options 19 power button 18 power meter 20 power plans customizing 21 selecting 20 viewing current 20 power switch 18 power-on password creating 47 entering 47 managing 47 power...

HP ENVY14 Getting Started - Windows 7
Page 37
... TouchPad buttons like the buttons on , quickly double-tap the TouchPad light. Using the TouchPad To move the pointer, slide one finger across the TouchPad in Windows to customize settings for pointing devices, such as button configuration, click speed, and pointer options. Turning the TouchPad off and on To turn the TouchPad off when the TouchPad is on the computer. NOTE: The TouchPad light is off and on an external mouse. To access Mouse Properties, select Start > Devices...
... TouchPad buttons like the buttons on , quickly double-tap the TouchPad light. Using the TouchPad To move the pointer, slide one finger across the TouchPad in Windows to customize settings for pointing devices, such as button configuration, click speed, and pointer options. Turning the TouchPad off and on To turn the TouchPad off when the TouchPad is on the computer. NOTE: The TouchPad light is off and on an external mouse. To access Mouse Properties, select Start > Devices...

HP ENVY14 Getting Started - Windows 7
Page 52
... operating system. Remove the battery cover and battery. CAUTION: To prevent information loss or an unresponsive system: Shut down the computer before removing the hard drive from the AC outlet. 4. NOTE: For instructions on page 32. 5. Do not remove the hard drive while the computer is located inside the battery bay. Removing the hard drive 1. Disconnect all external devices connected to Removing the battery on removing the battery cover and battery, refer to the computer. 3. Replacing or upgrading...
... operating system. Remove the battery cover and battery. CAUTION: To prevent information loss or an unresponsive system: Shut down the computer before removing the hard drive from the AC outlet. 4. NOTE: For instructions on page 32. 5. Do not remove the hard drive while the computer is located inside the battery bay. Removing the hard drive 1. Disconnect all external devices connected to Removing the battery on removing the battery cover and battery, refer to the computer. 3. Replacing or upgrading...

HP ENVY14 Getting Started - Windows 7
Page 76
... of external HP power supply 63 Digital Media Slot, identifying 12 display image, switching 24 drive light 13 drive, hard 43 E esc key, identifying 11 F f11 54 Fast Charge Mode 40 flicking TouchPad gesture 31 fn key, identifying 11, 25 G graphics modes, switching 3 H hard drive installing 43 removing 41 hard drive bay, identifying 17 HDMI port, identifying 13, 49 headphone (audio-out) jack 15 Help and Support key 23 hotkeys bass settings 25 description 25 display system information 25 using 25 HP HDMI to VGA Display Adapter, using 49 HP Recovery Manager...
... of external HP power supply 63 Digital Media Slot, identifying 12 display image, switching 24 drive light 13 drive, hard 43 E esc key, identifying 11 F f11 54 Fast Charge Mode 40 flicking TouchPad gesture 31 fn key, identifying 11, 25 G graphics modes, switching 3 H hard drive installing 43 removing 41 hard drive bay, identifying 17 HDMI port, identifying 13, 49 headphone (audio-out) jack 15 Help and Support key 23 hotkeys bass settings 25 description 25 display system information 25 using 25 HP HDMI to VGA Display Adapter, using 49 HP Recovery Manager...

HP ENVY14 Getting Started - Windows 7
Page 77
... 61 latch, battery cover release 17 lights battery 14 drive 13 mute 9 power 9, 13 TouchPad 9 webcam 16 wireless 9 M memory module inserting 46 removing 45 replacing 44 memory module compartment cover removing 45 replacing 47 66 Index memory module compartment, identifying 17 microphone (audio-in) jack, identifying 15 Microsoft Certificate of Authenticity label 60 Mini DisplayPort, identifying 13 monitor, connecting 49 mouse, external setting preferences 26 mute key, identifying 24 mute light, identifying 9 N network jack, identifying 13 O operating environment 64 operating system Microsoft...
... 61 latch, battery cover release 17 lights battery 14 drive 13 mute 9 power 9, 13 TouchPad 9 webcam 16 wireless 9 M memory module inserting 46 removing 45 replacing 44 memory module compartment cover removing 45 replacing 47 66 Index memory module compartment, identifying 17 microphone (audio-in) jack, identifying 15 Microsoft Certificate of Authenticity label 60 Mini DisplayPort, identifying 13 monitor, connecting 49 mouse, external setting preferences 26 mute key, identifying 24 mute light, identifying 9 N network jack, identifying 13 O operating environment 64 operating system Microsoft...
HP ENVY 14 Notebook PC - Maintenance and Service Guide
Page 49
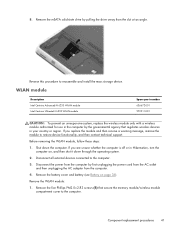
... Advanced-N 6230 WLAN module Intel Centrino Ultimate-N 6300 WLAN module Spare part number 636672-001 572511-001 CAUTION: To prevent an unresponsive system, replace the wireless module only with a wireless module authorized for use in Hibernation, turn the computer on page 36). Remove the mSATA solid-state drive by the governmental agency that secure the memory module/wireless module compartment cover to restore device functionality, and then contact technical support. Reverse this...
... Advanced-N 6230 WLAN module Intel Centrino Ultimate-N 6300 WLAN module Spare part number 636672-001 572511-001 CAUTION: To prevent an unresponsive system, replace the wireless module only with a wireless module authorized for use in Hibernation, turn the computer on page 36). Remove the mSATA solid-state drive by the governmental agency that secure the memory module/wireless module compartment cover to restore device functionality, and then contact technical support. Reverse this...
HP ENVY 14 Notebook PC - Maintenance and Service Guide
Page 84
...: a. Using the hard drive path you are displayed on your hard drive designation. Windows XP-Select Start > Help and Support, and then select the software and drivers update. 2. Identify the BIOS update that provides software for example, filename.exe). The BIOS installation begins. 5. At the download area, follow these instructions: Do not disconnect power from the AC outlet. Follow the on battery power, docked in an optional docking device, or connected to download. 3. BIOS installation procedures vary. Make a note...
...: a. Using the hard drive path you are displayed on your hard drive designation. Windows XP-Select Start > Help and Support, and then select the software and drivers update. 2. Identify the BIOS update that provides software for example, filename.exe). The BIOS installation begins. 5. At the download area, follow these instructions: Do not disconnect power from the AC outlet. Follow the on battery power, docked in an optional docking device, or connected to download. 3. BIOS installation procedures vary. Make a note...
HP ENVY 14 Notebook PC - Maintenance and Service Guide
Page 104
... device, product description 4 ports eSATA 12 HDMI 12 Mini DisplayPort 12 product description 3 Universal Serial Bus (USB) 11, 12 power button 5 power connector 13 power connector cable removal 60 spare part number 19, 29, 60 power cord set requirements 87 spare part numbers 24, 25 power light 7, 12 power requirements, product description 4 processor spare part numbers 28 product description processors 1 audio 3 chipset 1 display panel 2 Ethernet 3 external media cards 3 graphics 1 hard drives 2 keyboard 4 memory module 2 microphone 3 operating system 4 optical drive 3 pointing device 4 ports...
... device, product description 4 ports eSATA 12 HDMI 12 Mini DisplayPort 12 product description 3 Universal Serial Bus (USB) 11, 12 power button 5 power connector 13 power connector cable removal 60 spare part number 19, 29, 60 power cord set requirements 87 spare part numbers 24, 25 power light 7, 12 power requirements, product description 4 processor spare part numbers 28 product description processors 1 audio 3 chipset 1 display panel 2 Ethernet 3 external media cards 3 graphics 1 hard drives 2 keyboard 4 memory module 2 microphone 3 operating system 4 optical drive 3 pointing device 4 ports...

HP Notebook Hard Drives & Solid State Drives Identifying, Preventing, Diagnosing and Recovering from Drive Failures Care and Mai
Page 6
.../support/SupportManual/c01600726/c01600726.pdf. Updates to the Intel Matrix Storage Manager driver are released to 150MB/sec transfer rate for notebook PC models that are configured with Intel Matrix Storage Manager Technology. To download the latest version of the Intel Matrix Storage Technology driver: http://www8.hp.com/us/en/support-drivers.html Installing SATA drivers SATA Native Mode is a storage interface technology that could affect hard disk drive...
.../support/SupportManual/c01600726/c01600726.pdf. Updates to the Intel Matrix Storage Manager driver are released to 150MB/sec transfer rate for notebook PC models that are configured with Intel Matrix Storage Manager Technology. To download the latest version of the Intel Matrix Storage Technology driver: http://www8.hp.com/us/en/support-drivers.html Installing SATA drivers SATA Native Mode is a storage interface technology that could affect hard disk drive...


