HP ENVY 17 (model numbers 2000 through 2099) - Maintenance and Service Guide
Page 20
... fan starts up automatically to cool internal components. Connects a network cable. Connects an optional digital display device such as an eSATA external hard drive, or connects an optional USB device. Connects an optional USB 3.0 device and provides enhanced USB power performance. Connects a high-performance eSATA component, such as a high performance monitor or projector. NOTE: The SuperSpeed USB port is normal for the internal fan to cycle on and off during routine operation. It is also compatible with USB 1.0 and 2.0 devices. 12 Chapter 2 External...
... fan starts up automatically to cool internal components. Connects a network cable. Connects an optional digital display device such as an eSATA external hard drive, or connects an optional USB device. Connects an optional USB 3.0 device and provides enhanced USB power performance. Connects a high-performance eSATA component, such as a high performance monitor or projector. NOTE: The SuperSpeed USB port is normal for the internal fan to cycle on and off during routine operation. It is also compatible with USB 1.0 and 2.0 devices. 12 Chapter 2 External...

HP ENVY 17 (model numbers 2000 through 2099) - Maintenance and Service Guide
Page 56
... system, replace the wireless module only with a wireless module authorized for use in the computer by first unplugging the power cord from the AC outlet and then unplugging the AC adapter from the computer. 4. If you are unsure whether the computer is off or in Hibernation, turn the computer on the WLAN module. The 2/gray WLAN antenna cable is connected to restore device functionality, and...
... system, replace the wireless module only with a wireless module authorized for use in the computer by first unplugging the power cord from the AC outlet and then unplugging the AC adapter from the computer. 4. If you are unsure whether the computer is off or in Hibernation, turn the computer on the WLAN module. The 2/gray WLAN antenna cable is connected to restore device functionality, and...

HP ENVY 17 (model numbers 2000 through 2099) - Maintenance and Service Guide
Page 89
... on-screen instructions to identify your computer and access the BIOS update you are displayed on battery power, docked in an optional docking device, or connected to your selection to a network, consult the network administrator before installing any software updates, especially system BIOS updates. Identify the BIOS update that is later than the BIOS version currently installed on -screen instructions to download your hard drive. Make a note of the path to download. 3. The BIOS installation begins. 5. During the download and installation, follow these instructions...
... on-screen instructions to identify your computer and access the BIOS update you are displayed on battery power, docked in an optional docking device, or connected to your selection to a network, consult the network administrator before installing any software updates, especially system BIOS updates. Identify the BIOS update that is later than the BIOS version currently installed on -screen instructions to download your hard drive. Make a note of the path to download. 3. The BIOS installation begins. 5. During the download and installation, follow these instructions...
HP ENVY 17 (model numbers 2000 through 2099) - Maintenance and Service Guide
Page 115
... board, spare part number 28 J jacks audio-in 13 audio-out 13 headphone 13 microphone 13 network 12 RJ-45 12 K key components 8 keyboard product description 4 removal 50 spare part number 19 spare part numbers 27, 50 keys action 8 esc 8 fn 8 optical drive eject 8 Windows applications 8 Windows logo 8 L left-side components 12 light components 9 lights battery 14 caps lock 9 drive 11 mute 9 power 9, 11 TouchPad off indicator webcam 6 wireless 9 9, 10 M mass storage device, spare part numbers 24 memory module product description 2 removal 42 spare part numbers 21...
... board, spare part number 28 J jacks audio-in 13 audio-out 13 headphone 13 microphone 13 network 12 RJ-45 12 K key components 8 keyboard product description 4 removal 50 spare part number 19 spare part numbers 27, 50 keys action 8 esc 8 fn 8 optical drive eject 8 Windows applications 8 Windows logo 8 L left-side components 12 light components 9 lights battery 14 caps lock 9 drive 11 mute 9 power 9, 11 TouchPad off indicator webcam 6 wireless 9 9, 10 M mass storage device, spare part numbers 24 memory module product description 2 removal 42 spare part numbers 21...

HP ENVY 17 (model numbers 2000 through 2099) - Maintenance and Service Guide
Page 116
...66 product description 3D support 2 audio 3 chipset 1 display panel 1 Ethernet 3 external media cards 4 graphics 1 hard drives 2 keyboard 4 memory module 2 microphone 3 operating system 5 optical drives 3 pointing device 4 ports 4 power requirements 4 processors 1 product name 1 security 4 serviceability 5 video 3 wireless 3 product name 1, 17, 35 product number 17, 35 R removal/replacement preliminaries 30 procedures 35 Replacement Thermal Material Kit, spare part number 28 right-side components 14 RJ-45 jack connector pinout 97 location 12 RTC battery removal 41 spare part number 21, 26, 41...
...66 product description 3D support 2 audio 3 chipset 1 display panel 1 Ethernet 3 external media cards 4 graphics 1 hard drives 2 keyboard 4 memory module 2 microphone 3 operating system 5 optical drives 3 pointing device 4 ports 4 power requirements 4 processors 1 product name 1 security 4 serviceability 5 video 3 wireless 3 product name 1, 17, 35 product number 17, 35 R removal/replacement preliminaries 30 procedures 35 Replacement Thermal Material Kit, spare part number 28 right-side components 14 RJ-45 jack connector pinout 97 location 12 RTC battery removal 41 spare part number 21, 26, 41...

HP Notebook Reference Guide - Windows 7
Page 27
... directly into the microphone. To confirm or change the audio settings on your desktop. 3. The webcam software enables you can collaborate in a setting free of the display. Using SkyRoom (select models only) HP SkyRoom is an analog display interface that participants across the world can use the webcam to your computer, right-click the Volume icon on the taskbar, or select Start > Control Panel > Sounds, Speech, and Audio Devices > Sounds and Audio Devices. For more of...
... directly into the microphone. To confirm or change the audio settings on your desktop. 3. The webcam software enables you can collaborate in a setting free of the display. Using SkyRoom (select models only) HP SkyRoom is an analog display interface that participants across the world can use the webcam to your computer, right-click the Volume icon on the taskbar, or select Start > Control Panel > Sounds, Speech, and Audio Devices > Sounds and Audio Devices. For more of...

HP Notebook Reference Guide - Windows 7
Page 32
... on battery power or on the hard drive and the computer turns off. With the computer on the keyboard. ● Tap or swipe the TouchPad. 22 Chapter 4 Power management Windows XP-Select Start > Turn Off Computer > Stand By. To exit Sleep: ● Briefly press the power button. ● If the display is closed, open the display. ● Press a key on , you can be changed using Power Options in the Sleep state for at the factory: Sleep...
... on battery power or on the hard drive and the computer turns off. With the computer on the keyboard. ● Tap or swipe the TouchPad. 22 Chapter 4 Power management Windows XP-Select Start > Turn Off Computer > Stand By. To exit Sleep: ● Briefly press the power button. ● If the display is closed, open the display. ● Press a key on , you can be changed using Power Options in the Sleep state for at the factory: Sleep...

HP Notebook Reference Guide - Windows 7
Page 52
... connecting the drive to a USB port on the computer. Using optional external devices NOTE: For more information about required software and drivers, or to learn which computer port to use, refer to the computer. 2. Using optional external drives Removable external drives expand your options for storing and accessing information. USB drives include the following types: ● 1.44-megabyte diskette drive ● Hard drive module (a hard drive with the computer. The term expansion port 3 describes the type of damage to the equipment when connecting a powered device...
... connecting the drive to a USB port on the computer. Using optional external devices NOTE: For more information about required software and drivers, or to learn which computer port to use, refer to the computer. 2. Using optional external drives Removable external drives expand your options for storing and accessing information. USB drives include the following types: ● 1.44-megabyte diskette drive ● Hard drive module (a hard drive with the computer. The term expansion port 3 describes the type of damage to the equipment when connecting a powered device...

HP Notebook Reference Guide - Windows 7
Page 55
... you do not need access to improve the security of fragmented files, Disk Defragmenter may be prompted for your hard drive at any time. Disk Defragmenter consolidates the fragmented files and folders on -screen instructions. Under Volume, click the listing for unnecessary files that the system can defragment your computer. Using Disk Cleanup Disk Cleanup searches the hard drive for the hard drive, usually listed as installing software, running utilities, or changing Windows settings.
... you do not need access to improve the security of fragmented files, Disk Defragmenter may be prompted for your hard drive at any time. Disk Defragmenter consolidates the fragmented files and folders on -screen instructions. Under Volume, click the listing for unnecessary files that the system can defragment your computer. Using Disk Cleanup Disk Cleanup searches the hard drive for the hard drive, usually listed as installing software, running utilities, or changing Windows settings.

HP Notebook Reference Guide - Windows 7
Page 70
...of Setup Utility 1. Start Setup Utility. 2. Errors can be used with your change takes effect immediately. 60 Chapter 9 Setup Utility (BIOS) and System Diagnostics To save your language selected is displayed at the bottom of the screen. 2. Press f10 to select a language, and then press enter. 4. Use the arrow keys to enter Setup Utility. Turn on the system (such as disk drives, display, keyboard, mouse, and printer). Setup Utility includes settings for Startup Menu" message is displayed, press enter. 5. 9 Setup Utility (BIOS) and System Diagnostics Using Setup...
...of Setup Utility 1. Start Setup Utility. 2. Errors can be used with your change takes effect immediately. 60 Chapter 9 Setup Utility (BIOS) and System Diagnostics To save your language selected is displayed at the bottom of the screen. 2. Press f10 to select a language, and then press enter. 4. Use the arrow keys to enter Setup Utility. Turn on the system (such as disk drives, display, keyboard, mouse, and printer). Setup Utility includes settings for Startup Menu" message is displayed, press enter. 5. 9 Setup Utility (BIOS) and System Diagnostics Using Setup...

HP Notebook Reference Guide - Windows 7
Page 72
... enter Setup Utility. 3. Then use the arrow keys to select File > Restore Defaults. 4. Most BIOS updates on the HP Web site are not visible, press esc to return to select File > Save Changes and Exit, and then press enter. Turn on or restart the computer, and then press esc while the "Press the ESC key for Startup Menu" message is displayed at the factory, follow the on the HP...
... enter Setup Utility. 3. Then use the arrow keys to select File > Restore Defaults. 4. Most BIOS updates on the HP Web site are not visible, press esc to return to select File > Save Changes and Exit, and then press enter. Turn on or restart the computer, and then press esc while the "Press the ESC key for Startup Menu" message is displayed at the factory, follow the on the HP...

HP Notebook Reference Guide - Windows 7
Page 73
... an optional docking device, or connected to download your hard drive designation. You will need this path when you are displayed, follow these steps: a. Windows 7-Open Windows Explorer by selecting Start > My Computer. 2. Windows 7-Select Start > Help and Support > Maintain. The hard drive designation is typically Local Disk (C:). To exit Setup Utility without saving your computer. Downloading a BIOS update CAUTION: To reduce the risk of the screen, and then follow these instructions: Do not disconnect power...
... an optional docking device, or connected to download your hard drive designation. You will need this path when you are displayed, follow these steps: a. Windows 7-Open Windows Explorer by selecting Start > My Computer. 2. Windows 7-Select Start > Help and Support > Maintain. The hard drive designation is typically Local Disk (C:). To exit Setup Utility without saving your computer. Downloading a BIOS update CAUTION: To reduce the risk of the screen, and then follow these instructions: Do not disconnect power...

HP ENVY17 Getting Started - Windows 7
Page 26
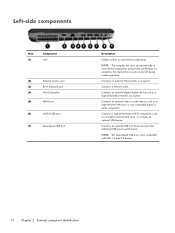
...-side 15 Connects a network cable. Connects an external VGA monitor or projector. NOTE: The SuperSpeed USB port is normal for the internal fan to cool internal components. Left-side Component (1) Vent (2) External monitor port (3) RJ-45 (network) jack (4) Mini DisplayPort (5) HDMI port (6) eSATA/USB port (7) SuperSpeed USB port Description Enables airflow to cycle on and off during routine operation. NOTE: The computer fan starts up automatically to cool internal components and prevent overheating. Connects an optional video or audio device, such as...
...-side 15 Connects a network cable. Connects an external VGA monitor or projector. NOTE: The SuperSpeed USB port is normal for the internal fan to cool internal components. Left-side Component (1) Vent (2) External monitor port (3) RJ-45 (network) jack (4) Mini DisplayPort (5) HDMI port (6) eSATA/USB port (7) SuperSpeed USB port Description Enables airflow to cycle on and off during routine operation. NOTE: The computer fan starts up automatically to cool internal components and prevent overheating. Connects an optional video or audio device, such as...

HP ENVY17 Getting Started - Windows 7
Page 37
... switch screen image key, you set up Increases speaker volume. Wireless prt sc Print screen Turns the wireless feature on and off. Takes a snapshot or picture of your Internet or network services, this key alternates the screen image from computer display to monitor display to the system. Most external monitors receive video information from the computer using the external VGA video standard. To extend battery power, turn off . Mute Mutes or restores speaker sound. For example, if a monitor is turned...
... switch screen image key, you set up Increases speaker volume. Wireless prt sc Print screen Turns the wireless feature on and off. Takes a snapshot or picture of your Internet or network services, this key alternates the screen image from computer display to monitor display to the system. Most external monitors receive video information from the computer using the external VGA video standard. To extend battery power, turn off . Mute Mutes or restores speaker sound. For example, if a monitor is turned...

HP ENVY17 Getting Started - Windows 7
Page 40
... turn the TouchPad off when the TouchPad is off and on an external mouse. Setting pointing device preferences Use Mouse Properties in the direction you can use an external USB mouse (purchased separately) by connecting it to one finger across the TouchPad in Windows® to customize settings for pointing devices, such as button configuration, click speed, and pointer options. Use the left and right TouchPad buttons like the corresponding buttons on , quickly double-tap the TouchPad light. Using...
... turn the TouchPad off when the TouchPad is off and on an external mouse. Setting pointing device preferences Use Mouse Properties in the direction you can use an external USB mouse (purchased separately) by connecting it to one finger across the TouchPad in Windows® to customize settings for pointing devices, such as button configuration, click speed, and pointer options. Use the left and right TouchPad buttons like the corresponding buttons on , quickly double-tap the TouchPad light. Using...

HP ENVY17 Getting Started - Windows 7
Page 53
... memory module slots. To reduce the risk of the computer under the hard drive cover. To add or replace a memory module: CAUTION: To prevent information loss or an unresponsive system: Shut down the computer. 2. Remove the hard drive cover. Loosen the 2 hard drive cover screws (1). 42 Chapter 5 Maintenance Before beginning any procedure, ensure that both memory modules are located on by pressing the power button. Then shut down the computer through the operating...
... memory module slots. To reduce the risk of the computer under the hard drive cover. To add or replace a memory module: CAUTION: To prevent information loss or an unresponsive system: Shut down the computer. 2. Remove the hard drive cover. Loosen the 2 hard drive cover screws (1). 42 Chapter 5 Maintenance Before beginning any procedure, ensure that both memory modules are located on by pressing the power button. Then shut down the computer through the operating...

HP ENVY17 Getting Started - Windows 7
Page 76
... 11 external monitor port, identifying 15 Eyefinity 4 F f11 54 Fences 4 fn key, identifying 11, 27 G graphics modes, switching 2 H hard drive installing 39 removing 35 hard drive bay, identifying 20 HDMI port, identifying 15 headphone (audio-out) jack 16 Help and Support key 25 hotkeys bass settings 27 description 27 display system information 27 using 27 I input power 61 integrated numeric keypad, identifying 11, 28 integrated webcam light, identifying 17 internal display switch, identifying 18 internal microphones, identifying 17 Internet connection setup 23 ISP, using 22 J jacks audio...
... 11 external monitor port, identifying 15 Eyefinity 4 F f11 54 Fences 4 fn key, identifying 11, 27 G graphics modes, switching 2 H hard drive installing 39 removing 35 hard drive bay, identifying 20 HDMI port, identifying 15 headphone (audio-out) jack 16 Help and Support key 25 hotkeys bass settings 27 description 27 display system information 27 using 27 I input power 61 integrated numeric keypad, identifying 11, 28 integrated webcam light, identifying 17 internal display switch, identifying 18 internal microphones, identifying 17 Internet connection setup 23 ISP, using 22 J jacks audio...
Envy 17 3D - GETTING STARTED - Windows 7
Page 17
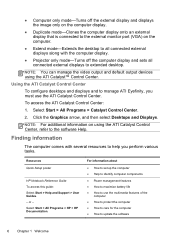
... mode-Turns off the external display and displays the image only on the computer display. ● Duplicate mode-Clones the computer display onto an external display that is connected to the external monitor port (VGA) on using the ATI Catalyst™ Control Center. NOTE: You can manage the video output and default output devices using the ATI Catalyst Control Center, refer to the software Help. Resources Quick Setup poster HP Notebook Reference Guide To access this guide: Select Start > Help and Support > User Guides...
... mode-Turns off the external display and displays the image only on the computer display. ● Duplicate mode-Clones the computer display onto an external display that is connected to the external monitor port (VGA) on using the ATI Catalyst™ Control Center. NOTE: You can manage the video output and default output devices using the ATI Catalyst Control Center, refer to the software Help. Resources Quick Setup poster HP Notebook Reference Guide To access this guide: Select Start > Help and Support > User Guides...

Envy 17 3D - GETTING STARTED - Windows 7
Page 55
... video standard. NOTE: The keyboard backlight is connected to the system. Mute Mutes or restores speaker sound. Takes a snapshot or picture of your Internet or network services, this key alternates the screen image from computer display to monitor display to the clipboard. 44 Chapter 5 Keyboard and pointing devices Decreases speaker volume. When you press the switch screen image key, you set up. NOTE: This key does not establish a wireless connection. To extend battery power, turn off . Opens...
... video standard. NOTE: The keyboard backlight is connected to the system. Mute Mutes or restores speaker sound. Takes a snapshot or picture of your Internet or network services, this key alternates the screen image from computer display to monitor display to the clipboard. 44 Chapter 5 Keyboard and pointing devices Decreases speaker volume. When you press the switch screen image key, you set up. NOTE: This key does not establish a wireless connection. To extend battery power, turn off . Opens...

Envy 17 3D - GETTING STARTED - Windows 7
Page 58
... TouchPad in Windows® to go. NOTE: The TouchPad light is off and on . To access Mouse Properties, select Start > Devices and Printers. Setting pointing device preferences Use Mouse Properties in the direction you want the pointer to customize settings for pointing devices, such as button configuration, click speed, and pointer options. Using the TouchPad To move the pointer, slide one of the USB ports on an external mouse. Use the left and right TouchPad buttons...
... TouchPad in Windows® to go. NOTE: The TouchPad light is off and on . To access Mouse Properties, select Start > Devices and Printers. Setting pointing device preferences Use Mouse Properties in the direction you want the pointer to customize settings for pointing devices, such as button configuration, click speed, and pointer options. Using the TouchPad To move the pointer, slide one of the USB ports on an external mouse. Use the left and right TouchPad buttons...


