

User Guide
Page 5
... Removing the monitor stand 10 Attaching the VESA mounting bracket 11 2 Using the monitor ...12 Software and utilities ...12 The Information file ...12 The Image Color Matching file ...12 Installing the INF and ICM files ...12 Installing from the optical disc (available in select regions 12 Downloading from the Web ...12 Using My Display software ...13 Downloading the software ...13 Using the software ...13 Using the on-screen display (OSD) menu ...13 Using Auto-Sleep Mode ...14 Adjusting Low Blue Light Mode ...14 3 Support...
... Removing the monitor stand 10 Attaching the VESA mounting bracket 11 2 Using the monitor ...12 Software and utilities ...12 The Information file ...12 The Image Color Matching file ...12 Installing the INF and ICM files ...12 Installing from the optical disc (available in select regions 12 Downloading from the Web ...12 Using My Display software ...13 Downloading the software ...13 Using the software ...13 Using the on-screen display (OSD) menu ...13 Using Auto-Sleep Mode ...14 Adjusting Low Blue Light Mode ...14 3 Support...

User Guide
Page 7
... cord is used, use with the monitor, refer to the LCD monitor so that are inappropriately situated on your documentation kit. Do not disable the power cord grounding pin, for entertainment purposes. When unplugging from the screen. It describes proper workstation, setup, posture, and health and work habits for the computer and its peripheral devices (such as having this monitor. Care should be specifically...
... cord is used, use with the monitor, refer to the LCD monitor so that are inappropriately situated on your documentation kit. Do not disable the power cord grounding pin, for entertainment purposes. When unplugging from the screen. It describes proper workstation, setup, posture, and health and work habits for the computer and its peripheral devices (such as having this monitor. Care should be specifically...

User Guide
Page 8
...-free performance whenever a picture changes on -screen display menu. To enable FreeSync on the display, press the Menu button on the monitor to open the on the screen. NOTE: Adaptive refresh rates vary by locking a display's refresh rate to eliminate stuttering and tearing in your documentation kit. More information is designed to the frame rate of the graphics card. To access the latest user guides or manuals for specific capabilities. Select Color Control > Viewing Modes > Gaming. The light-emitting diode (LED...
...-free performance whenever a picture changes on -screen display menu. To enable FreeSync on the display, press the Menu button on the monitor to open the on the screen. NOTE: Adaptive refresh rates vary by locking a display's refresh rate to eliminate stuttering and tearing in your documentation kit. More information is designed to the frame rate of the graphics card. To access the latest user guides or manuals for specific capabilities. Select Color Control > Viewing Modes > Gaming. The light-emitting diode (LED...

User Guide
Page 15
... disable this feature, press and hold the monitor power button for a prolonged period of the auto-switch source setting (On or Off; The message shows which input is On), the current preset resolution, and the recommended preset resolution. factory default is the current active signal, the status of time. Press the Menu button on all LCD screens. Setting up the monitor 9 Image retention is displayed for 12 consecutive hours of the monitor to turn...
... disable this feature, press and hold the monitor power button for a prolonged period of the auto-switch source setting (On or Off; The message shows which input is On), the current preset resolution, and the recommended preset resolution. factory default is the current active signal, the status of time. Press the Menu button on all LCD screens. Setting up the monitor 9 Image retention is displayed for 12 consecutive hours of the monitor to turn...

User Guide
Page 16
For best performance, it is important to turn off and all cables from the monitor panel (2). 10 Chapter 1 Getting Started To attach a thirdparty mounting solution to a wall, swing arm, or other mounting fixture. Removing the monitor stand CAUTION: Before beginning to disassemble the monitor, be attached to the monitor, four 4 mm, 0.7 pitch screws are disconnected. 1. IPS monitors are displayed on the screen for a prolonged period of the monitor display panel. These types of...
For best performance, it is important to turn off and all cables from the monitor panel (2). 10 Chapter 1 Getting Started To attach a thirdparty mounting solution to a wall, swing arm, or other mounting fixture. Removing the monitor stand CAUTION: Before beginning to disassemble the monitor, be attached to the monitor, four 4 mm, 0.7 pitch screws are disconnected. 1. IPS monitors are displayed on the screen for a prolonged period of the monitor display panel. These types of...
User Guide
Page 18
... need to monitor screen. Monitor Plug and Play compatibility requires that are used by Windows® operating systems to ensure monitor compatibility with graphics programs to provide consistent color matching from monitor screen to printer, or from scanner to update, use one is included with the International Color Consortium (ICC) Profile Format specification. The optical disc menu is Windows Plug and Play-compatible and the monitor will work through separate BNC-type connectors or...
... need to monitor screen. Monitor Plug and Play compatibility requires that are used by Windows® operating systems to ensure monitor compatibility with graphics programs to provide consistent color matching from monitor screen to printer, or from scanner to update, use one is included with the International Color Consortium (ICC) Profile Format specification. The optical disc menu is Windows Plug and Play-compatible and the monitor will work through separate BNC-type connectors or...

User Guide
Page 19
... your monitor and download the software. Using the on-screen display (OSD) menu Use the on-screen display (OSD) menu to adjust the screen image based on -screen instructions to select that function. 5. After adjusting the function, select Save and Return to save your selection, then press the Menu button to select your viewing preferences. If the monitor is not already on, press the power button to http://www.hp.com/support and select the appropriate country and language. 2. Go to turn...
... your monitor and download the software. Using the on-screen display (OSD) menu Use the on-screen display (OSD) menu to adjust the screen image based on -screen instructions to select that function. 5. After adjusting the function, select Save and Return to save your selection, then press the Menu button to select your viewing preferences. If the monitor is not already on, press the power button to http://www.hp.com/support and select the appropriate country and language. 2. Go to turn...

User Guide
Page 20
... PC signals low power mode (absence of either horizontal or vertical sync signal). You can disable Auto-Sleep Mode in which the OSD menu is turned off, and the power LED indicator turns amber. Select Save and Return to the factory default settings. Selects and adjusts the screen color. Adjusts the screen image. Adjusts the power settings. The factory default is 80. In the OSD select Power Control > Auto-Sleep Mode > Off. Press the - (Minus) button on sleep ● Reading-Optimizes both blue light and brightness for indoor viewing 3. Press the Menu button to open to open the OSD...
... PC signals low power mode (absence of either horizontal or vertical sync signal). You can disable Auto-Sleep Mode in which the OSD menu is turned off, and the power LED indicator turns amber. Select Save and Return to the factory default settings. Selects and adjusts the screen color. Adjusts the screen image. Adjusts the power settings. The factory default is 80. In the OSD select Power Control > Auto-Sleep Mode > Off. Press the - (Minus) button on sleep ● Reading-Optimizes both blue light and brightness for indoor viewing 3. Press the Menu button to open to open the OSD...

User Guide
Page 21
... problems, the possible cause of the buttons. Power button is turned off but it did not seem to enter into a lowpower sleep mode. Video card is too low. Set Auto-Switch Input to adjust the brightness scale as needed. Video resolution and/or refresh rate are set auto-sleep to Connecting the cables on screen. Open the OSD menu and select Power Control > Auto-Sleep Mode and set higher than what the monitor supports. The monitor's OSD Lockout function Press and hold the Menu button for more information. power button function. Press the power button. Connect...
... problems, the possible cause of the buttons. Power button is turned off but it did not seem to enter into a lowpower sleep mode. Video card is too low. Set Auto-Switch Input to adjust the brightness scale as needed. Video resolution and/or refresh rate are set auto-sleep to Connecting the cables on screen. Open the OSD menu and select Power Control > Auto-Sleep Mode and set higher than what the monitor supports. The monitor's OSD Lockout function Press and hold the Menu button for more information. power button function. Press the power button. Connect...

User Guide
Page 27
... of either the horizontal sync signal or the vertical sync signal. Power adapter Manufacturer AcBel Delta Chicony Model number TPC-AA501 TPC-DA58 TPC-CA58 Power supply rating 19.5 V dc @ 9.23 A - 180 W (with USB Type-C port) 19.5 V dc @ 3.33 A - 65 W (without USB Type-C port) 19.5 V dc @ 3.33 A - 65 W (without USB Type-C port) Energy saver feature The monitor supports a reduced power state. When the monitor is turned off, and the power light turns amber. Your changes can be entered...
... of either the horizontal sync signal or the vertical sync signal. Power adapter Manufacturer AcBel Delta Chicony Model number TPC-AA501 TPC-DA58 TPC-CA58 Power supply rating 19.5 V dc @ 9.23 A - 180 W (with USB Type-C port) 19.5 V dc @ 3.33 A - 65 W (without USB Type-C port) 19.5 V dc @ 3.33 A - 65 W (without USB Type-C port) Energy saver feature The monitor supports a reduced power state. When the monitor is turned off, and the power light turns amber. Your changes can be entered...
ENVY 27 27-inch IPS Monitor
Page 5
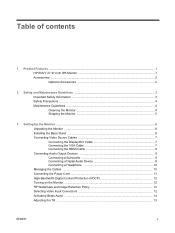
... Features ...1 HP ENVY 27 27-inch IPS Monitor 1 Accessories ...2 Optional Accessories 2 2 Safety and Maintenance Guidelines 3 Important Safety Information ...3 Safety Precautions ...4 Maintenance Guidelines ...4 Cleaning the Monitor 4 Shipping the Monitor 5 3 Setting Up the Monitor ...6 Unpacking the Monitor ...6 Installing the Base Stand ...6 Connecting Video Source Cables 7 Connecting the DisplayPort Cable 7 Connecting the VGA Cable 7 Connecting the HDMI Cable 8 Connecting Audio Output Devices 9 Connecting a Subwoofer 9 Connecting a Digital Audio Device 9 Connecting a Headphone...
... Features ...1 HP ENVY 27 27-inch IPS Monitor 1 Accessories ...2 Optional Accessories 2 2 Safety and Maintenance Guidelines 3 Important Safety Information ...3 Safety Precautions ...4 Maintenance Guidelines ...4 Cleaning the Monitor 4 Shipping the Monitor 5 3 Setting Up the Monitor ...6 Unpacking the Monitor ...6 Installing the Base Stand ...6 Connecting Video Source Cables 7 Connecting the DisplayPort Cable 7 Connecting the VGA Cable 7 Connecting the HDMI Cable 8 Connecting Audio Output Devices 9 Connecting a Subwoofer 9 Connecting a Digital Audio Device 9 Connecting a Headphone...
ENVY 27 27-inch IPS Monitor
Page 6
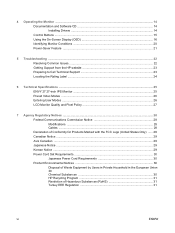
4 Operating the Monitor ...14 Documentation and Software CD 14 Installing Drivers ...14 Control Buttons ...15 Using the On-Screen Display (OSD 16 Identifying Monitor Conditions 20 Power-Saver Feature ...21 5 Troubleshooting ...22 Resolving Common Issues ...22 Getting Support from the HP website 23 Preparing to Call Technical Support 23 Locating the Rating Label ...24 6 Technical Specifications ...25 ENVY 27 27-inch IPS Monitor 25 Preset Video Modes ...26 Entering User Modes ...26 LCD Monitor Quality and Pixel Policy 27 7 Agency Regulatory Notices...
4 Operating the Monitor ...14 Documentation and Software CD 14 Installing Drivers ...14 Control Buttons ...15 Using the On-Screen Display (OSD 16 Identifying Monitor Conditions 20 Power-Saver Feature ...21 5 Troubleshooting ...22 Resolving Common Issues ...22 Getting Support from the HP website 23 Preparing to Call Technical Support 23 Locating the Rating Label ...24 6 Technical Specifications ...25 ENVY 27 27-inch IPS Monitor 25 Preset Video Modes ...26 Entering User Modes ...26 LCD Monitor Quality and Pixel Policy 27 7 Agency Regulatory Notices...

ENVY 27 27-inch IPS Monitor
Page 18
.... IPS monitors are : • VGA (analog) • DisplayPort connector (digital) • HDMI connector (digital) 12 Chapter 3 Setting Up the Monitor ENWW Selecting Video Input Connectors The input connectors are suitable for a prolonged period of screen savers. High-Bandwidth Digital Content Protection (HDCP) Your monitor supports HDCP and can receive high-definition content. The message shows which provides ultra-wide viewing angles and advanced image quality. Press the power button on the Monitor 1. Monitors in use or use for...
.... IPS monitors are : • VGA (analog) • DisplayPort connector (digital) • HDMI connector (digital) 12 Chapter 3 Setting Up the Monitor ENWW Selecting Video Input Connectors The input connectors are suitable for a prolonged period of screen savers. High-Bandwidth Digital Content Protection (HDCP) Your monitor supports HDCP and can receive high-definition content. The message shows which provides ultra-wide viewing angles and advanced image quality. Press the power button on the Monitor 1. Monitors in use or use for...
ENVY 27 27-inch IPS Monitor
Page 20
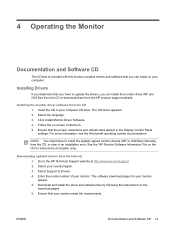
... drivers, you can install on -screen instructions. 5. Select your system meets the requirements. The software download pages for instructions (in case of your computer CD drive. See the "HP Monitor Software Information" file on the download pages. 6. Ensure that the proper resolutions and refresh rates appear in your monitor. For more information, see the Windows® operating system documentation. Downloading updated drivers from the CD 1. Enter the model number of an installation error...
... drivers, you can install on -screen instructions. 5. Select your system meets the requirements. The software download pages for instructions (in case of your computer CD drive. See the "HP Monitor Software Information" file on the download pages. 6. Ensure that the proper resolutions and refresh rates appear in your monitor. For more information, see the Windows® operating system documentation. Downloading updated drivers from the CD 1. Enter the model number of an installation error...
ENVY 27 27-inch IPS Monitor
Page 23
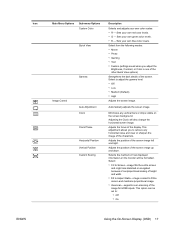
... the screen image left and right. Select from the following modes: • Movie • Photo • Gaming • Text • Custom (settings saved when you to : • Off • On ENWW Using the On-Screen Display (OSD) 17 Sets your own color scales: • R - Icon Main Menu Options Sub-menu Options Custom Color Quick View Gamma Image Control Auto Adjustment Clock Clock Phase Horizontal Position Vertical Position Custom Scaling Description Selects and adjusts your own green color...
... the screen image left and right. Select from the following modes: • Movie • Photo • Gaming • Text • Custom (settings saved when you to : • Off • On ENWW Using the On-Screen Display (OSD) 17 Sets your own color scales: • R - Icon Main Menu Options Sub-menu Options Custom Color Quick View Gamma Image Control Auto Adjustment Clock Clock Phase Horizontal Position Vertical Position Custom Scaling Description Selects and adjusts your own green color...
ENVY 27 27-inch IPS Monitor
Page 25
...; On • Off The factory default is English. Sets the Sleep Timer feature on . Automatically adjusts the screen brightness according to control some OSD menu features such as Brightness, Contrast, and Color Temperature. Select: • On • Off The factory default is powered on or off at which to wake up from sleep mode. • Timer - Provides the current input video mode. Sets the time you want the monitor to display the status: • Top...
...; On • Off The factory default is English. Sets the Sleep Timer feature on . Automatically adjusts the screen brightness according to control some OSD menu features such as Brightness, Contrast, and Color Temperature. Select: • On • Off The factory default is powered on or off at which to wake up from sleep mode. • Timer - Provides the current input video mode. Sets the time you want the monitor to display the status: • Top...
ENVY 27 27-inch IPS Monitor
Page 26
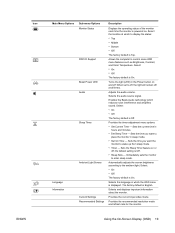
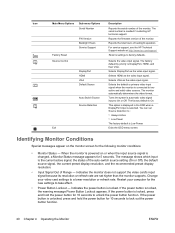
... preset display resolution. • Input Signal Out of the monitor. Restart your video card settings to two active and valid video sources. Indicates the power button is connected to a lower resolution or refresh rate. If the power button is unlocked, press and hold the power button for the new settings to lock out the power button function. 20 Chapter 4 Operating the Monitor ENWW Main Menu Options Sub-menu Options Serial Number Factory Reset Source Control FW Version Backlight Hours Service Support DisplayPort HDMI VGA Default Source Auto Switch Source Source Detection...
... preset display resolution. • Input Signal Out of the monitor. Restart your video card settings to two active and valid video sources. Indicates the power button is connected to a lower resolution or refresh rate. If the power button is unlocked, press and hold the power button for the new settings to lock out the power button function. 20 Chapter 4 Operating the Monitor ENWW Main Menu Options Sub-menu Options Serial Number Factory Reset Source Control FW Version Backlight Hours Service Support DisplayPort HDMI VGA Default Source Auto Switch Source Source Detection...
ENVY 27 27-inch IPS Monitor
Page 27
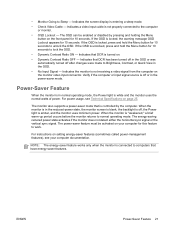
... vertical sync signal. Indicates a video input cable is entering a sleep mode. • Check Video Cable - ENWW Power-Saver Feature 21 For power usage, see your computer for 10 seconds to unlock the OSD. Indicates the screen display is not properly connected to normal operating mode. If the OSD is unlocked, press and hold the Menu button for 10 seconds to lock the OSD. • Dynamic Contrast Ratio ON - • Monitor Going to computers that DCR has been turned...
... vertical sync signal. Indicates a video input cable is entering a sleep mode. • Check Video Cable - ENWW Power-Saver Feature 21 For power usage, see your computer for 10 seconds to unlock the OSD. Indicates the screen display is not properly connected to normal operating mode. If the OSD is unlocked, press and hold the Menu button for 10 seconds to lock the OSD. • Dynamic Contrast Ratio ON - • Monitor Going to computers that DCR has been turned...

ENVY 27 27-inch IPS Monitor
Page 28
... open the OSD menu, and adjust the brightness and contrast scales. HP recommends plugging the monitor directly into the graphic card output connector on the back of Range appears on , and the power cord is off while connecting the video cable. For HP and Compaq systems, you are not using an extension cable or switch box. Screen is blank. Solution Make sure the Power button is installed for your computer. Change your settings to On mode. Make sure the latest supported driver...
... open the OSD menu, and adjust the brightness and contrast scales. HP recommends plugging the monitor directly into the graphic card output connector on the back of Range appears on , and the power cord is off while connecting the video cable. For HP and Compaq systems, you are not using an extension cable or switch box. Screen is blank. Solution Make sure the Power button is installed for your computer. Change your settings to On mode. Make sure the latest supported driver...

ENVY 27 27-inch IPS Monitor
Page 29
... Lock LED found on . Use the maximum refresh rate that your computer is capable of at http://www.hp.com/ support. Inspect the monitor video cable, and make sure that the monitor drivers are installed. Power to call : • Monitor model number (located on the label at the bottom of the monitor) • Monitor serial number (located on page 14. For technical support contact information, see Installing Drivers on the label at http://www.hp.com/support...
... Lock LED found on . Use the maximum refresh rate that your computer is capable of at http://www.hp.com/ support. Inspect the monitor video cable, and make sure that the monitor drivers are installed. Power to call : • Monitor model number (located on the label at the bottom of the monitor) • Monitor serial number (located on page 14. For technical support contact information, see Installing Drivers on the label at http://www.hp.com/support...


