
Setup Poster
Page 1
Quick Setup HP EliteDisplay E221c Webcam LED Backlit Monitor Optimal Resolution: 1920 x 1080 @ 60 Hz 1 2 VGA DisplayPort DVI-D OR OR 3 USB 4 5 6 7 3 8 731682-B21 Copyright © 2013 Hewlett-Packard Development Company, L.P. Printed in xxxxx First Edition April 2013 The information contained herein is subject to change without notice.
Quick Setup HP EliteDisplay E221c Webcam LED Backlit Monitor Optimal Resolution: 1920 x 1080 @ 60 Hz 1 2 VGA DisplayPort DVI-D OR OR 3 USB 4 5 6 7 3 8 731682-B21 Copyright © 2013 Hewlett-Packard Development Company, L.P. Printed in xxxxx First Edition April 2013 The information contained herein is subject to change without notice.

User Guide
Page 5
... ...1 HP LCD Monitor ...1 2 Setting Up the Monitor ...3 Unfolding the Monitor ...3 Rear Components ...4 Connecting the Cables ...5 Front Panel Controls ...9 Adjusting the Monitor ...10 Turning on the Monitor ...13 Connecting USB Devices ...14 Removing the Monitor Stand ...15 Mounting the Monitor ...16 Locating the Rating Labels ...17 Installing a Cable Lock ...17 3 Using the Webcam ...18 Installing YouCam from the Disc ...18 Capturing Webcam Video and Snapshots 18 Having a Video Chat or Making Conference Calls 18 4 Using HP MyRoom ...20 Installing HP MyRoom from the Disc 20 Downloading HP...
... ...1 HP LCD Monitor ...1 2 Setting Up the Monitor ...3 Unfolding the Monitor ...3 Rear Components ...4 Connecting the Cables ...5 Front Panel Controls ...9 Adjusting the Monitor ...10 Turning on the Monitor ...13 Connecting USB Devices ...14 Removing the Monitor Stand ...15 Mounting the Monitor ...16 Locating the Rating Labels ...17 Installing a Cable Lock ...17 3 Using the Webcam ...18 Installing YouCam from the Disc ...18 Capturing Webcam Video and Snapshots 18 Having a Video Chat or Making Conference Calls 18 4 Using HP MyRoom ...20 Installing HP MyRoom from the Disc 20 Downloading HP...
User Guide
Page 7
... dual microphones and webcam cover for privacy ● Tilt capability ● Pivot capability to rotate display to portrait ● Swivel and height adjustment capabilities ● Removable stand for flexible monitor panel mounting solutions ● Video signal input to support VGA analog (cables are provided with select models) ● Video signal input to support DVI digital (cables are provided with select models) ● Video signal input to support DisplayPort digital (cables are provided with select models) ● USB 2.0 hub with one upstream port (connects to the computer...
... dual microphones and webcam cover for privacy ● Tilt capability ● Pivot capability to rotate display to portrait ● Swivel and height adjustment capabilities ● Removable stand for flexible monitor panel mounting solutions ● Video signal input to support VGA analog (cables are provided with select models) ● Video signal input to support DVI digital (cables are provided with select models) ● Video signal input to support DisplayPort digital (cables are provided with select models) ● USB 2.0 hub with one upstream port (connects to the computer...
User Guide
Page 9
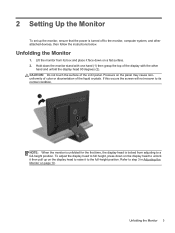
... attached devices, then follow the instructions below. To adjust the display head to full height, press down on the display head to unlock it then pull up the monitor, ensure that the power is locked from its normal condition. 2 Setting Up the Monitor To set up on a flat surface. 2. If this occurs the screen will not recover to the monitor, computer system, and other hand...
... attached devices, then follow the instructions below. To adjust the display head to full height, press down on the display head to unlock it then pull up the monitor, ensure that the power is locked from its normal condition. 2 Setting Up the Monitor To set up on a flat surface. 2. If this occurs the screen will not recover to the monitor, computer system, and other hand...

User Guide
Page 10
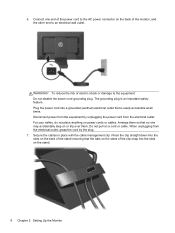
... power cord to the monitor. Connects the audio cable from the computer to the monitor. Connects external speakers or a headphone. Connects the DVI-D cable to a host USB port/hub. 4 Chapter 2 Setting Up the Monitor Connects the USB hub cable to the monitor's USB hub connector and to the monitor. Connects the VGA cable to the monitor. Connects the DisplayPort cable to the monitor. Rear Components Component 1 USB 2.0 Downstream Connectors (2) 2 AC Power Connector 3 DisplayPort 4 VGA 5 DVI-D 6 Audio-in 7 Audio-out 8 USB 2.0 Upstream Connector Function Connects...
... power cord to the monitor. Connects the audio cable from the computer to the monitor. Connects external speakers or a headphone. Connects the DVI-D cable to a host USB port/hub. 4 Chapter 2 Setting Up the Monitor Connects the USB hub cable to the monitor's USB hub connector and to the monitor. Connects the VGA cable to the monitor. Connects the DisplayPort cable to the monitor. Rear Components Component 1 USB 2.0 Downstream Connectors (2) 2 AC Power Connector 3 DisplayPort 4 VGA 5 DVI-D 6 Audio-in 7 Audio-out 8 USB 2.0 Upstream Connector Function Connects...

User Guide
Page 11
..., DVI, or VGA video cable between the PC and the monitor. NOTE: The monitor is determined by pressing the Menu button. ● For analog operation, connect the VGA signal cable to the VGA connector on your configuration, connect either analog or digital input. The monitor will automatically determine which inputs have valid video signals. Connecting the Cables 5 The inputs can be selected by pressing the Input button on the front panel or through the On-Screen Display (OSD) feature by the video cable used. The video mode...
..., DVI, or VGA video cable between the PC and the monitor. NOTE: The monitor is determined by pressing the Menu button. ● For analog operation, connect the VGA signal cable to the VGA connector on your configuration, connect either analog or digital input. The monitor will automatically determine which inputs have valid video signals. Connecting the Cables 5 The inputs can be selected by pressing the Input button on the front panel or through the On-Screen Display (OSD) feature by the video cable used. The video mode...
User Guide
Page 14
... cable management clip. 6. Plug the power cord into the slots on the back of the stand ensuring that no one end of electric shock or damage to the AC power connector on or trip over them so that the tabs on the sides of the monitor, and the other end to an electrical wall outlet. Do not pull on power cords...
... cable management clip. 6. Plug the power cord into the slots on the back of the stand ensuring that no one end of electric shock or damage to the AC power connector on or trip over them so that the tabs on the sides of the monitor, and the other end to an electrical wall outlet. Do not pull on power cords...
User Guide
Page 15
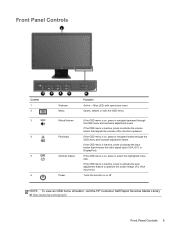
... inactive, press to navigate backward through the OSD menu and increase adjustment levels. If the OSD menu is on, press to optimize the screen image. (For VGA input only.) Turns the monitor on , press to activate the input button that adjusts the volume of the monitor's speakers. If the OSD menu is inactive, press to activate the auto adjustment feature to select the highlighted menu item. Front Panel Controls Control 1 2 3 4 5 6 Webcam Menu Minus/Volume Plus/Input OK/Auto Adjust Power Function Active - Blue LED;
... inactive, press to navigate backward through the OSD menu and increase adjustment levels. If the OSD menu is on, press to optimize the screen image. (For VGA input only.) Turns the monitor on , press to activate the input button that adjusts the volume of the monitor's speakers. If the OSD menu is inactive, press to activate the auto adjustment feature to select the highlighted menu item. Front Panel Controls Control 1 2 3 4 5 6 Webcam Menu Minus/Volume Plus/Input OK/Auto Adjust Power Function Active - Blue LED;
User Guide
Page 17
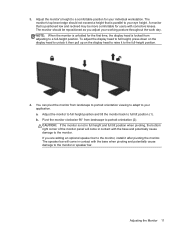
... display head is positioned low and reclined may be repositioned as you are adding an optional speaker bar to full tilt position (1). Adjust the monitor to full height position and tilt the monitor back to the monitor, install it to portrait orientation (2). The speaker bar will come in contact with the base when pivoting and potentially cause damage to your working posture throughout the work day. Adjusting the Monitor...
... display head is positioned low and reclined may be repositioned as you are adding an optional speaker bar to full tilt position (1). Adjust the monitor to full height position and tilt the monitor back to the monitor, install it to portrait orientation (2). The speaker bar will come in contact with the base when pivoting and potentially cause damage to your working posture throughout the work day. Adjusting the Monitor...

User Guide
Page 18
To rotate the OSD menu, access the OSD menu by pressing the Menu button on the software and documentation disc. The position of the OSD menu can install the HP Display Assistant software included on the front panel, select OSD Control from the menu, then select Rotate OSD. 12 Chapter 2 Setting Up the Monitor NOTE: To view information on the screen in portrait mode, you can also be rotated to portrait mode.
To rotate the OSD menu, access the OSD menu by pressing the Menu button on the software and documentation disc. The position of the OSD menu can install the HP Display Assistant software included on the front panel, select OSD Control from the menu, then select Rotate OSD. 12 Chapter 2 Setting Up the Monitor NOTE: To view information on the screen in portrait mode, you can also be rotated to portrait mode.

User Guide
Page 19
... OSD menu. factory default is On), the default source signal (factory default is a condition that input for 10 seconds. Turning on the Monitor 1. The monitor automatically scans the signal inputs for an active input and uses that may be enabled. Turning on the Monitor 13 You can disable the power LED in the following order: DisplayPort, DVI, then VGA. NOTE: You can change the default source in image damage on . NOTE: If pressing the power button has no effect, the Power Button...
... OSD menu. factory default is On), the default source signal (factory default is a condition that input for 10 seconds. Turning on the Monitor 1. The monitor automatically scans the signal inputs for an active input and uses that may be enabled. Turning on the Monitor 13 You can disable the power LED in the following order: DisplayPort, DVI, then VGA. NOTE: You can change the default source in image damage on . NOTE: If pressing the power button has no effect, the Power Button...
User Guide
Page 21
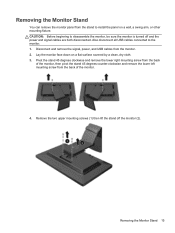
... monitor panel from the stand to install the panel on a flat surface covered by a clean, dry cloth. 3. Lay the monitor face down on a wall, a swing arm, or other mounting fixture. Pivot the stand 45 degrees clockwise and remove the lower right mounting screw from the back of the monitor, then pivot the stand 45 degrees counter-clockwise and remove the lower left mounting screw from the monitor. 2. Also disconnect all USB cables connected to disassemble...
... monitor panel from the stand to install the panel on a flat surface covered by a clean, dry cloth. 3. Lay the monitor face down on a wall, a swing arm, or other mounting fixture. Pivot the stand 45 degrees clockwise and remove the lower right mounting screw from the back of the monitor, then pivot the stand 45 degrees counter-clockwise and remove the lower left mounting screw from the monitor. 2. Also disconnect all USB cables connected to disassemble...

User Guide
Page 22
... the VESA standard and is important to use the power and video cables provided with the mounting fixture to ensure that the monitor is intended to Removing the Monitor Stand on the monitor. To attach a third-party mounting solution to the monitor panel. 16 Chapter 2 Setting Up the Monitor Mounting the Monitor The monitor panel can be used because they may damage the monitor. Refer to be supported by UL or CSA Listed wall mount...
... the VESA standard and is important to use the power and video cables provided with the mounting fixture to ensure that the monitor is intended to Removing the Monitor Stand on the monitor. To attach a third-party mounting solution to the monitor panel. 16 Chapter 2 Setting Up the Monitor Mounting the Monitor The monitor panel can be used because they may damage the monitor. Refer to be supported by UL or CSA Listed wall mount...

User Guide
Page 23
Installing a Cable Lock You can secure the monitor to a fixed object with an optional cable lock available from HP. Locating the Rating Labels 17 You may need these numbers when contacting HP about the monitor model. The rating labels are located on the monitor provide the spare part number, product number, and serial number. Locating the Rating Labels The rating labels on the rear panel of the monitor display head.
Installing a Cable Lock You can secure the monitor to a fixed object with an optional cable lock available from HP. Locating the Rating Labels 17 You may need these numbers when contacting HP about the monitor model. The rating labels are located on the monitor provide the spare part number, product number, and serial number. Locating the Rating Labels The rating labels on the rear panel of the monitor display head.

User Guide
Page 24
... required for recording sound with Windows Live Messenger or other compatible software program. ● Import live video chats with the array microphone is about .5 meters (2 feet) away from the provided disc: 1. Having a Video Chat or Making Conference Calls To set up a video chat, you must have a connection to the Internet, and ISP, and software that enables you to view an instructional video. Use your computer...
... required for recording sound with Windows Live Messenger or other compatible software program. ● Import live video chats with the array microphone is about .5 meters (2 feet) away from the provided disc: 1. Having a Video Chat or Making Conference Calls To set up a video chat, you must have a connection to the Internet, and ISP, and software that enables you to view an instructional video. Use your computer...
User Guide
Page 26
... the question mark button and select Documentation for detailed instructions. 20 Chapter 4 Using HP MyRoom Go to run the setup file. 3. Insert the disc that came with useful tools. Begin using HP MyRoom after the software installation is your name, e-mail address, and set a password. 3. Select language of the screen. Click Go if changing language. 3. Enter your online meeting room. Click Download Now. 4. 4 Using HP MyRoom HP MyRoom is complete...
... the question mark button and select Documentation for detailed instructions. 20 Chapter 4 Using HP MyRoom Go to run the setup file. 3. Insert the disc that came with useful tools. Begin using HP MyRoom after the software installation is your name, e-mail address, and set a password. 3. Select language of the screen. Click Go if changing language. 3. Enter your online meeting room. Click Download Now. 4. 4 Using HP MyRoom HP MyRoom is complete...

User Guide
Page 27
... a particular language, it is available in English. ● E-mail support ● Find support telephone numbers ● Locate an HP service center Reference Guides 21 5 Finding More Information Reference Guides Refer to the HP LCD Monitors Reference Guide included on the disc with your monitor for additional information on: ● Optimizing monitor performance ● Safety and maintenance guidelines ● Installing software from the disc ● Using the OSD menu ● Downloading software from the...
... a particular language, it is available in English. ● E-mail support ● Find support telephone numbers ● Locate an HP service center Reference Guides 21 5 Finding More Information Reference Guides Refer to the HP LCD Monitors Reference Guide included on the disc with your monitor for additional information on: ● Optimizing monitor performance ● Safety and maintenance guidelines ● Installing software from the disc ● Using the OSD menu ● Downloading software from the...
User Guide
Page 28
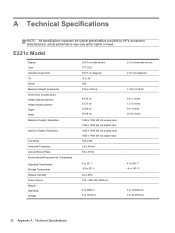
E221c Model Display Type Viewable Image Size Tilt Swivel Maximum Weight (Unpacked) Dimensions (include base) Height (highest position) Height (lowest position) Depth Width Maximum Graphic Resolution Optimum Graphic Resolution Text Mode Horizontal Frequency Vertical Refresh Rate Environmental Requirements Temperature Operating Temperature Storage Temperature Relative Humidity Power Source Altitude: Operating Storage 54.61 cm wide screen TFT LCD 54.61 cm diagonal -5 to 30° 360° 5.30 ± 0.25 kg 46.00 cm 33.37 cm...
E221c Model Display Type Viewable Image Size Tilt Swivel Maximum Weight (Unpacked) Dimensions (include base) Height (highest position) Height (lowest position) Depth Width Maximum Graphic Resolution Optimum Graphic Resolution Text Mode Horizontal Frequency Vertical Refresh Rate Environmental Requirements Temperature Operating Temperature Storage Temperature Relative Humidity Power Source Altitude: Operating Storage 54.61 cm wide screen TFT LCD 54.61 cm diagonal -5 to 30° 360° 5.30 ± 0.25 kg 46.00 cm 33.37 cm...
User Guide
Page 29
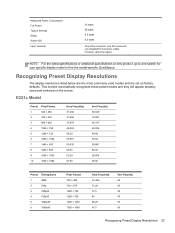
... display resolutions listed below are the most commonly used modes and are set as factory defaults. This monitor automatically recognizes these preset modes and they will appear properly sized and centered on this product, go to and search for your specific display model to find the model-specific QuickSpecs. one DVI connector; Measured Power Consumption: Full Power Typical Settings Sleep Switch Off Input Terminal 33 watts 29 watts 0.5 watts 0.5 watts One VGA connector; one DisplayPort connector (cable...
... display resolutions listed below are the most commonly used modes and are set as factory defaults. This monitor automatically recognizes these preset modes and they will appear properly sized and centered on this product, go to and search for your specific display model to find the model-specific QuickSpecs. one DVI connector; Measured Power Consumption: Full Power Typical Settings Sleep Switch Off Input Terminal 33 watts 29 watts 0.5 watts 0.5 watts One VGA connector; one DisplayPort connector (cable...

User Guide
Page 30
... the factory preset modes, there are not using the on setting energy saver features (sometimes called power management features). Refer to enter into if the monitor detects the absence of power. Energy Saver Feature The monitors support a reduced power state. Entering User Modes The video controller signal may need to readjust the parameters of these modes and saved in the monitor's sleep timer OSD menu, you may occasionally call for instructions on -screen display. Your changes...
... the factory preset modes, there are not using the on setting energy saver features (sometimes called power management features). Refer to enter into if the monitor detects the absence of power. Energy Saver Feature The monitors support a reduced power state. Entering User Modes The video controller signal may need to readjust the parameters of these modes and saved in the monitor's sleep timer OSD menu, you may occasionally call for instructions on -screen display. Your changes...


