
User Guide
Page 5
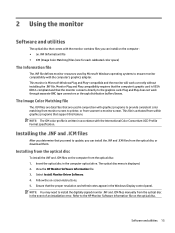
... monitor stand ...12 Mounting the display head ...12 Installing a security cable ...14 2 Using the monitor ...15 Software and utilities ...15 The Information file ...15 The Image Color Matching file ...15 Installing the .INF and .ICM files ...15 Installing from the optical disc ...15 Downloading from the Web ...16 Using the On-Screen Display (OSD) menu ...17 Assigning the Function buttons ...18 Using Auto-Sleep Mode ...19 3 Support and troubleshooting ...20 Solving common problems ...20 Using the auto-adjustment function (analog input 21 Optimizing image...
... monitor stand ...12 Mounting the display head ...12 Installing a security cable ...14 2 Using the monitor ...15 Software and utilities ...15 The Information file ...15 The Image Color Matching file ...15 Installing the .INF and .ICM files ...15 Installing from the optical disc ...15 Downloading from the Web ...16 Using the On-Screen Display (OSD) menu ...17 Assigning the Function buttons ...18 Using Auto-Sleep Mode ...19 3 Support and troubleshooting ...20 Solving common problems ...20 Using the auto-adjustment function (analog input 21 Optimizing image...
User Guide
Page 6
... guidelines ...25 Cleaning the monitor ...25 Shipping the monitor ...25 Appendix A Technical specifications ...26 50.8 cm/20-inch model ...26 54.61 cm/21.5-inch model ...27 58 cm/23-inch model ...27 60.45 cm/23.8-inch model ...28 60.45 cm/23.8-inch QHD model ...28 61 cm/24-inch model ...29 68.47 cm/27-inch QHD model ...29 Preset display resolutions ...30 50.8 cm/20-inch model ...30...
... guidelines ...25 Cleaning the monitor ...25 Shipping the monitor ...25 Appendix A Technical specifications ...26 50.8 cm/20-inch model ...26 54.61 cm/21.5-inch model ...27 58 cm/23-inch model ...27 60.45 cm/23.8-inch model ...28 60.45 cm/23.8-inch QHD model ...28 61 cm/24-inch model ...29 68.47 cm/27-inch QHD model ...29 Preset display resolutions ...30 50.8 cm/20-inch model ...30...
User Guide
Page 7
... rating (AMPS or A) for each device. To reduce the risk of the cord. It describes proper workstation, setup, posture, and health and work habits for computer users, and provides important electrical and mechanical safety information. the power strips must be specifically labeled as having this monitor. LCD monitors that are inappropriately situated on the power label to avoid interference from surrounding light...
... rating (AMPS or A) for each device. To reduce the risk of the cord. It describes proper workstation, setup, posture, and health and work habits for computer users, and provides important electrical and mechanical safety information. the power strips must be specifically labeled as having this monitor. LCD monitors that are inappropriately situated on the power label to avoid interference from surrounding light...
User Guide
Page 8
... to connect the monitor's USB hub to portrait mode ● Swivel and height adjustment capabilities ● Removable stand for flexible display head mounting solutions ● DisplayPort and VGA video inputs (cables provided) ● One HDMI (High-Definition Multimedia Interface) video input (cable not provided) ● USB 2.0 hub with 1920 x 1200 resolution, plus full-screen support for lower resolutions; includes custom scaling for maximum image size while preserving original aspect ratio ● Nonglare panel with an LED backlight ● Wide viewing...
... to connect the monitor's USB hub to portrait mode ● Swivel and height adjustment capabilities ● Removable stand for flexible display head mounting solutions ● DisplayPort and VGA video inputs (cables provided) ● One HDMI (High-Definition Multimedia Interface) video input (cable not provided) ● USB 2.0 hub with 1920 x 1200 resolution, plus full-screen support for lower resolutions; includes custom scaling for maximum image size while preserving original aspect ratio ● Nonglare panel with an LED backlight ● Wide viewing...
User Guide
Page 9
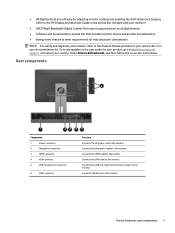
...the monitor. Connects USB devices to the monitor. Rear components Component 1 Power connector 2 DisplayPort connector 3 HDMI connector 4 VGA connector 5 USB 2.0 upstream connector 6 USB connectors Function Connects the AC power cord to the monitor. Product features and components 3 Connects the HDMI cable to the monitor. To locate updates to the user guide for reduced power consumption NOTE: For safety and regulatory information, refer to the Product Notices provided on -screen instructions. ● HP Display Assistant software for adjusting monitor settings...
...the monitor. Connects USB devices to the monitor. Rear components Component 1 Power connector 2 DisplayPort connector 3 HDMI connector 4 VGA connector 5 USB 2.0 upstream connector 6 USB connectors Function Connects the AC power cord to the monitor. Product features and components 3 Connects the HDMI cable to the monitor. To locate updates to the user guide for reduced power consumption NOTE: For safety and regulatory information, refer to the Product Notices provided on -screen instructions. ● HP Display Assistant software for adjusting monitor settings...
User Guide
Page 11
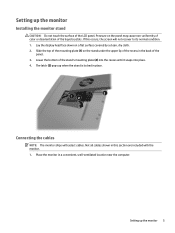
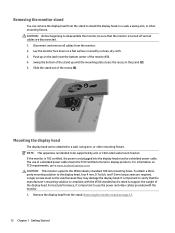
... a flat surface covered by a clean, dry cloth. 2. Lower the bottom of the liquid crystals. Connecting the cables NOTE: The monitor ships with the monitor. 1. The latch (3) pops up when the stand is locked in the back of the recess in place. Setting up the monitor 5 Lay the display head face down on the panel may cause non-uniformity of color or disorientation of the stand's mounting...
... a flat surface covered by a clean, dry cloth. 2. Lower the bottom of the liquid crystals. Connecting the cables NOTE: The monitor ships with the monitor. 1. The latch (3) pops up when the stand is locked in the back of the recess in place. Setting up the monitor 5 Lay the display head face down on the panel may cause non-uniformity of color or disorientation of the stand's mounting...
User Guide
Page 16
... OSD menu, access the OSD menu by pressing the Menu button on the software and documentation optical disc. Adjust the monitor's height to your eye height. A monitor that is not in portrait mode, you adjust your individual workstation. CAUTION: If the monitor is parallel to the monitor. NOTE: To view information on the screen in full-height and full-tilt position when pivoting, the bottom right corner of the OSD menu can install the HP Display...
... OSD menu, access the OSD menu by pressing the Menu button on the software and documentation optical disc. Adjust the monitor's height to your eye height. A monitor that is not in portrait mode, you adjust your individual workstation. CAUTION: If the monitor is parallel to the monitor. NOTE: To view information on the screen in full-height and full-tilt position when pivoting, the bottom right corner of the OSD menu can install the HP Display...
User Guide
Page 17
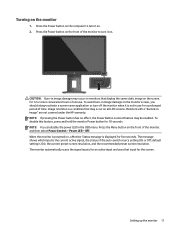
... preset screen resolution. Press the Power button on . Image retention is displayed for the screen. Monitors with a "burned-in the OSD menu. Press the Menu button on all LCD screens. The monitor automatically scans the signal inputs for an active input and uses that input for five seconds. NOTE: If pressing the Power button has no effect, the Power Button Lockout feature may occur on the front of the auto-switch source setting (On or Off; Turning on . 2. To disable...
... preset screen resolution. Press the Power button on . Image retention is displayed for the screen. Monitors with a "burned-in the OSD menu. Press the Menu button on all LCD screens. The monitor automatically scans the signal inputs for an active input and uses that input for five seconds. NOTE: If pressing the Power button has no effect, the Power Button Lockout feature may occur on the front of the auto-switch source setting (On or Off; Turning on . 2. To disable...
User Guide
Page 18
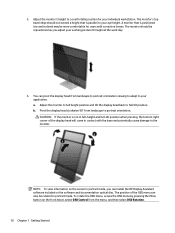
... to disassemble the monitor, be supported by a clean, dry cloth. 3. If the monitor is turned off and all cables from the stand to verify that the monitor is TCO certified, the power cord plugged into the display head must not be a shielded power cable. It is important to install the display head on a flat surface covered by a UL or CSA Listed wall-mount bracket. Removing the monitor stand on TCO requirements, go to use of...
... to disassemble the monitor, be supported by a clean, dry cloth. 3. If the monitor is turned off and all cables from the stand to verify that the monitor is TCO certified, the power cord plugged into the display head must not be a shielded power cable. It is important to install the display head on a flat surface covered by a UL or CSA Listed wall-mount bracket. Removing the monitor stand on TCO requirements, go to use of...
User Guide
Page 21
... work through separate BNC type connectors or through distribution buffers/boxes. Installing the .INF and .ICM files After you determine that are used by Microsoft Windows operating systems to ensure monitor compatibility with the International Color Consortium (ICC) Profile Format specification. NOTE: You may need to update, you can install the .INF and .ICM files from scanner to the HP Monitor Software Information file on -screen instructions...
... work through separate BNC type connectors or through distribution buffers/boxes. Installing the .INF and .ICM files After you determine that are used by Microsoft Windows operating systems to ensure monitor compatibility with the International Color Consortium (ICC) Profile Format specification. NOTE: You may need to update, you can install the .INF and .ICM files from scanner to the HP Monitor Software Information file on -screen instructions...
User Guide
Page 22
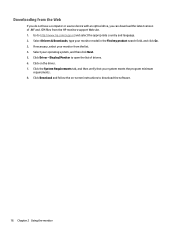
... or source device with an optical drive, you can download the latest version of drivers. 6. Go to download the software. 16 Chapter 2 Using the monitor Click Download and follow the on the driver. 7. Display/Monitor to open the list of .INF and .ICM files from the HP monitors support Web site. 1. Click on -screen instructions to http://www.hp.com/support and select the appropriate country and language. 2. Select Drivers & Downloads, type...
... or source device with an optical drive, you can download the latest version of drivers. 6. Go to download the software. 16 Chapter 2 Using the monitor Click Download and follow the on the driver. 7. Display/Monitor to open the list of .INF and .ICM files from the HP monitors support Web site. 1. Click on -screen instructions to http://www.hp.com/support and select the appropriate country and language. 2. Select Drivers & Downloads, type...
User Guide
Page 23
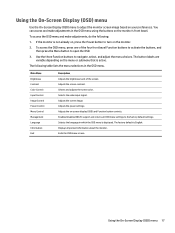
... -screen display (OSD) and Function button controls. Selects and adjusts the screen color. Adjusts the power settings. Adjusts the on the menu or submenu that is not already on, press the Power button to turn on the monitor's front bezel. The factory default is displayed. Selects the language in the OSD menu. Adjusts the screen contrast. Using the On-Screen Display (OSD) menu 17 Displays important information about the monitor. Selects the video input signal. Using the On-Screen Display (OSD) menu Use the On-Screen Display (OSD) menu to the factory default settings. If...
... -screen display (OSD) and Function button controls. Selects and adjusts the screen color. Adjusts the power settings. Adjusts the on the menu or submenu that is not already on, press the Power button to turn on the monitor's front bezel. The factory default is displayed. Selects the language in the OSD menu. Adjusts the screen contrast. Using the On-Screen Display (OSD) menu 17 Displays important information about the monitor. Selects the video input signal. Using the On-Screen Display (OSD) menu Use the On-Screen Display (OSD) menu to the factory default settings. If...

User Guide
Page 25
... the Menu button to the monitor (for the monitor. You can disable Auto-Sleep Mode in this reduced power state (sleep mode), the monitor screen is blanked, the backlight is enabled (enabled by default), the monitor will wake from the sleep mode when the host PC sends an active signal to open the OSD. In the OSD menu select Power Control > AutoSleep Mode > Off. Press one of either horizontal or vertical sync signal). Using Auto-Sleep Mode 19 Using Auto-Sleep Mode The monitor supports an OSD (On-Screen Display) menu option called Auto-Sleep Mode that...
... the Menu button to the monitor (for the monitor. You can disable Auto-Sleep Mode in this reduced power state (sleep mode), the monitor screen is blanked, the backlight is enabled (enabled by default), the monitor will wake from the sleep mode when the host PC sends an active signal to open the OSD. In the OSD menu select Power Control > AutoSleep Mode > Off. Press one of either horizontal or vertical sync signal). Using Auto-Sleep Mode 19 Using Auto-Sleep Mode The monitor supports an OSD (On-Screen Display) menu option called Auto-Sleep Mode that...
User Guide
Page 26
...to On. Connect the appropriate video signal cable between the computer and monitor. Video resolution and/or refresh rate are set auto-sleep to exit sleep mode. OSD Lockout is in sleep mode. the Power Button Lockout function. 20 Chapter 3 Support and troubleshooting Problem Possible Cause Solution Screen is blank or video is improperly connected. Press the front bezel Power button. Video cable is flashing. See Connecting the cables on page 5 for more information. Open the OSD menu and select the Input Control menu. Check Video Cable is displayed. Input Signal Out...
...to On. Connect the appropriate video signal cable between the computer and monitor. Video resolution and/or refresh rate are set auto-sleep to exit sleep mode. OSD Lockout is in sleep mode. the Power Button Lockout function. 20 Chapter 3 Support and troubleshooting Problem Possible Cause Solution Screen is blank or video is improperly connected. Press the front bezel Power button. Video cable is flashing. See Connecting the cables on page 5 for more information. Open the OSD menu and select the Input Control menu. Check Video Cable is displayed. Input Signal Out...
User Guide
Page 27
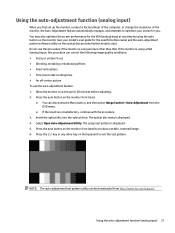
... time by using the auto button on the monitor (see your screen for you first set up for the specific button name) and the auto-adjustment pattern software utility on the monitor front bezel. ● You can also press the Menu button, and then select Image Control > Auto-Adjustment from http://www.hp.com/support. Press the auto button on the keyboard to optimize your model's user guide for 20 minutes before adjusting. 2. Using the auto-adjustment function (analog input) 21 Allow...
... time by using the auto button on the monitor (see your screen for you first set up for the specific button name) and the auto-adjustment pattern software utility on the monitor front bezel. ● You can also press the Menu button, and then select Image Control > Auto-Adjustment from http://www.hp.com/support. Press the auto button on the keyboard to optimize your model's user guide for 20 minutes before adjusting. 2. Using the auto-adjustment function (analog input) 21 Allow...
User Guide
Page 28
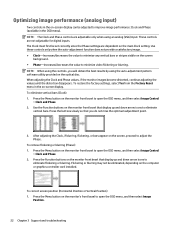
... analog (VGA) input. Press the Menu button on the optical disc. NOTE: The Clock and Phase controls are not adjustable for digital inputs. These controls are adjustable only when using the auto-adjustment pattern software utility provided on the monitor's front bezel to open the OSD menu, and then select Image Control > Clock and Phase. 2. To restore the factory settings, select Yes from the Factory Reset menu in the on the main Clock setting. To correct screen position (Horizontal Position or Vertical Position...
... analog (VGA) input. Press the Menu button on the optical disc. NOTE: The Clock and Phase controls are not adjustable for digital inputs. These controls are adjustable only when using the auto-adjustment pattern software utility provided on the monitor's front bezel to open the OSD menu, and then select Image Control > Clock and Phase. 2. To restore the factory settings, select Yes from the Factory Reset menu in the on the main Clock setting. To correct screen position (Horizontal Position or Vertical Position...
User Guide
Page 29
... Function buttons on , displaying an active signal, and the OSD is available in this section, you can contact support. You can : ● Chat online with an HP technician NOTE: When support chat is not available in a particular language, it is not active. NOTE: The monitor user guide, reference material, and drivers are using the troubleshooting tips in English. ● Find support telephone numbers ● Locate an HP service center...
... Function buttons on , displaying an active signal, and the OSD is available in this section, you can contact support. You can : ● Chat online with an HP technician NOTE: When support chat is not available in a particular language, it is not active. NOTE: The monitor user guide, reference material, and drivers are using the troubleshooting tips in English. ● Find support telephone numbers ● Locate an HP service center...
User Guide
Page 31
... a power source and connection appropriate for ventilation. Cleaning the monitor 1. It may damage the monitor. Shipping the monitor Keep the original packing box in use . Never push objects of the monitor. ● Turn the monitor off when not in the operating instructions. For more difficult cleaning situations, use the damp cloth to service this monitor, as benzene, thinner, or any kind into cabinet slots or other openings. ● Keep...
... a power source and connection appropriate for ventilation. Cleaning the monitor 1. It may damage the monitor. Shipping the monitor Keep the original packing box in use . Never push objects of the monitor. ● Turn the monitor off when not in the operating instructions. For more difficult cleaning situations, use the damp cloth to service this monitor, as benzene, thinner, or any kind into cabinet slots or other openings. ● Keep...
User Guide
Page 36
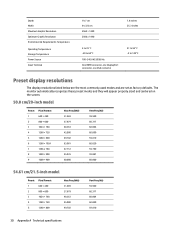
The monitor automatically recognizes these preset modes and they will appear properly sized and centered on the screen. 50.8 cm/20-inch model Preset 1 2 3 4 5 6 7 8 9 Pixel Format 640 × 480 800 × 600 ...Power Source Input Terminal 19.7 cm 64.323 cm 2560 × 1440 2560 x 1440 7.8 inches 25.3 inches 5 to 35° C -20 to 60° C 100-240 VAC 50/60 Hz One HDMI connector, one DisplayPort connector, one VGA connector 41 to 95° F -4 to 140° F Preset display resolutions The display resolutions listed below are the most commonly used modes and are set as factory defaults...
The monitor automatically recognizes these preset modes and they will appear properly sized and centered on the screen. 50.8 cm/20-inch model Preset 1 2 3 4 5 6 7 8 9 Pixel Format 640 × 480 800 × 600 ...Power Source Input Terminal 19.7 cm 64.323 cm 2560 × 1440 2560 x 1440 7.8 inches 25.3 inches 5 to 35° C -20 to 60° C 100-240 VAC 50/60 Hz One HDMI connector, one DisplayPort connector, one VGA connector 41 to 95° F -4 to 140° F Preset display resolutions The display resolutions listed below are the most commonly used modes and are set as factory defaults...
User Guide
Page 40
... of these signals, the monitor screen is blanked, the backlight is turned off, and the power light is connected to a computer that can also program the monitor to enter into if the monitor detects the absence of either the horizontal sync signal or the vertical sync signal. Entering user modes The video controller signal may need to readjust the parameters of the monitor screen by using the on setting energy saver features (sometimes called power management features...
... of these signals, the monitor screen is blanked, the backlight is turned off, and the power light is connected to a computer that can also program the monitor to enter into if the monitor detects the absence of either the horizontal sync signal or the vertical sync signal. Entering user modes The video controller signal may need to readjust the parameters of the monitor screen by using the on setting energy saver features (sometimes called power management features...


