
User Guide
Page 5
... features and components ...2 Features ...2 Rear components ...3 Front bezel controls ...4 Setting up the monitor ...5 Installing the monitor stand ...5 Connecting the cables ...5 Adjusting the monitor ...9 Turning on the monitor ...11 Removing the monitor stand ...12 Mounting the display head ...12 Installing a security cable ...14 2 Using the monitor ...15 Software and utilities ...15 The Information file ...15 The Image Color Matching...
... features and components ...2 Features ...2 Rear components ...3 Front bezel controls ...4 Setting up the monitor ...5 Installing the monitor stand ...5 Connecting the cables ...5 Adjusting the monitor ...9 Turning on the monitor ...11 Removing the monitor stand ...12 Mounting the display head ...12 Installing a security cable ...14 2 Using the monitor ...15 Software and utilities ...15 The Information file ...15 The Image Color Matching...
User Guide
Page 8
...● Pivot capability to rotate the display head from landscape to portrait mode ● Swivel and height adjustment capabilities ● Removable stand for flexible display head mounting solutions ● DisplayPort and VGA video inputs (cables provided) ● One HDMI (High-Definition Multimedia Interface... computer ● Plug-and-play capability if supported by your operating system ● Security cable slot provision on rear of monitor for optional security cable ● On-Screen Display (OSD) adjustments in several languages for lower resolutions; includes custom scaling for...
...● Pivot capability to rotate the display head from landscape to portrait mode ● Swivel and height adjustment capabilities ● Removable stand for flexible display head mounting solutions ● DisplayPort and VGA video inputs (cables provided) ● One HDMI (High-Definition Multimedia Interface... computer ● Plug-and-play capability if supported by your operating system ● Security cable slot provision on rear of monitor for optional security cable ● On-Screen Display (OSD) adjustments in several languages for lower resolutions; includes custom scaling for...
User Guide
Page 11
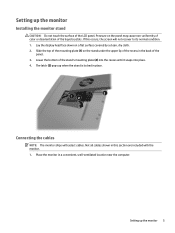
... pops up the monitor 5 Connecting the cables NOTE: The monitor ships with the monitor. 1. Not all cables shown in place. Setting up when the stand is locked in this occurs, the screen will not recover to its normal condition. 1. Setting up the monitor Installing the monitor stand CAUTION: Do not... touch the surface of the stand's mounting plate (2) into the recess until it snaps...
... pops up the monitor 5 Connecting the cables NOTE: The monitor ships with the monitor. 1. Not all cables shown in place. Setting up when the stand is locked in this occurs, the screen will not recover to its normal condition. 1. Setting up the monitor Installing the monitor stand CAUTION: Do not... touch the surface of the stand's mounting plate (2) into the recess until it snaps...
User Guide
Page 12
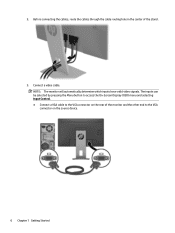
The inputs can be selected by pressing the Menu button to access the On-Screen Display (OSD) menu and selecting Input Control. ● Connect a VGA cable to the VGA connector on the rear of the stand. 3. NOTE: The monitor will automatically determine which inputs have valid video signals. 2. Connect a video cable. Before connecting the cables, route the cables through the cable routing hole in the center of the monitor and the other end to the VGA connector on the source device. 6 Chapter 1 Getting Started
The inputs can be selected by pressing the Menu button to access the On-Screen Display (OSD) menu and selecting Input Control. ● Connect a VGA cable to the VGA connector on the rear of the stand. 3. NOTE: The monitor will automatically determine which inputs have valid video signals. 2. Connect a video cable. Before connecting the cables, route the cables through the cable routing hole in the center of the monitor and the other end to the VGA connector on the source device. 6 Chapter 1 Getting Started
User Guide
Page 18
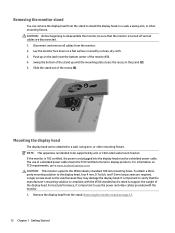
... (2). 5. To attach a thirdparty mounting solution to www.tcodevelopment.com. Removing the monitor stand on a flat surface covered by a UL or CSA Listed wall-mount bracket. Swing the bottom of the monitor (1). 4. The use the power and video cables provided with the VESA standard and...0.7 pitch, and 10 mm long screws are disconnected. 1. For best performance, it is intended to use of the recess (3). Removing the monitor stand You can be attached to a wall, swing arm, or other mounting fixture. Disconnect and remove all cables are required. Remove the display head...
... (2). 5. To attach a thirdparty mounting solution to www.tcodevelopment.com. Removing the monitor stand on a flat surface covered by a UL or CSA Listed wall-mount bracket. Swing the bottom of the monitor (1). 4. The use the power and video cables provided with the VESA standard and...0.7 pitch, and 10 mm long screws are disconnected. 1. For best performance, it is intended to use of the recess (3). Removing the monitor stand You can be attached to a wall, swing arm, or other mounting fixture. Disconnect and remove all cables are required. Remove the display head...
User Guide
Page 31
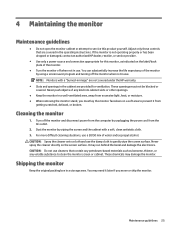
...slots or other openings. ● Keep the monitor in a well-ventilated area, away from excessive light, heat, or moisture. ● When removing the monitor stand, you move or ship the monitor. You can substantially increase the life expectancy of the monitor by wiping the screen and the cabinet with ...a "burned-in image" are not covered under the HP warranty. ● Slots and openings in the...
...slots or other openings. ● Keep the monitor in a well-ventilated area, away from excessive light, heat, or moisture. ● When removing the monitor stand, you move or ship the monitor. You can substantially increase the life expectancy of the monitor by wiping the screen and the cabinet with ...a "burned-in image" are not covered under the HP warranty. ● Slots and openings in the...
User Guide
Page 41
Use the Search feature on a stand-alone basis or with appropriate assistive devices. Supported assistive technologies 35 Supported assistive technologies HP products support a wide variety of our products and services and welcome feedback from users. B Accessibility HP designs, produces, and markets products and services that can be used by ...p.m. If you have accessibility questions by everyone, including people with disabilities, either on your source device that is connected to the monitor to locate more information about assistive features. to 9 p.m. Mountain Time.
Use the Search feature on a stand-alone basis or with appropriate assistive devices. Supported assistive technologies 35 Supported assistive technologies HP products support a wide variety of our products and services and welcome feedback from users. B Accessibility HP designs, produces, and markets products and services that can be used by ...p.m. If you have accessibility questions by everyone, including people with disabilities, either on your source device that is connected to the monitor to locate more information about assistive features. to 9 p.m. Mountain Time.


