

Quick Setup Guide
Page 2
... alınan ürünler için qualsiasi momento. • Scollegare l'alimentazione dal monitor scollegando cavo di alimentazione dalla presa elettrica. HP DVD HP http://www.hp.com/go /orderdocuments. English Čeština Lietuviškai Português do Brasil Suomi ...Singapore 911507. Per ridurre il rischio di folgorazioni e danni all times. • Disconnect power from the monitor by unplugging the power cord from http://www.hp.com/go /orderdocuments Hewlett Packard, POD, P.O. Il collegamento a terra è un'importante caratteristica di ...
... alınan ürünler için qualsiasi momento. • Scollegare l'alimentazione dal monitor scollegando cavo di alimentazione dalla presa elettrica. HP DVD HP http://www.hp.com/go /orderdocuments. English Čeština Lietuviškai Português do Brasil Suomi ...Singapore 911507. Per ridurre il rischio di folgorazioni e danni all times. • Disconnect power from the monitor by unplugging the power cord from http://www.hp.com/go /orderdocuments Hewlett Packard, POD, P.O. Il collegamento a terra è un'importante caratteristica di ...

User Guide
Page 3
NOTE: Contains additional information to emphasize or supplement important points of the main text. About This Guide This guide provides information on monitor features, setting up the monitor, and technical specifications. CAUTION: Indicates a hazardous situation that , if not avoided, could result in death or serious injury. This product incorporates HDMI technology. TIP: Provides helpful hints for completing a task. iii Indicates a hazardous situation that , if not avoided, could result in minor or moderate injury. WARNING!
NOTE: Contains additional information to emphasize or supplement important points of the main text. About This Guide This guide provides information on monitor features, setting up the monitor, and technical specifications. CAUTION: Indicates a hazardous situation that , if not avoided, could result in death or serious injury. This product incorporates HDMI technology. TIP: Provides helpful hints for completing a task. iii Indicates a hazardous situation that , if not avoided, could result in minor or moderate injury. WARNING!
User Guide
Page 5
... and components ...2 Features ...2 Rear components ...3 Front bezel controls ...4 Setting up the monitor ...5 Installing the monitor stand ...5 Connecting the cables ...5 Adjusting the monitor ...9 Turning on the monitor ...11 Removing the monitor stand ...12 Mounting the display head ...12 Installing a security cable ...14 2 Using the monitor ...15 Software and utilities ...15 The Information file ...15 The Image Color...
... and components ...2 Features ...2 Rear components ...3 Front bezel controls ...4 Setting up the monitor ...5 Installing the monitor stand ...5 Connecting the cables ...5 Adjusting the monitor ...9 Turning on the monitor ...11 Removing the monitor stand ...12 Mounting the display head ...12 Installing a security cable ...14 2 Using the monitor ...15 Software and utilities ...15 The Information file ...15 The Image Color...
User Guide
Page 6
... Maintenance guidelines ...25 Cleaning the monitor ...25 Shipping the monitor ...25 Appendix A Technical specifications ...26 50.8 cm/20-inch model ...26 54.61 cm/21.5-inch model ...27 58 cm/23-inch model ...27 60....
... Maintenance guidelines ...25 Cleaning the monitor ...25 Shipping the monitor ...25 Appendix A Technical specifications ...26 50.8 cm/20-inch model ...26 54.61 cm/21.5-inch model ...27 58 cm/23-inch model ...27 60....
User Guide
Page 7
... on an unstable surface. WARNING! WARNING! Disconnect the monitor by attaching a 2-pin adapter. NOTE: This product is used, use with the monitor, refer to some form of electric shock or damage to properly support your HP LCD monitor. If another cord is suitable for this ability. To... reduce the risk of surge protection device such as having this monitor. Use a power strip whose manufacturer offers a Damage Replacement Policy so ...
... on an unstable surface. WARNING! WARNING! Disconnect the monitor by attaching a 2-pin adapter. NOTE: This product is used, use with the monitor, refer to some form of electric shock or damage to properly support your HP LCD monitor. If another cord is suitable for this ability. To... reduce the risk of surge protection device such as having this monitor. Use a power strip whose manufacturer offers a Damage Replacement Policy so ...
User Guide
Page 8
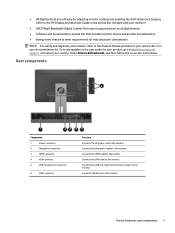
...inch) diagonal viewable screen area with 2560 x 1440 resolution (QHD), plus full-screen support for lower resolutions; Product features and components Features The monitor features include the following: ● 50.8 cm (20-inch) diagonal viewable screen area with 1600 x 900 resolution, plus full-screen support for...one upstream port (connects to the computer) and two downstream ports (connects to USB devices) ● USB cable provided to connect the monitor's USB hub to the USB connector on the computer ● Plug-and-play capability if supported by your operating system ● Security...
...inch) diagonal viewable screen area with 2560 x 1440 resolution (QHD), plus full-screen support for lower resolutions; Product features and components Features The monitor features include the following: ● 50.8 cm (20-inch) diagonal viewable screen area with 1600 x 900 resolution, plus full-screen support for...one upstream port (connects to the computer) and two downstream ports (connects to USB devices) ● USB cable provided to connect the monitor's USB hub to the USB connector on the computer ● Plug-and-play capability if supported by your operating system ● Security...
User Guide
Page 9
...the AC power cord to the monitor. Connects USB devices to the monitor. ● HP Display Assistant software for adjusting monitor settings and enabling the theft deterrence features (refer to the HP Display Assistant User Guide on the optical disc included with your monitor) ● HDCP (High-Bandwidth...on all digital inputs ● Software and documentation optical disc that includes monitor drivers and product documentation ● Energy saver feature to meet requirements for your product, go to http://www.hp.com/ support, and select your documentation kit. To locate updates to ...
...the AC power cord to the monitor. Connects USB devices to the monitor. ● HP Display Assistant software for adjusting monitor settings and enabling the theft deterrence features (refer to the HP Display Assistant User Guide on the optical disc included with your monitor) ● HDCP (High-Bandwidth...on all digital inputs ● Software and documentation optical disc that includes monitor drivers and product documentation ● Energy saver feature to meet requirements for your product, go to http://www.hp.com/ support, and select your documentation kit. To locate updates to ...
User Guide
Page 10
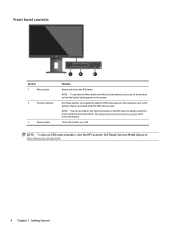
Turns the monitor on the screen. NOTE: To activate the Menu button and the Function buttons, press any of the buttons so that are activated while the OSD ... next to the buttons that the button labels appear on or off. NOTE: To view an OSD menu simulator, visit the HP Customer Self Repair Services Media Library at http://www.hp.com/go/sml. 4 Chapter 1 Getting Started Front bezel controls Control 1 Menu button 2 Function buttons 3 Power button Function Opens and closes...
Turns the monitor on the screen. NOTE: To activate the Menu button and the Function buttons, press any of the buttons so that are activated while the OSD ... next to the buttons that the button labels appear on or off. NOTE: To view an OSD menu simulator, visit the HP Customer Self Repair Services Media Library at http://www.hp.com/go/sml. 4 Chapter 1 Getting Started Front bezel controls Control 1 Menu button 2 Function buttons 3 Power button Function Opens and closes...
User Guide
Page 11
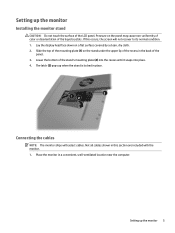
... on the stand under the upper lip of the recess in place. Place the monitor in this occurs, the screen will not recover to its normal condition. 1. Connecting the cables NOTE: The monitor ships with the monitor. 1. Setting up when the stand is locked in the back of the liquid ...crystals. Slide the top of the mounting plate (1) on a flat surface covered by a clean, dry cloth. 2. The latch (3) pops up the monitor 5 Not all cables shown in a...
... on the stand under the upper lip of the recess in place. Place the monitor in this occurs, the screen will not recover to its normal condition. 1. Connecting the cables NOTE: The monitor ships with the monitor. 1. Setting up when the stand is locked in the back of the liquid ...crystals. Slide the top of the mounting plate (1) on a flat surface covered by a clean, dry cloth. 2. The latch (3) pops up the monitor 5 Not all cables shown in a...
User Guide
Page 12
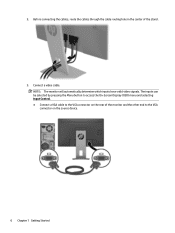
Connect a video cable. The inputs can be selected by pressing the Menu button to access the On-Screen Display (OSD) menu and selecting Input Control. ● Connect a VGA cable to the VGA connector on the rear of the stand. 3. NOTE: The monitor will automatically determine which inputs have valid video signals. 2. Before connecting the cables, route the cables through the cable routing hole in the center of the monitor and the other end to the VGA connector on the source device. 6 Chapter 1 Getting Started
Connect a video cable. The inputs can be selected by pressing the Menu button to access the On-Screen Display (OSD) menu and selecting Input Control. ● Connect a VGA cable to the VGA connector on the rear of the stand. 3. NOTE: The monitor will automatically determine which inputs have valid video signals. 2. Before connecting the cables, route the cables through the cable routing hole in the center of the monitor and the other end to the VGA connector on the source device. 6 Chapter 1 Getting Started
User Guide
Page 13
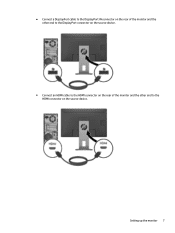
Setting up the monitor 7 ● Connect a DisplayPort cable to the DisplayPort IN connector on the rear of the monitor and the other end to the DisplayPort connector on the source device. ● Connect an HDMI cable to the HDMI connector on the rear of the monitor and the other end to the HDMI connector on the source device.
Setting up the monitor 7 ● Connect a DisplayPort cable to the DisplayPort IN connector on the rear of the monitor and the other end to the DisplayPort connector on the source device. ● Connect an HDMI cable to the HDMI connector on the rear of the monitor and the other end to the HDMI connector on the source device.
User Guide
Page 14
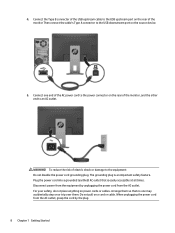
... of the USB upstream cable to the USB upstream port on or trip over them. Connect one may accidentally step on the rear of the monitor, and the other end to an AC outlet. Disconnect power from the equipment by unplugging the power cord from the AC outlet, grasp the cord... power cord from the AC outlet. 4. To reduce the risk of electric shock or damage to the USB downstream port on the rear of the monitor Then connect the cable's Type A connector to the equipment: Do not disable the power cord grounding plug.
... of the USB upstream cable to the USB upstream port on or trip over them. Connect one may accidentally step on the rear of the monitor, and the other end to an AC outlet. Disconnect power from the equipment by unplugging the power cord from the AC outlet, grasp the cord... power cord from the AC outlet. 4. To reduce the risk of electric shock or damage to the USB downstream port on the rear of the monitor Then connect the cable's Type A connector to the equipment: Do not disable the power cord grounding plug.
User Guide
Page 15
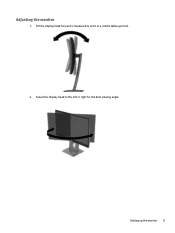
Tilt the display head forward or backward to set it to the left or right for the best viewing angle. Adjusting the monitor 1. Setting up the monitor 9 Swivel the display head to a comfortable eye level. 2.
Tilt the display head forward or backward to set it to the left or right for the best viewing angle. Adjusting the monitor 1. Setting up the monitor 9 Swivel the display head to a comfortable eye level. 2.
User Guide
Page 16
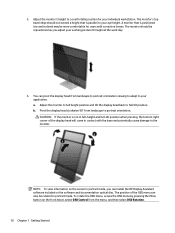
...orientation viewing to adapt to your individual workstation. CAUTION: If the monitor is not in full-height and full-tilt position when pivoting, the bottom right corner of the OSD menu can install the HP Display Assistant software included on the software and documentation optical disc. ...The monitor should not exceed a height that is parallel to your working posture throughout the work day. 4. ...
...orientation viewing to adapt to your individual workstation. CAUTION: If the monitor is not in full-height and full-tilt position when pivoting, the bottom right corner of the OSD menu can install the HP Display Assistant software included on the software and documentation optical disc. ...The monitor should not exceed a height that is parallel to your working posture throughout the work day. 4. ...
User Guide
Page 17
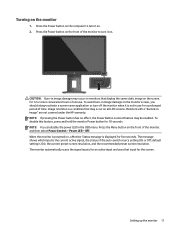
...Menu button on . default setting is the current active signal, the status of time. Press the Power button on the front of the monitor to turn it on the monitor 1. CAUTION: Burn-in use for five seconds. NOTE: If pressing the Power button has no effect, the Power Button Lockout feature ... button for 12 or more consecutive hours of the monitor, and then select Power Control > Power LED > Off. NOTE: You can disable the power LED in image" are not covered under the HP warranty. The monitor automatically scans the signal inputs for an active input and uses that display the same static ...
...Menu button on . default setting is the current active signal, the status of time. Press the Power button on the front of the monitor to turn it on the monitor 1. CAUTION: Burn-in use for five seconds. NOTE: If pressing the Power button has no effect, the Power Button Lockout feature ... button for 12 or more consecutive hours of the monitor, and then select Power Control > Power LED > Off. NOTE: You can disable the power LED in image" are not covered under the HP warranty. The monitor automatically scans the signal inputs for an active input and uses that display the same static ...
User Guide
Page 18
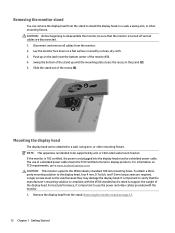
...information on a wall, a swing arm, or other mounting fixture. For best performance, it is important to use of the recess (3). Lay the monitor face down on a flat surface covered by a UL or CSA Listed wall-mount bracket. Disconnect and remove all cables are required. Remove the ...display head from the monitor. 2. Removing the monitor stand You can be sure that the manufacturer's mounting solution is intended to be supported by a clean, dry cloth. 3. Slide the...
...information on a wall, a swing arm, or other mounting fixture. For best performance, it is important to use of the recess (3). Lay the monitor face down on a flat surface covered by a UL or CSA Listed wall-mount bracket. Disconnect and remove all cables are required. Remove the ...display head from the monitor. 2. Removing the monitor stand You can be sure that the manufacturer's mounting solution is intended to be supported by a clean, dry cloth. 3. Slide the...
User Guide
Page 19
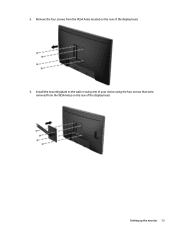
Setting up the monitor 13 Install the mounting plate to the wall or swing arm of your choice using the four screws that were removed from the VESA holes located on the rear of the display head. 3. Remove the four screws from the VESA holes on the rear of the display head. 2.
Setting up the monitor 13 Install the mounting plate to the wall or swing arm of your choice using the four screws that were removed from the VESA holes located on the rear of the display head. 3. Remove the four screws from the VESA holes on the rear of the display head. 2.

User Guide
Page 20
Installing a security cable You can secure the monitor to a fixed object with an optional cable lock available from HP. 14 Chapter 1 Getting Started
Installing a security cable You can secure the monitor to a fixed object with an optional cable lock available from HP. 14 Chapter 1 Getting Started
User Guide
Page 21
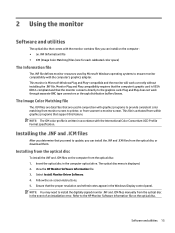
... Image Color Matching file The .ICM files are used by Microsoft Windows operating systems to ensure monitor compatibility with graphics programs to provide consistent color matching from monitor screen to printer, or from scanner to the HP Monitor Software Information file on -screen instructions. 5. The optical disc menu is Microsoft Windows Plug and Play...
... Image Color Matching file The .ICM files are used by Microsoft Windows operating systems to ensure monitor compatibility with graphics programs to provide consistent color matching from monitor screen to printer, or from scanner to the HP Monitor Software Information file on -screen instructions. 5. The optical disc menu is Microsoft Windows Plug and Play...
User Guide
Page 22
... the System Requirements tab, and then verify that your operating system, and then click Next. 5. If necessary, select your monitor model in the Find my product search field, and click Go. 3. Click Download and follow the on the driver. 7. Go to open the list of ....INF and .ICM files from the list. 4. Display/Monitor to http://www.hp.com/support and select the appropriate country and language. 2. Downloading from the Web If you do not have a computer or source device with an...
... the System Requirements tab, and then verify that your operating system, and then click Next. 5. If necessary, select your monitor model in the Find my product search field, and click Go. 3. Click Download and follow the on the driver. 7. Go to open the list of ....INF and .ICM files from the list. 4. Display/Monitor to http://www.hp.com/support and select the appropriate country and language. 2. Downloading from the Web If you do not have a computer or source device with an...


