User Guide
Page 5
... ...1 HP LCD Monitor ...1 2 Setting Up the Monitor ...3 Unfolding the Monitor Pedestal Base 3 Rear Components ...4 Connecting the Monitor Cables ...5 Turning on the Monitor ...8 Connecting an HP Notebook Computer and Installing Drivers 9 Charging Your HP Notebook Computer 11 Connecting Optional USB Devices ...12 Front Panel Controls ...12 Adjusting the Monitor ...13 Removing the Monitor Pedestal Base 15 Mounting the Monitor ...16 Installing a Cable Lock ...17 Locating the Rating Labels ...17 3 Using the Webcam ...18 Installing YouCam from the media disc 18 Capturing Webcam Video and...
... ...1 HP LCD Monitor ...1 2 Setting Up the Monitor ...3 Unfolding the Monitor Pedestal Base 3 Rear Components ...4 Connecting the Monitor Cables ...5 Turning on the Monitor ...8 Connecting an HP Notebook Computer and Installing Drivers 9 Charging Your HP Notebook Computer 11 Connecting Optional USB Devices ...12 Front Panel Controls ...12 Adjusting the Monitor ...13 Removing the Monitor Pedestal Base 15 Mounting the Monitor ...16 Installing a Cable Lock ...17 Locating the Rating Labels ...17 3 Using the Webcam ...18 Installing YouCam from the media disc 18 Capturing Webcam Video and...
User Guide
Page 7
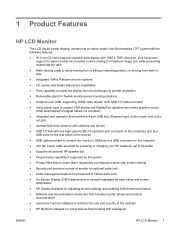
... orientation ● Removable stand for flexible monitor panel mounting solutions ● Graphics over USB, supporting 1080p video stream (with USB 3.0 cable provided) ● Video signal input to support VGA analog and DisplayPort digital as secondary graphics inputs (VGA and DisplayPort signal cables not provided) ● Integrated port replicator that includes a 4-port USB hub, Ethernet input, audio in jack, and audio out jack ● Internal flash drive memory with software and drivers ● USB 3.0 hub with one high speed USB 3.0 upstream port (connects to the...
... orientation ● Removable stand for flexible monitor panel mounting solutions ● Graphics over USB, supporting 1080p video stream (with USB 3.0 cable provided) ● Video signal input to support VGA analog and DisplayPort digital as secondary graphics inputs (VGA and DisplayPort signal cables not provided) ● Integrated port replicator that includes a 4-port USB hub, Ethernet input, audio in jack, and audio out jack ● Internal flash drive memory with software and drivers ● USB 3.0 hub with one high speed USB 3.0 upstream port (connects to the...
User Guide
Page 9
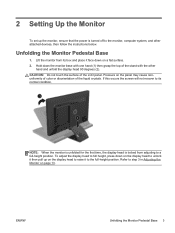
... color or disorientation of the LCD panel. To adjust the display head to full height, press down on the display head to unlock it then pull up the monitor, ensure that the power is locked from its box and place it to its normal condition. Lift the monitor from adjusting to step 3 in Adjusting the Monitor on the display head to raise it face down the monitor base...
... color or disorientation of the LCD panel. To adjust the display head to full height, press down on the display head to unlock it then pull up the monitor, ensure that the power is locked from its box and place it to its normal condition. Lift the monitor from adjusting to step 3 in Adjusting the Monitor on the display head to raise it face down the monitor base...
User Guide
Page 10
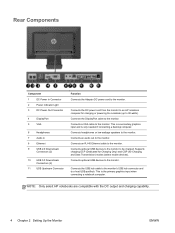
... needed if connecting a desktop computer. Connects an audio out to the monitor. Connects an RJ-45 Ethernet cable to be charged. Connects optional USB devices to the monitor to the monitor. Connects a VGA cable to an HP notebook computer for Charging and Data Transmission) modes (select mobile devices). NOTE: Only select HP notebooks are compatible with the DC output and charging capability. 4 Chapter 2 Setting Up the Monitor ENWW Connects the DC power cord...
... needed if connecting a desktop computer. Connects an audio out to the monitor. Connects an RJ-45 Ethernet cable to be charged. Connects optional USB devices to the monitor to the monitor. Connects a VGA cable to an HP notebook computer for Charging and Data Transmission) modes (select mobile devices). NOTE: Only select HP notebooks are compatible with the DC output and charging capability. 4 Chapter 2 Setting Up the Monitor ENWW Connects the DC power cord...
User Guide
Page 12
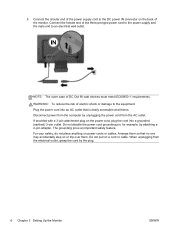
... power cord from the electrical outlet, grasp the cord by attaching a 2-pin adapter. Do not disable the power cord grounding pin, for example, by the plug. 6 Chapter 2 Setting Up the Monitor ENWW Do not pull on power cords or cables. Connect ...wall outlet. The grounding pin is easily accessible at all times. 5. NOTE: The outer case of the three-pronged power cord to the power supply and the male end to the equipment: Plug the power cord into a grounded (earthed) 3-pin outlet. Arrange them . Connect the circular end of the power supply cord to the DC power IN connector...
... power cord from the electrical outlet, grasp the cord by attaching a 2-pin adapter. Do not disable the power cord grounding pin, for example, by the plug. 6 Chapter 2 Setting Up the Monitor ENWW Do not pull on power cords or cables. Connect ...wall outlet. The grounding pin is easily accessible at all times. 5. NOTE: The outer case of the three-pronged power cord to the power supply and the male end to the equipment: Plug the power cord into a grounded (earthed) 3-pin outlet. Arrange them . Connect the circular end of the power supply cord to the DC power IN connector...

User Guide
Page 14
... all three video inputs (USB, DisplayPort and VGA), ● The current setting for the Auto-Switch Input option (On or Off), ● The current setting for all LCD screens. As an alternative to the headphones jack. 8. Image retention is powered on the monitor as the factory default), ● The current detected display resolution, ● The recommended native preset display resolution. 8 Chapter 2 Setting Up the Monitor ENWW 7. Turning on . 2. NOTE: You can connect low wattage speakers to...
... all three video inputs (USB, DisplayPort and VGA), ● The current setting for the Auto-Switch Input option (On or Off), ● The current setting for all LCD screens. As an alternative to the headphones jack. 8. Image retention is powered on the monitor as the factory default), ● The current detected display resolution, ● The recommended native preset display resolution. 8 Chapter 2 Setting Up the Monitor ENWW 7. Turning on . 2. NOTE: You can connect low wattage speakers to...
User Guide
Page 15
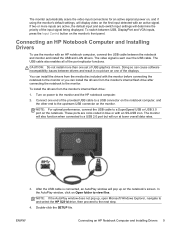
... connecting the notebook to view files. The video signal is connected, an AutoPlay window will determine the priority of the input signal being displayed. The monitor will display video on the first input detected with an SS-USB icon. You can cause software incompatibility issues between USB, DisplayPort and VGA inputs, press the Input Control button on the monitor. NOTE: For optimal performance, connect the USB cable to a USB 2.0 port but will run at power on, and if using the monitor's default settings...
... connecting the notebook to view files. The video signal is connected, an AutoPlay window will determine the priority of the input signal being displayed. The monitor will display video on the first input detected with an SS-USB icon. You can cause software incompatibility issues between USB, DisplayPort and VGA inputs, press the Input Control button on the monitor. NOTE: For optimal performance, connect the USB cable to a USB 2.0 port but will run at power on, and if using the monitor's default settings...
User Guide
Page 16
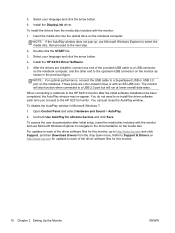
... window may re-appear. To install the drivers from the drop down menu. Install the HP S231d Driver Software: 5. You do not need to re-install the driver software each of the driver software files for this monitor, go to the HP S231d monitor. Open Control Panel and select Hardware and Sound > AutoPlay. 2. Uncheck Use AutoPlay for this monitor. 10 Chapter 2 Setting Up the Monitor ENWW For updates to each time you connect to http://www.hp.com and click Support...
... window may re-appear. To install the drivers from the drop down menu. Install the HP S231d Driver Software: 5. You do not need to re-install the driver software each of the driver software files for this monitor, go to the HP S231d monitor. Open Control Panel and select Hardware and Sound > AutoPlay. 2. Uncheck Use AutoPlay for this monitor. 10 Chapter 2 Setting Up the Monitor ENWW For updates to each time you connect to http://www.hp.com and click Support...

User Guide
Page 17
Only HP notebooks are supported. NOTE: The charging system supplies up to 90 watts of the supplied DC power cable to the power OUT connector on the monitor and the other end to charge your HP notebook, connect one end of power. HP notebooks requiring more than 90 watts may not be used to the power connector on the notebook. To charge your HP notebook computer. ENWW Charging Your HP Notebook Computer 11 Charging Your HP Notebook Computer The monitor includes a 90W DC power out port that can be charged by the system.
Only HP notebooks are supported. NOTE: The charging system supplies up to 90 watts of the supplied DC power cable to the power OUT connector on the monitor and the other end to charge your HP notebook, connect one end of power. HP notebooks requiring more than 90 watts may not be used to the power connector on the notebook. To charge your HP notebook computer. ENWW Charging Your HP Notebook Computer 11 Charging Your HP Notebook Computer The monitor includes a 90W DC power out port that can be charged by the system.

User Guide
Page 18
... OSD menu and decrease adjustment levels. 5 Plus/source If the OSD menu is inactive, press to enable the USB ports on the rear panel. Front Panel Controls Table 2-1 Monitor Front Panel Controls Control 1 Microphone (2) 2 Webcam 3 Menu Function Records sound. NOTE: You must connect the USB hub cable from the monitor to the computer to activate the source button that chooses the video signal input (DisplayPort or USB or VGA) 6 OK/auto adjustment If the OSD menu is VGA. 7 Power Turns the monitor on page 5. If the OSD menu...
... OSD menu and decrease adjustment levels. 5 Plus/source If the OSD menu is inactive, press to enable the USB ports on the rear panel. Front Panel Controls Table 2-1 Monitor Front Panel Controls Control 1 Microphone (2) 2 Webcam 3 Menu Function Records sound. NOTE: You must connect the USB hub cable from the monitor to the computer to activate the source button that chooses the video signal input (DisplayPort or USB or VGA) 6 OK/auto adjustment If the OSD menu is VGA. 7 Power Turns the monitor on page 5. If the OSD menu...

User Guide
Page 20
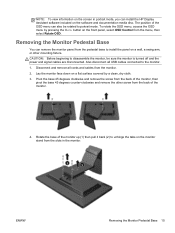
... cause damage to full tilt position (1). 3. Pivot the monitor from landscape to portrait orientation viewing to adapt to a full-height position. If you adjust your eye height. The monitor's top bezel edge should be more comfortable for users with the base when pivoting and potentially cause damage to the monitor or speaker bar. 14 Chapter 2 Setting Up the Monitor ENWW A monitor that is positioned low and reclined may...
... cause damage to full tilt position (1). 3. Pivot the monitor from landscape to portrait orientation viewing to adapt to a full-height position. If you adjust your eye height. The monitor's top bezel edge should be more comfortable for users with the base when pivoting and potentially cause damage to the monitor or speaker bar. 14 Chapter 2 Setting Up the Monitor ENWW A monitor that is positioned low and reclined may...
User Guide
Page 21
... portrait mode, you can install the HP Display Assistant software included on the front panel, select OSD Control from the menu, then select Rotate OSD. The position of the monitor up (1) then pull it back (2) to portrait mode. Disconnect and remove all USB cables connected to disassemble the monitor, be rotated to unhinge the tabs on the monitor stand from the pedestal base to install the panel on a flat surface covered by pressing the Menu button on the software...
... portrait mode, you can install the HP Display Assistant software included on the front panel, select OSD Control from the menu, then select Rotate OSD. The position of the monitor up (1) then pull it back (2) to portrait mode. Disconnect and remove all USB cables connected to disassemble the monitor, be rotated to unhinge the tabs on the monitor stand from the pedestal base to install the panel on a flat surface covered by pressing the Menu button on the software...

User Guide
Page 22
... use the power and video cables provided with the VESA standard and is compliant with the monitor. 2. Mounting the Monitor The monitor panel can be attached to Removing the Monitor Pedestal Base on the monitor. It is important to verify that the monitor is intended to be used because they may damage the monitor. To attach a third-party mounting solution to support the weight of the monitor display panel. CAUTION: This monitor supports the VESA...
... use the power and video cables provided with the VESA standard and is compliant with the monitor. 2. Mounting the Monitor The monitor panel can be attached to Removing the Monitor Pedestal Base on the monitor. It is important to verify that the monitor is intended to be used because they may damage the monitor. To attach a third-party mounting solution to support the weight of the monitor display panel. CAUTION: This monitor supports the VESA...

User Guide
Page 24
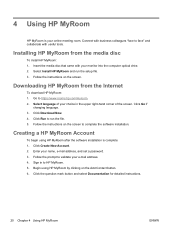
... setup file. 3. Capturing Webcam Video and Snapshots To use CyberLink YouCam after you can use this kind of software to disc. Click Tutorials to save, send, stream on the screen. Click All Programs, CyberLink YouCam, and then click CyberLink YouCam again. 3. The optimal distance for recording sound with your monitor into a movie-making program to view an instructional video. 3 Using the Webcam Install CyberLink YouCam software and driver...
... setup file. 3. Capturing Webcam Video and Snapshots To use CyberLink YouCam after you can use this kind of software to disc. Click Tutorials to save, send, stream on the screen. Click All Programs, CyberLink YouCam, and then click CyberLink YouCam again. 3. The optimal distance for recording sound with your monitor into a movie-making program to view an instructional video. 3 Using the Webcam Install CyberLink YouCam software and driver...

User Guide
Page 25
... latest drivers for your webcam as the default video input. Enable your monitor model. ● Search the HP website for the video-calling software program. Send your video call program. Download an Internet messenger or video phone call by following the instructions for known webcam issues, program updates, and support articles. Make sure the person you are using. 3. This is usually done through the video setup in the Tools menu...
... latest drivers for your webcam as the default video input. Enable your monitor model. ● Search the HP website for the video-calling software program. Send your video call program. Download an Internet messenger or video phone call by following the instructions for known webcam issues, program updates, and support articles. Make sure the person you are using. 3. This is usually done through the video setup in the Tools menu...
User Guide
Page 26
... name, e-mail address, and set a password. 3. Click the question mark button and select Documentation for detailed instructions. 20 Chapter 4 Using HP MyRoom ENWW Click Go if changing language. 3. Follow the instructions on the screen to HP MyRoom. 5. Click Run to validate your monitor into the computer optical drive. 2. Click Create New Account. 2. Follow the prompt to run the setup file. 3. Insert the media...
... name, e-mail address, and set a password. 3. Click the question mark button and select Documentation for detailed instructions. 20 Chapter 4 Using HP MyRoom ENWW Click Go if changing language. 3. Follow the instructions on the screen to HP MyRoom. 5. Click Run to validate your monitor into the computer optical drive. 2. Click Create New Account. 2. Follow the prompt to run the setup file. 3. Insert the media...

User Guide
Page 27
... your monitor. For U.S. Product Support The monitor user guide, reference guide, and drivers are available at http://www.hp.com/ support. 5 Locating Additional Information Refer to the HP LCD Monitors Reference Guide included on the media disc with your monitor for additional information on: ● Optimizing monitor performance ● Safety and maintenance guidelines ● Using the OSD menu ● Agency and regulatory notices ● Troubleshooting and recommended solutions to common problems...
... your monitor. For U.S. Product Support The monitor user guide, reference guide, and drivers are available at http://www.hp.com/ support. 5 Locating Additional Information Refer to the HP LCD Monitors Reference Guide included on the media disc with your monitor for additional information on: ● Optimizing monitor performance ● Safety and maintenance guidelines ● Using the OSD menu ● Agency and regulatory notices ● Troubleshooting and recommended solutions to common problems...

User Guide
Page 28
actual performance may vary either higher or lower. EliteDisplay S231d Table 6-1 EliteDisplay S231d Specifications Display Type Viewable Image Size Aspect Ratio Tilt Swivel Maximum Weight (Unpacked) Dimensions (include base) Height (highest position) Height (lowest position) Depth Width Maximum Graphic Resolution Optimum Graphic Resolution Text Mode Horizontal Frequency Vertical Refresh Rate Environmental Requirements Temperature Operating Temperature Storage Temperature Relative Humidity Power Source: DC Altitude: Operating Storage 58.4 cm wide screen 58.4 cm diagonal 16:9 -5 to 30°...
actual performance may vary either higher or lower. EliteDisplay S231d Table 6-1 EliteDisplay S231d Specifications Display Type Viewable Image Size Aspect Ratio Tilt Swivel Maximum Weight (Unpacked) Dimensions (include base) Height (highest position) Height (lowest position) Depth Width Maximum Graphic Resolution Optimum Graphic Resolution Text Mode Horizontal Frequency Vertical Refresh Rate Environmental Requirements Temperature Operating Temperature Storage Temperature Relative Humidity Power Source: DC Altitude: Operating Storage 58.4 cm wide screen 58.4 cm diagonal 16:9 -5 to 30°...

User Guide
Page 29
... 60.00 ENWW Recognizing Preset Display Resolutions 23 Table 6-1 EliteDisplay S231d Specifications (continued) Measured Power Consumption: Full Power Typical Settings Sleep Switch Off 60 watts 38 watts 2.2 watts 0.5 watts Input Terminals One USB upstream connector with cable included; one DisplayPort connector (cable not included); Model number ADP150TB TA Power supply rating 150 W/19.5 V Recognizing Preset Display Resolutions The display resolutions listed below are the most commonly used modes and are set as factory defaults. This monitor automatically recognizes these preset...
... 60.00 ENWW Recognizing Preset Display Resolutions 23 Table 6-1 EliteDisplay S231d Specifications (continued) Measured Power Consumption: Full Power Typical Settings Sleep Switch Off 60 watts 38 watts 2.2 watts 0.5 watts Input Terminals One USB upstream connector with cable included; one DisplayPort connector (cable not included); Model number ADP150TB TA Power supply rating 150 W/19.5 V Recognizing Preset Display Resolutions The display resolutions listed below are the most commonly used modes and are set as factory defaults. This monitor automatically recognizes these preset...
User Guide
Page 30
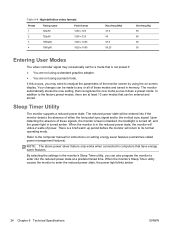
... 50 Entering User Modes The video controller signal may need to readjust the parameters of the monitor screen by using a preset mode. In addition to enter the reduced power state, the power light blinks amber. 24 Chapter 6 Technical Specifications ENWW There is in memory. When the monitor's Sleep Timer utility causes the monitor to the factory preset modes, there are not using the on setting energy saver features (sometimes called power management features...
... 50 Entering User Modes The video controller signal may need to readjust the parameters of the monitor screen by using a preset mode. In addition to enter the reduced power state, the power light blinks amber. 24 Chapter 6 Technical Specifications ENWW There is in memory. When the monitor's Sleep Timer utility causes the monitor to the factory preset modes, there are not using the on setting energy saver features (sometimes called power management features...


