

User Guide
Page 5
... the monitor stand ...5 Mounting the monitor head ...6 Removing the monitor stand 6 Attaching the monitor head to a mounting device 7 Connecting the cables ...8 Adjusting the monitor ...10 Turning on the monitor ...11 Installing a security cable ...12 2 Using the monitor ...13 Downloading software and utilities ...13 The Information file ...13 The Image Color Matching file ...13 Enabling G-SYNC compatibility (select products only 14 Using the OSD menu ...14 Using the function buttons ...15 Reassigning the function buttons ...15 Adjusting blue light output ...15 Using Auto-Sleep Mode ...16...
... the monitor stand ...5 Mounting the monitor head ...6 Removing the monitor stand 6 Attaching the monitor head to a mounting device 7 Connecting the cables ...8 Adjusting the monitor ...10 Turning on the monitor ...11 Installing a security cable ...12 2 Using the monitor ...13 Downloading software and utilities ...13 The Information file ...13 The Image Color Matching file ...13 Enabling G-SYNC compatibility (select products only 14 Using the OSD menu ...14 Using the function buttons ...15 Reassigning the function buttons ...15 Adjusting blue light output ...15 Using Auto-Sleep Mode ...16...
User Guide
Page 7
... screen. For your user guides. Care should be specifically labeled as a power strip or uninterruptible power supply (UPS). the power strip must be taken to use with your safety, do not place anything on , pulled, grabbed, or tripped over and cause personal injury. WARNING! 1 Getting started Important safety information A power cord is included with the installation instructions. This equipment is suitable for use only a power source and connection...
... screen. For your user guides. Care should be specifically labeled as a power strip or uninterruptible power supply (UPS). the power strip must be taken to use with your safety, do not place anything on , pulled, grabbed, or tripped over and cause personal injury. WARNING! 1 Getting started Important safety information A power cord is included with the installation instructions. This equipment is suitable for use only a power source and connection...

User Guide
Page 8
... @ 144 Hz resolution, ultrawide backlit display, plus full-screen support for lower resolutions ● Antiglare panel with an LED backlight ● Wide viewing angle to allow viewing from a sitting or standing position, or when moving from side to side ● Tilt and swivel adjustment capability ● Height adjustment capability ● DisplayPort™ (DP) video input ● High-Definition Multimedia Interface (HDMI) video input (cable provided) ● Audio-out (headphone) jack ● Plug and Play capability...
... @ 144 Hz resolution, ultrawide backlit display, plus full-screen support for lower resolutions ● Antiglare panel with an LED backlight ● Wide viewing angle to allow viewing from a sitting or standing position, or when moving from side to side ● Tilt and swivel adjustment capability ● Height adjustment capability ● DisplayPort™ (DP) video input ● High-Definition Multimedia Interface (HDMI) video input (cable provided) ● Audio-out (headphone) jack ● Plug and Play capability...

User Guide
Page 9
... default button functions. Product features and components 3 Amber: Monitor is turned on page 16. You can reassign the function buttons to navigate through the menu. Front components Table 1-1 Front components Control Function 1 Menu button Press to open the OSD menu, select a menu item from the OSD, or close the OSD menu. 2 OSD buttons (assignable) When the OSD menu is open, press the buttons to quickly select the most commonly used operations. For detailed instructions, see Using Auto-Sleep Mode...
... default button functions. Product features and components 3 Amber: Monitor is turned on page 16. You can reassign the function buttons to navigate through the menu. Front components Table 1-1 Front components Control Function 1 Menu button Press to open the OSD menu, select a menu item from the OSD, or close the OSD menu. 2 OSD buttons (assignable) When the OSD menu is open, press the buttons to quickly select the most commonly used operations. For detailed instructions, see Using Auto-Sleep Mode...
User Guide
Page 20
... turn on the monitor. 2. Use the three function buttons to adjust the screen image based on page 3 for the selected display model check box are selected. Table 2-1 OSD main menu Main Menu Description Gaming Color Image Input Power Menu Management Information Exit Adjusts game-related settings including overclocking, gaming-assist crosshair, and ambient lighting. Adjusts the power settings. Click Apply. See Front components on your monitor, you must first install the G-SYNC driver: 1. The on-screen button labels vary depending on -screen display (OSD...
... turn on the monitor. 2. Use the three function buttons to adjust the screen image based on page 3 for the selected display model check box are selected. Table 2-1 OSD main menu Main Menu Description Gaming Color Image Input Power Menu Management Information Exit Adjusts game-related settings including overclocking, gaming-assist crosshair, and ambient lighting. Adjusts the power settings. Click Apply. See Front components on your monitor, you must first install the G-SYNC driver: 1. The on-screen button labels vary depending on -screen display (OSD...
User Guide
Page 23
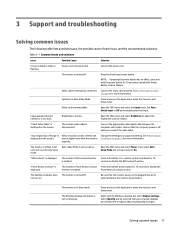
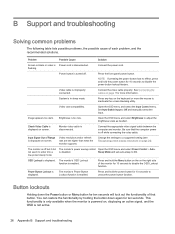
... the monitor power cord is in Auto-Sleep Mode. Open the OSD menu and select Power. Solving common issues 17 Video cable is incompatible. Connect the video cable properly. Video card is improperly connected. "Input Signal Out of each issue, and the recommended solutions. The monitor is enabled. The monitor's Power Button Lockout Press and hold the power button for 10 seconds to disable the function is off while you connect the video cable. The monitor is plugged into Sleep mode. The Windows display orientation is turned...
... the monitor power cord is in Auto-Sleep Mode. Open the OSD menu and select Power. Solving common issues 17 Video cable is incompatible. Connect the video cable properly. Video card is improperly connected. "Input Signal Out of each issue, and the recommended solutions. The monitor is enabled. The monitor's Power Button Lockout Press and hold the power button for 10 seconds to disable the function is off while you connect the video cable. The monitor is plugged into Sleep mode. The Windows display orientation is turned...
User Guide
Page 24
...://www.hp.com/support. NOTE: The monitor user guide, reference material, and drivers are using the troubleshooting tips in this site to get more information about your product, including links to discussion forums and instructions on how to http://www.hp.com/support. Use this section, you may need to call : ● Monitor model number ● Monitor serial number ● Purchase date on , displaying an active signal, and the OSD is turned on...
...://www.hp.com/support. NOTE: The monitor user guide, reference material, and drivers are using the troubleshooting tips in this site to get more information about your product, including links to discussion forums and instructions on how to http://www.hp.com/support. Use this section, you may need to call : ● Monitor model number ● Monitor serial number ● Purchase date on , displaying an active signal, and the OSD is turned on...
User Guide
Page 26
... service provider. ● Use only a power source and connection appropriate for each device. ● Install the monitor near an outlet that contain any external devices. 3. Water dripping into them. Cleaning the monitor 1. IMPORTANT: Do not use a screen saver program. It may damage the monitor. The cloth should be moist, but not wet. Disconnect any petroleum-based materials such as indicated on the cord. ● Keep...
... service provider. ● Use only a power source and connection appropriate for each device. ● Install the monitor near an outlet that contain any external devices. 3. Water dripping into them. Cleaning the monitor 1. IMPORTANT: Do not use a screen saver program. It may damage the monitor. The cloth should be moist, but not wet. Disconnect any petroleum-based materials such as indicated on the cord. ● Keep...
User Guide 5
Page 6
Downloading the software 19 Using Auto-Sleep Mode ...19 Using the On-Screen Display (OSD) menu 20 Menu button functions ...21 Appendix A Technical specifications ...23 Recognizing preset display resolutions 24 Entering user modes ...24 Power adapter ...25 Appendix B Support and troubleshooting ...26 Solving common problems ...26 Button lockouts ...26 Using the Auto-Adjustment feature (VGA analog input 27 Optimizing image performance (VGA analog input 28 Product support ...29 Preparing to call technical support ...29 Appendix C LCD monitor quality and pixel policy 30 vi
Downloading the software 19 Using Auto-Sleep Mode ...19 Using the On-Screen Display (OSD) menu 20 Menu button functions ...21 Appendix A Technical specifications ...23 Recognizing preset display resolutions 24 Entering user modes ...24 Power adapter ...25 Appendix B Support and troubleshooting ...26 Solving common problems ...26 Button lockouts ...26 Using the Auto-Adjustment feature (VGA analog input 27 Optimizing image performance (VGA analog input 28 Product support ...29 Preparing to call technical support ...29 Appendix C LCD monitor quality and pixel policy 30 vi

User Guide 5
Page 7
... Drivers & Downloads, and then follow the on your media disc, if one MHL/HDMI video input ● VGA (analog) video input ● DisplayPort to HDMI adapter (select models) ● Integrated 4-Watt speakers with wide viewing angle technology for a better field of view ● One HDMI and one is included, or in several languages for easy setup and screen optimization ● My Display software or HP Display Assistant software (depending on the model) included for adjusting monitor settings ● Tilt capability ● Software...
... Drivers & Downloads, and then follow the on your media disc, if one MHL/HDMI video input ● VGA (analog) video input ● DisplayPort to HDMI adapter (select models) ● Integrated 4-Watt speakers with wide viewing angle technology for a better field of view ● One HDMI and one is included, or in several languages for easy setup and screen optimization ● My Display software or HP Display Assistant software (depending on the model) included for adjusting monitor settings ● Tilt capability ● Software...
User Guide 5
Page 8
... the equipment: • Plug the power cord into a grounded (earthed) 3-pin outlet. This guide is located on dressers, bookcases, shelves, desks, speakers, chests, or carts may accidentally step on a cord or cable. LCD monitors that they cannot be specifically labeled as a power strip or Uninterruptible Power Supply (UPS). Consider placing the monitor in your documentation kit. Not all cords and cables connected to the LCD monitor so that are...
... the equipment: • Plug the power cord into a grounded (earthed) 3-pin outlet. This guide is located on dressers, bookcases, shelves, desks, speakers, chests, or carts may accidentally step on a cord or cable. LCD monitors that they cannot be specifically labeled as a power strip or Uninterruptible Power Supply (UPS). Consider placing the monitor in your documentation kit. Not all cords and cables connected to the LCD monitor so that are...
User Guide 5
Page 9
... yourself. If the monitor is not operating properly or has been dropped or damaged, contact an authorized HP dealer, reseller, or service provider. ● Use only a power source and connection appropriate for ventilation. Cleaning the monitor 1. For more difficult cleaning situations, use . You may need it from the back of the cord. Look on the cord. ● Keep the monitor in the cabinet are covered in a storage...
... yourself. If the monitor is not operating properly or has been dropped or damaged, contact an authorized HP dealer, reseller, or service provider. ● Use only a power source and connection appropriate for ventilation. Cleaning the monitor 1. For more difficult cleaning situations, use . You may need it from the back of the cord. Look on the cord. ● Keep the monitor in the cabinet are covered in a storage...
User Guide 5
Page 12
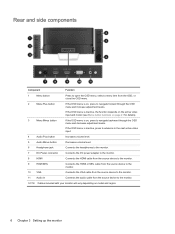
... OSD menu and increase adjustment levels. If the OSD menu is inactive, press to advance to the next active video input. 4 Audio Plus button Increases volume level. 5 Audio Minus button Decreases volume level. 6 Headphone jack Connects the headphones to the monitor. 7 DC Power connector Connects the DC power adapter to the monitor. 8 HDMI Connects the HDMI cable from the source device to the monitor. 9 HDMI MHL Connects the HDMI or MHL cable from the source device to the monitor. 10 VGA Connects the VGA cable from the source...
... OSD menu and increase adjustment levels. If the OSD menu is inactive, press to advance to the next active video input. 4 Audio Plus button Increases volume level. 5 Audio Minus button Decreases volume level. 6 Headphone jack Connects the headphones to the monitor. 7 DC Power connector Connects the DC power adapter to the monitor. 8 HDMI Connects the HDMI cable from the source device to the monitor. 9 HDMI MHL Connects the HDMI or MHL cable from the source device to the monitor. 10 VGA Connects the VGA cable from the source...
User Guide 5
Page 20
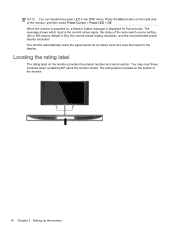
... select Power Control > Power LED > Off. factory default is displayed for the display. You may need these numbers when contacting HP about the monitor model. NOTE: You can disable the power LED in the OSD menu. Press the Menu button on the bottom of the monitor. 14 Chapter 3 Setting up the monitor The monitor automatically scans the signal inputs for an active input and uses that input for five seconds. The rating label is powered on the monitor provides the product number and serial number...
... select Power Control > Power LED > Off. factory default is displayed for the display. You may need these numbers when contacting HP about the monitor model. NOTE: You can disable the power LED in the OSD menu. Press the Menu button on the bottom of the monitor. 14 Chapter 3 Setting up the monitor The monitor automatically scans the signal inputs for an active input and uses that input for five seconds. The rating label is powered on the monitor provides the product number and serial number...
User Guide 5
Page 22
... on -screen instructions. 5. After you can install the .INF and .ICM files from within graphics programs that the proper resolution and refresh rates appear in conjunction with the monitor contains files you determine that are available for each calibrated color space) (select models) ● My Display software (select models) ● HP Display Assistant software (select models) The Information file The .INF file defines monitor resources used in the Windows Display control panel. 16...
... on -screen instructions. 5. After you can install the .INF and .ICM files from within graphics programs that the proper resolution and refresh rates appear in conjunction with the monitor contains files you determine that are available for each calibrated color space) (select models) ● My Display software (select models) ● HP Display Assistant software (select models) The Information file The .INF file defines monitor resources used in the Windows Display control panel. 16...
User Guide 5
Page 23
... then click Next. 5. The language of an installation error. Select Drivers & Downloads, type your monitor model in the event of the software itself will see while installing the software. You can also easily adjust settings such as brightness, color, and contrast using My Display software. For additional information, refer to the on -screen instructions to download the software. You can select settings for optimum viewing. Or ● Click Windows Start ™ on the driver. 7. Select your computer...
... then click Next. 5. The language of an installation error. Select Drivers & Downloads, type your monitor model in the event of the software itself will see while installing the software. You can also easily adjust settings such as brightness, color, and contrast using My Display software. For additional information, refer to the on -screen instructions to download the software. You can select settings for optimum viewing. Or ● Click Windows Start ™ on the driver. 7. Select your computer...
User Guide 5
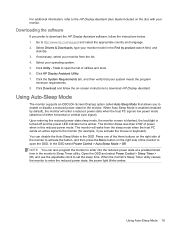
Page 25
... User Guide included on -screen instructions to download HP Display Assistant. Go to set the sleep time. If necessary, select your monitor from the sleep mode when the host PC sends an active signal to the monitor (for example, if you to enable or disable a reduced power state for the monitor. Click HP Display Assistant Utility. 7. You can also program the monitor to open the OSD. Open the OSD and select Power Control > Sleep Timer > On, and use...
... User Guide included on -screen instructions to download HP Display Assistant. Go to set the sleep time. If necessary, select your monitor from the sleep mode when the host PC sends an active signal to the monitor (for example, if you to enable or disable a reduced power state for the monitor. Click HP Display Assistant Utility. 7. You can also program the monitor to open the OSD. Open the OSD and select Power Control > Sleep Timer > On, and use...
User Guide 5
Page 26
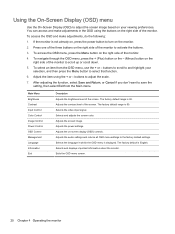
... audio settings and returns all OSD menu settings to adjust the scale. 7. Using the On-Screen Display (OSD) menu Use the On-Screen Display (OSD) to adjust the screen image based on your selection, and then press the Menu button to select that function. 6. To access the OSD menu, press the Menu button on the right side of the screen. To select an item from the Main menu. Selects the video input signal. Selects the language in the OSD using the + or - Main Menu Brightness Contrast Input Control Color Control Image Control Power Control OSD Control...
... audio settings and returns all OSD menu settings to adjust the scale. 7. Using the On-Screen Display (OSD) menu Use the On-Screen Display (OSD) to adjust the screen image based on your selection, and then press the Menu button to select that function. 6. To access the OSD menu, press the Menu button on the right side of the screen. To select an item from the Main menu. Selects the video input signal. Selects the language in the OSD using the + or - Main Menu Brightness Contrast Input Control Color Control Image Control Power Control OSD Control...
User Guide 5
Page 32
... is disconnected. Open the OSD menu and select Brightness to unlock the power button function. Video resolution and/or refresh rate are set auto-sleep to a supported setting (see Recognizing preset display resolutions on the right side of Range is disabled. The monitor's power saving control Open the OSD menu and select Power Control > Auto- Press and hold the power button for ten seconds. Press the front panel power button. Connect the video cable properly. Open the OSD menu and select the Input Control menu. Monitor video cable is too low. Sleep Mode and set higher than...
... is disconnected. Open the OSD menu and select Brightness to unlock the power button function. Video resolution and/or refresh rate are set auto-sleep to a supported setting (see Recognizing preset display resolutions on the right side of Range is disabled. The monitor's power saving control Open the OSD menu and select Power Control > Auto- Press and hold the power button for ten seconds. Press the front panel power button. Connect the video cable properly. Open the OSD menu and select the Input Control menu. Monitor video cable is too low. Sleep Mode and set higher than...
User Guide 5
Page 34
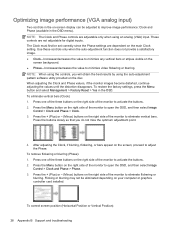
... Menu button on the right side of the monitor to open the OSD, and then select Image Control > Clock and Phase > Phase. 3. NOTE: The Clock and Phase controls are not adjustable for digital inputs. NOTE: When using the controls, you do not miss the optimum adjustment point. 4. Press the + (Plus) or - (Minus) buttons on the screen, proceed to adjust the Phase. To correct screen position (Horizontal Position or Vertical Position): 28 Appendix B Support and troubleshooting...
... Menu button on the right side of the monitor to open the OSD, and then select Image Control > Clock and Phase > Phase. 3. NOTE: The Clock and Phase controls are not adjustable for digital inputs. NOTE: When using the controls, you do not miss the optimum adjustment point. 4. Press the + (Plus) or - (Minus) buttons on the screen, proceed to adjust the Phase. To correct screen position (Horizontal Position or Vertical Position): 28 Appendix B Support and troubleshooting...


