User Manual
Page 2
HP iPAQ products are powered by Hewlett-Packard Development Company, L.P. Java and all Java-based trademarks and logos are trademarks of its proprietor and used by Microsoft&#...
HP iPAQ products are powered by Hewlett-Packard Development Company, L.P. Java and all Java-based trademarks and logos are trademarks of its proprietor and used by Microsoft&#...
User Manual
Page 3
... Install the battery and replace the battery cover 8 Step 3: Charge the battery ...9 Step 4: Turn on your HP iPAQ ...10 Step 5: Locate the stylus ...10 Step 6: Use the keyboard ...11 5 Get started with your HP iPAQ The Today screen ...13 Launch Getting Started ...13 Status icons ...14 Use the touch screen display ...14 Use... shortcut menus ...15 Use the 5-way optical navigation ...15 Use the main buttons on the HP iPAQ 15 Answer/Send key ...16 End/Power key ...16 Windows key ...16 ok key ...16 Volume up/down keys ...16 Camera key ...16 Keyboard...
... Install the battery and replace the battery cover 8 Step 3: Charge the battery ...9 Step 4: Turn on your HP iPAQ ...10 Step 5: Locate the stylus ...10 Step 6: Use the keyboard ...11 5 Get started with your HP iPAQ The Today screen ...13 Launch Getting Started ...13 Status icons ...14 Use the touch screen display ...14 Use... shortcut menus ...15 Use the 5-way optical navigation ...15 Use the main buttons on the HP iPAQ 15 Answer/Send key ...16 End/Power key ...16 Windows key ...16 ok key ...16 Volume up/down keys ...16 Camera key ...16 Keyboard...

User Manual
Page 4
...on-screen keyboard ...17 Use Key Guard ...18 Know your device ...18 Find information about your HP iPAQ 18 Access programs ...19 View the operating system (OS) information 20 Customize your HP iPAQ ...20 Create a device name ...20 Specify owner information 20 Change the regional settings 21 Adjust ...Adjust the speed for scrolling through items in a list 26 Use the proximity sensor 26 Protect your HP iPAQ with a password 26 Battery-saving tips ...27 Power Save Mode ...28 6 Use your HP iPAQ Check connection and signal strength 29 Call features ...29 Make a call ...29 Call a contact ...29...
...on-screen keyboard ...17 Use Key Guard ...18 Know your device ...18 Find information about your HP iPAQ 18 Access programs ...19 View the operating system (OS) information 20 Customize your HP iPAQ ...20 Create a device name ...20 Specify owner information 20 Change the regional settings 21 Adjust ...Adjust the speed for scrolling through items in a list 26 Use the proximity sensor 26 Protect your HP iPAQ with a password 26 Battery-saving tips ...27 Power Save Mode ...28 6 Use your HP iPAQ Check connection and signal strength 29 Call features ...29 Make a call ...29 Call a contact ...29...
User Manual
Page 7
... 67 Create a Bluetooth partnership 67 End a Bluetooth partnership 68 Accept a Bluetooth partnership 68 Edit a Bluetooth partnership 68 Connect to a computer using Bluetooth 69 Use your HP iPAQ as a wireless modem with Bluetooth 69 Bluetooth device profiles ...69 Access services ...70 Set up an incoming or outgoing Bluetooth communications (COM) port 70 End...
... 67 Create a Bluetooth partnership 67 End a Bluetooth partnership 68 Accept a Bluetooth partnership 68 Edit a Bluetooth partnership 68 Connect to a computer using Bluetooth 69 Use your HP iPAQ as a wireless modem with Bluetooth 69 Bluetooth device profiles ...69 Access services ...70 Set up an incoming or outgoing Bluetooth communications (COM) port 70 End...
User Manual
Page 8
... Player ...82 Customer Feedback ...82 Games ...83 Bubble Breaker ...83 Solitaire ...83 Global Positioning System (GPS) on your HP iPAQ 83 Prepare your HP iPAQ ...83 Verify Internet access ...83 Verify the date and time ...84 Download the GPS Connection Utility data file 84 Verify compatibility...software 85 Google Maps™ for mobile ...86 Google Search ...87 HP Asset Viewer ...87 Certificates ...88 HP Enterprise Mobility Suite ...88 HP iPAQ DataConnect ...88 HP Photosmart Mobile ...89 View the pictures and videos stored on your HP iPAQ or a storage card 89 Attach a voice note to a picture...
... Player ...82 Customer Feedback ...82 Games ...83 Bubble Breaker ...83 Solitaire ...83 Global Positioning System (GPS) on your HP iPAQ 83 Prepare your HP iPAQ ...83 Verify Internet access ...83 Verify the date and time ...84 Download the GPS Connection Utility data file 84 Verify compatibility...software 85 Google Maps™ for mobile ...86 Google Search ...87 HP Asset Viewer ...87 Certificates ...88 HP Enterprise Mobility Suite ...88 HP iPAQ DataConnect ...88 HP Photosmart Mobile ...89 View the pictures and videos stored on your HP iPAQ or a storage card 89 Attach a voice note to a picture...
User Manual
Page 9
... library ...108 Windows Update ...108 16 Product specifications System specifications ...109 Physical specifications ...110 Operating environment ...110 17 Guidelines for care and maintenance Use your HP iPAQ appropriately ...111 Clean your HP iPAQ ...111 Carry or store your HP iPAQ ...111 Use accessories ...111 ix
... library ...108 Windows Update ...108 16 Product specifications System specifications ...109 Physical specifications ...110 Operating environment ...110 17 Guidelines for care and maintenance Use your HP iPAQ appropriately ...111 Clean your HP iPAQ ...111 Carry or store your HP iPAQ ...111 Use accessories ...111 ix

User Manual
Page 13
... e-mail message about special offers and promotions. Register your new HP iPAQ with the instructions necessary to set up for free support alerts, software updates, and personalized newsletters. 1 Welcome to your HP iPAQ Welcome and congratulations on the purchase of all the features and ...enjoy your new HP iPAQ. Please read the user instructions contained in this Product Guide before using your HP iPAQ. NOTE: In addition to update your online profile. Visit http://www.register.hp.com to register your HP iPAQ or to the instructions contained in this HP iPAQ Getting Started Guide...
... e-mail message about special offers and promotions. Register your new HP iPAQ with the instructions necessary to set up for free support alerts, software updates, and personalized newsletters. 1 Welcome to your HP iPAQ Welcome and congratulations on the purchase of all the features and ...enjoy your new HP iPAQ. Please read the user instructions contained in this Product Guide before using your HP iPAQ. NOTE: In addition to update your online profile. Visit http://www.register.hp.com to register your HP iPAQ or to the instructions contained in this HP iPAQ Getting Started Guide...
User Manual
Page 14
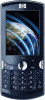
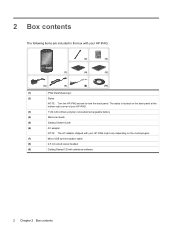
...on the back panel at the bottom-right corner of your HP iPAQ. (3) 1140 mAh Lithium-polymer removable/rechargeable battery (4) Welcome Guide (5) Getting Started Guide (6) AC adapter NOTE: The AC adapter shipped with your HP iPAQ might vary depending on the country/region. (7) Micro-USB... synchronization cable (8) 2.5 mm wired stereo headset (9) Getting Started CD with your HP iPAQ. 2 Box contents The following items are included in the box with...
...on the back panel at the bottom-right corner of your HP iPAQ. (3) 1140 mAh Lithium-polymer removable/rechargeable battery (4) Welcome Guide (5) Getting Started Guide (6) AC adapter NOTE: The AC adapter shipped with your HP iPAQ might vary depending on the country/region. (7) Micro-USB... synchronization cable (8) 2.5 mm wired stereo headset (9) Getting Started CD with your HP iPAQ. 2 Box contents The following items are included in the box with...

User Manual
Page 15
... navigate menus, change feature settings, and play games. Front panel components 3 3 Components To use , and then locks the screen and turns off the HP iPAQ. NOTE: The keyboard layout might vary depending on the keyboard to wake it up , down, left, and right on the screen. Press and hold for... 1 second to put your HP iPAQ to its full potential, identify components and learn about its functions. QWERTY Keyboard Use keys on the country/ region. Scroll by sliding your selection, ...
... navigate menus, change feature settings, and play games. Front panel components 3 3 Components To use , and then locks the screen and turns off the HP iPAQ. NOTE: The keyboard layout might vary depending on the keyboard to wake it up , down, left, and right on the screen. Press and hold for... 1 second to put your HP iPAQ to its full potential, identify components and learn about its functions. QWERTY Keyboard Use keys on the country/ region. Scroll by sliding your selection, ...

User Manual
Page 17
... to avoid any accidental calls. Key Guard will disable buttons and the touchscreen on the screen and input information. Use to select elements on your HP iPAQ to connect the Micro-USB charging/synchronization cable.
... to avoid any accidental calls. Key Guard will disable buttons and the touchscreen on the screen and input information. Use to select elements on your HP iPAQ to connect the Micro-USB charging/synchronization cable.

User Manual
Page 18
... component will be visible externally. Slide up for data storage. NOTE: This component will be visible externally. Use the speaker to listen to illuminate your HP iPAQ on page 7 and Storage cards on the screen and input information. Use the camera flash LED to music or as a speakerphone. Covers the battery, SIM...
... component will be visible externally. Slide up for data storage. NOTE: This component will be visible externally. Use the speaker to listen to illuminate your HP iPAQ on page 7 and Storage cards on the screen and input information. Use the camera flash LED to music or as a speakerphone. Covers the battery, SIM...
User Manual
Page 19
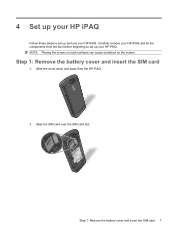
Carefully remove your HP iPAQ and all the components from the HP iPAQ. 2. Step 1: Remove the battery cover and insert the SIM card 1. Align the SIM card over the SIM card slot. NOTE: Placing the screen on hard surfaces can cause scratches on the screen. Slide the cover down and away from the box before beginning to set up and use your HP iPAQ. Step 1: Remove the battery cover and insert the SIM card 7 4 Set up your HP iPAQ Follow these steps to set up your HP iPAQ.
Carefully remove your HP iPAQ and all the components from the HP iPAQ. 2. Step 1: Remove the battery cover and insert the SIM card 1. Align the SIM card over the SIM card slot. NOTE: Placing the screen on hard surfaces can cause scratches on the screen. Slide the cover down and away from the box before beginning to set up and use your HP iPAQ. Step 1: Remove the battery cover and insert the SIM card 7 4 Set up your HP iPAQ Follow these steps to set up your HP iPAQ.
User Manual
Page 20
... the upper-right corner of the screen. 4. Slide the SIM card into the SIM card slot. If the battery is not correctly inserted in the HP iPAQ and you turn on the battery with the housing pins in the battery compartment, and insert the battery. 8 Chapter 4 Set up your... HP iPAQ If the SIM card is already inserted, remove it before inserting the SIM card. 3. Slide the switch, located over the battery, towards the right to ...
... the upper-right corner of the screen. 4. Slide the SIM card into the SIM card slot. If the battery is not correctly inserted in the HP iPAQ and you turn on the battery with the housing pins in the battery compartment, and insert the battery. 8 Chapter 4 Set up your... HP iPAQ If the SIM card is already inserted, remove it before inserting the SIM card. 3. Slide the switch, located over the battery, towards the right to ...
User Manual
Page 21
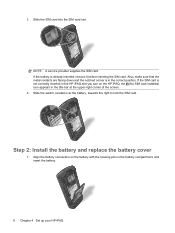
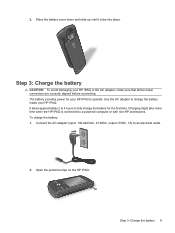
...-63Hz, output: 5VDC, 1A) to a powered computer or with non-HP accessories. Step 3: Charge the battery 9 Charging might take more time when the HP iPAQ is connected to an electrical outlet. 2. Open the protective flap on the HP iPAQ. Place the battery cover down and slide up until it locks into place... 2 to 4 hours to operate. The battery provides power for your HP iPAQ to fully charge the battery for the first time. To charge the battery: 1. 2. Use the AC adapter to charge the battery inside your HP iPAQ or the AC adapter, make sure that all the metal connectors are correctly...
...-63Hz, output: 5VDC, 1A) to a powered computer or with non-HP accessories. Step 3: Charge the battery 9 Charging might take more time when the HP iPAQ is connected to an electrical outlet. 2. Open the protective flap on the HP iPAQ. Place the battery cover down and slide up until it locks into place... 2 to 4 hours to operate. The battery provides power for your HP iPAQ to fully charge the battery for the first time. To charge the battery: 1. 2. Use the AC adapter to charge the battery inside your HP iPAQ or the AC adapter, make sure that all the metal connectors are correctly...

User Manual
Page 22
...your computer through the Micro-USB synchronization cable. Tap the keyboard icon on the screen to the Micro-USB connector port on your HP iPAQ Press and hold the (End/Power) key for five seconds to specify information. The cable connector only fits one way. To ... select items on -screen keyboard. Follow the instructions on the screen to a computer that has the software already installed on your HP iPAQ. Alternatively, you connect your HP iPAQ, tap Start > Settings > System > Power > USB Charging. If the connector does not insert easily, turn on the computer...
...your computer through the Micro-USB synchronization cable. Tap the keyboard icon on the screen to the Micro-USB connector port on your HP iPAQ Press and hold the (End/Power) key for five seconds to specify information. The cable connector only fits one way. To ... select items on -screen keyboard. Follow the instructions on the screen to a computer that has the software already installed on your HP iPAQ. Alternatively, you connect your HP iPAQ, tap Start > Settings > System > Power > USB Charging. If the connector does not insert easily, turn on the computer...

User Manual
Page 23
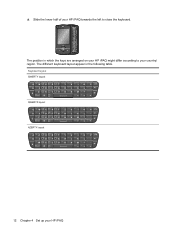
.... The on-screen content automatically switches to replace it after you finish using it. Slide the keyboard into the HP iPAQ to return to enter text, numbers, and symbols on the country/region. ▲ Slide the lower half of... Slide out the keyboard to the portrait view. NOTE: The keyboard layout might vary depending on your HP iPAQ towards the right to view the keyboard to extend the stylus. 3. Step 6: Use the keyboard Your HP iPAQ is equipped with a full QWERTY keyboard. TAB Z 7 X 8 C 9 V # B = N & M % * (A ) S 4 D5 F 6 G+H \ J " K , L ; ' U € I $ O / P SYM Y_ 0 ...
.... The on-screen content automatically switches to replace it after you finish using it. Slide the keyboard into the HP iPAQ to return to enter text, numbers, and symbols on the country/region. ▲ Slide the lower half of... Slide out the keyboard to the portrait view. NOTE: The keyboard layout might vary depending on your HP iPAQ towards the right to view the keyboard to extend the stylus. 3. Step 6: Use the keyboard Your HP iPAQ is equipped with a full QWERTY keyboard. TAB Z 7 X 8 C 9 V # B = N & M % * (A ) S 4 D5 F 6 G+H \ J " K , L ; ' U € I $ O / P SYM Y_ 0 ...
User Manual
Page 24
... the left to your country/ region. The different keyboard layout appear in which the keys are arranged on your HP iPAQ AZERTY layout ~A @ Z 1 E2R3 T -Y _ U € I $ O / P SYM Y_ 0 ~Q@W 1 E 2 R 3 T - SHIFT 0 TAB ? ! 12 Chapter 4 Set up your HP iPAQ might differ according to close the keyboard. :. ! ? TAB Z 7 X 8 C 9 V # B = N & M % * (A ) S 4 D5 F 6 G+H \ J " K , L ; ' U € I $O /P SYM (Q ) S 4D5F 6G+H \J "K , L ; ' *W 7 X 8 C 9 V # B =N &M % :. Keyboard layout QWERTY layout ~Q @ W 1 E2R3...
... the left to your country/ region. The different keyboard layout appear in which the keys are arranged on your HP iPAQ AZERTY layout ~A @ Z 1 E2R3 T -Y _ U € I $ O / P SYM Y_ 0 ~Q@W 1 E 2 R 3 T - SHIFT 0 TAB ? ! 12 Chapter 4 Set up your HP iPAQ might differ according to close the keyboard. :. ! ? TAB Z 7 X 8 C 9 V # B = N & M % * (A ) S 4 D5 F 6 G+H \ J " K , L ; ' U € I $O /P SYM (Q ) S 4D5F 6G+H \J "K , L ; ' *W 7 X 8 C 9 V # B =N &M % :. Keyboard layout QWERTY layout ~Q @ W 1 E2R3...

User Manual
Page 25
... information. The Today screen 13 Tap to select it, and then tap Move Up or Move Down. View upcoming appointments. Tap to set up your HP iPAQ. You can view and access the following features and information from the Today screen: ● Date and Time - View the current date and time. For... more information, see Tasks on the Today screen. 4. On the Items tab, select the items to set up your HP iPAQ. Tap the task that you want to learn how to perform frequently used tasks and to display on page 54. ● Wireless Manager - The Today...
... information. The Today screen 13 Tap to select it, and then tap Move Up or Move Down. View upcoming appointments. Tap to set up your HP iPAQ. You can view and access the following features and information from the Today screen: ● Date and Time - View the current date and time. For... more information, see Tasks on the Today screen. 4. On the Items tab, select the items to set up your HP iPAQ. Tap the task that you want to learn how to perform frequently used tasks and to display on page 54. ● Wireless Manager - The Today...
User Manual
Page 26
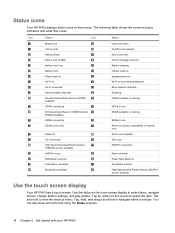
... feature settings, and play games. Use the stylus on ActiveSync inactive High Speed Uplink Packet Access (HSUPA) service available Use the touch screen display Your HP iPAQ has a touch screen. Tap and hold , and drag a scroll bar to navigate within a window. You can also draw and write text using ...the Notes program. 14 Chapter 5 Get started with your HP iPAQ The following table shows the common status indicators and what they mean. Tap, hold to view the shortcut menu. Tap an option on the screen...
... feature settings, and play games. Use the stylus on ActiveSync inactive High Speed Uplink Packet Access (HSUPA) service available Use the touch screen display Your HP iPAQ has a touch screen. Tap and hold , and drag a scroll bar to navigate within a window. You can also draw and write text using ...the Notes program. 14 Chapter 5 Get started with your HP iPAQ The following table shows the common status indicators and what they mean. Tap, hold to view the shortcut menu. Tap an option on the screen...
User Manual
Page 27
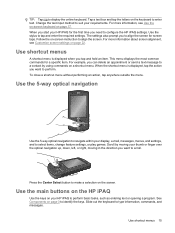
... menu is displayed when you need to perform basic tasks, such as entering text or opening a program. Use the main buttons on the HP iPAQ Use the keys on a shortcut menu. Scroll by using commands on your thumb or finger over the optical navigation up, down, left, ...or right, moving your HP iPAQ to configure the HP iPAQ settings. TIP: Tap to type information, commands, and messages. This menu displays the most common commands for screen taps. See Components on...
... menu is displayed when you need to perform basic tasks, such as entering text or opening a program. Use the main buttons on the HP iPAQ Use the keys on a shortcut menu. Scroll by using commands on your thumb or finger over the optical navigation up, down, left, ...or right, moving your HP iPAQ to configure the HP iPAQ settings. TIP: Tap to type information, commands, and messages. This menu displays the most common commands for screen taps. See Components on...


