
User Guide
Page 5
... HDMI Cable (Select Models Only 3-6 Audio and Video Cables and Adapters 3-6 High-Bandwidth Digital Content Protection (HDCP 3-7 Connecting the Audio Cable...3-7 Connecting the Power Cable ...3-8 Cable Management...3-9 Adjusting the Tilt...3-9 Adjusting the Swivel...3-10 Keyboard Parking...3-10 4 Operating the Monitor CD Software and Utilities ...4-1 Installing Drivers...4-1 Downloading updated drivers from the Internet 4-1 Using the Auto-Adjustment Function 4-2 Front-Panel Controls ...4-3 Using the On-screen Display (OSD) ...4-3 OSD Menu Selections ...4-4 Selecting Video Input Connectors...
... HDMI Cable (Select Models Only 3-6 Audio and Video Cables and Adapters 3-6 High-Bandwidth Digital Content Protection (HDCP 3-7 Connecting the Audio Cable...3-7 Connecting the Power Cable ...3-8 Cable Management...3-9 Adjusting the Tilt...3-9 Adjusting the Swivel...3-10 Keyboard Parking...3-10 4 Operating the Monitor CD Software and Utilities ...4-1 Installing Drivers...4-1 Downloading updated drivers from the Internet 4-1 Using the Auto-Adjustment Function 4-2 Front-Panel Controls ...4-3 Using the On-screen Display (OSD) ...4-3 OSD Menu Selections ...4-4 Selecting Video Input Connectors...

User Guide
Page 7
... resolutions ■ Video inputs supported: ❏ VGA analog signal (select models only) ❏ DVI digital signal (select models only) ❏ High-definition multimedia interface (HDMI) (select models only) ■ Fast response time, providing better experience for gaming and graphics ■ Easy viewing from a sitting or standing position, or while moving from one side of the monitor to the other ■ Tilt adjustment ■ Swivel adjustment ■ Removable pedestal and Video Electronics Standards Association (VESA...
... resolutions ■ Video inputs supported: ❏ VGA analog signal (select models only) ❏ DVI digital signal (select models only) ❏ High-definition multimedia interface (HDMI) (select models only) ■ Fast response time, providing better experience for gaming and graphics ■ Easy viewing from a sitting or standing position, or while moving from one side of the monitor to the other ■ Tilt adjustment ■ Swivel adjustment ■ Removable pedestal and Video Electronics Standards Association (VESA...
User Guide
Page 10
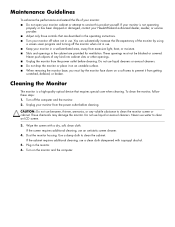
...; Keep your Hewlett-Packard authorized dealer, reseller, or service provider. ■ Adjust only those controls that requires special care when cleaning. Unplug your monitor cabinet or attempt to clean an LCD screen. 3. CAUTION: Do not use . Do not use water to service this product yourself. Plug in use benzene, thinner, ammonia, or any kind into cabinet slots or other openings. ■ Unplug the monitor from the power...
...; Keep your Hewlett-Packard authorized dealer, reseller, or service provider. ■ Adjust only those controls that requires special care when cleaning. Unplug your monitor cabinet or attempt to clean an LCD screen. 3. CAUTION: Do not use . Do not use water to service this product yourself. Plug in use benzene, thinner, ammonia, or any kind into cabinet slots or other openings. ■ Unplug the monitor from the power...

User Guide
Page 14
... mounting screws in the mounting holes. Some models will need to remove the screws, position the mounting device, then re-install the screws. 100 x 100mm Threaded holes for attaching wall mount 100 x 200mm Threaded holes for attaching wall mount 6. Attach a swing arm or other mounting fixture to the back of the panel are on your model). Four or six threaded holes are for mounting flat-panel monitors. 7. Follow the instructions included with the VESA...
... mounting screws in the mounting holes. Some models will need to remove the screws, position the mounting device, then re-install the screws. 100 x 100mm Threaded holes for attaching wall mount 100 x 200mm Threaded holes for attaching wall mount 6. Attach a swing arm or other mounting fixture to the back of the panel are on your model). Four or six threaded holes are for mounting flat-panel monitors. 7. Follow the instructions included with the VESA...
User Guide
Page 15
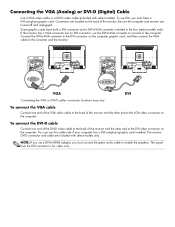
... the monitor has a VGA connector but no DVI connector, use a DVI-to-HDMI adapter, you must connect the green audio cable to the VGA video connector on the computer graphic card, and then connect the VGA cable to -VGA converter included in the box (select models only). NOTE: If you use the DVI-to-VGA converter to connect to the computer: Connect the DVI-to-VGA converter to the DVI connector on the computer. The signal from the DVI connector is for video only. Connectors are turned...
... the monitor has a VGA connector but no DVI connector, use a DVI-to-HDMI adapter, you must connect the green audio cable to the VGA video connector on the computer graphic card, and then connect the VGA cable to -VGA converter included in the box (select models only). NOTE: If you use the DVI-to-VGA converter to connect to the computer: Connect the DVI-to-VGA converter to the DVI connector on the computer. The signal from the DVI connector is for video only. Connectors are turned...

User Guide
Page 17
... a VGA or DVI signal converts only video data, not audio data. A separate audio connection is available in many sources, such as shown in monitor speakers to the computer by using a VGA or DVI signal, you use a DVI-to-HDMI adapter, you may vary Connecting the Audio Cable Connect the built-in the following illustration. High-definition content is not necessary when you must both video and audio data. Connecting the audio cables-connector locations may see a black screen or a lower resolution picture...
... a VGA or DVI signal converts only video data, not audio data. A separate audio connection is available in many sources, such as shown in monitor speakers to the computer by using a VGA or DVI signal, you use a DVI-to-HDMI adapter, you may vary Connecting the Audio Cable Connect the built-in the following illustration. High-definition content is not necessary when you must both video and audio data. Connecting the audio cables-connector locations may see a black screen or a lower resolution picture...
User Guide
Page 21
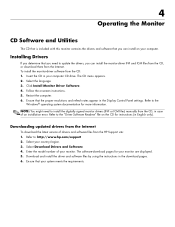
... Windows® operating system documentation for instructions (in English only). Follow the onscreen instructions. 5. Click Install Monitor Driver Software. 4. Ensure that your system meets the requirements. Enter the model number of your monitor are displayed. 5. The CD menu appears. 2. Refer to the "Driver Software Readme" file on your computer. Restart the computer. 6. The software-download pages for your monitor. Ensure that the proper resolutions and refresh rates appear in the Display Control Panel settings. Select Download Drivers...
... Windows® operating system documentation for instructions (in English only). Follow the onscreen instructions. 5. Click Install Monitor Driver Software. 4. Ensure that your system meets the requirements. Enter the model number of your monitor are displayed. 5. The CD menu appears. 2. Refer to the "Driver Software Readme" file on your computer. Restart the computer. 6. The software-download pages for your monitor. Ensure that the proper resolutions and refresh rates appear in the Display Control Panel settings. Select Download Drivers...
User Guide
Page 22
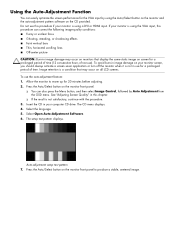
... picture CAUTION: Burn-in this procedure if your monitor is not in your computer CD drive. Image retention is a condition that may occur on monitors that display the same static image on your monitor is using a DVI or HDMI input. The CD menu displays. 4. Using the Auto-Adjustment Function You can easily optimize the screen performance for the VGA input by Auto Adjustment from the OSD menu. Allow the monitor to produce a stable, centered image. Select Open Auto-Adjustment Software. 6. Auto-adjustment setup...
... picture CAUTION: Burn-in this procedure if your monitor is not in your computer CD drive. Image retention is a condition that may occur on monitors that display the same static image on your monitor is using a DVI or HDMI input. The CD menu displays. 4. Using the Auto-Adjustment Function You can easily optimize the screen performance for the VGA input by Auto Adjustment from the OSD menu. Allow the monitor to produce a stable, centered image. Select Open Auto-Adjustment Software. 6. Auto-adjustment setup...
User Guide
Page 23
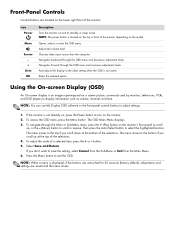
... OSD menu and increases adjustment levels. To adjust the scale of the monitor: Icon Power Menu Source - + Auto OK Description Turns the monitor on a screen picture, commonly used by monitors, televisions, VCRs, and DVD players to the top if you scroll up , or the - (Minus) button to standby or sleep mode. Select Save and Return. Chooses video input source from the Main Menu. 6. Navigates backward through the OSD menu and decreases adjustment levels. The OSD Main Menu displays. 3. The menu...
... OSD menu and increases adjustment levels. To adjust the scale of the monitor: Icon Power Menu Source - + Auto OK Description Turns the monitor on a screen picture, commonly used by monitors, televisions, VCRs, and DVD players to the top if you scroll up , or the - (Minus) button to standby or sleep mode. Select Save and Return. Chooses video input source from the Main Menu. 6. Navigates backward through the OSD menu and decreases adjustment levels. The OSD Main Menu displays. 3. The menu...

User Guide
Page 24
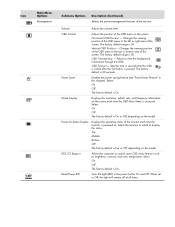
... red color levels. Icon Main Menu Options Submenu Options Switch Video Input (select models only) Brightness Description Switches the video input signal source when the monitor is 6500 K or Custom Color, depending on the screen background. Adjusts the brightness level of the display. Minimizes any horizontal noise, and clear or sharpen the image of the picture (VGA Input only). Changes to the previous menu level. ■ Save and Return - G - B - The factory default is active only if you change a menu item. ■ Reset...
... red color levels. Icon Main Menu Options Submenu Options Switch Video Input (select models only) Brightness Description Switches the video input signal source when the monitor is 6500 K or Custom Color, depending on the screen background. Adjusts the brightness level of the display. Minimizes any horizontal noise, and clear or sharpen the image of the picture (VGA Input only). Changes to the previous menu level. ■ Save and Return - G - B - The factory default is active only if you change a menu item. ■ Reset...
User Guide
Page 25
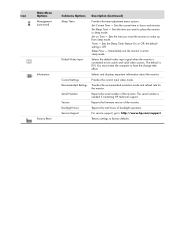
Vertical OSD Position - Changes the viewing position of the OSD menu to view the background information through the OSD. Adjust to the top or bottom area of the screen. Power Saver Enables the power saving feature (see "Power-Saver Feature" in the power button On and Off. The factory default range is On or Off, depending on the model. OSD Transparency - OSD Timeout - Select: On Off The factory default is 50. Horizontal OSD Position - Mode Display Displays the resolution, refresh rate, and frequency information on the screen each...
Vertical OSD Position - Changes the viewing position of the OSD menu to view the background information through the OSD. Adjust to the top or bottom area of the screen. Power Saver Enables the power saving feature (see "Power-Saver Feature" in the power button On and Off. The factory default range is On or Off, depending on the model. OSD Transparency - OSD Timeout - Select: On Off The factory default is 50. Horizontal OSD Position - Mode Display Displays the resolution, refresh rate, and frequency information on the screen each...
User Guide
Page 26
...service support, go to: http://www.hp.com/support Returns settings to have the change take effect. Set Sleep Time - Immediately sets the monitor to wake up from sleep mode. Reports the firmware version of the monitor. Provides the recommended resolution mode and refresh rate for the monitor. Icon Main Menu Options Management (continued) Information Factory Reset Submenu Options Sleep Timer Default Video Input Current Settings Recommended Settings Serial Number Version Backlight Hours Service Support Description (Continued) Provides the timer-adjustment menu options: Set...
...service support, go to: http://www.hp.com/support Returns settings to have the change take effect. Set Sleep Time - Immediately sets the monitor to wake up from sleep mode. Reports the firmware version of the monitor. Provides the recommended resolution mode and refresh rate for the monitor. Icon Main Menu Options Management (continued) Information Factory Reset Submenu Options Sleep Timer Default Video Input Current Settings Recommended Settings Serial Number Version Backlight Hours Service Support Description (Continued) Provides the timer-adjustment menu options: Set...

User Guide
Page 27
...source of Range - Change your computer for 10 seconds to the computer or monitor. ■ OSD Lock-out - Check to a lower resolution or refresh rate. Switching from the computer on the front panel for 10 seconds to lock the OSD. ■ No Input Signal - Indicates the monitor does not support the video card's input signal because its resolution or refresh rate are : ■ VGA connector (analog) ■ DVI-D connector (digital) ■ HDMI connector The monitor automatically determines which inputs have valid video signals, and displays the image. Restart your video card settings...
...source of Range - Change your computer for 10 seconds to the computer or monitor. ■ OSD Lock-out - Check to a lower resolution or refresh rate. Switching from the computer on the front panel for 10 seconds to lock the OSD. ■ No Input Signal - Indicates the monitor does not support the video card's input signal because its resolution or refresh rate are : ■ VGA connector (analog) ■ DVI-D connector (digital) ■ HDMI connector The monitor automatically determines which inputs have valid video signals, and displays the image. Restart your video card settings...

User Guide
Page 28
... the horizontal sync signal or the vertical sync signal. NOTE: The energy-saver feature works only when the monitor is connected to computers that is green and the monitor uses the normal watts of VGA input, run the Auto-Adjustment software on the CD. See "Optimizing Analog Video" in normal operating mode, the Power light is controlled by the computer. Display the adjustment-pattern application provided on the main Clock setting. To restore the factory settings, access the OSD menu, select Factory Reset...
... the horizontal sync signal or the vertical sync signal. NOTE: The energy-saver feature works only when the monitor is connected to computers that is green and the monitor uses the normal watts of VGA input, run the Auto-Adjustment software on the CD. See "Optimizing Analog Video" in normal operating mode, the Power light is controlled by the computer. Display the adjustment-pattern application provided on the main Clock setting. To restore the factory settings, access the OSD menu, select Factory Reset...
User Guide
Page 31
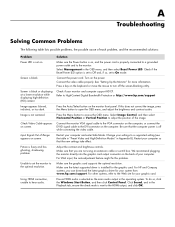
... the monitor front panel. Select Management in the operating system. To do so, click the Windows Start Button, and then click Control Panel. Screen is fuzzy and has ghosting, shadowing problem. Connect the power cord. Press the Menu button to turn off while connecting the video cable. Input Signal Out of Range appears on the power. Unable to set to open the OSD menu, and adjust the brightness and contrast scales. Make sure that the computer power is next to the optimal resolution. A Troubleshooting...
... the monitor front panel. Select Management in the operating system. To do so, click the Windows Start Button, and then click Control Panel. Screen is fuzzy and has ghosting, shadowing problem. Connect the power cord. Press the Menu button to turn off while connecting the video cable. Input Signal Out of Range appears on the power. Unable to set to open the OSD menu, and adjust the brightness and contrast scales. Make sure that the computer power is next to the optimal resolution. A Troubleshooting...

User Guide
Page 32
... Plug and Play. Monitor is always in speakers. Use the maximum refresh rate that your monitor is capable of at the resolution that the HP monitor drivers are installed. The computer graphic card should be in its slot. Check that the monitor video cable is properly connected to access the OSD menu. The computer power switch should either turn on most keyboards. Do the following: ■ Ensure the source signal is good by using . Check the monitor's video cable, and make...
... Plug and Play. Monitor is always in speakers. Use the maximum refresh rate that your monitor is capable of at the resolution that the HP monitor drivers are installed. The computer graphic card should be in its slot. Check that the monitor video cable is properly connected to access the OSD menu. The computer power switch should either turn on most keyboards. Do the following: ■ Ensure the source signal is good by using . Check the monitor's video cable, and make...
User Guide
Page 33
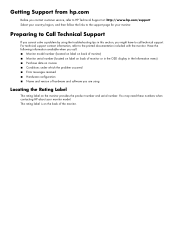
... Technical Support If you cannot solve a problem by using the troubleshooting tips in the Information menu) ■ Purchase date on invoice ■ Conditions under which the problem occurred ■ Error messages received ■ Hardware configuration ■ Name and version of hardware and software you are using Locating the Rating Label The rating label on the monitor provides the product number and serial number. The rating label...
... Technical Support If you cannot solve a problem by using the troubleshooting tips in the Information menu) ■ Purchase date on invoice ■ Conditions under which the problem occurred ■ Error messages received ■ Hardware configuration ■ Name and version of hardware and software you are using Locating the Rating Label The rating label on the monitor provides the product number and serial number. The rating label...

User Guide
Page 35
...actual performance may vary either higher or lower. HP LCD Monitors Face treatment: Glare polarizer with hard coating Input Terminals: ■ VGA connector (select models) ■ DVI-D 24-pin D-type connector (select models) ■ HDMI connector (select models) Specifications model 1859m Display Type: Viewable Image Size: Tilt: Maximum Weight (unpacked): Dimensions (h x w x d): Maximum Graphics Resolution: Optimum Graphics Resolution: Text Mode: Dot Pitch: Horizontal Frequency (analog mode): Vertical Frequency (analog mode): Environmental Requirements Temperature (independent of altitude...
...actual performance may vary either higher or lower. HP LCD Monitors Face treatment: Glare polarizer with hard coating Input Terminals: ■ VGA connector (select models) ■ DVI-D 24-pin D-type connector (select models) ■ HDMI connector (select models) Specifications model 1859m Display Type: Viewable Image Size: Tilt: Maximum Weight (unpacked): Dimensions (h x w x d): Maximum Graphics Resolution: Optimum Graphics Resolution: Text Mode: Dot Pitch: Horizontal Frequency (analog mode): Vertical Frequency (analog mode): Environmental Requirements Temperature (independent of altitude...
User Guide
Page 40
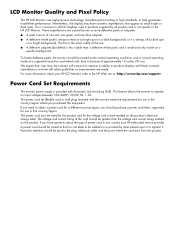
... HP LCD Monitor, refer to the HP Web site at a supported resolution and refresh rate, from the product. Particular attention should be paid to the plug, electrical outlet, and the point where the cord exits from a distance of the cord should be viewed under normal operating conditions and in that it is not specific to produce displays with Automatic Line Switching (ALS). The power cord set (flexible cord or wall plug...
... HP LCD Monitor, refer to the HP Web site at a supported resolution and refresh rate, from the product. Particular attention should be paid to the plug, electrical outlet, and the point where the cord exits from a distance of the cord should be viewed under normal operating conditions and in that it is not specific to produce displays with Automatic Line Switching (ALS). The power cord set (flexible cord or wall plug...

User Guide
Page 47
... 3-10 tilt 3-9 audio and video cables and adapters 3-6 B base unfolding 3-1 C cable management 3-9 cleaning 2-2 connecting audio cable 3-7 HDMI 3-6 power cable 3-8 VGA DVI-D 3-5 F features 1-1 front panel 4-3 H High-Bandwidth Digital Content Protection (HDCP) 3-7 I installing 3-1 - 3-10 K keyboard parking 3-10 M maintenance cleaning 2-2 guidelines 2-2 monitor conditions Auto Adjustment in Progress 4-7 Check Video Cable 4-7 Input Signal Out of Range 4-7 Monitor Going to Sleep 4-7 No Input Signal 4-7 OSD Lock-out 4-7 monitor operation 4-1 - 4-8 monitor setup 3-1 - 3-10 P power cable connecting...
... 3-10 tilt 3-9 audio and video cables and adapters 3-6 B base unfolding 3-1 C cable management 3-9 cleaning 2-2 connecting audio cable 3-7 HDMI 3-6 power cable 3-8 VGA DVI-D 3-5 F features 1-1 front panel 4-3 H High-Bandwidth Digital Content Protection (HDCP) 3-7 I installing 3-1 - 3-10 K keyboard parking 3-10 M maintenance cleaning 2-2 guidelines 2-2 monitor conditions Auto Adjustment in Progress 4-7 Check Video Cable 4-7 Input Signal Out of Range 4-7 Monitor Going to Sleep 4-7 No Input Signal 4-7 OSD Lock-out 4-7 monitor operation 4-1 - 4-8 monitor setup 3-1 - 3-10 P power cable connecting...


