
User Guide
Page 5
... Removing the Monitor Pedestal Base 16 Mounting the Monitor ...18 Locating the Rating Labels ...20 4 Operating the Monitor Software and Utilities ...21 The Information File ...21 The Image Color Matching File 21 Installing the .INF and .ICM Files ...22 Installing from the CD ...22 Downloading from the Worldwide Web 22 Using the Auto-Adjustment Function 23 Front Panel Controls ...24 Adjusting the Monitor Settings ...25 Using the On-Screen Display Menu 25 OSD Menu Selections 26 Optimizing Digital Conversion...
... Removing the Monitor Pedestal Base 16 Mounting the Monitor ...18 Locating the Rating Labels ...20 4 Operating the Monitor Software and Utilities ...21 The Information File ...21 The Image Color Matching File 21 Installing the .INF and .ICM Files ...22 Installing from the CD ...22 Downloading from the Worldwide Web 22 Using the Auto-Adjustment Function 23 Front Panel Controls ...24 Adjusting the Monitor Settings ...25 Using the On-Screen Display Menu 25 OSD Menu Selections 26 Optimizing Digital Conversion...
User Guide
Page 6
Sleep Timer Mode ...31 HP Display LiteSaver ...32 Installing the HP Display LiteSaver Software 32 sRGB Support ...33 Changing the Color Temperature 33 Installing the sRGB ICM File for Microsoft Windows 2000 and Windows XP 34 Installing the sRGB ICM File for Microsoft Windows Vista 34 Appendix A Troubleshooting Solving Common Problems ...35 Using the Worldwide Web ...36 Preparing to Call Technical Support 36 Appendix B Technical Specifications L1750 Model ...37 L1950 Model ...38 L1710 Model ...39...
Sleep Timer Mode ...31 HP Display LiteSaver ...32 Installing the HP Display LiteSaver Software 32 sRGB Support ...33 Changing the Color Temperature 33 Installing the sRGB ICM File for Microsoft Windows 2000 and Windows XP 34 Installing the sRGB ICM File for Microsoft Windows Vista 34 Appendix A Troubleshooting Solving Common Problems ...35 Using the Worldwide Web ...36 Preparing to Call Technical Support 36 Appendix B Technical Specifications L1750 Model ...37 L1950 Model ...38 L1710 Model ...39...
User Guide
Page 7
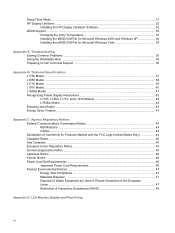
... resolutions; includes custom scaling for maximum image size while preserving original aspect ratio ● Wide viewing angle to allow viewing from a sitting or standing position, or moving side-to-side ● Tilt capability ● Pivot capability to rotate display to portrait mode (select models) ● Swivel and height adjustment capabilities (select models) ● Removable base for flexible monitor panel mounting solutions ● Video signal input to support VGA analog with VGA signal cable provided ● Video signal input to block side screen viewing (select models) HP LCD...
... resolutions; includes custom scaling for maximum image size while preserving original aspect ratio ● Wide viewing angle to allow viewing from a sitting or standing position, or moving side-to-side ● Tilt capability ● Pivot capability to rotate display to portrait mode (select models) ● Swivel and height adjustment capabilities (select models) ● Removable base for flexible monitor panel mounting solutions ● Video signal input to support VGA analog with VGA signal cable provided ● Video signal input to block side screen viewing (select models) HP LCD...
User Guide
Page 8
... cable lock ● Internal speakers (select models) ● Audio input signal cable (select models) ● Cable management feature for placement of cables and cords ● On-Screen Display (OSD) adjustments in English, Dutch, French, German, Italian, Japanese, Simplified Chinese, and Spanish for ease of setup and screen optimization ● HP Display Assistant for adjusting monitor settiings ● Software and documentation CD that includes software, monitor drivers, and product documentation ● Energy saver feature to meet requirements for reduced power...
... cable lock ● Internal speakers (select models) ● Audio input signal cable (select models) ● Cable management feature for placement of cables and cords ● On-Screen Display (OSD) adjustments in English, Dutch, French, German, Italian, Japanese, Simplified Chinese, and Spanish for ease of setup and screen optimization ● HP Display Assistant for adjusting monitor settiings ● Software and documentation CD that includes software, monitor drivers, and product documentation ● Energy saver feature to meet requirements for reduced power...
User Guide
Page 10
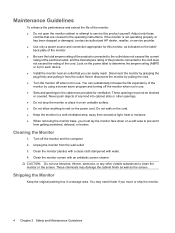
... service provider. ● Use only a power source and connection appropriate for ventilation. Disconnect the monitor by grasping the plug firmly and pulling it later if you can substantially increase the life expectancy of the monitor by pulling the cord. ● Turn the monitor off when not in use. These chemicals may need it from the wall outlet. 3. Turn off the monitor when not in the operating instructions...
... service provider. ● Use only a power source and connection appropriate for ventilation. Disconnect the monitor by grasping the plug firmly and pulling it later if you can substantially increase the life expectancy of the monitor by pulling the cord. ● Turn the monitor off when not in use. These chemicals may need it from the wall outlet. 3. Turn off the monitor when not in the operating instructions...
User Guide
Page 28
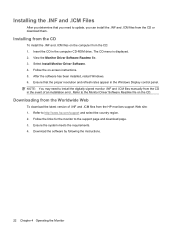
... that the proper resolution and refresh rates appear in the Windows Display control panel. Select Install Monitor Driver Software. 4. After the software has been installed, restart Windows. 6. Refer to the support page and download page. 3. Installing from the CD To install the .INF and .ICM files on the computer from the CD in the computer CD-ROM drive. Ensure that you need to the Monitor Driver Software Readme file on -screen instructions. 5. Insert the...
... that the proper resolution and refresh rates appear in the Windows Display control panel. Select Install Monitor Driver Software. 4. After the software has been installed, restart Windows. 6. Refer to the support page and download page. 3. Installing from the CD To install the .INF and .ICM files on the computer from the CD in the computer CD-ROM drive. Ensure that you need to the Monitor Driver Software Readme file on -screen instructions. 5. Insert the...
User Guide
Page 30
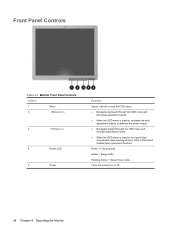
... = Sleep Timer mode. Front Panel Controls Table 4-1 Monitor Front Panel Controls Control 1 Menu 2 - (Minus)/Auto 3 + (Plus)/Input 4 Power LED 5 Power Function Opens, selects or exits the OSD menu. ● Navigates backward through the OSD menu and decreases adjustment levels. ● When the OSD menu is inactive, activates the auto adjustment feature to optimize the screen image. ● Navigates forward through the OSD menu and increases adjustment levels. ● When the OSD menu is inactive, an Input button chooses the video input signal input, VGA or DVI (select models...
... = Sleep Timer mode. Front Panel Controls Table 4-1 Monitor Front Panel Controls Control 1 Menu 2 - (Minus)/Auto 3 + (Plus)/Input 4 Power LED 5 Power Function Opens, selects or exits the OSD menu. ● Navigates backward through the OSD menu and decreases adjustment levels. ● When the OSD menu is inactive, activates the auto adjustment feature to optimize the screen image. ● Navigates forward through the OSD menu and increases adjustment levels. ● When the OSD menu is inactive, an Input button chooses the video input signal input, VGA or DVI (select models...
User Guide
Page 32
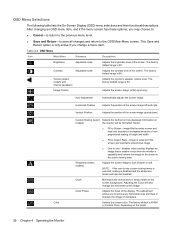
... contrast level of the display. Table 4-2 OSD Menu Icon Main Menu Submenu Description Brightness Adjustable scale Adjusts the brightness level of characters. Selects the screen color. The factory default range is smaller in the active viewing area Sharpness (select models) Adjusts the screen image to look distorted or elongated because of nonproportional scaling of height and width ● Fill to Screen - Image Control Adjusts the screen image. (VGA input only) Auto Adjustment Automatically adjusts the screen image. disables video scaling, displays an image...
... contrast level of the display. Table 4-2 OSD Menu Icon Main Menu Submenu Description Brightness Adjustable scale Adjusts the brightness level of characters. Selects the screen color. The factory default range is smaller in the active viewing area Sharpness (select models) Adjusts the screen image to look distorted or elongated because of nonproportional scaling of height and width ● Fill to Screen - Image Control Adjusts the screen image. (VGA input only) Auto Adjustment Automatically adjusts the screen image. disables video scaling, displays an image...
User Guide
Page 33
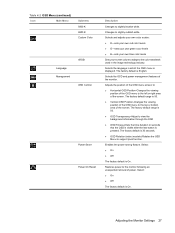
... reddish white. The factory default range is displayed. Enables the power saving feature. Changes to the monitor following an unexpected removal of power. Selects the language in which the OSD menu is 50. ● Vertical OSD Position-Changes the viewing position of the OSD menu to support pivot function. Select: ● On ● Off The factory default is On. Select: ● On ● Off The factory default is On. Adjusts the position of the OSD menu screen to: ● Horizontal OSD Position-Changes the viewing position of the OSD menu...
... reddish white. The factory default range is displayed. Enables the power saving feature. Changes to the monitor following an unexpected removal of power. Selects the language in which the OSD menu is 50. ● Vertical OSD Position-Changes the viewing position of the OSD menu to support pivot function. Select: ● On ● Off The factory default is On. Select: ● On ● Off The factory default is On. Adjusts the position of the OSD menu screen to: ● Horizontal OSD Position-Changes the viewing position of the OSD menu...
User Guide
Page 34
... Off. DVI - Turns off the power LED on the front panel of the monitor each time the OSD Main Menu is Top. Table 4-2 OSD Menu (continued) Icon Main Menu Video Input Control (select models) Submenu Mode Display Power-On Status Display DDC/CI Support Bezel Power LED Sleep Timer Switch Video Input Description Displays the resolution, refresh rate and frequency information on the screen each time the monitor is On. Select: ● On ● Off The factory default is the factory default. DVI is On. Analog - VGA - Selects DVI input. Displays the operating...
... Off. DVI - Turns off the power LED on the front panel of the monitor each time the OSD Main Menu is Top. Table 4-2 OSD Menu (continued) Icon Main Menu Video Input Control (select models) Submenu Mode Display Power-On Status Display DDC/CI Support Bezel Power LED Sleep Timer Switch Video Input Description Displays the resolution, refresh rate and frequency information on the screen each time the monitor is On. Select: ● On ● Off The factory default is the factory default. DVI is On. Analog - VGA - Selects DVI input. Displays the operating...

User Guide
Page 37
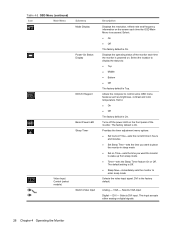
... the monitor uses the default signal input. ● Auto Adjustment in Progress-Indicates the auto-adjustment function is active. ● Monitor Going to Sleep-Indicates the screen display is entering a sleep mode. ● Check Video Cable-Indicates the video cable is not properly connected to lock the OSD. ● Power Button Lock-Out-Indicates the power button is not receiving a video signal from the PC on the monitor video input connector. This also extends the life of Range-Change resolution setting to lock out the power button function. If the power button is locked...
... the monitor uses the default signal input. ● Auto Adjustment in Progress-Indicates the auto-adjustment function is active. ● Monitor Going to Sleep-Indicates the screen display is entering a sleep mode. ● Check Video Cable-Indicates the video cable is not properly connected to lock the OSD. ● Power Button Lock-Out-Indicates the power button is not receiving a video signal from the PC on the monitor video input connector. This also extends the life of Range-Change resolution setting to lock out the power button function. If the power button is locked...
User Guide
Page 38
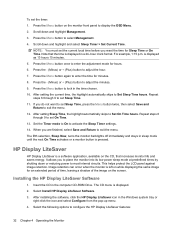
... installing the software, click the HP Display LiteSaver icon in the computer CD-ROM Drive. Scroll down and highlight Management. 3. Press the Menu button once to most internal circuits. When you to place the monitor into its low power sleep mode at predefined times by shutting down or reducing power to enter the adjustment mode for Sleep Time or On Time. This helps protect the LCD panel...
... installing the software, click the HP Display LiteSaver icon in the computer CD-ROM Drive. Scroll down and highlight Management. 3. Press the Menu button once to most internal circuits. When you to place the monitor into its low power sleep mode at predefined times by shutting down or reducing power to enter the adjustment mode for Sleep Time or On Time. This helps protect the LCD panel...
User Guide
Page 39
... HP Display LiteSaver functions; Status Shows the time until it is next due to launch the Main Menu of sRGB images on . To take advantage of keyboard or mouse activity. Set to 0 to sRGB and install the sRGB color profile (ICM) file. If disabled, the monitor will no longer control the monitor power until the monitor is next run . Changing the Color Temperature 1. It will turn...
... HP Display LiteSaver functions; Status Shows the time until it is next due to launch the Main Menu of sRGB images on . To take advantage of keyboard or mouse activity. Set to 0 to sRGB and install the sRGB color profile (ICM) file. If disabled, the monitor will no longer control the monitor power until the monitor is next run . Changing the Color Temperature 1. It will turn...
User Guide
Page 41
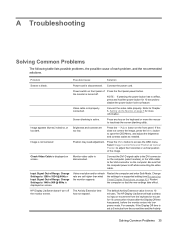
... Menu button to open the OSD Menu, and adjust the brightness and contrast scales as needed. Video resolution and/or refresh rate are too low. Change the settings to Chapter 3, Setting Up the Monitor on screen. has not elapsed. Press the front panel power button. Refer to a supported setting (see Recognizing Preset Display Resolutions on the computer. Connect the DVI-D signal cable to the DVI connector on the computer (select models), or the VGA cable to 10 minutes. Check Video Cable is set higher than what the monitor supports. The default...
... Menu button to open the OSD Menu, and adjust the brightness and contrast scales as needed. Video resolution and/or refresh rate are too low. Change the settings to Chapter 3, Setting Up the Monitor on screen. has not elapsed. Press the front panel power button. Refer to a supported setting (see Recognizing Preset Display Resolutions on the computer. Connect the DVI-D signal cable to the DVI connector on the computer (select models), or the VGA cable to 10 minutes. Check Video Cable is set higher than what the monitor supports. The default...
User Guide
Page 42
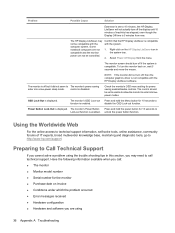
... HP Display LiteSaver is compatible with the computer system. Have the following information available when you cannot solve a problem using 36 Appendix A Troubleshooting The monitor's OSD Lock-out Press and hold the power button for 10 seconds to function is enabled. Power Button Lock-Out is disabled. unlock the power button function. The HP Display LiteSaver may need to call : ● The monitor ● Monitor model number ● Serial number for power saving enable/disable controls. Select Power Off Display from now. control is displayed. OSD Lock...
... HP Display LiteSaver is compatible with the computer system. Have the following information available when you cannot solve a problem using 36 Appendix A Troubleshooting The monitor's OSD Lock-out Press and hold the power button for 10 seconds to function is enabled. Power Button Lock-Out is disabled. unlock the power button function. The HP Display LiteSaver may need to call : ● The monitor ● Monitor model number ● Serial number for power saving enable/disable controls. Select Power Off Display from now. control is displayed. OSD Lock...
User Guide
Page 43
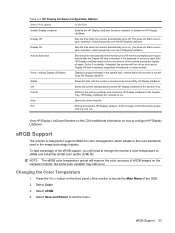
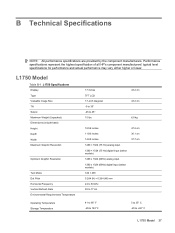
Performance specifications represent the highest specification of all HP's component manufacturers' typical level specifications for performance and actual performance may vary either higher or lower. L1750 Model Table B-1 L1750 Specifications Display Type Viewable Image Size Tilt Swivel Maximum Weight (Unpacked) Dimensions (include base) Height Depth Width Maximum Graphic Resolution Optimum Graphic Resolution Text Mode Dot Pitch Horizontal Frequency Vertical Refresh Rate Environmental Requirements Temperature Operating Temperature Storage Temperature 17 inches TFT LCD 17-inch diagonal...
Performance specifications represent the highest specification of all HP's component manufacturers' typical level specifications for performance and actual performance may vary either higher or lower. L1750 Model Table B-1 L1750 Specifications Display Type Viewable Image Size Tilt Swivel Maximum Weight (Unpacked) Dimensions (include base) Height Depth Width Maximum Graphic Resolution Optimum Graphic Resolution Text Mode Dot Pitch Horizontal Frequency Vertical Refresh Rate Environmental Requirements Temperature Operating Temperature Storage Temperature 17 inches TFT LCD 17-inch diagonal...
User Guide
Page 44
Table B-1 L1750 Specifications (continued) Relative Humidity 20 to 80% Power Source 90 - 265 VAC, 45/63 Hz Altitude: Operating 0 to 12,000 feet Storage 0 to 40,000 feet Power Consumption (maximum)
Table B-1 L1750 Specifications (continued) Relative Humidity 20 to 80% Power Source 90 - 265 VAC, 45/63 Hz Altitude: Operating 0 to 12,000 feet Storage 0 to 40,000 feet Power Consumption (maximum)
User Guide
Page 45
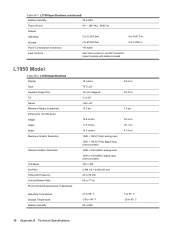
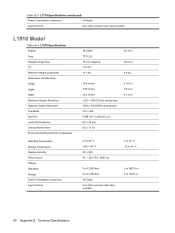
Table B-2 L1950 Specifications (continued) Power Source 90 - 265 VAC, 45/63 Hz Altitude: Operating 0 to 12,000 feet 0 to 3657.6 m Storage 0 to 40,000 feet 0 to 12192 m Power Consumption (maximum)
Table B-2 L1950 Specifications (continued) Power Source 90 - 265 VAC, 45/63 Hz Altitude: Operating 0 to 12,000 feet 0 to 3657.6 m Storage 0 to 40,000 feet 0 to 12192 m Power Consumption (maximum)
User Guide
Page 46
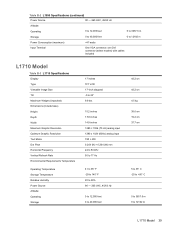
Table B-3 L1710 Specifications (continued) Power Consumption (maximum)
Table B-3 L1710 Specifications (continued) Power Consumption (maximum)
User Guide
Page 47
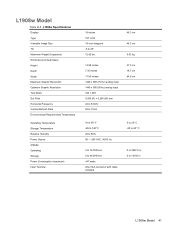
... Model Table B-5 L1908w Specifications Display Type Viewable Image Size Tilt Maximum Weight (Unpacked) Dimensions (include base) Height Depth Width Maximum Graphic Resolution Optimum Graphic Resolution Text Mode Dot Pitch Horizontal Frequency Vertical Refresh Rate Environmental Requirements Temperature Operating Temperature Storage Temperature Relative Humidity Power Source Altitude: Operating Storage Power Consumption (maximum) Input Terminal 19 inches TFT LCD 19-inch diagonal -5 to 25° 12.42 lbs. 48.3 cm 48.3 cm 5.63 kg 14.58 inches...
... Model Table B-5 L1908w Specifications Display Type Viewable Image Size Tilt Maximum Weight (Unpacked) Dimensions (include base) Height Depth Width Maximum Graphic Resolution Optimum Graphic Resolution Text Mode Dot Pitch Horizontal Frequency Vertical Refresh Rate Environmental Requirements Temperature Operating Temperature Storage Temperature Relative Humidity Power Source Altitude: Operating Storage Power Consumption (maximum) Input Terminal 19 inches TFT LCD 19-inch diagonal -5 to 25° 12.42 lbs. 48.3 cm 48.3 cm 5.63 kg 14.58 inches...


