User Manual
Page 48
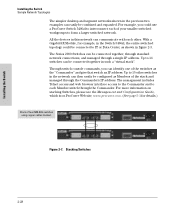
..., the entire switched topology could use a ProCurve Switch 5406zl to interconnect each of the stack and managed through the Commander's IP address. With a Gigabit-SX Module, for details.) Stack of the switches as Members of your smaller switched workgroups to each other switches in figure 2-3. The Series 2900 Switches can easily...
..., the entire switched topology could use a ProCurve Switch 5406zl to interconnect each of the stack and managed through the Commander's IP address. With a Gigabit-SX Module, for details.) Stack of the switches as Members of your smaller switched workgroups to each other switches in figure 2-3. The Series 2900 Switches can easily...
User Manual
Page 51
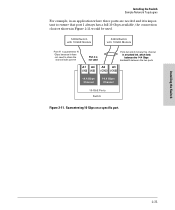
... ensure that port 1 always has a full 10 Gbps available, the connection choices shown in Figure 2-11 would be used. 5400zlSwitch with 10-GbE Module 5400zlSwitch with 10-GbE Module Port A1 is guaranteed 10 Gbps because it does not need to share the channel with port A4 Port 4 is not used Ports...
... ensure that port 1 always has a full 10 Gbps available, the connection choices shown in Figure 2-11 would be used. 5400zlSwitch with 10-GbE Module 5400zlSwitch with 10-GbE Module Port A1 is guaranteed 10 Gbps because it does not need to share the channel with port A4 Port 4 is not used Ports...
User Manual
Page 61
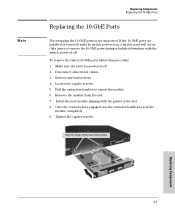
... edges of the board with the guides in the slot. 8. Remove any transceivers. 4. Insert the new module aligning with guides Replacing Components 4-3 Loosen the captive screws. 5. Remove the module from the slot. 7. Make sure the switch is not supported. Note Replacing Components Replacing the 10-GbE ...Ports Replacing the 10-GbE Ports Hot swapping the 10-GbE ports is powered off . Pull the extractors handles to seat the module completely. 9. Disconnect all network cables. 3. If the 10-GbE ports are installed or removed with the switch powered off . 2. Only ...
... edges of the board with the guides in the slot. 8. Remove any transceivers. 4. Insert the new module aligning with guides Replacing Components 4-3 Loosen the captive screws. 5. Remove the module from the slot. 7. Make sure the switch is not supported. Note Replacing Components Replacing the 10-GbE ...Ports Replacing the 10-GbE Ports Hot swapping the 10-GbE ports is powered off . Pull the extractors handles to seat the module completely. 9. Disconnect all network cables. 3. If the 10-GbE ports are installed or removed with the switch powered off . 2. Only ...
User Manual
Page 68
... Table 4-1 shows LED patterns on the next few pages. Refer to the corresponding diagnostic tip on the switch and the switch modules that indicate problem conditions. 1. Table 5-1. Check in the table for the diagnosis. † The Flashing behavior is an on.../off cycle once every 1.6 seconds, approximately. ** The Module Status LED is located on the module in * * * * * ➊ On Prolonged On * * Prolonged * On * ➋ On Flashing† * * Flashing† * * ➌ On...
... Table 4-1 shows LED patterns on the next few pages. Refer to the corresponding diagnostic tip on the switch and the switch modules that indicate problem conditions. 1. Table 5-1. Check in the table for the diagnosis. † The Flashing behavior is an on.../off cycle once every 1.6 seconds, approximately. ** The Module Status LED is located on the module in * * * * * ➊ On Prolonged On * * Prolonged * On * ➋ On Flashing† * * Flashing† * * ➌ On...

User Manual
Page 110
... button ... 3-4 if you lose the password ... 3-4 passwords, deleting ... 1-7 physical specifications, switch ... C-8 replacing components management module battery ... 4-4 replacing hardware fans ... 4-1 Reset button location on switch ... 1-3 restoring factory default configuration ... 5-12 reset button... ... 2-5 fiber-optic, specifications ... B-5 twisted-pair, wiring rules ... Index mounting the switch in ... 2-13 recycle statements ... B-2 HP Auto-MDIX feature ... A-2 types of ... 1-4, 2-5 non-standard network cables, effects ... 5-2 O optimizing 10-GbE port configuration ... ...
... button ... 3-4 if you lose the password ... 3-4 passwords, deleting ... 1-7 physical specifications, switch ... C-8 replacing components management module battery ... 4-4 replacing hardware fans ... 4-1 Reset button location on switch ... 1-3 restoring factory default configuration ... 5-12 reset button... ... 2-5 fiber-optic, specifications ... B-5 twisted-pair, wiring rules ... Index mounting the switch in ... 2-13 recycle statements ... B-2 HP Auto-MDIX feature ... A-2 types of ... 1-4, 2-5 non-standard network cables, effects ... 5-2 O optimizing 10-GbE port configuration ... ...
