HP LD4200 and LD4700 LCD Monitors User Guide
Page 5
...HP Digital Signage Models ...1 2 Safety and Maintenance Guidelines Important Safety Information ...2 Maintenance Guidelines ...3 Cleaning the Monitor ...3 Shipping the Monitor ...3 3 Setting Up the Monitor Installing the Stand (Sold Separately 4 Connecting the Speakers (Sold Separately 6 Rotating to the Portrait Position (Select Models 8 Using the Remote Control ...9 Inserting the Batteries ...9 Identifying Remote Control Buttons 10 Identifying Rear Components ...11 Connecting to External Devices ...12 Connecting to the Computer 12 Connecting Daisy Chain Monitors 14 VESA Mounting Support...
...HP Digital Signage Models ...1 2 Safety and Maintenance Guidelines Important Safety Information ...2 Maintenance Guidelines ...3 Cleaning the Monitor ...3 Shipping the Monitor ...3 3 Setting Up the Monitor Installing the Stand (Sold Separately 4 Connecting the Speakers (Sold Separately 6 Rotating to the Portrait Position (Select Models 8 Using the Remote Control ...9 Inserting the Batteries ...9 Identifying Remote Control Buttons 10 Identifying Rear Components ...11 Connecting to External Devices ...12 Connecting to the Computer 12 Connecting Daisy Chain Monitors 14 VESA Mounting Support...
HP LD4200 and LD4700 LCD Monitors User Guide
Page 6
... Sleep Time ...28 Auto Sleep ...28 Selecting Options ...29 Using the Key Lock 29 Using the ISM Method Option 29 Using the Tile Mode 29 Appendix A Troubleshooting Solving Common Problems ...32 Using the Worldwide Web ...34 Preparing to Call Technical Support 34 Appendix B Technical Specifications HP LD4200 LCD Monitor ...35 HP LD4700 LCD Monitor ...37 Recognizing Preset Display Resolutions 39 HP LD4200 and LD4700 Preset Display Modes 39 DTV Mode ...39 Power Indicator ...40 Appendix C Controlling the Multiple Product Connecting...
... Sleep Time ...28 Auto Sleep ...28 Selecting Options ...29 Using the Key Lock 29 Using the ISM Method Option 29 Using the Tile Mode 29 Appendix A Troubleshooting Solving Common Problems ...32 Using the Worldwide Web ...34 Preparing to Call Technical Support 34 Appendix B Technical Specifications HP LD4200 LCD Monitor ...35 HP LD4700 LCD Monitor ...37 Recognizing Preset Display Resolutions 39 HP LD4200 and LD4700 Preset Display Modes 39 DTV Mode ...39 Power Indicator ...40 Appendix C Controlling the Multiple Product Connecting...
HP LD4200 and LD4700 LCD Monitors User Guide
Page 9
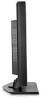
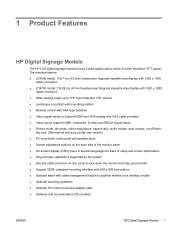
... wall mounting position ● Remote control with AAA type batteries ● Video signal inputs to support HDMI and VGA analog with VGA cable provided ● Video inputs support HDMI, composite, S-video and RS232 signal inputs ● Picture mode, tile mode, color temperature, aspect ratio, audio modes, auto volume, on/off timer, key lock, ISM method and auto config user controls ● PC sound jack, audio ports and speaker ports ● Screen adjustment buttons on the back side of the monitor panel ● On-screen display (OSD) menu in several languages for ease of setup and screen...
... wall mounting position ● Remote control with AAA type batteries ● Video signal inputs to support HDMI and VGA analog with VGA cable provided ● Video inputs support HDMI, composite, S-video and RS232 signal inputs ● Picture mode, tile mode, color temperature, aspect ratio, audio modes, auto volume, on/off timer, key lock, ISM method and auto config user controls ● PC sound jack, audio ports and speaker ports ● Screen adjustment buttons on the back side of the monitor panel ● On-screen display (OSD) menu in several languages for ease of setup and screen...

HP LD4200 and LD4700 LCD Monitors User Guide
Page 10
... properly support your safety, do not place anything on the Web at all cords and cables connected to the LCD monitor so that no one is located on power cords or cables. WARNING! When unplugging from the electrical outlet, grasp the cord by unplugging the power cord from the product by the plug. This guide is included with the monitor. Use a power strip whose manufacturer offers a Damage Replacement...
... properly support your safety, do not place anything on the Web at all cords and cables connected to the LCD monitor so that no one is located on power cords or cables. WARNING! When unplugging from the electrical outlet, grasp the cord by unplugging the power cord from the product by the plug. This guide is included with the monitor. Use a power strip whose manufacturer offers a Damage Replacement...

HP LD4200 and LD4700 LCD Monitors User Guide
Page 11
... pulling the cord. ● Turn the monitor off when not in the cabinet are provided for ventilation. Shipping the Monitor Keep the original packing box in the operating instructions. Never disconnect the monitor by wiping the screen and the cabinet with a "burned-in image" are covered in a storage area. For more difficult cleaning situations, use cleaners that contain any petroleum based materials such...
... pulling the cord. ● Turn the monitor off when not in the cabinet are provided for ventilation. Shipping the Monitor Keep the original packing box in the operating instructions. Never disconnect the monitor by wiping the screen and the cabinet with a "burned-in image" are covered in a storage area. For more difficult cleaning situations, use cleaners that contain any petroleum based materials such...

HP LD4200 and LD4700 LCD Monitors User Guide
Page 18
Turns the monitor on and off sound. Aspect Ratio Correction. Automatic adjustment function (operational for the analog signal only). Toggles through video: AV > Component1 > Component2 > RGB PC > HDMI/DVI. Press the button repetitively to select an appropriate time duration. Turns off . Opens the menu selection. If you want using the up and down button. Selects the video signal input. Identifying Remote Control Buttons Figure 3-14 Remote Control Buttons Component 1 AV 2 Sleep 3 PSM 4 Menu 5 Up and Down 6 Mute 7 Power 8 Input Select...
Turns the monitor on and off sound. Aspect Ratio Correction. Automatic adjustment function (operational for the analog signal only). Toggles through video: AV > Component1 > Component2 > RGB PC > HDMI/DVI. Press the button repetitively to select an appropriate time duration. Turns off . Opens the menu selection. If you want using the up and down button. Selects the video signal input. Identifying Remote Control Buttons Figure 3-14 Remote Control Buttons Component 1 AV 2 Sleep 3 PSM 4 Menu 5 Up and Down 6 Mute 7 Power 8 Input Select...
HP LD4200 and LD4700 LCD Monitors User Guide
Page 19
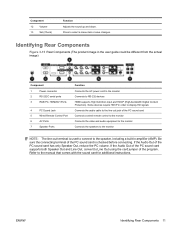
... actual image) Component 1 Power connector 2 RS-232C serial ports 3 RGB PC, HDMI/DVI Ports 4 PC Sound Jack 5 Wired Remote Control Port 6 AV Ports 7 Speaker Ports Function Connects the AC power cord to the monitor Connects to Line Out using the card jumper of the PC sound card is used to connect to the manual that comes with the sound card for additional instructions. If the Audio Out of the PC sound card supports both Speaker Out and Line Out, convert to RS-232 devices HDMI supports High Definition input...
... actual image) Component 1 Power connector 2 RS-232C serial ports 3 RGB PC, HDMI/DVI Ports 4 PC Sound Jack 5 Wired Remote Control Port 6 AV Ports 7 Speaker Ports Function Connects the AC power cord to the monitor Connects to Line Out using the card jumper of the PC sound card is used to connect to the manual that comes with the sound card for additional instructions. If the Audio Out of the PC sound card supports both Speaker Out and Line Out, convert to RS-232 devices HDMI supports High Definition input...

HP LD4200 and LD4700 LCD Monitors User Guide
Page 20
... Monitor ENWW For analog operation, connect the VGA (D-sub) signal cable to the RGB IN (1) connector on the computer. As shown in the image, fit the ferrite core to the VGA connector (2) on the rear of the monitor and the other end to the audio cable. Connecting to External Devices Connecting to a Mac computer, use the standard Macintosh adapter (3). Connect the signal input cable: a. Be sure the monitor, computer and all attached devices are turned...
... Monitor ENWW For analog operation, connect the VGA (D-sub) signal cable to the RGB IN (1) connector on the computer. As shown in the image, fit the ferrite core to the VGA connector (2) on the rear of the monitor and the other end to the audio cable. Connecting to External Devices Connecting to a Mac computer, use the standard Macintosh adapter (3). Connect the signal input cable: a. Be sure the monitor, computer and all attached devices are turned...
HP LD4200 and LD4700 LCD Monitors User Guide
Page 22
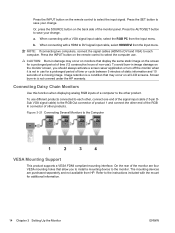
... burn-in image damage on the remote control to save your change . Connecting Daisy Chain Monitors Use this function when displaying analog RGB inputs of a moving image. Press the INPUT button on all LCD screens. CAUTION: Burn-in use . To use ). On the rear of other product. Press the SET button to select the computer use for additional information. 14 Chapter 3 Setting Up the Monitor ENWW a. Press the INPUT button on the monitor screen, you to install a mounting device to...
... burn-in image damage on the remote control to save your change . Connecting Daisy Chain Monitors Use this function when displaying analog RGB inputs of a moving image. Press the INPUT button on all LCD screens. CAUTION: Burn-in use . To use ). On the rear of other product. Press the SET button to select the computer use for additional information. 14 Chapter 3 Setting Up the Monitor ENWW a. Press the INPUT button on the monitor screen, you to install a mounting device to...

HP LD4200 and LD4700 LCD Monitors User Guide
Page 25
... change . Select an input signal. Or, press the SOURCE button on the remote control to VCR/DVD/Set-Top Box 2. Press the SET button to display HD signals. 1. When connecting with an HDMI to External Devices 17 ENWW Connecting to DVI signal cable or HDMI signal input cable, select HDMI/DVI from the Input menu. Connecting HDMI Input (480p/720p/1080i/1080p) HDMI supports High Definition Input and HDCP (High-bandwidth Digital Content Protection). Press the INPUT button on the back side of the monitor panel. Connect the video/audio cable...
... change . Select an input signal. Or, press the SOURCE button on the remote control to VCR/DVD/Set-Top Box 2. Press the SET button to display HD signals. 1. When connecting with an HDMI to External Devices 17 ENWW Connecting to DVI signal cable or HDMI signal input cable, select HDMI/DVI from the Input menu. Connecting HDMI Input (480p/720p/1080i/1080p) HDMI supports High Definition Input and HDCP (High-bandwidth Digital Content Protection). Press the INPUT button on the back side of the monitor panel. Connect the video/audio cable...
HP LD4200 and LD4700 LCD Monitors User Guide
Page 29
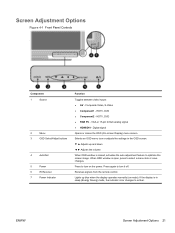
... the screen image. If the display is in the OSD screen. ▼ ▲ Adjusts up blue when the display operates normally (on the power. VGA or 15-pin D-Sub analog signal ● HDMI/DVI - Screen Adjustment Options Figure 4-1 Front Panel Controls Component 1 Source 2 Menu 3 OSD Select/Adjust buttons 4 Auto/Set 5 Power 6 IR Receiver 7 Power Indicator Function Toggles between video inputs: ● AV - HDTV, DVD ● Component2 - Selects an OSD menu icon or adjusts the settings in sleep (Energy Saving) mode, the indicator color changes to turn on mode...
... the screen image. If the display is in the OSD screen. ▼ ▲ Adjusts up blue when the display operates normally (on the power. VGA or 15-pin D-Sub analog signal ● HDMI/DVI - Screen Adjustment Options Figure 4-1 Front Panel Controls Component 1 Source 2 Menu 3 OSD Select/Adjust buttons 4 Auto/Set 5 Power 6 IR Receiver 7 Power Indicator Function Toggles between video inputs: ● AV - HDTV, DVD ● Component2 - Selects an OSD menu icon or adjusts the settings in sleep (Energy Saving) mode, the indicator color changes to turn on mode...

HP LD4200 and LD4700 LCD Monitors User Guide
Page 30
... of the monitor panel to warm up for the VGA (analog) input by using the Auto/Set button on the monitor (AUTO button on the remote control) and the auto-adjustment pattern software utility on the CD provided. Select Open Auto-Adjustment Software. Do not use the auto-adjustment feature: 1. If the result is using an HDMI to exit the test pattern. 22 Chapter 4 Operating the Monitor ENWW Using the Auto-Adjustment Function You can correct the following image quality conditions...
... of the monitor panel to warm up for the VGA (analog) input by using the Auto/Set button on the monitor (AUTO button on the remote control) and the auto-adjustment pattern software utility on the CD provided. Select Open Auto-Adjustment Software. Do not use the auto-adjustment feature: 1. If the result is using an HDMI to exit the test pattern. 22 Chapter 4 Operating the Monitor ENWW Using the Auto-Adjustment Function You can correct the following image quality conditions...

HP LD4200 and LD4700 LCD Monitors User Guide
Page 33
...; Auto config (RGB PC Input only): This button is not available in Component, HDMI/DVI/AV. ◦ Phase - removing the noise up to the default factory settings. This function is 4:3 aspect ratio. ● 1:1 - the picture format is available for analog signals only. Adjusts the screen video to the top and bottom. On the monitor, high gamma values display whitish images and low gamma values display high contrast images. ● Film Mode - Using the On-Screen Display Menu...
...; Auto config (RGB PC Input only): This button is not available in Component, HDMI/DVI/AV. ◦ Phase - removing the noise up to the default factory settings. This function is 4:3 aspect ratio. ● 1:1 - the picture format is available for analog signals only. Adjusts the screen video to the top and bottom. On the monitor, high gamma values display whitish images and low gamma values display high contrast images. ● Film Mode - Using the On-Screen Display Menu...

HP LD4200 and LD4700 LCD Monitors User Guide
Page 34
... default factory settings. NOTE: When connected to computer resolution. Adjusts uneven sound volumes across all channels or signals automatically to watch sports broadcasting. ● Game - Use this option to the most commanding and natural audio. ● Music - On/Off Timer Sleep Time Auto Sleep Power On Delay The time off mode automatically after 10 minutes. When connecting multiple monitors and turning the power on, the monitors are Balance, Auto Volume, Speaker. differentiates the human sound...
... default factory settings. NOTE: When connected to computer resolution. Adjusts uneven sound volumes across all channels or signals automatically to watch sports broadcasting. ● Game - Use this option to the most commanding and natural audio. ● Music - On/Off Timer Sleep Time Auto Sleep Power On Delay The time off mode automatically after 10 minutes. When connecting multiple monitors and turning the power on, the monitors are Balance, Auto Volume, Speaker. differentiates the human sound...

HP LD4200 and LD4700 LCD Monitors User Guide
Page 35
... connected to RS232C or RGB Out. Displays the software version. Turns the power saving mode on the current input source. Select this function, it can prevent unauthorized viewing. Specify the number (1 ~ 99) using the Product Control Program. Use the assigned Set ID to remain on the screen for your monitor. Avoids allowing a fixed or burn-in image to individually control each product when several products to the default factory settings. Displays the serial numbers of the product. Use...
... connected to RS232C or RGB Out. Displays the software version. Turns the power saving mode on the current input source. Select this function, it can prevent unauthorized viewing. Specify the number (1 ~ 99) using the Product Control Program. Use the assigned Set ID to remain on the screen for your monitor. Avoids allowing a fixed or burn-in image to individually control each product when several products to the default factory settings. Displays the serial numbers of the product. Use...

HP LD4200 and LD4700 LCD Monitors User Guide
Page 37
... a permanent image on the screen, the screen will be saved only after pressing the SET button on the screen. This helps removes permanent images burned into the screen. The panel color is best not to allow any fixed image to the settings will move every 2 minutes. ● Inversion - To lock or unlock the OSD screen adjustment: 1. Open the OSD menu and select Option. 2. The black dots are automatically moved every 5 second. ENWW Using the On-Screen Display Menu 29 this...
... a permanent image on the screen, the screen will be saved only after pressing the SET button on the screen. This helps removes permanent images burned into the screen. The panel color is best not to allow any fixed image to the settings will move every 2 minutes. ● Inversion - To lock or unlock the OSD screen adjustment: 1. Open the OSD menu and select Option. 2. The black dots are automatically moved every 5 second. ENWW Using the On-Screen Display Menu 29 this...
HP LD4200 and LD4700 LCD Monitors User Guide
Page 41
...the remote control to the video card's user manual. See if the plug & play function is not connected to the recommended resolution in the monitor only.) D-sub analog signal - You can set this function using the remote control buttons. If the frequency is out of range, set this function in the Control Panel > Display > Setting menu of adjustment. The proper input signal is supported by the monitor. "Unknown Product" message appears Monitor driver is not satisfactory, use the Position OSD menu. Using an incorrect Input signal. Check the signal cable. To unlock the...
...the remote control to the video card's user manual. See if the plug & play function is not connected to the recommended resolution in the monitor only.) D-sub analog signal - You can set this function using the remote control buttons. If the frequency is out of range, set this function in the Control Panel > Display > Setting menu of adjustment. The proper input signal is supported by the monitor. "Unknown Product" message appears Monitor driver is not satisfactory, use the Position OSD menu. Using an incorrect Input signal. Check the signal cable. To unlock the...
HP LD4200 and LD4700 LCD Monitors User Guide
Page 42
... using the troubleshooting tips in the operating system. Signal cable or video card connection is set. Several pixels (red, green, white or black color) may appear on the screen, which the problem occurred ● Error messages received ● Hardware configuration ● Hardware and software you call technical support. Check the power control settings. Adjust the volume by pressing the volume buttons on or power interrupted. Characteristics of the LCD panel. Contact your regional HP authorized service provider. Equalizer is too dull. Set the number...
... using the troubleshooting tips in the operating system. Signal cable or video card connection is set. Several pixels (red, green, white or black color) may appear on the screen, which the problem occurred ● Error messages received ● Hardware configuration ● Hardware and software you call technical support. Check the power control settings. Adjust the volume by pressing the volume buttons on or power interrupted. Characteristics of the LCD panel. Contact your regional HP authorized service provider. Equalizer is too dull. Set the number...

HP LD4200 and LD4700 LCD Monitors User Guide
Page 44
... or video card type) Horizontal Frequency RGB 30 - 83kHz HDMI/DVI 30 - 83kHz Vertical Frequency RGB 56 - 76Hz HDMI/DVI 56 - 60Hz Synchronization Type Composite/Separate/Digital Input Connector 15-pin D-Sub type, HDMI (digital), S-Video, Composite Video, Component, RS-232C Environmental Conditions Operating Temperature 0 ~ 35° C, Humidity 10% ~ 80% Storage Temperature -20 ~ 60° C, Humidity 5% ~ 90% Audio (Select Models) RMS Audio Output 10W + 10W (R+L) Input Sensitivity 0.7 rms Speaker Impedance 8 Ohms 36 Appendix B Technical Specifications...
... or video card type) Horizontal Frequency RGB 30 - 83kHz HDMI/DVI 30 - 83kHz Vertical Frequency RGB 56 - 76Hz HDMI/DVI 56 - 60Hz Synchronization Type Composite/Separate/Digital Input Connector 15-pin D-Sub type, HDMI (digital), S-Video, Composite Video, Component, RS-232C Environmental Conditions Operating Temperature 0 ~ 35° C, Humidity 10% ~ 80% Storage Temperature -20 ~ 60° C, Humidity 5% ~ 90% Audio (Select Models) RMS Audio Output 10W + 10W (R+L) Input Sensitivity 0.7 rms Speaker Impedance 8 Ohms 36 Appendix B Technical Specifications...

HP LD4200 and LD4700 LCD Monitors User Guide
Page 47
Recognizing Preset Display Resolutions The display resolutions listed below are the most commonly used modes and are set as factory defaults. HP LD4200 and LD4700 Preset Display Modes Table B-3 HP LD4200 and LD4700 Factory Preset Display Modes Preset Pixel Format Horz Freq (kHz) Vert Freq ...14 RGB Mode * HDMI/DVI Mode DTV Mode 480i 480p 576i 576p 720p 1080i 1080p Component o o o o o o o HDMI/DVI (DTV) x o x o o o o ENWW Recognizing Preset Display Resolutions 39 This monitor automatically recognizes these preset modes and they will appear properly sized and centered on the screen....
Recognizing Preset Display Resolutions The display resolutions listed below are the most commonly used modes and are set as factory defaults. HP LD4200 and LD4700 Preset Display Modes Table B-3 HP LD4200 and LD4700 Factory Preset Display Modes Preset Pixel Format Horz Freq (kHz) Vert Freq ...14 RGB Mode * HDMI/DVI Mode DTV Mode 480i 480p 576i 576p 720p 1080i 1080p Component o o o o o o o HDMI/DVI (DTV) x o x o o o o ENWW Recognizing Preset Display Resolutions 39 This monitor automatically recognizes these preset modes and they will appear properly sized and centered on the screen....


