
Line Sensor Cleaning
Page 3
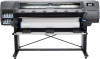
... the door on the right-hand side of cleaning the line sensor is to avoid problems caused by accumulated dirt. Cleaning procedure 1. Turn off the printer and unplug the power cords. 2. You should clean the line sensor when the following cases: ● The edge-detection procedure fails during substrate loading and... detected in prints. ● Misalignment between colors is detected. ● Calibration of the line sensor fails. ● The maintenance cartridge is not detected. ● The printer is shown in any of the following message is unable to clean the sensor or call your...
... the door on the right-hand side of cleaning the line sensor is to avoid problems caused by accumulated dirt. Cleaning procedure 1. Turn off the printer and unplug the power cords. 2. You should clean the line sensor when the following cases: ● The edge-detection procedure fails during substrate loading and... detected in prints. ● Misalignment between colors is detected. ● Calibration of the line sensor fails. ● The maintenance cartridge is not detected. ● The printer is shown in any of the following message is unable to clean the sensor or call your...
Line Sensor Cleaning
Page 4
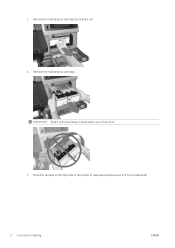
Remove the maintenance cartridge by sliding it from underneath. 2 Line sensor cleaning ENWW Move the carriage to it out. 4. Remove the maintenance cartridge. IMPORTANT: Slide it out horizontally to avoid spills, as it is full of the printer to have appropriate access to the right side of ink. 5. 3.
Remove the maintenance cartridge by sliding it from underneath. 2 Line sensor cleaning ENWW Move the carriage to it out. 4. Remove the maintenance cartridge. IMPORTANT: Slide it out horizontally to avoid spills, as it is full of the printer to have appropriate access to the right side of ink. 5. 3.

Line Sensor Cleaning
Page 5
6. Close the door on the printer. 12. Perform a printhead alignment to see its specific location), using a lint-free cloth or swab and, if necessary, a non-abrasive liquid such as 91% isopropyl ... carriage (a flashlight is needed . Turn on the right-hand side. 11. If cleaning the line sensor does not yield results, call your HP representative to the middle of the printer. 8. Reinsert the maintenance cartridge. 9. NOTE: If you are in an area (such as properly diluted Simple Green All-Purpose Cleaner. 7. Slowly push...
6. Close the door on the printer. 12. Perform a printhead alignment to see its specific location), using a lint-free cloth or swab and, if necessary, a non-abrasive liquid such as 91% isopropyl ... carriage (a flashlight is needed . Turn on the right-hand side. 11. If cleaning the line sensor does not yield results, call your HP representative to the middle of the printer. 8. Reinsert the maintenance cartridge. 9. NOTE: If you are in an area (such as properly diluted Simple Green All-Purpose Cleaner. 7. Slowly push...

Users Guide
Page 3
... ...7 The front panel ...9 The Embedded Web Server ...17 Connectivity and software instructions ...24 Advanced network configuration ...25 Turn the printer on and off ...32 Restart the printer ...33 2 Useful links ...34 When you need help ...34 3 Handle the substrate and troubleshoot substrate issues 36 Overview ...37... a roll onto the spindle ...42 Load a roll into the printer ...46 Assisted manual load ...49 The edge holders ...51 Load a cut sheet into the printer ...53 How to cut substrate ...53 Unload a roll from the printer ...54 The take-up reel (accessory) ...55 View information about...
... ...7 The front panel ...9 The Embedded Web Server ...17 Connectivity and software instructions ...24 Advanced network configuration ...25 Turn the printer on and off ...32 Restart the printer ...33 2 Useful links ...34 When you need help ...34 3 Handle the substrate and troubleshoot substrate issues 36 Overview ...37... a roll onto the spindle ...42 Load a roll into the printer ...46 Assisted manual load ...49 The edge holders ...51 Load a cut sheet into the printer ...53 How to cut substrate ...53 Unload a roll from the printer ...54 The take-up reel (accessory) ...55 View information about...

Users Guide
Page 5
... the carriage rod ...122 Clean the encoder strip ...124 Clean the platen ...125 Clean the exterior of the printer ...127 Move or store the printer ...127 Service maintenance ...128 8 Firmware update ...129 Firmware update using a USB flash drive ...129 Firmware update... services such as firmware update, online search, or the Customer Involvement Program ...136 Front-panel error codes ...137 11 Printer specifications ...143 Functional specifications ...143 Physical specifications ...144 Memory specifications ...144 Power specifications ...144 Ecological specifications ...145 Environmental ...
... the carriage rod ...122 Clean the encoder strip ...124 Clean the platen ...125 Clean the exterior of the printer ...127 Move or store the printer ...127 Service maintenance ...128 8 Firmware update ...129 Firmware update using a USB flash drive ...129 Firmware update... services such as firmware update, online search, or the Customer Involvement Program ...136 Front-panel error codes ...137 11 Printer specifications ...143 Functional specifications ...143 Physical specifications ...144 Memory specifications ...144 Power specifications ...144 Ecological specifications ...145 Environmental ...

Users Guide
Page 7
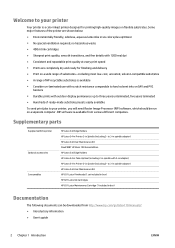
1 Introduction ● Welcome to your printer ● Supplementary parts ● Documentation ● Safety precautions ● The printer's main components ● The front panel ● The Embedded Web Server ● Connectivity and software instructions ● Advanced network configuration ● Turn the printer on and off ● Restart the printer ENWW 1
1 Introduction ● Welcome to your printer ● Supplementary parts ● Documentation ● Safety precautions ● The printer's main components ● The front panel ● The Embedded Web Server ● Connectivity and software instructions ● Advanced network configuration ● Turn the printer on and off ● Restart the printer ENWW 1
Users Guide
Page 8
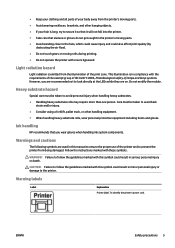
... ink cartridges ● Sharpest print quality, smooth transitions, and fine details with 3-in adaptor) HP Latex 54-in Printer 2-in Spindle (including 2- Some major features of the printer are completely dry and ready for printing high-quality images on SAV and PVC banners ● Durable... prints with the printer Optional accessories Consumables HP Latex 3x0 Edge Holders HP Latex 54-in Printer 2-in Spindle (including 2- RIP software is available ● Consider un-laminated use with scratch resistance...
... ink cartridges ● Sharpest print quality, smooth transitions, and fine details with 3-in adaptor) HP Latex 54-in Printer 2-in Spindle (including 2- Some major features of the printer are completely dry and ready for printing high-quality images on SAV and PVC banners ● Durable... prints with the printer Optional accessories Consumables HP Latex 3x0 Edge Holders HP Latex 54-in Printer 2-in Spindle (including 2- RIP software is available ● Consider un-laminated use with scratch resistance...

Users Guide
Page 9
... curing enclosures are expected to have the appropriate technical training and experience necessary to be aware of such an image, see http://www.hp.com/go/selfrepair/). The printer uses two power cords. ENWW Safety precautions 3 ● Legal information ● Limited warranty The Quick Response (QR) code images found in some parts...
... curing enclosures are expected to have the appropriate technical training and experience necessary to be aware of such an image, see http://www.hp.com/go/selfrepair/). The printer uses two power cords. ENWW Safety precautions 3 ● Legal information ● Limited warranty The Quick Response (QR) code images found in some parts...

Users Guide
Page 10
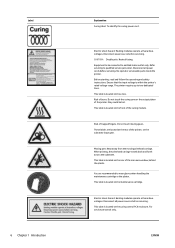
... (482°F). Mechanical hazard The printer has moving parts that the operating temperature of fire, take the following precautions when working close to spill liquid on EN ISO 6942:2002; To avoid the risk of the substrate recommended by HP with auto-ignition temperatures below . ...Use the power supply voltage specified on the nameplate. ● Connect the power cords to dedicated lines, each protected by a branch circuit breaker according to the information detailed in the printer. ● Take care not...
... (482°F). Mechanical hazard The printer has moving parts that the operating temperature of fire, take the following precautions when working close to spill liquid on EN ISO 6942:2002; To avoid the risk of the substrate recommended by HP with auto-ignition temperatures below . ...Use the power supply voltage specified on the nameplate. ● Connect the power cords to dedicated lines, each protected by a branch circuit breaker according to the information detailed in the printer. ● Take care not...
Users Guide
Page 11
...strain and/or injury. ● Consider using a forklift, pallet truck, or other hanging objects. ● If your body away from the printer's moving parts. ● Avoid wearing necklaces, bracelets, and other handling equipment. ● When handling heavy substrate rolls, wear personal protective ...gloves. WARNING! Failure to follow the guidelines marked with these symbols. To identify the printer's power cord. Ink handling HP recommends that sleeves or gloves do not get caught in the printer's moving parts. ● Avoid standing close to look directly at the LEDs while...
...strain and/or injury. ● Consider using a forklift, pallet truck, or other hanging objects. ● If your body away from the printer's moving parts. ● Avoid wearing necklaces, bracelets, and other handling equipment. ● When handling heavy substrate rolls, wear personal protective ...gloves. WARNING! Failure to follow the guidelines marked with these symbols. To identify the printer's power cord. Ink handling HP recommends that sleeves or gloves do not get caught in the printer's moving parts. ● Avoid standing close to look directly at the LEDs while...
Users Guide
Page 12
...range. This label is located on the curing control PCA enclosure. For service personnel only. Neutral fusing. No operator serviceable parts inside the printer. Risk of the scan axis window, behind the plastic. Electric shock hazard. This label is located on the e-box. Do not touch... moving printhead carriage. You are located at the rear of the printer: they could be connected to qualified service personnel. Moving part. Electric shock hazard. This label is located on the rear of burns. ...
...range. This label is located on the curing control PCA enclosure. For service personnel only. Neutral fusing. No operator serviceable parts inside the printer. Risk of the scan axis window, behind the plastic. Electric shock hazard. This label is located on the e-box. Do not touch... moving printhead carriage. You are located at the rear of the printer: they could be connected to qualified service personnel. Moving part. Electric shock hazard. This label is located on the rear of burns. ...
Users Guide
Page 13
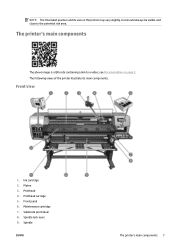
Front view 1. Ink cartridge 2. Maintenance cartridge 7. see Documentation on the printer may vary slightly, but should always be visible and close to a video; Platen 3. Printhead carriage 5. Spindle lock lever 9. Spindle ENWW The printer's main components 7 Front panel 6. NOTE: The final label position and its main components. The following views of the printer illustrate its size on page 2. Printhead 4. Substrate pinch lever 8. The printer's main components The above image is a QR code containing a link to the potential risk area.
Front view 1. Ink cartridge 2. Maintenance cartridge 7. see Documentation on the printer may vary slightly, but should always be visible and close to a video; Platen 3. Printhead carriage 5. Spindle lock lever 9. Spindle ENWW The printer's main components 7 Front panel 6. NOTE: The final label position and its main components. The following views of the printer illustrate its size on page 2. Printhead 4. Substrate pinch lever 8. The printer's main components The above image is a QR code containing a link to the potential risk area.
Users Guide
Page 15
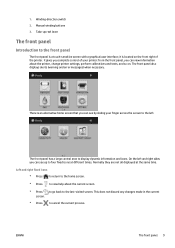
... 9 Manual winding buttons 3. Left and right fixed icons ● Press to return to the home screen. ● Press to view help about the printer, change printer settings, perform calibrations and tests, and so on the front right of your finger across the screen to cancel the current process. This does not... screen. ● Press to go back to display dynamic information and icons. On the left and right sides you can see by sliding your printer: from the front panel, you can see up reel lever The front panel Introduction to the front panel The front panel is an alternative home...
... 9 Manual winding buttons 3. Left and right fixed icons ● Press to return to the home screen. ● Press to view help about the printer, change printer settings, perform calibrations and tests, and so on the front right of your finger across the screen to cancel the current process. This does not... screen. ● Press to go back to display dynamic information and icons. On the left and right sides you can see by sliding your printer: from the front panel, you can see up reel lever The front panel Introduction to the front panel The front panel is an alternative home...

Users Guide
Page 16
... , then Setup > Front panel options > Sleep mode wait time. Press this guide. the default is some time, it . If the printer is left of substrate presets. ● Press to view information about the job that is currently printing. ● Press to view ink-cartridge... status and perform operations. ● Press to view printhead status and perform operations. ● Press to view and change printer settings in general. ● Press to view network and Internet status and change related settings. ● Press to view information about specific ...
... , then Setup > Front panel options > Sleep mode wait time. Press this guide. the default is some time, it . If the printer is left of substrate presets. ● Press to view information about the job that is currently printing. ● Press to view ink-cartridge... status and perform operations. ● Press to view printhead status and perform operations. ● Press to view and change printer settings in general. ● Press to view network and Internet status and change related settings. ● Press to view information about specific ...
Users Guide
Page 17
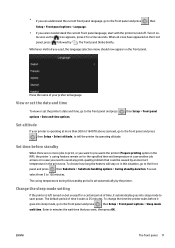
...You can understand the current front panel language, go to the front panel and press , then Setup > Select altitude, to tell the printer its operating altitude. Enter in minutes the wait time that could be caused by an incorrect temperature in the print zone. ENWW The front... and press , then Setup > Front panel options > Language. ● If you cannot understand the current front panel language, start with the printer turned off. Set time before it automatically goes into sleep mode, go to the front panel and press then Substrate > Substrate handling options > ...
...You can understand the current front panel language, go to the front panel and press , then Setup > Select altitude, to tell the printer its operating altitude. Enter in minutes the wait time that could be caused by an incorrect temperature in the print zone. ENWW The front... and press , then Setup > Front panel options > Language. ● If you cannot understand the current front panel language, start with the printer turned off. Set time before it automatically goes into sleep mode, go to the front panel and press then Substrate > Substrate handling options > ...
Users Guide
Page 18
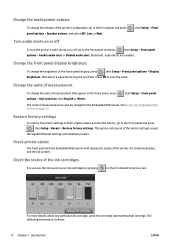
...the loudspeaker volume To change the units of measurement that cartridge. By default, audio alerts are enabled. Restore factory settings To restore the printer settings to their original values as set in the Embedded Web Server. Change the front panel display brightness To change the brightness of ...Off, Low, or High. , then Setup > Front Turn audio alerts on or off To turn the printer's audio alerts on the front panel's home screen. Check the status of the printer's loudspeaker, go to save the value. For more details about any particular ink cartridge, press the rectangle ...
...the loudspeaker volume To change the units of measurement that cartridge. By default, audio alerts are enabled. Restore factory settings To restore the printer settings to their original values as set in the Embedded Web Server. Change the front panel display brightness To change the brightness of ...Off, Low, or High. , then Setup > Front Turn audio alerts on or off To turn the printer's audio alerts on the front panel's home screen. Check the status of the printer's loudspeaker, go to save the value. For more details about any particular ink cartridge, press the rectangle ...
Users Guide
Page 19
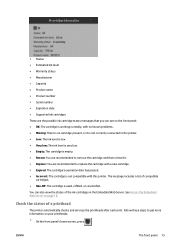
...OK: The cartridge is working normally, with no known problems. ● Missing: There is no cartridge present, or it is not correctly connected to the printer. ● Low: The ink level is low. ● Very low: The ink level is very low. ● Empty: The cartridge is empty.... reinsert it. ● Replace: You are recommended to get more information on page 19. The message includes a list of compatible cartridges. ● Non-HP: The cartridge is not compatible with a new cartridge. ● Expired: The cartridge's expiration date has passed. ● Incorrect: The cartridge is used,...
...OK: The cartridge is working normally, with no known problems. ● Missing: There is no cartridge present, or it is not correctly connected to the printer. ● Low: The ink level is low. ● Very low: The ink level is very low. ● Empty: The cartridge is empty.... reinsert it. ● Replace: You are recommended to get more information on page 19. The message includes a list of compatible cartridges. ● Non-HP: The cartridge is not compatible with a new cartridge. ● Expired: The cartridge's expiration date has passed. ● Incorrect: The cartridge is used,...
Users Guide
Page 20
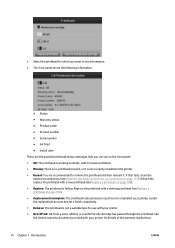
...; Replacement incomplete: The printhead replacement process has not completed successfully; restart the replacement process and let it . Replace the printhead with your printer for details of the warranty implications. 14 Chapter 1 Introduction ENWW See the limited warranty document provided with no known problems. ● Missing... fails, clean the electrical connections (see on page 115). Select the printhead for use with a working normally, with your printer. ● Non-HP ink: Ink from a used, refilled, or counterfeit ink cartridge has passed through the printhead.
...; Replacement incomplete: The printhead replacement process has not completed successfully; restart the replacement process and let it . Replace the printhead with your printer for details of the warranty implications. 14 Chapter 1 Introduction ENWW See the limited warranty document provided with no known problems. ● Missing... fails, clean the electrical connections (see on page 115). Select the printhead for use with a working normally, with your printer. ● Non-HP ink: Ink from a used, refilled, or counterfeit ink cartridge has passed through the printhead.
Users Guide
Page 21
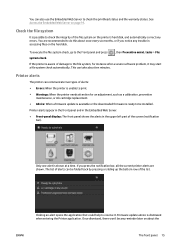
...system check automatically. You are shown. This can take about the ENWW The front panel 15 Only one alert is dismissed when entering the Printer application. Check the file system It is aware of the screen (notification bar). Firmware update advice is shown at a time. tasks ...ink cartridge replacement. ● Advice: When a firmware update is available or the downloaded firmware is unable to print. ● Warnings: When the printer needs attention for instance after a severe software problem, it . Once dismissed, there won't be any errors. You can also use the Embedded ...
...system check automatically. You are shown. This can take about the ENWW The front panel 15 Only one alert is dismissed when entering the Printer application. Check the file system It is aware of the screen (notification bar). Firmware update advice is shown at a time. tasks ...ink cartridge replacement. ● Advice: When a firmware update is available or the downloaded firmware is unable to print. ● Warnings: When the printer needs attention for instance after a severe software problem, it . Once dismissed, there won't be any errors. You can also use the Embedded ...
Users Guide
Page 22
...0.5 to single prints. see Table 11-4 Margins on page 144. The side margins for a particular print job are sent while the printer is cooling down and preparing for the top and bottom margins: see Hardware maintenance on page 100. The front panel offers additional settings for... stand-by. Change margins The printer margins determine the area between prints, you to perform a maintenance operation; If jobs of the same print mode as the already-printed...
...0.5 to single prints. see Table 11-4 Margins on page 144. The side margins for a particular print job are sent while the printer is cooling down and preparing for the top and bottom margins: see Hardware maintenance on page 100. The front panel offers additional settings for... stand-by. Change margins The printer margins determine the area between prints, you to perform a maintenance operation; If jobs of the same print mode as the already-printed...


