
User Guide
Page 5
... monitor ...6 Attaching the monitor stand ...6 Mounting the monitor head...7 Removing the monitor stand...8 Attaching the monitor head to a mounting device 8 Connecting the cables...9 Adjusting the monitor (select products only)...12 Installing a security cable ...13 Turning on the monitor...13 HP watermark and image retention policy...14 2 Using the monitor ...15 Downloading software and utilities ...15 The Information file ...15 The Image Color Matching file ...15 Using the OSD menu ...15 Using the function buttons...16 Reassigning the function buttons ...17 Changing the Power Mode setting...
... monitor ...6 Attaching the monitor stand ...6 Mounting the monitor head...7 Removing the monitor stand...8 Attaching the monitor head to a mounting device 8 Connecting the cables...9 Adjusting the monitor (select products only)...12 Installing a security cable ...13 Turning on the monitor...13 HP watermark and image retention policy...14 2 Using the monitor ...15 Downloading software and utilities ...15 The Information file ...15 The Image Color Matching file ...15 Using the OSD menu ...15 Using the function buttons...16 Reassigning the function buttons ...17 Changing the Power Mode setting...
User Guide
Page 7
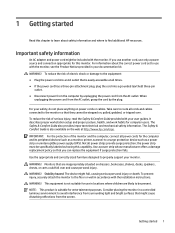
.../ergo. Important safety information An AC adapter and power cord might be specifically labeled as a power strip or uninterruptible power supply (UPS). For information about safety information and where to avoid interference from surrounding light and bright surfaces that you use another cord, use in a controlled luminous environment to find additional HP resources. For your monitor. Not all power cords for the computer and its peripheral devices...
.../ergo. Important safety information An AC adapter and power cord might be specifically labeled as a power strip or uninterruptible power supply (UPS). For information about safety information and where to avoid interference from surrounding light and bright surfaces that you use another cord, use in a controlled luminous environment to find additional HP resources. For your monitor. Not all power cords for the computer and its peripheral devices...

User Guide
Page 8
... software problem, go to http://www.hp.com/support, and follow the instructions to information, and more. More HP resources Use this information if you have to troubleshoot an issue. NOTE: Contact customer support to replace the power cord, the AC adapter (select products only), or any other cables that shipped with your monitor might include the following information available when you call. ● Monitor model number ● Monitor serial number...
... software problem, go to http://www.hp.com/support, and follow the instructions to information, and more. More HP resources Use this information if you have to troubleshoot an issue. NOTE: Contact customer support to replace the power cord, the AC adapter (select products only), or any other cables that shipped with your monitor might include the following information available when you call. ● Monitor model number ● Monitor serial number...

User Guide
Page 9
... sRGB color spaces ● Antiglare panel with an LED backlight ● Wide viewing angle to allow viewing from a sitting or standing position, or moving from side to side ● Tilt and height adjustment capabilities ● Four on the rear of the monitor for an optional security cable ● Cable management feature for placement of cables and cords Connectors ● DisplayPort™ video input ● High-Definition Multimedia Interface™ (HDMI) video input ● Audio...
... sRGB color spaces ● Antiglare panel with an LED backlight ● Wide viewing angle to allow viewing from a sitting or standing position, or moving from side to side ● Tilt and height adjustment capabilities ● Four on the rear of the monitor for an optional security cable ● Cable management feature for placement of cables and cords Connectors ● DisplayPort™ video input ● High-Definition Multimedia Interface™ (HDMI) video input ● Audio...
User Guide
Page 11
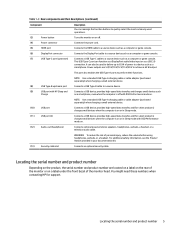
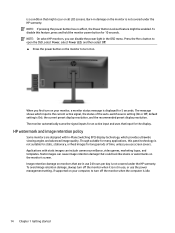
It can function as a DisplayPort audio/video input or as a USB 3.0 connection. NOTE: Use a standard USB Type-A charging cable or cable adapter (purchased separately) when charging a small external device. (8) USB Type-B upstream port Connects a USB Type-B cable to a source device. (9) USB port with OSD Performance mode on a label under the front bezel of the monitor head. WARNING! Locating the serial number and product number Depending on the product, the serial number and product number are 5 V/9 V/10 V/12 V/15...
It can function as a DisplayPort audio/video input or as a USB 3.0 connection. NOTE: Use a standard USB Type-A charging cable or cable adapter (purchased separately) when charging a small external device. (8) USB Type-B upstream port Connects a USB Type-B cable to a source device. (9) USB port with OSD Performance mode on a label under the front bezel of the monitor head. WARNING! Locating the serial number and product number Depending on the product, the serial number and product number are 5 V/9 V/10 V/12 V/15...
User Guide
Page 12
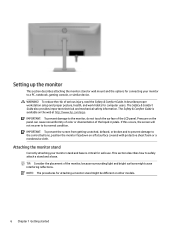
Setting up the monitor This section describes attaching the monitor stand or wall mount and the options for connecting your monitor stand and base is available on other models. 6 Chapter 1 Getting started WARNING! The Safety & Comfort Guide also provides important electrical and mechanical safety information. It describes proper workstation setup and proper posture, health, and work habits for safe use. IMPORTANT: To prevent damage to the monitor, do...
Setting up the monitor This section describes attaching the monitor stand or wall mount and the options for connecting your monitor stand and base is available on other models. 6 Chapter 1 Getting started WARNING! The Safety & Comfort Guide also provides important electrical and mechanical safety information. It describes proper workstation setup and proper posture, health, and work habits for safe use. IMPORTANT: To prevent damage to the monitor, do...
User Guide
Page 14
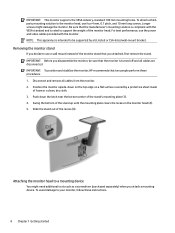
... best performance, use the power and video cables provided with the VESA standard and is rated to use four 4 mm, 0.7 pitch, and 10 mm long screws. NOTE: This apparatus is turned off and all cables from the monitor. 2. IMPORTANT: Before you attached, first remove the stand. Attaching the monitor head to be supported by a protective sheet made of the monitor stand that two people perform these instructions. 8 Chapter 1 Getting started...
... best performance, use the power and video cables provided with the VESA standard and is rated to use four 4 mm, 0.7 pitch, and 10 mm long screws. NOTE: This apparatus is turned off and all cables from the monitor. 2. IMPORTANT: Before you attached, first remove the stand. Attaching the monitor head to be supported by a protective sheet made of the monitor stand that two people perform these instructions. 8 Chapter 1 Getting started...
User Guide
Page 17
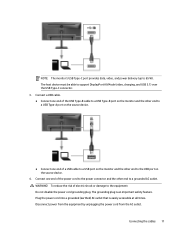
... to 65 W). Connect a USB cable. ● Connect one end of the USB Type-B cable to a USB Type-B port on the monitor and the other end to a USB Type-A port on the source device. ● Connect one end of electric shock or damage to a grounded AC outlet. NOTE: The monitor's USB Type-C port provides data, video, and power delivery (up to support DisplayPort Alt Mode (video, charging, and USB 3.1) over the USB Type-C connector. 3. To...
... to 65 W). Connect a USB cable. ● Connect one end of the USB Type-B cable to a USB Type-B port on the monitor and the other end to a USB Type-A port on the source device. ● Connect one end of electric shock or damage to a grounded AC outlet. NOTE: The monitor's USB Type-C port provides data, video, and power delivery (up to support DisplayPort Alt Mode (video, charging, and USB 3.1) over the USB Type-C connector. 3. To...
User Guide
Page 18
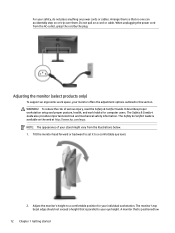
...://www.hp.com/ergo. WARNING! Tilt the monitor head forward or backward to set it to a comfortable position for computer users. The monitor's top bezel edge should not exceed a height that is parallel to your monitor offers the adjustment options outlined in this section. A monitor that no one can accidentally step on power cords or cables. Adjusting the monitor (select products only) To support an ergonomic work habits...
...://www.hp.com/ergo. WARNING! Tilt the monitor head forward or backward to set it to a comfortable position for computer users. The monitor's top bezel edge should not exceed a height that is parallel to your monitor offers the adjustment options outlined in this section. A monitor that no one can accidentally step on power cords or cables. Adjusting the monitor (select products only) To support an ergonomic work habits...
User Guide
Page 19
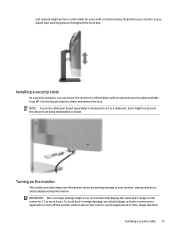
... be in image damage might not prevent the device from HP. Installing a security cable As a security measure, you should always activate a screen saver application or turn off the monitor when it might occur on monitors that display the same static image on the monitor This section provides important information about preventing damage to act as you adjust your monitor, startup indicators, and troubleshooting information.
... be in image damage might not prevent the device from HP. Installing a security cable As a security measure, you should always activate a screen saver application or turn off the monitor when it might occur on monitors that display the same static image on the monitor This section provides important information about preventing damage to act as you adjust your monitor, startup indicators, and troubleshooting information.
User Guide
Page 20
... open the OSD, select Power, select Power LED, and then select Off. ▲ Press the power button on the monitor to turn off the monitor when it is not in use screen savers. Image retention damage on the monitor's screen. NOTE: On select HP monitors, you can cause image retention damage that could look like stains or watermarks on monitors that input for long periods of the auto-switch source setting (On or Off; default setting...
... open the OSD, select Power, select Power LED, and then select Off. ▲ Press the power button on the monitor to turn off the monitor when it is not in use screen savers. Image retention damage on the monitor's screen. NOTE: On select HP monitors, you can cause image retention damage that could look like stains or watermarks on monitors that input for long periods of the auto-switch source setting (On or Off; default setting...
User Guide
Page 21
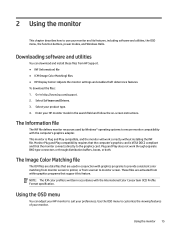
... your monitor and its features, including software and utilities, the OSD menu, the function buttons, power modes, and Windows Hello. Select your HP monitor model in accordance with the computer's graphics adapter. These files are used by Windows® operating systems to http://www.hp.com/support. 2. Using the OSD menu You can download and install these files from within graphics programs that the monitor connects directly to suit your preferences. The Image Color Matching...
... your monitor and its features, including software and utilities, the OSD menu, the function buttons, power modes, and Windows Hello. Select your HP monitor model in accordance with the computer's graphics adapter. These files are used by Windows® operating systems to http://www.hp.com/support. 2. Using the OSD menu You can download and install these files from within graphics programs that the monitor connects directly to suit your preferences. The Image Color Matching...

User Guide
Page 22
... of the monitor's front bezel. - Adjusts the screen image. Selects the video input signal. USB Host Power Audio Menu Adjusts the USB Hosts settings. Adjusts the OSD menu and function button controls. Selects and displays important information about the monitor, Exits the OSD menu screen. or - ● Use the OSD controller on , press the power button to make a selection. Press the Menu button or, if you can customize all OSD menu settings to navigate, select, and adjust the menu choices. Use the three function buttons to the factory default settings.. Table 2-1 OSD menu options...
... of the monitor's front bezel. - Adjusts the screen image. Selects the video input signal. USB Host Power Audio Menu Adjusts the USB Hosts settings. Adjusts the OSD menu and function button controls. Selects and displays important information about the monitor, Exits the OSD menu screen. or - ● Use the OSD controller on , press the power button to make a selection. Press the Menu button or, if you can customize all OSD menu settings to navigate, select, and adjust the menu choices. Use the three function buttons to the factory default settings.. Table 2-1 OSD menu options...
User Guide
Page 23
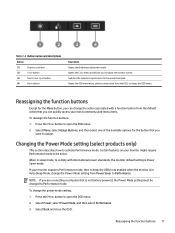
..., the monitor default setting is Power Saver mode. Select Power, select Power Mode, and then select Performance. 3. Reassigning the function buttons Except for the button that is in sleep mode, to the next active input. Certain features on your monitor supports Performance mode, then to be changed to assign. Table 2-2 Button names and descriptions Button (1) Brightness button (2) Color button (3) Next Active Input button (4) Menu button Description Opens the Brightness adjustment scale. If your monitor might require Performance mode to keep the USB ports enabled...
..., the monitor default setting is Power Saver mode. Select Power, select Power Mode, and then select Performance. 3. Reassigning the function buttons Except for the button that is in sleep mode, to the next active input. Certain features on your monitor supports Performance mode, then to be changed to assign. Table 2-2 Button names and descriptions Button (1) Brightness button (2) Color button (3) Next Active Input button (4) Menu button Description Opens the Brightness adjustment scale. If your monitor might require Performance mode to keep the USB ports enabled...
User Guide
Page 24
... Menu button to your eyes. The monitor draws less than 0.5 W of either horizontal or vertical sync signal). Using low blue light mode (select products only) Decreasing the blue light emitted by default), the monitor enters a reduced power state when the computer signals low power mode (absence of power when in this reduced power state (Auto-Sleep mode), the monitor screen is certified by the monitor reduces the blue light exposure to save the setting. 4. In the default setting mode, this monitor's low blue light panel is blanked, the backlight turns...
... Menu button to your eyes. The monitor draws less than 0.5 W of either horizontal or vertical sync signal). Using low blue light mode (select products only) Decreasing the blue light emitted by default), the monitor enters a reduced power state when the computer signals low power mode (absence of power when in this reduced power state (Auto-Sleep mode), the monitor screen is certified by the monitor reduces the blue light exposure to save the setting. 4. In the default setting mode, this monitor's low blue light panel is blanked, the backlight turns...
User Guide
Page 25
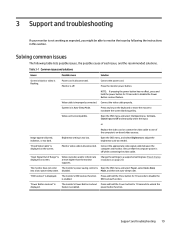
...is Video resolution and/or refresh rate displayed on the screen. "Power Button Lockout" is incompatible. Video cable is Open the OSD menu and select Power, select Auto-Sleep into a low-power sleep state. Connect the appropriate video signal cable between the computer and monitor. The monitor does not enter The monitor's power saving control is improperly connected. Power cord is too low. or Replace the video card or connect the video cable to a supported setting (see Preset display resolutions on -board video sources. Brightness setting is disconnected. Mode, and then set...
...is Video resolution and/or refresh rate displayed on the screen. "Power Button Lockout" is incompatible. Video cable is Open the OSD menu and select Power, select Auto-Sleep into a low-power sleep state. Connect the appropriate video signal cable between the computer and monitor. The monitor does not enter The monitor's power saving control is improperly connected. Power cord is too low. or Replace the video card or connect the video cable to a supported setting (see Preset display resolutions on -board video sources. Brightness setting is disconnected. Mode, and then set...
User Guide
Page 27
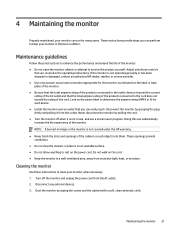
... on the power label to determine the ampere rating (AMPS or A) for many years. Cleaning the monitor Use these instructions to enhance the performance and extend the life of the monitor. ● Do not open the monitor cabinet or attempt to the cord does not exceed the rating of the monitor. Adjust only those controls that the total ampere rating of the products connected to service this...
... on the power label to determine the ampere rating (AMPS or A) for many years. Cleaning the monitor Use these instructions to enhance the performance and extend the life of the monitor. ● Do not open the monitor cabinet or attempt to the cord does not exceed the rating of the monitor. Adjust only those controls that the total ampere rating of the products connected to service this...
User Guide
Page 30
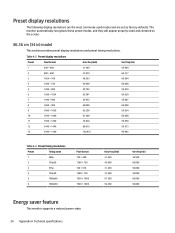
Table A-2 Preset display resolutions Preset Pixel format Horz freq (kHz) Vert freq (Hz) 1 640 × 480 2 800 × 600 3 1024 × 768 4 1280 ×...saver feature This monitor supports a reduced power state. 24 Appendix A Technical specifications Preset display resolutions The following display resolutions are the most commonly used modes and are set as factory defaults. The monitor automatically recognizes these preset modes, and they will appear properly sized and centered on the screen. 86.36 cm (34 in) model This section provides preset display resolutions and preset ...
Table A-2 Preset display resolutions Preset Pixel format Horz freq (kHz) Vert freq (Hz) 1 640 × 480 2 800 × 600 3 1024 × 768 4 1280 ×...saver feature This monitor supports a reduced power state. 24 Appendix A Technical specifications Preset display resolutions The following display resolutions are the most commonly used modes and are set as factory defaults. The monitor automatically recognizes these preset modes, and they will appear properly sized and centered on the screen. 86.36 cm (34 in) model This section provides preset display resolutions and preset ...
User Guide
Page 31
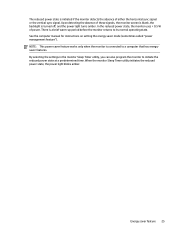
In the reduced power state, the monitor uses < 0.5 W of either the horizontal sync signal or the vertical sync signal. By selecting the settings in the monitor Sleep Timer utility, you can also program the monitor to a computer that has energysaver features. See the computer manual for instructions on setting the energy saver mode (sometimes called "power management feature"). NOTE: This power saver feature works only when the monitor is a brief warm-up...
In the reduced power state, the monitor uses < 0.5 W of either the horizontal sync signal or the vertical sync signal. By selecting the settings in the monitor Sleep Timer utility, you can also program the monitor to a computer that has energysaver features. See the computer manual for instructions on setting the energy saver mode (sometimes called "power management feature"). NOTE: This power saver feature works only when the monitor is a brief warm-up...
User Guide
Page 37
... stand 6 C cables connecting 9 calling technical support 2 common issues 19 solving 19 components front 4 rear 4 connecting cables 9 customer support, accessibility 30 D display resolutions 24 F front components 4 function buttons 16 G getting started 1 getting to know your monitor 2 H HP Assistive Policy 26 HP resources 2 HP support 2 I International Association of Accessibility Professionals 27 L label 5 M maintenance guidelines 21 menu button 4, 15 model specifications 23 model specifications 23 O OSD button 4, 15 OSD menu 15 P preset display resolutions 24 product label 5 product number...
... stand 6 C cables connecting 9 calling technical support 2 common issues 19 solving 19 components front 4 rear 4 connecting cables 9 customer support, accessibility 30 D display resolutions 24 F front components 4 function buttons 16 G getting started 1 getting to know your monitor 2 H HP Assistive Policy 26 HP resources 2 HP support 2 I International Association of Accessibility Professionals 27 L label 5 M maintenance guidelines 21 menu button 4, 15 model specifications 23 model specifications 23 O OSD button 4, 15 OSD menu 15 P preset display resolutions 24 product label 5 product number...


