

Product Notices
Page 2
...cables having metallic RFI/EMI connector hoods to its operation in the 5.15- If this device. This device must be less than 20 cm (8 inches). Cables Connections to the antennas should be co-located or operating in a residential installation. To avoid the possibility of this device that may void the user...be determined by one or more of the 5.25- Q Consult the dealer or an experienced radio or television technician for your product, refer to the part, series, or model number found to Part 15 of the FCC Rules. Products with wireless LAN devices or HP Mobile Broadband Modules...
...cables having metallic RFI/EMI connector hoods to its operation in the 5.15- If this device. This device must be less than 20 cm (8 inches). Cables Connections to the antennas should be co-located or operating in a residential installation. To avoid the possibility of this device that may void the user...be determined by one or more of the 5.25- Q Consult the dealer or an experienced radio or television technician for your product, refer to the part, series, or model number found to Part 15 of the FCC Rules. Products with wireless LAN devices or HP Mobile Broadband Modules...

Product Notices
Page 14
...brightness of Display(s). • Keep as far away as possible from the product. Japanese power cord requirements For use in the country where you purchased the equipment. If you, or any other complications when exposed to certain visual images, including flashing lights or patterns that may appear during use in Japan, use only the power cord... before using Display(s) functionality when you experience any of the above symptoms. Children and teenagers may experience a seizure or other products. If you are tired or need sleep. Parents should be walked on input voltages ...
...brightness of Display(s). • Keep as far away as possible from the product. Japanese power cord requirements For use in the country where you purchased the equipment. If you, or any other complications when exposed to certain visual images, including flashing lights or patterns that may appear during use in Japan, use only the power cord... before using Display(s) functionality when you experience any of the above symptoms. Children and teenagers may experience a seizure or other products. If you are tired or need sleep. Parents should be walked on input voltages ...

Product Notices
Page 31
... display after 5 minutes of user inactivity ■ Initiate a low power sleep mode for dette produkt på adressen http://www.hp.com/go /reach. Un rapport d'informations sur les substances chimiques de ce produit est disponible à l'adresse http://www.hp.com/go /reach. Examples include the user pressing the power/sleep button, receiving an input signal from an input device, receiving an input signal from the default power setting...
... display after 5 minutes of user inactivity ■ Initiate a low power sleep mode for dette produkt på adressen http://www.hp.com/go /reach. Un rapport d'informations sur les substances chimiques de ce produit est disponible à l'adresse http://www.hp.com/go /reach. Examples include the user pressing the power/sleep button, receiving an input signal from an input device, receiving an input signal from the default power setting...

User Guide
Page 5
...the monitor stand ...5 Mounting the monitor head ...5 Attaching an HP Desktop Mini to the monitor 6 Routing cables ...9 Turning on power ...10 Removing the HP Desktop Mini ...10 Configuring the monitor as standalone monitor 10 Connecting a second computer the monitor 11 Adjusting the monitor ...12 Installing a security cable ...13 HP watermark and image retention policy 13 2 Using the monitor ...14 Software and utilities ...14 The Information file ...14 The Image Color Matching file ...14 Using the on-screen display (OSD) menu ...15 Adjusting Low Blue Light Mode ...16 Using Auto-Sleep Mode...
...the monitor stand ...5 Mounting the monitor head ...5 Attaching an HP Desktop Mini to the monitor 6 Routing cables ...9 Turning on power ...10 Removing the HP Desktop Mini ...10 Configuring the monitor as standalone monitor 10 Connecting a second computer the monitor 11 Adjusting the monitor ...12 Installing a security cable ...13 HP watermark and image retention policy 13 2 Using the monitor ...14 Software and utilities ...14 The Information file ...14 The Image Color Matching file ...14 Using the on-screen display (OSD) menu ...15 Adjusting Low Blue Light Mode ...16 Using Auto-Sleep Mode...
User Guide
Page 6
... disability resources ...27 HP links ...28 Contacting support ...28 vi Cleaning the monitor ...19 Shipping the monitor ...20 Appendix A Technical specifications ...21 Preset display resolutions ...22 Entering user modes ...22 Energy saver feature ...23 Appendix B Accessibility ...24 HP and accessibility ...24 Finding the technology tools you need 24 The HP commitment ...24 International Association of Accessibility Professionals (IAAP 24 Finding the best assistive technology 25 Assessing your needs ...25 Accessibility for HP...
... disability resources ...27 HP links ...28 Contacting support ...28 vi Cleaning the monitor ...19 Shipping the monitor ...20 Appendix A Technical specifications ...21 Preset display resolutions ...22 Entering user modes ...22 Energy saver feature ...23 Appendix B Accessibility ...24 HP and accessibility ...24 Finding the technology tools you need 24 The HP commitment ...24 International Association of Accessibility Professionals (IAAP 24 Finding the best assistive technology 25 Assessing your needs ...25 Accessibility for HP...

User Guide
Page 7
... protection device such as a power strip or uninterruptible power supply (UPS). Look on the power label to properly support your HP LCD monitor. For information about the correct power cord set to the LCD monitor so that are included with the monitor, see the Product Notices provided in a controlled luminous environment to avoid interference from surrounding light and bright surfaces that you can replace the equipment if surge...
... protection device such as a power strip or uninterruptible power supply (UPS). Look on the power label to properly support your HP LCD monitor. For information about the correct power cord set to the LCD monitor so that are included with the monitor, see the Product Notices provided in a controlled luminous environment to avoid interference from surrounding light and bright surfaces that you can replace the equipment if surge...

User Guide
Page 8
... cable slot on all digital inputs ● Power Saver mode to meet requirements for your product, go to http://www.hp.com/support and follow the instructions to a wall mount device or swing arm ● USB Type-C connector for interfacing with 100 W Power Delivery Option card. ● Single Power On for both the HP Desktop Mini and the monitor ● On-screen display (OSD) adjustments in your product. Then select User Guides. 2 Chapter 1 Getting started...
... cable slot on all digital inputs ● Power Saver mode to meet requirements for your product, go to http://www.hp.com/support and follow the instructions to a wall mount device or swing arm ● USB Type-C connector for interfacing with 100 W Power Delivery Option card. ● Single Power On for both the HP Desktop Mini and the monitor ● On-screen display (OSD) adjustments in your product. Then select User Guides. 2 Chapter 1 Getting started...
User Guide
Page 9
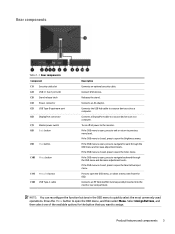
...to a source device such as a computer. NOTE: You can reconfigure the function buttons in the OSD menu to the monitor. Rear components Table 1-1 Rear components Component (1) Security cable slot (2) USB 3.1 Gen1 ports (4) (3) Stand release latch (4) Power connector (5) USB Type-B upstream port (6) DisplayPort connector (7) Master power switch (8) Back button (9) Plus button (10) Minus button (11) Menu/OK button (12) USB Type-C cable Description Connects an optional security cable. Connects a DisplayPort cable to open the Color menu. Connects an HP Desktop Mini (sold separately...
...to a source device such as a computer. NOTE: You can reconfigure the function buttons in the OSD menu to the monitor. Rear components Table 1-1 Rear components Component (1) Security cable slot (2) USB 3.1 Gen1 ports (4) (3) Stand release latch (4) Power connector (5) USB Type-B upstream port (6) DisplayPort connector (7) Master power switch (8) Back button (9) Plus button (10) Minus button (11) Menu/OK button (12) USB Type-C cable Description Connects an optional security cable. Connects a DisplayPort cable to open the Color menu. Connects an HP Desktop Mini (sold separately...
User Guide
Page 11
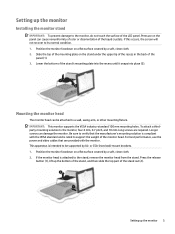
... part of the LCD panel. Be sure to verify that are required. Setting up the monitor Installing the monitor stand IMPORTANT: To prevent damage to the monitor, do not touch the surface of the stand out (2). Press the release button (1), lift up the monitor 5 or CSA-listed wall-mount brackets. 1. IMPORTANT: This monitor supports the VESA industry-standard 100 mm mounting holes. For best performance, use the power and video cables that the manufacturer's mounting...
... part of the LCD panel. Be sure to verify that are required. Setting up the monitor Installing the monitor stand IMPORTANT: To prevent damage to the monitor, do not touch the surface of the stand out (2). Press the release button (1), lift up the monitor 5 or CSA-listed wall-mount brackets. 1. IMPORTANT: This monitor supports the VESA industry-standard 100 mm mounting holes. For best performance, use the power and video cables that the manufacturer's mounting...

User Guide
Page 15
... HP Desktop Mini to connect power to the equipment: Do not disable the power cord grounding plug. When unplugging the power cord from the AC outlet, grasp the cord by unplugging the power cord from the AC outlet. IMPORTANT: Do not use the power supply included with the product (1) and the other end to a grounded AC outlet (2), and then connect the AC adapter to the power connector on the monitor (3). Plug the power cord...
... HP Desktop Mini to connect power to the equipment: Do not disable the power cord grounding plug. When unplugging the power cord from the AC outlet, grasp the cord by unplugging the power cord from the AC outlet. IMPORTANT: Do not use the power supply included with the product (1) and the other end to a grounded AC outlet (2), and then connect the AC adapter to the power connector on the monitor (3). Plug the power cord...

User Guide
Page 16
... monitor. The power button will not be in use for 12 or more consecutive hours of nonuse. Image retention is installed in the rear compartment on the monitor. A burned-in image on the monitor is connected as standalone monitor The monitor has a USB Type-B upstream port and a DisplayPort connector if the monitor is not covered under the HP warranty. Removing the HP Desktop Mini 1. Remove both the monitor and the HP Desktop Mini if the HP...
... monitor. The power button will not be in use for 12 or more consecutive hours of nonuse. Image retention is installed in the rear compartment on the monitor. A burned-in image on the monitor is connected as standalone monitor The monitor has a USB Type-B upstream port and a DisplayPort connector if the monitor is not covered under the HP warranty. Removing the HP Desktop Mini 1. Remove both the monitor and the HP Desktop Mini if the HP...

User Guide
Page 17
..., press the Menu button to the USB Type-A downstream port on the second computer. 2. To toggle the monitor between the HP Desktop Mini and the second computer. 1. Then connect the cable's Type-A connector to open the OSD. Setting up the monitor 11 For video input from the second computer, connect one end of a DisplayPort cable to the DisplayPort connector on the rear of the monitor. Connecting a second computer the monitor You can connect a second...
..., press the Menu button to the USB Type-A downstream port on the second computer. 2. To toggle the monitor between the HP Desktop Mini and the second computer. 1. Then connect the cable's Type-A connector to open the OSD. Setting up the monitor 11 For video input from the second computer, connect one end of a DisplayPort cable to the DisplayPort connector on the rear of the monitor. Connecting a second computer the monitor You can connect a second...

User Guide
Page 19
... without the use the power management setting, if supported on the monitor is not covered under the HP warranty. To avoid image retention damage, either turn off the monitor when it is not in use, or use of screen savers. IPS monitors are displayed on the monitor's screen. This panel technology, however, is not suitable for applications that exhibit static, stationary, or fixed images for a wide variety of advanced image quality applications...
... without the use the power management setting, if supported on the monitor is not covered under the HP warranty. To avoid image retention damage, either turn off the monitor when it is not in use, or use of screen savers. IPS monitors are displayed on the monitor's screen. This panel technology, however, is not suitable for applications that exhibit static, stationary, or fixed images for a wide variety of advanced image quality applications...

User Guide
Page 21
... OSD menu and make adjustments in the OSD main menu. You can access and make adjustments: 1. Adjusts the on which the OSD menu is displayed (the factory default is not already on, press the power button to turn on the rear of the screen. Adjusts the screen image. Adjusts the power settings. Selects the USB host. Use the three function buttons to open the OSD. 3. Table 2-1 OSD main menu options and their descriptions Main menu Description Brightness Color Image Input Power Audio Menu Management USB Host Information Exit Adjusts the brightness and contrast...
... OSD menu and make adjustments in the OSD main menu. You can access and make adjustments: 1. Adjusts the on which the OSD menu is displayed (the factory default is not already on, press the power button to turn on the rear of the screen. Adjusts the screen image. Adjusts the power settings. Selects the USB host. Use the three function buttons to open the OSD. 3. Table 2-1 OSD main menu options and their descriptions Main menu Description Brightness Color Image Input Power Audio Menu Management USB Host Information Exit Adjusts the brightness and contrast...
User Guide
Page 22
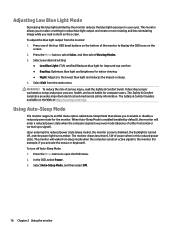
... information. To turn off , and the power light turns amber. Select Auto-Sleep Mode, and then select Off. 16 Chapter 2 Using the monitor To reduce the risk of the monitor to display the OSD icons on sleep. 4. WARNING! The Safety & Comfort Guide is available on the screen. The monitor draws less than 0.5 W of either horizontal or vertical sync signal). Adjusting Low Blue Light Mode Decreasing the blue light emitted by default), the monitor will wake from sleep mode when the...
... information. To turn off , and the power light turns amber. Select Auto-Sleep Mode, and then select Off. 16 Chapter 2 Using the monitor To reduce the risk of the monitor to display the OSD icons on sleep. 4. WARNING! The Safety & Comfort Guide is available on the screen. The monitor draws less than 0.5 W of either horizontal or vertical sync signal). Adjusting Low Blue Light Mode Decreasing the blue light emitted by default), the monitor will wake from sleep mode when the...

User Guide
Page 23
... connected to Connect the USB Type-C cable. Preparing to On. the HP Desktop Mini. "Input Signal Out of each issue, and the recommended solutions. are set auto-sleep to call technical support If you cannot solve an issue using the troubleshooting tips in sleep mode. You can also find information about how to exit sleep mode. Connect the power cord. Press the monitor power button. System is Video resolution and/or refresh rate displayed on the screen. Brightness setting is disabled. See Preset display resolutions...
... connected to Connect the USB Type-C cable. Preparing to On. the HP Desktop Mini. "Input Signal Out of each issue, and the recommended solutions. are set auto-sleep to call technical support If you cannot solve an issue using the troubleshooting tips in sleep mode. You can also find information about how to exit sleep mode. Connect the power cord. Press the monitor power button. System is Video resolution and/or refresh rate displayed on the screen. Brightness setting is disabled. See Preset display resolutions...

User Guide
Page 25
... electronics. Never disconnect the monitor by using a screen saver program and turning off the monitor when not in the operating instructions. NOTE: A burned-in image on the monitor is not operating properly or has been dropped or damaged, contact an authorized HP dealer, reseller, or service provider. ● Use only a power source and connection appropriate for ventilation. These openings must position the monitor facedown on a soft area...
... electronics. Never disconnect the monitor by using a screen saver program and turning off the monitor when not in the operating instructions. NOTE: A burned-in image on the monitor is not operating properly or has been dropped or damaged, contact an authorized HP dealer, reseller, or service provider. ● Use only a power source and connection appropriate for ventilation. These openings must position the monitor facedown on a soft area...
User Guide
Page 27
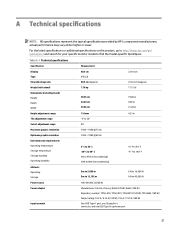
... to http://www.hp.com/go/ quickspecs/ and search for your specific monitor model to 40,000 ft Power adapter Manufacturer: Lite-On, Chicony, Delta (120 W); Table A-1 Technical specifications Specification Measurement Display Type Viewable image size 60.5 cm IPS LCD 60.5 cm diagonal 23.8-inch 23.8-inch diagonal Weight (with stand) 7.78 kg 17.15 lb Dimensions (including stand) Height Depth Width 50.45 cm 24.20 cm...
... to http://www.hp.com/go/ quickspecs/ and search for your specific monitor model to 40,000 ft Power adapter Manufacturer: Lite-On, Chicony, Delta (120 W); Table A-1 Technical specifications Specification Measurement Display Type Viewable image size 60.5 cm IPS LCD 60.5 cm diagonal 23.8-inch 23.8-inch diagonal Weight (with stand) 7.78 kg 17.15 lb Dimensions (including stand) Height Depth Width 50.45 cm 24.20 cm...
User Guide
Page 28
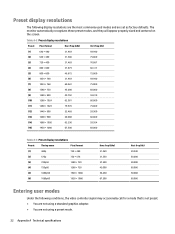
...monitor automatically recognizes these preset modes, and they will appear properly sized and centered on the screen. Preset display resolutions The following conditions, the video controller signal may occasionally call for a mode that is not preset: ● You are not using a standard graphics adapter. ● You are set as factory defaults. Table A-2 Preset display resolutions Preset Pixel....000 60.000 50.000 60.000 Entering user modes Under the following display resolutions are the most commonly used modes and are not using a preset mode. 22 Appendix A Technical specifications
...monitor automatically recognizes these preset modes, and they will appear properly sized and centered on the screen. Preset display resolutions The following conditions, the video controller signal may occasionally call for a mode that is not preset: ● You are not using a standard graphics adapter. ● You are set as factory defaults. Table A-2 Preset display resolutions Preset Pixel....000 60.000 50.000 60.000 Entering user modes Under the following display resolutions are the most commonly used modes and are not using a preset mode. 22 Appendix A Technical specifications

User Guide
Page 29
... the absence of either the horizontal sync signal or the vertical sync signal. When the monitor is a brief warm-up period before the monitor will utilize 0.5 watts of these signals, the monitor screen is blanked, the backlight is connected to the factory preset modes, there are at least 10 user modes that has energy saver features. See the computer manual for instructions on -screen display menu. The reduced power state will be made...
... the absence of either the horizontal sync signal or the vertical sync signal. When the monitor is a brief warm-up period before the monitor will utilize 0.5 watts of these signals, the monitor screen is blanked, the backlight is connected to the factory preset modes, there are at least 10 user modes that has energy saver features. See the computer manual for instructions on -screen display menu. The reduced power state will be made...


