

User Guide
Page 4
... Started 1 Important safety information 1 Product features and components 2 Features 2 Rear components 3 54.61 cm/21.5-inch model 3 60.47 cm/23.8-inch model 3 Front bezel controls 4 Setting up the monitor 5 Installing the monitor stand 5 Connecting the cables 5 Adjusting the monitor 7 Turning on the monitor 8 HP Watermark and Image Retention Policy 9 Installing a security cable 9 2 Using the Monitor 10 Downloading the monitor drivers 10 Using the On-Screen Display (OSD) menu 10 Assigning the Function buttons 11 Adjusting to Low Blue Light Mode 11 Using Auto-Sleep Mode...
... Started 1 Important safety information 1 Product features and components 2 Features 2 Rear components 3 54.61 cm/21.5-inch model 3 60.47 cm/23.8-inch model 3 Front bezel controls 4 Setting up the monitor 5 Installing the monitor stand 5 Connecting the cables 5 Adjusting the monitor 7 Turning on the monitor 8 HP Watermark and Image Retention Policy 9 Installing a security cable 9 2 Using the Monitor 10 Downloading the monitor drivers 10 Using the On-Screen Display (OSD) menu 10 Assigning the Function buttons 11 Adjusting to Low Blue Light Mode 11 Using Auto-Sleep Mode...

User Guide
Page 5
3 Support and troubleshooting 12 Solving common problems 12 Using the auto-adjustment function (analog input 13 Optimizing image performance (analog input 14 Button lockouts 15 Product support 15 Preparing to call technical support 15 Locating the serial number and product number 16 4 Maintaining the monitor 17 Maintenance guidelines 17 Cleaning the monitor 17 Shipping the monitor 17 A Technical specifications 18 54.61 cm/21.5-inch model 18 60.47 cm/23.8-inch model 18 Preset display resolutions 19 54.61...
3 Support and troubleshooting 12 Solving common problems 12 Using the auto-adjustment function (analog input 13 Optimizing image performance (analog input 14 Button lockouts 15 Product support 15 Preparing to call technical support 15 Locating the serial number and product number 16 4 Maintaining the monitor 17 Maintenance guidelines 17 Cleaning the monitor 17 Shipping the monitor 17 A Technical specifications 18 54.61 cm/21.5-inch model 18 60.47 cm/23.8-inch model 18 Preset display resolutions 19 54.61...
User Guide
Page 6
... the Web at all cords and cables connected to avoid interference from surrounding light and bright surfaces that no one may cause disturbing reflections from the computer by attaching a 2-pin adapter. Install the monitor near an AC outlet that they cannot be specifically labeled as a power strip or Uninterruptible Power Supply (UPS). 1 Getting Started Important safety information An AC power cord is included with a 3-pin...
... the Web at all cords and cables connected to avoid interference from surrounding light and bright surfaces that no one may cause disturbing reflections from the computer by attaching a 2-pin adapter. Install the monitor near an AC outlet that they cannot be specifically labeled as a power strip or Uninterruptible Power Supply (UPS). 1 Getting Started Important safety information An AC power cord is included with a 3-pin...

User Guide
Page 7
... 1920 x 1080 resolution, plus full-screen support for maximum image size while preserving original aspect ratio • 60.47 cm (23.8-inch) diagonal viewable screen area with an LED backlight • Wide viewing angle to allow viewing from a sitting or standing position, or when moving from side to side • Tilt capability • VGA video input • DVI digital signal (Select Models) • HDMI (High-Definition Multimedia Interface) video input (Select Models) • Plug-and-play capability...
... 1920 x 1080 resolution, plus full-screen support for maximum image size while preserving original aspect ratio • 60.47 cm (23.8-inch) diagonal viewable screen area with an LED backlight • Wide viewing angle to allow viewing from a sitting or standing position, or when moving from side to side • Tilt capability • VGA video input • DVI digital signal (Select Models) • HDMI (High-Definition Multimedia Interface) video input (Select Models) • Plug-and-play capability...

User Guide
Page 9
... OSD menu simulator, visit the HP Customer Self Repair Services Media Library at http://www.hp.com/go/sml. 4 1 Getting Started Front bezel controls Depending on your monitor model, the location of the front bezel controls will differ. 1 2 3 4 5 or 54.61 cm/21.5-inch model 12345 60.47 cm/23.8-inch model 54321 Control 1 Menu/OK 2 Minus 3 Plus 4 Exit 5 Power Function Opens the OSD menu or selects items on , press to save...
... OSD menu simulator, visit the HP Customer Self Repair Services Media Library at http://www.hp.com/go/sml. 4 1 Getting Started Front bezel controls Depending on your monitor model, the location of the front bezel controls will differ. 1 2 3 4 5 or 54.61 cm/21.5-inch model 12345 60.47 cm/23.8-inch model 54321 Control 1 Menu/OK 2 Minus 3 Plus 4 Exit 5 Power Function Opens the OSD menu or selects items on , press to save...

User Guide
Page 10
... occurs, the screen will automatically determine which inputs have valid video signals. NOTE: The monitor will not recover to the VGA connector on a flat and clean surface. 2. or NOTE: Connector locations may cause non-uniformity of color or disorientation of the LCD panel. Not all cables shown in a convenient, well-ventilated location near the computer. 2. Setting up the monitor Installing the monitor stand CAUTION: Do not touch the surface of...
... occurs, the screen will automatically determine which inputs have valid video signals. NOTE: The monitor will not recover to the VGA connector on a flat and clean surface. 2. or NOTE: Connector locations may cause non-uniformity of color or disorientation of the LCD panel. Not all cables shown in a convenient, well-ventilated location near the computer. 2. Setting up the monitor Installing the monitor stand CAUTION: Do not touch the surface of...

User Guide
Page 12
... monitor Tilt the display head forward or backward to set it to the equipment: Do not disable the power cord grounding plug. Plug the power cord into a grounded (earthed) AC outlet that no one end of electric shock or damage to a comfortable eye level. Do not pull on a cord or cable. The grounding plug is easily accessible at all times. Disconnect power from the equipment...
... monitor Tilt the display head forward or backward to set it to the equipment: Do not disable the power cord grounding plug. Plug the power cord into a grounded (earthed) AC outlet that no one end of electric shock or damage to a comfortable eye level. Do not pull on a cord or cable. The grounding plug is easily accessible at all times. Disconnect power from the equipment...

User Guide
Page 13
... disable the power LED in image" on the screen for 10 seconds. The message shows which input is not covered under the HP warranty. or CAUTION: Burn-in use for a prolonged period of the auto-switch source setting (On or Off; A "burned-in the OSD menu. To disable this feature, press and hold the monitor Power button for 12 or more consecutive hours of the monitor to turn it on all LCD screens...
... disable the power LED in image" on the screen for 10 seconds. The message shows which input is not covered under the HP warranty. or CAUTION: Burn-in use for a prolonged period of the auto-switch source setting (On or Off; A "burned-in the OSD menu. To disable this feature, press and hold the monitor Power button for 12 or more consecutive hours of the monitor to turn it on all LCD screens...

User Guide
Page 14
... on your system, to a fixed object with ADS (Advanced Super Dimension Switch ) display technology which provides ultra-wide viewing angles and advanced image quality. HP Watermark and Image Retention Policy The ADS monitor models are designed with an optional cable lock available from HP. 1 Getting Started 9 This panel technology, however, is idle. Monitors in use or use the power management setting, if supported on the monitor's screen. ADS monitors are suitable for a prolonged period...
... on your system, to a fixed object with ADS (Advanced Super Dimension Switch ) display technology which provides ultra-wide viewing angles and advanced image quality. HP Watermark and Image Retention Policy The ADS monitor models are designed with an optional cable lock available from HP. 1 Getting Started 9 This panel technology, however, is idle. Monitors in use or use the power management setting, if supported on the monitor's screen. ADS monitors are suitable for a prolonged period...

User Guide
Page 15
... Contrast Color Control Input Control Image Control Power Control Menu Control Management Language Information Exit Description Adjusts the brightness level of the Function buttons on -screen instructions to http://www.hp.com/support. 2. Adjusts the screen image. Adjusts the power settings. To access the OSD menu, press one of the screen. Select Get software and drivers. 3. Exits the OSD menu screen. 10 2 Using the Monitor Go to download the software. The following : 1. 2 Using the Monitor Downloading the monitor drivers You can access and make adjustments...
... Contrast Color Control Input Control Image Control Power Control Menu Control Management Language Information Exit Description Adjusts the brightness level of the Function buttons on -screen instructions to http://www.hp.com/support. 2. Adjusts the screen image. Adjusts the power settings. To access the OSD menu, press one of the screen. Select Get software and drivers. 3. Exits the OSD menu screen. 10 2 Using the Monitor Go to download the software. The following : 1. 2 Using the Monitor Downloading the monitor drivers You can access and make adjustments...

User Guide
Page 16
... activate the buttons, and then press the Menu button to your user guide. The Safety & Comfort Guide also provides important electrical and mechanical safety information. The Safety & Comfort Guide also available on the bottom side of either horizontal or vertical sync signal). Using Auto-Sleep Mode The monitor supports an OSD (On-Screen Display) menu option called Auto-Sleep Mode that when the buttons are activated you can disable Auto-Sleep Mode in this adjustment, • Press the Menu button, select Color Control > Viewing Modes > Low Blue Light.
... activate the buttons, and then press the Menu button to your user guide. The Safety & Comfort Guide also provides important electrical and mechanical safety information. The Safety & Comfort Guide also available on the bottom side of either horizontal or vertical sync signal). Using Auto-Sleep Mode The monitor supports an OSD (On-Screen Display) menu option called Auto-Sleep Mode that when the buttons are activated you can disable Auto-Sleep Mode in this adjustment, • Press the Menu button, select Color Control > Viewing Modes > Low Blue Light.

User Guide
Page 17
... and hold the Power button for more information. Connect the appropriate video signal cable between the computer and monitor. Problem Screen is blank or video is incompatible. Video card is flashing. Monitor video cable is enabled. Press the Power button. The monitor's Power Button Lockout function is disconnected. Video resolution and/or refresh rate are set auto-sleep to disable the Power button lockout feature. Open the OSD menu and select Brightness to a supported setting. Connect the video cable properly. See Preset display resolutions on page...
... and hold the Power button for more information. Connect the appropriate video signal cable between the computer and monitor. Problem Screen is blank or video is incompatible. Video card is flashing. Monitor video cable is enabled. Press the Power button. The monitor's Power Button Lockout function is disconnected. Video resolution and/or refresh rate are set auto-sleep to disable the Power button lockout feature. Open the OSD menu and select Brightness to a supported setting. Connect the video cable properly. See Preset display resolutions on page...

User Guide
Page 18
... screen for the specific button name) and the autoadjustment pattern software utility (select models only). Allow the monitor to warm up the monitor, conduct a Factory Reset of the computer, or change the resolution of the monitor, the Auto-Adjustment feature automatically engages, and attempts to exit the test pattern. 3 Support and troubleshooting 13 Press the Menu button, and then select Image Control>Auto-Adjustment from http://www.hp.com/support and open the Auto-Adjustment utility. 4. Using the auto-adjustment...
... screen for the specific button name) and the autoadjustment pattern software utility (select models only). Allow the monitor to warm up the monitor, conduct a Factory Reset of the computer, or change the resolution of the monitor, the Auto-Adjustment feature automatically engages, and attempts to exit the test pattern. 3 Support and troubleshooting 13 Press the Menu button, and then select Image Control>Auto-Adjustment from http://www.hp.com/support and open the Auto-Adjustment utility. 4. Using the auto-adjustment...
User Guide
Page 19
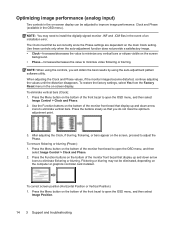
... auto-adjustment pattern software utility. To restore the factory settings, select Yes from the Factory Reset menu in the on the screen background. • Phase-Increases/decreases the value to minimize video flickering or blurring. To correct screen position (Horizontal Position or Vertical Position): 1. When adjusting the Clock and Phase values, if the monitor images become distorted, continue adjusting the values until the distortion disappears. Flickering or blurring may need to install the digitally signed monitor...
... auto-adjustment pattern software utility. To restore the factory settings, select Yes from the Factory Reset menu in the on the screen background. • Phase-Increases/decreases the value to minimize video flickering or blurring. To correct screen position (Horizontal Position or Vertical Position): 1. When adjusting the Clock and Phase values, if the monitor images become distorted, continue adjusting the values until the distortion disappears. Flickering or blurring may need to install the digitally signed monitor...

User Guide
Page 20
... an HP technician NOTE: When support chat is not available in a particular language, it is available in this section, you call: • Monitor model number • Monitor serial number • Purchase date on -screen directions. 2. Press the Function buttons on , displaying an active signal, and the OSD is powered on the bottom of that display up and down the Power button or Menu button for ten seconds. The Horizontal Position shifts the image...
... an HP technician NOTE: When support chat is not available in a particular language, it is available in this section, you call: • Monitor model number • Monitor serial number • Purchase date on -screen directions. 2. Press the Function buttons on , displaying an active signal, and the OSD is powered on the bottom of that display up and down the Power button or Menu button for ten seconds. The Horizontal Position shifts the image...

User Guide
Page 22
... the screen surface. NOTE: A "burned-in image" on a soft area to prevent it later if you must not be blocked or covered. These openings must lay the monitor facedown on the monitor is not operating properly or has been dropped or damaged, contact an authorized HP dealer, reseller, or service provider. • Use only a power source and connection appropriate for ventilation. Turn off...
... the screen surface. NOTE: A "burned-in image" on a soft area to prevent it later if you must not be blocked or covered. These openings must lay the monitor facedown on the monitor is not operating properly or has been dropped or damaged, contact an authorized HP dealer, reseller, or service provider. • Use only a power source and connection appropriate for ventilation. Turn off...

User Guide
Page 23
...: The product specifications provided in the user guide might have changed between the time of manufacturing and delivery of your specific monitor model to find the model-specific QuickSpecs. 54.61 cm/21.5-inch model Display Type Viewable Image Size Maximum Weight (Unpacked) Dimensions (include base) Height Depth Width Maximum Graphic Resolution Optimum Graphic Resolution Environmental Requirements Temperature Operating Temperature Storage Temperature Power Source Input Terminal 54.61 cm wide screen TN 54...
...: The product specifications provided in the user guide might have changed between the time of manufacturing and delivery of your specific monitor model to find the model-specific QuickSpecs. 54.61 cm/21.5-inch model Display Type Viewable Image Size Maximum Weight (Unpacked) Dimensions (include base) Height Depth Width Maximum Graphic Resolution Optimum Graphic Resolution Environmental Requirements Temperature Operating Temperature Storage Temperature Power Source Input Terminal 54.61 cm wide screen TN 54...
User Guide
Page 24
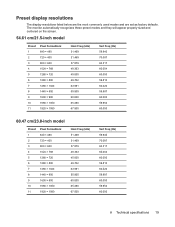
The monitor automatically recognizes these preset modes and they will appear properly sized and centered on the screen. 54.61 cm/21.5-inch model Preset 1 2 3 4 5 6 7 8 9 10 11 Pixel FormatHorz 640 × 480 720 × 400 800 × 600 1024 × 768 1280 × 720 1280 × 800 1280 × 1024 1440 × 900 ... Freq (Hz) 59.940 70.087 60.317 60.004 60.000 59.810 60.020 59.887 60.000 59.954 60.000 A Technical specifications 19 Preset display resolutions The display resolutions listed below are the most commonly used modes and are set as factory defaults.
The monitor automatically recognizes these preset modes and they will appear properly sized and centered on the screen. 54.61 cm/21.5-inch model Preset 1 2 3 4 5 6 7 8 9 10 11 Pixel FormatHorz 640 × 480 720 × 400 800 × 600 1024 × 768 1280 × 720 1280 × 800 1280 × 1024 1440 × 900 ... Freq (Hz) 59.940 70.087 60.317 60.004 60.000 59.810 60.020 59.887 60.000 59.954 60.000 A Technical specifications 19 Preset display resolutions The display resolutions listed below are the most commonly used modes and are set as factory defaults.

User Guide
Page 25
... horizontal sync signal or the vertical sync signal. When the monitor is connected to a computer that can be entered and stored. NOTE: The above power saver feature only works when the monitor is in the monitor's Energy Saver utility, you may occasionally call for instructions on -screen display. Entering user modes The video controller signal may need to readjust the parameters of the monitor screen by using the on setting energy saver features (sometimes called power...
... horizontal sync signal or the vertical sync signal. When the monitor is connected to a computer that can be entered and stored. NOTE: The above power saver feature only works when the monitor is in the monitor's Energy Saver utility, you may occasionally call for instructions on -screen display. Entering user modes The video controller signal may need to readjust the parameters of the monitor screen by using the on setting energy saver features (sometimes called power...

User Guide
Page 26
..., Monday through Friday, 6 a.m. If you have helped you require technical support or have accessibility questions by everyone, including people with disabilities, either on your source device that is connected to the monitor to locate more information about assistive features. B Accessibility HP designs, produces, and markets products and services that can be used by calling (877) 656-7058, Monday through...
..., Monday through Friday, 6 a.m. If you have helped you require technical support or have accessibility questions by everyone, including people with disabilities, either on your source device that is connected to the monitor to locate more information about assistive features. B Accessibility HP designs, produces, and markets products and services that can be used by calling (877) 656-7058, Monday through...


