

User Guide
Page 2
... contains proprietary information that is subject to another language without notice. The information contained herein is protected by copyright. Microsoft and Windows are set forth in the express warranty statements accompanying such products and services. Second Edition (May. 2017) Document Part Number: 918128-002 © Copyright 2017 HP Development Company, L.P. HP shall not be construed as constituting an...
... contains proprietary information that is subject to another language without notice. The information contained herein is protected by copyright. Microsoft and Windows are set forth in the express warranty statements accompanying such products and services. Second Edition (May. 2017) Document Part Number: 918128-002 © Copyright 2017 HP Development Company, L.P. HP shall not be construed as constituting an...

User Guide
Page 4
... Monitor 4 Installing the Monitor 4 Connecting Monitor Cables 6 High-Bandwidth Digital Content Protection (HDCP 7 Connecting the Power Cable 8 Adjusting the Tilt 9 4. Product Features 2. Troubleshooting Solving Common Problems 18 Getting Support from the Internet 10 Adjusting to Call Technical Support 19 Locating the Rating Label 19 B. Operating the Monitor Downloading the monitor driver from hp.com 19 Preparing to Low Blue Light Mode 10 Panel Controls 11 Using the On-Screen Display (OSD 12 Changing the Assign Buttons on the 5-in-1 Navigation Key 13 Using Auto-Sleep Mode...
... Monitor 4 Installing the Monitor 4 Connecting Monitor Cables 6 High-Bandwidth Digital Content Protection (HDCP 7 Connecting the Power Cable 8 Adjusting the Tilt 9 4. Product Features 2. Troubleshooting Solving Common Problems 18 Getting Support from the Internet 10 Adjusting to Call Technical Support 19 Locating the Rating Label 19 B. Operating the Monitor Downloading the monitor driver from hp.com 19 Preparing to Low Blue Light Mode 10 Panel Controls 11 Using the On-Screen Display (OSD 12 Changing the Assign Buttons on the 5-in-1 Navigation Key 13 Using Auto-Sleep Mode...

User Guide
Page 5
...-screen support for lower resolutions • VGA analog signal • DVI digital signal • USB charging function • Easy viewing from a sitting or standing position, or while moving from one side of the monitor to http://www.hp.com/support, Select Find your documentation kit. ENWW 1 To locate updates to the user guide for easy setup and screen optimization • Power Saver to reduce energy consumption • HDCP (High Bandwidth Digital Content Protection) on DVI input...
...-screen support for lower resolutions • VGA analog signal • DVI digital signal • USB charging function • Easy viewing from a sitting or standing position, or while moving from one side of the monitor to http://www.hp.com/support, Select Find your documentation kit. ENWW 1 To locate updates to the user guide for easy setup and screen optimization • Power Saver to reduce energy consumption • HDCP (High Bandwidth Digital Content Protection) on DVI input...

User Guide
Page 6
... replace the equipment, if surge protection fails. The grounding plug is an important safety feature. • Plug the power cord in your monitor near a power outlet that is easily accessible at http://www.hp.com/ergo. For your HP LCD monitor. To reduce the risk of surge protection device such as the computer, connect all cords and cables connected to use only a power source and connection appropriate for computer users...
... replace the equipment, if surge protection fails. The grounding plug is an important safety feature. • Plug the power cord in your monitor near a power outlet that is easily accessible at http://www.hp.com/ergo. For your HP LCD monitor. To reduce the risk of surge protection device such as the computer, connect all cords and cables connected to use only a power source and connection appropriate for computer users...
User Guide
Page 7
... covered in a well-ventilated area, away from the wall outlet or the power brick. 3. Maintenance Guidelines To enhance the performance and extend the life of the monitor by using a screen saver program and turning off the monitor and the computer. 2. Clean the monitor screen with water. 4. Look on a soft area to determine the ampere rating (AMPS or A) for each device. • Install the monitor...
... covered in a well-ventilated area, away from the wall outlet or the power brick. 3. Maintenance Guidelines To enhance the performance and extend the life of the monitor by using a screen saver program and turning off the monitor and the computer. 2. Clean the monitor screen with water. 4. Look on a soft area to determine the ampere rating (AMPS or A) for each device. • Install the monitor...

User Guide
Page 8
... too much pressure is adequately installed and secured before attaching the monitor. Installing the Monitor You can cause damage. 2. Stress on a flat, protected surface. Avoid touching or applying pressure to assemble the monitor. ENWW Preparing the monitor for wall-mounting 1. Check the stability of the display panel may need a flat, soft, protected area for placing the monitor screen-down on a flat, stable surface. Disconnect the power cable and any other attached...
... too much pressure is adequately installed and secured before attaching the monitor. Installing the Monitor You can cause damage. 2. Stress on a flat, protected surface. Avoid touching or applying pressure to assemble the monitor. ENWW Preparing the monitor for wall-mounting 1. Check the stability of the display panel may need a flat, soft, protected area for placing the monitor screen-down on a flat, stable surface. Disconnect the power cable and any other attached...
User Guide
Page 9
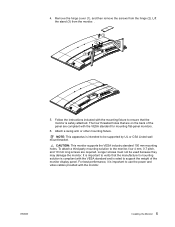
... of the monitor display panel. For best performance, it is safely attached. Remove the hinge cover (1), and then remove the screws from the monitor. . 1 2 3 5. Lift the stand (3) from the hinge (2). Attach a swing arm or other mounting fixture. CAUTION: This monitor supports the VESA industry standard 100 mm mounting holes. 4. NOTE: This apparatus is intended to verify that the monitor is important to use the power and video cables provided with...
... of the monitor display panel. For best performance, it is safely attached. Remove the hinge cover (1), and then remove the screws from the monitor. . 1 2 3 5. Lift the stand (3) from the hinge (2). Attach a swing arm or other mounting fixture. CAUTION: This monitor supports the VESA industry standard 100 mm mounting holes. 4. NOTE: This apparatus is intended to verify that the monitor is important to use the power and video cables provided with...

User Guide
Page 10
... DVI signal, you must have a DVIcompliant graphic card. To use DVI-D to your computer has a DVI compliant graphics card installed. Be sure the computer and monitor are included with select cables. Or to connect DVI-D to HDMI cable: Connector DVI-D connector to the back of the monitor and the other end to the back of the monitor. To use DVI, you must connect your monitor to HDMI cable, you must have HDMI compliance graphic card. Connecting the VGA (Analog) Cable or DVI-D (Digital) Cable...
... DVI signal, you must have a DVIcompliant graphic card. To use DVI-D to your computer has a DVI compliant graphics card installed. Be sure the computer and monitor are included with select cables. Or to connect DVI-D to HDMI cable: Connector DVI-D connector to the back of the monitor and the other end to the back of the monitor. To use DVI, you must connect your monitor to HDMI cable, you must have HDMI compliance graphic card. Connecting the VGA (Analog) Cable or DVI-D (Digital) Cable...
User Guide
Page 11
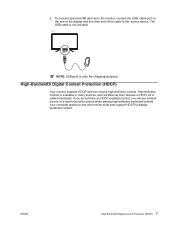
... a blank screen or a lower resolution picture when playing high-definition protected content. USB NOTE: USB port is available in many sources, such as Blue-ray Disc devices or HDTV air or cable broadcasts. Your computer graphics card and monitor must both support HDCP to the source device. The USB cable is not included. 2. To connect optional USB devices to the monitor, connect the USB cable port on the rear of the display and...
... a blank screen or a lower resolution picture when playing high-definition protected content. USB NOTE: USB port is available in many sources, such as Blue-ray Disc devices or HDTV air or cable broadcasts. Your computer graphics card and monitor must both support HDCP to the source device. The USB cable is not included. 2. To connect optional USB devices to the monitor, connect the USB cable port on the rear of the display and...

User Guide
Page 12
... should use an electrical outlet adapter that the grounded power outlet you plug the power cord into a grounded (earthed) electrical outlet. Connect one of the following if a properly grounded electrical outlet is not available: (1) You should do one end of electric shock or damage to a grounded electrical outlet. Follow all Electrical and Power Warnings WARNING! Connecting the Power Cable 1. See"Technical Specification...
... should use an electrical outlet adapter that the grounded power outlet you plug the power cord into a grounded (earthed) electrical outlet. Connect one of the following if a properly grounded electrical outlet is not available: (1) You should do one end of electric shock or damage to a grounded electrical outlet. Follow all Electrical and Power Warnings WARNING! Connecting the Power Cable 1. See"Technical Specification...

User Guide
Page 14
... Menu button to : http://www.hp.com/support. 2. Refer to open the OSD. Follow the on-screen instructions to install the digitally signed monitor drivers (INF or ICM files). It describes proper workstation setup, and proper posture, health, and work habits for computer users. 4. The Safety & Comfort Guide also provides important electrical and mechanical safety information. Operating the Monitor NOTE: You might need to your monitor and download the software. The monitor...
... Menu button to : http://www.hp.com/support. 2. Refer to open the OSD. Follow the on-screen instructions to install the digitally signed monitor drivers (INF or ICM files). It describes proper workstation setup, and proper posture, health, and work habits for computer users. 4. The Safety & Comfort Guide also provides important electrical and mechanical safety information. Operating the Monitor NOTE: You might need to your monitor and download the software. The monitor...

User Guide
Page 16
... On-Screen Display (OSD) 12 Selects the video input signal. The factory default is not already on, press the Power button on -screen display (OSD) and 5-in the OSD menu. Displays important information about the monitor. Using the On-Screen Display (OSD) Use the On-Screen Display (OSD) menu to adjust the monitor screen image based on the menu or submenu that is active. Use the 5-in -1 Navigation Key buttons located on the rear of the screen. Selects and adjusts the screen color. The following : 1. Adjusts the screen image. Adjusts the screen contrast. Adjusts the...
... On-Screen Display (OSD) 12 Selects the video input signal. The factory default is not already on, press the Power button on -screen display (OSD) and 5-in the OSD menu. Displays important information about the monitor. Using the On-Screen Display (OSD) Use the On-Screen Display (OSD) menu to adjust the monitor screen image based on the menu or submenu that is active. Use the 5-in -1 Navigation Key buttons located on the rear of the screen. Selects and adjusts the screen color. The following : 1. Adjusts the screen image. Adjusts the screen contrast. Adjusts the...
User Guide
Page 17
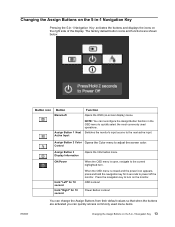
Switches the monitor's input source to turn on the 5-in-1 Navigation Key 13 Control Assign Button 3 Display Information Opens the Information menu. Press the navigation key to the next active input. Assign Button 2 Color Opens the Color menu to the current highlighted item. OSD Lockout Power Button Lockout You can change the Assign Buttons from their default values so that when the buttons are shown below. Changing the Assign Buttons on the 5-in-1 Navigation Key Pressing...
Switches the monitor's input source to turn on the 5-in-1 Navigation Key 13 Control Assign Button 3 Display Information Opens the Information menu. Press the navigation key to the next active input. Assign Button 2 Color Opens the Color menu to the current highlighted item. OSD Lockout Power Button Lockout You can change the Assign Buttons from their default values so that when the buttons are shown below. Changing the Assign Buttons on the 5-in-1 Navigation Key Pressing...

User Guide
Page 19
... PC on the monitor screen when identifying the following monitor conditions: • Monitor Status - Change resolution setting to Sleep - Indicates the auto-adjustment function is DVI.The source of input can connect the VGA cable or the DVI-D cable, or both cables are set higher than 0.5 W of either horizontal or vertical sync signal). Using Auto-Sleep Mode 15 If both . Indicates the monitor does not support the input signal because the resolution and/or refresh rate are installed, the default input selection is active. • Monitor Going to 1920...
... PC on the monitor screen when identifying the following monitor conditions: • Monitor Status - Change resolution setting to Sleep - Indicates the auto-adjustment function is DVI.The source of input can connect the VGA cable or the DVI-D cable, or both cables are set higher than 0.5 W of either horizontal or vertical sync signal). Using Auto-Sleep Mode 15 If both . Indicates the monitor does not support the input signal because the resolution and/or refresh rate are installed, the default input selection is active. • Monitor Going to 1920...

User Guide
Page 20
... displayed. Adjusting Screen Quality (VGA only) The auto adjustment feature automatically fine-tunes the image quality for 30 minutes before adjusting. 2. See "Optimizing Analog Video" in analog mode. Access the OSD menu, then select Image Setup. 3. Phase - Use these controls only when the auto adjustment function does not provide a satisfactory monitor image in this chapter. Optimizing Analog Video Some monitors contain advanced circuitry that allow the monitor to lock out the power button function. • Dynamic Contrast Ratio On - To obtain the best...
... displayed. Adjusting Screen Quality (VGA only) The auto adjustment feature automatically fine-tunes the image quality for 30 minutes before adjusting. 2. See "Optimizing Analog Video" in analog mode. Access the OSD menu, then select Image Setup. 3. Phase - Use these controls only when the auto adjustment function does not provide a satisfactory monitor image in this chapter. Optimizing Analog Video Some monitors contain advanced circuitry that allow the monitor to lock out the power button function. • Dynamic Contrast Ratio On - To obtain the best...

User Guide
Page 21
... the monitor uses the normal watts of power. The monitor uses minimum power. Refer to your computer for instructions on setting energy-saver features (sometimes called power-management features). The monitor also supports a power-saver mode that is connected to work. ENWW Power-Saver Feature 17 For power usage, refer to normal operating mode. The energy-saving reduced power state activates if the monitor does not detect either the horizontal sync signal or the vertical sync signal. Power...
... the monitor uses the normal watts of power. The monitor uses minimum power. Refer to your computer for instructions on setting energy-saver features (sometimes called power-management features). The monitor also supports a power-saver mode that is connected to work. ENWW Power-Saver Feature 17 For power usage, refer to normal operating mode. The energy-saving reduced power state activates if the monitor does not detect either the horizontal sync signal or the vertical sync signal. Power...

User Guide
Page 22
... a supported setting. Power cord is flashing. Press any key on screen. Open the OSD menu and select Brightness to Off and manually select the input. Check Video Cable is displayed on the keyboard or move the mouse to exit sleep mode. Monitor video cable is in sleep mode. Video resolution and/or refresh rate are set auto-sleep to disable Lockout function is off . The monitor's OSD Lockout Press and hold the Power button for 10 seconds to On. the Power Button Lockout function. System is disconnected. Set Auto-Switch Input...
... a supported setting. Power cord is flashing. Press any key on screen. Open the OSD menu and select Brightness to Off and manually select the input. Check Video Cable is displayed on the keyboard or move the mouse to exit sleep mode. Monitor video cable is in sleep mode. Video resolution and/or refresh rate are set auto-sleep to disable Lockout function is off . The monitor's OSD Lockout Press and hold the Power button for 10 seconds to On. the Power Button Lockout function. System is disconnected. Set Auto-Switch Input...
User Guide
Page 23
... to contact HP and open a support case. You may need these numbers when contacting HP about your monitor model. The rating label is on the back of hardware and software you are using the troubleshooting tips in this site to get more information about your product, including links to discussion forums and instructions on invoice • Conditions under which the problem occurred • Error messages...
... to contact HP and open a support case. You may need these numbers when contacting HP about your monitor model. The rating label is on the back of hardware and software you are using the troubleshooting tips in this site to get more information about your product, including links to discussion forums and instructions on invoice • Conditions under which the problem occurred • Error messages...

User Guide
Page 24
Technical Specifications All specifications represent the typical specifications provided by HP's component manufacturers; Face treatment: Glare polarizer with hard coating Input terminal: VGA connector DVI-D connector Specifications: Display Type: Viewable Image Size Tilt Maximum Weight (unpacked) Dimensions (w x h x d) Maximum Graphics Resolution Optimum Graphics Resolution Text Mode Dot Pitch Horizontal Frequency (analog mode) Vertical Frequency (analog mode) Operating Temperature Non-Operating Temperature Operating Humidity Non-Operating Humidity Power Source VA LCD active matrix 80.0...
Technical Specifications All specifications represent the typical specifications provided by HP's component manufacturers; Face treatment: Glare polarizer with hard coating Input terminal: VGA connector DVI-D connector Specifications: Display Type: Viewable Image Size Tilt Maximum Weight (unpacked) Dimensions (w x h x d) Maximum Graphics Resolution Optimum Graphics Resolution Text Mode Dot Pitch Horizontal Frequency (analog mode) Vertical Frequency (analog mode) Operating Temperature Non-Operating Temperature Operating Humidity Non-Operating Humidity Power Source VA LCD active matrix 80.0...

User Guide
Page 26
... in products supplied by one blue subpixel. LCD Monitor Quality and Pixel Policy Your LCD Monitor uses high-precision technology, manufactured according to high standards, to the HP Web site at a supported resolution and refresh rate, from a distance of approximately 50 cm (16 inches). These imperfections are made. The first is common to all vendors and is not specific to your LCD Monitor, refer to help guarantee trouble-free performance...
... in products supplied by one blue subpixel. LCD Monitor Quality and Pixel Policy Your LCD Monitor uses high-precision technology, manufactured according to high standards, to the HP Web site at a supported resolution and refresh rate, from a distance of approximately 50 cm (16 inches). These imperfections are made. The first is common to all vendors and is not specific to your LCD Monitor, refer to help guarantee trouble-free performance...


