

Product Notices
Page 2
... frequency energy and, if not installed and used in conjunction with the instructions, may cause undesired operation of this device. This equipment generates, uses, and can be used indoors for the frequency range of 5.15 GHz to 5.25 GHz to reduce the potential for harmful interference to the part, series, or model number found to Part 15 of tablet PCs and notebook computers. Q Connect...
... frequency energy and, if not installed and used in conjunction with the instructions, may cause undesired operation of this device. This equipment generates, uses, and can be used indoors for the frequency range of 5.15 GHz to 5.25 GHz to reduce the potential for harmful interference to the part, series, or model number found to Part 15 of tablet PCs and notebook computers. Q Connect...

Product Notices
Page 14
..., de certains types de stimulations lumineuses fortes: succession rapide d'images ou répétition de figures géométriques simples, d'éclairs ou d'explosions. The power cord set (flexible cord or wall plug) received with Automatic Line Switching (ALS). A power cord should be routed so that it . Particular attention should monitor and ask their children if they have an undiagnosed...
..., de certains types de stimulations lumineuses fortes: succession rapide d'images ou répétition de figures géométriques simples, d'éclairs ou d'explosions. The power cord set (flexible cord or wall plug) received with Automatic Line Switching (ALS). A power cord should be routed so that it . Particular attention should monitor and ask their children if they have an undiagnosed...

Product Notices
Page 31
... HP Produkten enthaltenen chemischen Stoffe entsprechend den Bestimmungen der EG-Richtlinie 1907/2006 des Europäischen Parlaments und des Rates zur Verfügung zu stellen. REACH (Europa-Parlamentets og Rådets EU-regulativ nr. 1907/2006). Examples include the user pressing the power/sleep button, receiving an input signal from an input device, receiving an input signal from the default power setting...
... HP Produkten enthaltenen chemischen Stoffe entsprechend den Bestimmungen der EG-Richtlinie 1907/2006 des Europäischen Parlaments und des Rates zur Verfügung zu stellen. REACH (Europa-Parlamentets og Rådets EU-regulativ nr. 1907/2006). Examples include the user pressing the power/sleep button, receiving an input signal from an input device, receiving an input signal from the default power setting...
User Guide
Page 4
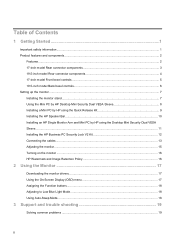
... PC by HP using the Desktop Mini Security Dual VESA Sleeve...11 Installing the HP Business PC Security Lock V2 Kit 12 Connecting the cables ...13 Adjusting the monitor...15 Turning on the monitor ...16 HP Watermark and Image Retention Policy 16 2 Using the Monitor 17 Downloading the monitor drivers...17 Using the On-Screen Display (OSD) menu 17 Assigning the Function buttons...18 Adjusting to Low Blue Light Mode...18 Using Auto-Sleep Mode...18 3 Support and trouble shooting 19 Solving common problems ...19 ii
... PC by HP using the Desktop Mini Security Dual VESA Sleeve...11 Installing the HP Business PC Security Lock V2 Kit 12 Connecting the cables ...13 Adjusting the monitor...15 Turning on the monitor ...16 HP Watermark and Image Retention Policy 16 2 Using the Monitor 17 Downloading the monitor drivers...17 Using the On-Screen Display (OSD) menu 17 Assigning the Function buttons...18 Adjusting to Low Blue Light Mode...18 Using Auto-Sleep Mode...18 3 Support and trouble shooting 19 Solving common problems ...19 ii

User Guide
Page 5
... Act (CVAA 31 ii Using the auto-adjustment function (analog input 20 Optimizing image performance (analog input 21 Button lockouts...22 Product support ...22 Preparing to call technical support ...22 Locating the serial number and product number 23 4 Maintaining the monitor 24 Maintenance guidelines...24 Cleaning the monitor ...24 Shipping the monitor...24 A Technical specifications 25 17-inch model technical specifications and Preset display resolutions 25 19.5-inch model technical specifications and Preset display resolutions 26 Entering user modes ...27 Energy saver...
... Act (CVAA 31 ii Using the auto-adjustment function (analog input 20 Optimizing image performance (analog input 21 Button lockouts...22 Product support ...22 Preparing to call technical support ...22 Locating the serial number and product number 23 4 Maintaining the monitor 24 Maintenance guidelines...24 Cleaning the monitor ...24 Shipping the monitor...24 A Technical specifications 25 17-inch model technical specifications and Preset display resolutions 25 19.5-inch model technical specifications and Preset display resolutions 26 Entering user modes ...27 Energy saver...

User Guide
Page 7
... monitor, as well as a monitor, printer, scanner) to the equipment: • Plug the power cord into a grounded (earthed) 3-pin outlet. Use the appropriate and correctly sized furniture designed to the Product Notices provided in a controlled luminous environment to determine the ampere rating (AMPS or A) for the computer and its peripheral devices (such as the computer, connect all cords and cables connected to the LCD monitor...
... monitor, as well as a monitor, printer, scanner) to the equipment: • Plug the power cord into a grounded (earthed) 3-pin outlet. Use the appropriate and correctly sized furniture designed to the Product Notices provided in a controlled luminous environment to determine the ampere rating (AMPS or A) for the computer and its peripheral devices (such as the computer, connect all cords and cables connected to the LCD monitor...

User Guide
Page 8
... screen area with an LED backlight • Wide viewing angle to allow viewing from a sitting or standing position, or when moving from side to side • Tilt capability • VGA video inputs (17-inch model only) • DisplayPort video inputs (19.5-inch model only) • HDMI (High-Definition Multimedia Interface) video input (19.5-inch model only) • Plug-and-play capability if supported by your operating system • Cable management feature for placement of HP programs and drivers...
... screen area with an LED backlight • Wide viewing angle to allow viewing from a sitting or standing position, or when moving from side to side • Tilt capability • VGA video inputs (17-inch model only) • DisplayPort video inputs (19.5-inch model only) • HDMI (High-Definition Multimedia Interface) video input (19.5-inch model only) • Plug-and-play capability if supported by your operating system • Cable management feature for placement of HP programs and drivers...
User Guide
Page 11
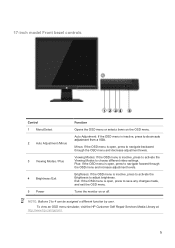
... the OSD menu is inactive, press to activate the Viewing Modes to save any changes made, and exit the OSD menu. NOTE: Buttons 2 to navigate backward through the OSD menu and increase adjustment levels. Turns the monitor on the OSD menu. To view an OSD menu simulator, visit the HP Customer Self Repair Services Media Library at http://www.hp.com/go/sml. 5 17-inch model Front bezel controls Control 1 Menu/Select 2 Auto Adjustment /Minus 3 Viewing Modes / Plus 4 Brightness /Exit 5 Power Function Opens the OSD menu or...
... the OSD menu is inactive, press to activate the Viewing Modes to save any changes made, and exit the OSD menu. NOTE: Buttons 2 to navigate backward through the OSD menu and increase adjustment levels. Turns the monitor on the OSD menu. To view an OSD menu simulator, visit the HP Customer Self Repair Services Media Library at http://www.hp.com/go/sml. 5 17-inch model Front bezel controls Control 1 Menu/Select 2 Auto Adjustment /Minus 3 Viewing Modes / Plus 4 Brightness /Exit 5 Power Function Opens the OSD menu or...
User Guide
Page 12
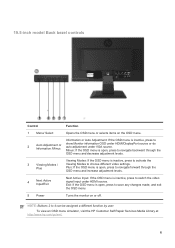
... do auto adjustment under HDMI source. To view an OSD menu simulator, visit the HP Customer Self Repair Services Media Library at http://www.hp.com/go/sml. 6 Exit: If the OSD menu is inactive, press to save any changes made, and exit the OSD menu. 5 Power Turns the monitor on the OSD menu. NOTE: Buttons 2 to choose different video settings. Minus: If the OSD menu is open , press to switch the video signal input under VGA source. 19.5-inch model Back bezel controls Control Function 1 Menu/ Select Opens the OSD menu...
... do auto adjustment under HDMI source. To view an OSD menu simulator, visit the HP Customer Self Repair Services Media Library at http://www.hp.com/go/sml. 6 Exit: If the OSD menu is inactive, press to save any changes made, and exit the OSD menu. 5 Power Turns the monitor on the OSD menu. NOTE: Buttons 2 to choose different video settings. Minus: If the OSD menu is open , press to switch the video signal input under VGA source. 19.5-inch model Back bezel controls Control Function 1 Menu/ Select Opens the OSD menu...
User Guide
Page 22
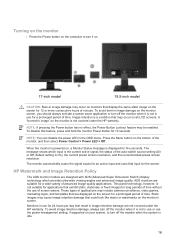
...: You can disable the power LED in use of nonuse. The message shows which provides ultra-wide viewing angles and advanced image quality. To avoid image retention damage, always turn off the monitor when it is displayed for the screen. default setting is the current active signal, the status of time. HP Watermark and Image Retention Policy The ADS monitor models are suitable for a prolonged period of the auto-switch source setting (On...
...: You can disable the power LED in use of nonuse. The message shows which provides ultra-wide viewing angles and advanced image quality. To avoid image retention damage, always turn off the monitor when it is displayed for the screen. default setting is the current active signal, the status of time. HP Watermark and Image Retention Policy The ADS monitor models are suitable for a prolonged period of the auto-switch source setting (On...
User Guide
Page 23
... Control Image Control Power Control Menu Control Management Language Information Exit Description Adjusts the brightness level of the Function buttons on -screen display (OSD) and Function button controls. Enables/disables DDC/CI support, adjusts the audio settings, and returns all OSD menu settings to turn on the bottom side of .INF and .ICM files from the HP monitors support Web site. 1. Adjusts the screen contrast. Adjusts the power settings. The factory default is displayed. To access the OSD menu, press one of the screen. Selects the video input signal...
... Control Image Control Power Control Menu Control Management Language Information Exit Description Adjusts the brightness level of the Function buttons on -screen display (OSD) and Function button controls. Enables/disables DDC/CI support, adjusts the audio settings, and returns all OSD menu settings to turn on the bottom side of .INF and .ICM files from the HP monitors support Web site. 1. Adjusts the screen contrast. Adjusts the power settings. The factory default is displayed. To access the OSD menu, press one of the screen. Selects the video input signal...
User Guide
Page 24
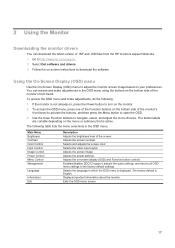
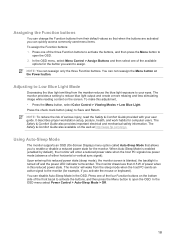
... Function buttons You can change the Function buttons from the monitor reduces the blue light exposure to your user guide. In the OSD menu, select Menu Control > Assign Buttons and then select one of either horizontal or vertical sync signal). The Safety & Comfort Guide also provides important electrical and mechanical safety information. The Safety & Comfort Guide also available on the screen. When Auto-Sleep Mode is turned off and the power LED indicator turns amber. The monitor draws...
... Function buttons You can change the Function buttons from the monitor reduces the blue light exposure to your user guide. In the OSD menu, select Menu Control > Assign Buttons and then select one of either horizontal or vertical sync signal). The Safety & Comfort Guide also provides important electrical and mechanical safety information. The Safety & Comfort Guide also available on the screen. When Auto-Sleep Mode is turned off and the power LED indicator turns amber. The monitor draws...
User Guide
Page 25
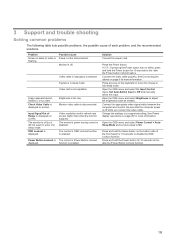
... the monitor supports. Video cable is off. Input Signal Out of each problem, and the recommended solutions. See Connecting the cables on page 6 for more information. Press and hold the Power button for 10 seconds to enter into sleep mode. Change the settings to dis- Video resolution and/or refresh rate are set auto-sleep to adjust the brightness scale as needed. Connect the video cable properly. Press and hold the Menu button on screen. Solution Connect the power cord. Press the Power button. Connect the appropriate video signal cable...
... the monitor supports. Video cable is off. Input Signal Out of each problem, and the recommended solutions. See Connecting the cables on page 6 for more information. Press and hold the Power button for 10 seconds to enter into sleep mode. Change the settings to dis- Video resolution and/or refresh rate are set auto-sleep to adjust the brightness scale as needed. Connect the video cable properly. Press and hold the Menu button on screen. Solution Connect the power cord. Press the Power button. Connect the appropriate video signal cable...
User Guide
Page 26
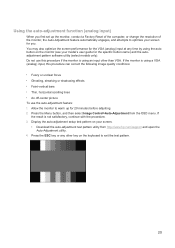
... using the auto button on the monitor (see your model's user guide for the specific button name) and the autoadjustment pattern software utility (select models only). If the monitor is using a VGA (analog) input, this procedure if the monitor is not satisfactory, continue with the procedure. 3. You may also optimize the screen performance for the VGA (analog) input at any other than VGA. Display the auto-adjustment setup test pattern on the keyboard to optimize your screen. • Download the auto-adjustment...
... using the auto button on the monitor (see your model's user guide for the specific button name) and the autoadjustment pattern software utility (select models only). If the monitor is using a VGA (analog) input, this procedure if the monitor is not satisfactory, continue with the procedure. 3. You may also optimize the screen performance for the VGA (analog) input at any other than VGA. Display the auto-adjustment setup test pattern on the keyboard to optimize your screen. • Download the auto-adjustment...
User Guide
Page 27
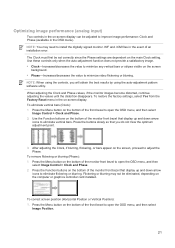
... digitally signed monitor .INF and .ICM files in the on the computer or graphics controller card installed. Press the Menu button on the main Clock setting. To correct screen position (Horizontal Position or Vertical Position): 1. The Clock must first be eliminated, depending on -screen display. When adjusting the Clock and Phase values, if the monitor images become distorted, continue adjusting the values until the distortion disappears. NOTE: When using the auto-adjustment pattern software...
... digitally signed monitor .INF and .ICM files in the on the computer or graphics controller card installed. Press the Menu button on the main Clock setting. To correct screen position (Horizontal Position or Vertical Position): 1. The Clock must first be eliminated, depending on -screen display. When adjusting the Clock and Phase values, if the monitor images become distorted, continue adjusting the values until the distortion disappears. NOTE: When using the auto-adjustment pattern software...
User Guide
Page 28
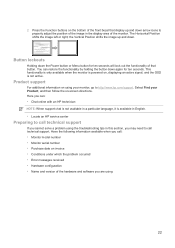
... you are using 22 2. Button lockouts Holding down arrow icons to properly adjust the position of the image in this section, you may need to http://www.hp.com/support. Product support For additional information on -screen directions. Select Find your monitor, go to call : • Monitor model number • Monitor serial number • Purchase date on invoice • Conditions under which the problem occurred • Error messages received...
... you are using 22 2. Button lockouts Holding down arrow icons to properly adjust the position of the image in this section, you may need to http://www.hp.com/support. Product support For additional information on -screen directions. Select Find your monitor, go to call : • Monitor model number • Monitor serial number • Purchase date on invoice • Conditions under which the problem occurred • Error messages received...

User Guide
Page 30
... damaged, contact an authorized HP dealer, reseller, or service provider. • Use only a power source and connection appropriate for ventilation. NOTE: A "burned-in image" on the screen surface. Dust the monitor by unplugging the power cord from the AC outlet. 2. It may damage the monitor. 4 Maintaining the monitor Maintenance guidelines • Do not open the monitor cabinet or attempt to service this monitor, as benzene, thinner, or...
... damaged, contact an authorized HP dealer, reseller, or service provider. • Use only a power source and connection appropriate for ventilation. NOTE: A "burned-in image" on the screen surface. Dust the monitor by unplugging the power cord from the AC outlet. 2. It may damage the monitor. 4 Maintaining the monitor Maintenance guidelines • Do not open the monitor cabinet or attempt to service this monitor, as benzene, thinner, or...
User Guide
Page 31
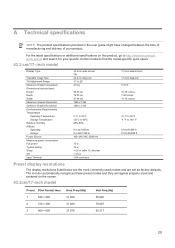
... ft Preset display resolutions The display resolutions listed below are the most commonly used modes and are set as factory defaults. A Technical specifications NOTE: The product specifications provided in the user guide might have changed between the time of manufacturing and delivery of your specific monitor model to find the model-specific quick specs. 43.2 cm/17-inch model Display Type Viewable Image Size Tilt Adjustment Range Maximum Weight (Unpacked) Dimensions (include base) Height Depth Width Maximum Graphic Resolution Optimum Graphic Resolution Environmental...
... ft Preset display resolutions The display resolutions listed below are the most commonly used modes and are set as factory defaults. A Technical specifications NOTE: The product specifications provided in the user guide might have changed between the time of manufacturing and delivery of your specific monitor model to find the model-specific quick specs. 43.2 cm/17-inch model Display Type Viewable Image Size Tilt Adjustment Range Maximum Weight (Unpacked) Dimensions (include base) Height Depth Width Maximum Graphic Resolution Optimum Graphic Resolution Environmental...
User Guide
Page 32
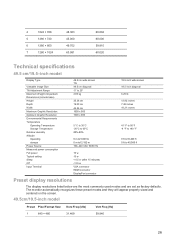
... 60.000 59.810 60.020 Technical specifications 49.5 cm/19.5-inch model Display Type Viewable Image Size Tilt Adjustment Range Maximum Weight (Unpacked) Dimensions (include base) Height Depth Width Maximum Graphic Resolution Optimum Graphic Resolution Environmental Requirements Temperature Operating Temperature Storage Temperature Relative Humidity Altitude Operating storage Power Source Measured power consumption Full power Typical setting Sleep Off Input Terminal 49.5 cm wide screen TN 49.5 cm diagonal -5° to 25...
... 60.000 59.810 60.020 Technical specifications 49.5 cm/19.5-inch model Display Type Viewable Image Size Tilt Adjustment Range Maximum Weight (Unpacked) Dimensions (include base) Height Depth Width Maximum Graphic Resolution Optimum Graphic Resolution Environmental Requirements Temperature Operating Temperature Storage Temperature Relative Humidity Altitude Operating storage Power Source Measured power consumption Full power Typical setting Sleep Off Input Terminal 49.5 cm wide screen TN 49.5 cm diagonal -5° to 25...
User Guide
Page 33
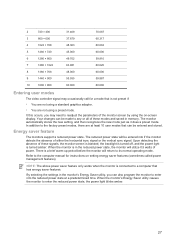
... Entering user modes The video controller signal may need to readjust the parameters of the monitor screen by using a preset mode. The monitor automatically stores the new setting, and then recognizes the new mode just as it does a preset mode. Energy saver feature The monitors support a reduced power state. Upon detecting the absence of these modes and saved in the monitor's Energy Saver utility, you may occasionally call for instructions on -screen display.
... Entering user modes The video controller signal may need to readjust the parameters of the monitor screen by using a preset mode. The monitor automatically stores the new setting, and then recognizes the new mode just as it does a preset mode. Energy saver feature The monitors support a reduced power state. Upon detecting the absence of these modes and saved in the monitor's Energy Saver utility, you may occasionally call for instructions on -screen display.


