

User Guide
Page 5
... monitor head ...7 Removing the monitor stand 8 Attaching the monitor head to a mounting device 8 Connecting the cables ...9 Adjusting the monitor (select products only 12 Installing a security cable ...13 Turning on the monitor ...14 HP watermark and image retention policy 15 2 Using the monitor ...16 Downloading software and utilities ...16 The Information file ...16 The Image Color Matching file ...16 Enabling G-SYNC compatibility (select products only 16 Using the OSD menu ...17 Using the function buttons ...18 Reassigning the function buttons ...18 Display mode...
... monitor head ...7 Removing the monitor stand 8 Attaching the monitor head to a mounting device 8 Connecting the cables ...9 Adjusting the monitor (select products only 12 Installing a security cable ...13 Turning on the monitor ...14 HP watermark and image retention policy 15 2 Using the monitor ...16 Downloading software and utilities ...16 The Information file ...16 The Image Color Matching file ...16 Enabling G-SYNC compatibility (select products only 16 Using the OSD menu ...17 Using the function buttons ...18 Reassigning the function buttons ...18 Display mode...
User Guide
Page 6
Button lockouts ...22 Using the auto-adjustment function (analog input 22 4 Maintaining the monitor ...23 Maintenance guidelines ...23 Cleaning the monitor ...23 Shipping the monitor ...24 Appendix A Technical specifications ...25 86.36 cm (34 in) model specifications ...25 Preset display resolutions ...25 86.36 cm (34 in) model ...26 Energy saver feature ...26 Appendix B Accessibility ...28 HP and accessibility ...28 Finding the technology tools you need 28 The HP commitment...
Button lockouts ...22 Using the auto-adjustment function (analog input 22 4 Maintaining the monitor ...23 Maintenance guidelines ...23 Cleaning the monitor ...23 Shipping the monitor ...24 Appendix A Technical specifications ...25 86.36 cm (34 in) model specifications ...25 Preset display resolutions ...25 86.36 cm (34 in) model ...26 Energy saver feature ...26 Appendix B Accessibility ...28 HP and accessibility ...28 Finding the technology tools you need 28 The HP commitment...

User Guide
Page 7
... death. This equipment is suitable for use in a controlled luminous environment to the floor or wall in your user guides. For information about safety information and where to information, and more. For your monitor. IMPORTANT: For the protection of the monitor and the computer, connect all cords and cables connected to be included with the installation instructions. Monitors that might fall over . WARNING! Consider...
... death. This equipment is suitable for use in a controlled luminous environment to the floor or wall in your user guides. For information about safety information and where to information, and more. For your monitor. IMPORTANT: For the protection of the monitor and the computer, connect all cords and cables connected to be included with the installation instructions. Monitors that might fall over . WARNING! Consider...

User Guide
Page 8
... replace the power cord, the AC adapter (select products only), or any other cables that shipped with VA type ● Wide color gamut to provide coverage of the hardware and software that you are located, and how they are using Support and troubleshooting on page 21, a call technical support Use this information if you cannot solve a problem using Getting to know your monitor Your monitor has top-rated...
... replace the power cord, the AC adapter (select products only), or any other cables that shipped with VA type ● Wide color gamut to provide coverage of the hardware and software that you are located, and how they are using Support and troubleshooting on page 21, a call technical support Use this information if you cannot solve a problem using Getting to know your monitor Your monitor has top-rated...
User Guide
Page 9
.... ● Antiglare panel with an LED backlight ● Wide viewing angle to allow viewing from a sitting or standing position, or moving from side to side ● Tilt and height adjustment capabilities ● Four on-screen display (OSD) buttons: one Menu button and three assignable buttons that you can reconfigure to quickly allow selection of the most commonly used operations ● On-screen display (OSD) adjustments in several languages for easy setup and screen optimization ● Color space presets for...
.... ● Antiglare panel with an LED backlight ● Wide viewing angle to allow viewing from a sitting or standing position, or moving from side to side ● Tilt and height adjustment capabilities ● Four on-screen display (OSD) buttons: one Menu button and three assignable buttons that you can reconfigure to quickly allow selection of the most commonly used operations ● On-screen display (OSD) adjustments in several languages for easy setup and screen optimization ● Color space presets for...
User Guide
Page 10
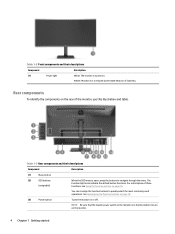
... On position to turn on the monitor. 4 Chapter 1 Getting started The function light icons indicate the default button functions. See Reassigning the function buttons on page 18. (3) Power button Turns the monitor on the rear of the monitor, use this illustration and table. For a description of inactivity. NOTE: Be sure that the master power switch on the monitor is turned on page 18. Amber: Monitor is open, press the buttons to quickly select...
... On position to turn on the monitor. 4 Chapter 1 Getting started The function light icons indicate the default button functions. See Reassigning the function buttons on page 18. (3) Power button Turns the monitor on the rear of the monitor, use this illustration and table. For a description of inactivity. NOTE: Be sure that the master power switch on the monitor is turned on page 18. Amber: Monitor is open, press the buttons to quickly select...
User Guide
Page 11
.... (8) USB Type-C port (upstream) Connects a USB Type-C cable to a source device such as a smartphone. You might need these numbers when contacting HP for select products) charges small devices when the computer is on or in Sleep mode. (12) USB port (2) Connects a USB device, provides high-speed data transfer, and (for support. Table 1-3 Rear components and their functions. Locating the serial number and product number Depending on the product, the serial number...
.... (8) USB Type-C port (upstream) Connects a USB Type-C cable to a source device such as a smartphone. You might need these numbers when contacting HP for select products) charges small devices when the computer is on or in Sleep mode. (12) USB port (2) Connects a USB device, provides high-speed data transfer, and (for support. Table 1-3 Rear components and their functions. Locating the serial number and product number Depending on the product, the serial number...
User Guide
Page 12
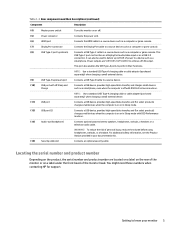
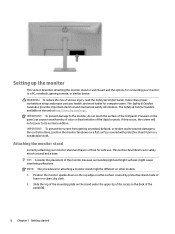
... color or disorientation of foam or a clean, dry cloth. 2. If this occurs, the screen will not recover to safely attach a stand and a base. TIP: Consider the placement of serious injury, read the Safety & Comfort Guide. The Safety & Comfort Guide also provides important electrical and mechanical safety information. IMPORTANT: To prevent damage to the control buttons, position the monitor facedown on a flat surface covered...
... color or disorientation of foam or a clean, dry cloth. 2. If this occurs, the screen will not recover to safely attach a stand and a base. TIP: Consider the placement of serious injury, read the Safety & Comfort Guide. The Safety & Comfort Guide also provides important electrical and mechanical safety information. IMPORTANT: To prevent damage to the control buttons, position the monitor facedown on a flat surface covered...

User Guide
Page 13
Mounting the monitor head To attach your monitor. Setting up when the stand is locked in this section to the monitor head, use the power and video cables provided with the monitor. Longer screws might damage the monitor. Be sure that the manufacturer's mounting solution is rated to support the weight of the monitor head. Attach the base to the stand (1), and then secure the base with the VESA standard and is compliant...
Mounting the monitor head To attach your monitor. Setting up when the stand is locked in this section to the monitor head, use the power and video cables provided with the monitor. Longer screws might damage the monitor. Be sure that the manufacturer's mounting solution is rated to support the weight of the monitor head. Attach the base to the stand (1), and then secure the base with the VESA standard and is compliant...
User Guide
Page 18
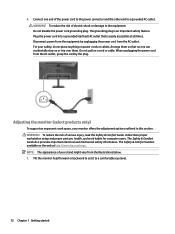
...: Do not disable the power cord grounding plug. Plug the power cord into a grounded (earthed) AC outlet that no one end of your safety, do not place anything on a cord or cable. Adjusting the monitor (select products only) To support an ergonomic work habits for computer users. The Safety & Comfort Guide is easily accessible at http://www.hp.com/ergo. When unplugging the power cord from the AC...
...: Do not disable the power cord grounding plug. Plug the power cord into a grounded (earthed) AC outlet that no one end of your safety, do not place anything on a cord or cable. Adjusting the monitor (select products only) To support an ergonomic work habits for computer users. The Safety & Comfort Guide is easily accessible at http://www.hp.com/ergo. When unplugging the power cord from the AC...
User Guide
Page 20
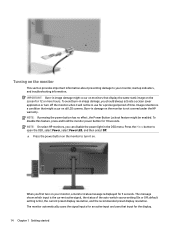
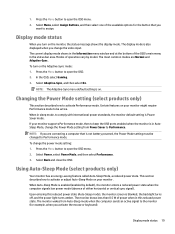
... HP monitors, you first turn it will not be enabled. To disable this feature, press and hold the monitor power button for the display. 14 Chapter 1 Getting started Burn-in image damage might be in the OSD menu. Turning on the monitor is not covered under the HP warranty. The message shows which input is On), the current preset display resolution, and the recommended preset display resolution. default setting is the current active signal...
... HP monitors, you first turn it will not be enabled. To disable this feature, press and hold the monitor power button for the display. 14 Chapter 1 Getting started Burn-in image damage might be in the OSD menu. Turning on the monitor is not covered under the HP warranty. The message shows which input is On), the current preset display resolution, and the recommended preset display resolution. default setting is the current active signal...

User Guide
Page 21
... computer is idle. To avoid image retention damage, always turn off the monitor when it is not in use the power management setting, if supported on the monitor's screen. Applications with In-Plane Switching (IPS) display technology, which provides ultrawide viewing angles and advanced image quality. Static images can include camera surveillance, video games, marketing logos, and templates. Setting up the monitor 15 Though suitable for long...
... computer is idle. To avoid image retention damage, always turn off the monitor when it is not in use the power management setting, if supported on the monitor's screen. Applications with In-Plane Switching (IPS) display technology, which provides ultrawide viewing angles and advanced image quality. Static images can include camera surveillance, video games, marketing logos, and templates. Setting up the monitor 15 Though suitable for long...
User Guide
Page 22
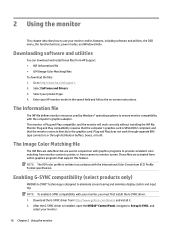
... follow the on-screen instructions. These files are used by Windows® operating systems to ensure monitor compatibility with graphics programs to provide consistent color matching from monitor screen to printer, or from within graphics programs that the monitor connects directly to Set up G-SYNC, and select your monitor and its features, including software and utilities, the OSD menu, the function buttons, power modes, and Windows Hello. Download the G-SYNC driver from HP Support. ● INF...
... follow the on-screen instructions. These files are used by Windows® operating systems to ensure monitor compatibility with graphics programs to provide consistent color matching from monitor screen to printer, or from within graphics programs that the monitor connects directly to Set up G-SYNC, and select your monitor and its features, including software and utilities, the OSD menu, the function buttons, power modes, and Windows Hello. Download the G-SYNC driver from HP Support. ● INF...

User Guide
Page 23
... if the monitor is 90. Press the Menu button or, if you are selected. Table 2-1 OSD menu options and descriptions for the selected display model check box are using a button or a controller (select products only) Main menu Description Gaming Brightness Contrast Color Input Image Power Menu Management Button or controller-Selects and adjusts gaming preferences, such as Adaptive-Sync, response time, frame rate, message timers, crosshair, ambient lighting, and multiple-monitor alignment. The factory default is G-SYNC certified. 4. Adjusts the power settings. At...
... if the monitor is 90. Press the Menu button or, if you are selected. Table 2-1 OSD menu options and descriptions for the selected display model check box are using a button or a controller (select products only) Main menu Description Gaming Brightness Contrast Color Input Image Power Menu Management Button or controller-Selects and adjusts gaming preferences, such as Adaptive-Sync, response time, frame rate, message timers, crosshair, ambient lighting, and multiple-monitor alignment. The factory default is G-SYNC certified. 4. Adjusts the power settings. At...
User Guide
Page 25
... Menu button to activate or adjust Auto-Sleep Mode on your monitor supports Performance mode, then to keep the USB ports enabled when the monitor is in sleep mode, to open the OSD menu. 2. NOTE: The Adaptive-Sync menu default setting is enabled (enabled by model. Using Auto-Sleep Mode (select products only) Your monitor has an energy-saving feature called Auto-Sleep Mode, a reduced power state. This section describes how to open the OSD menu. 2. 1. Modes of operation vary by default), the monitor enters a reduced power state when the computer signals...
... Menu button to activate or adjust Auto-Sleep Mode on your monitor supports Performance mode, then to keep the USB ports enabled when the monitor is in sleep mode, to open the OSD menu. 2. NOTE: The Adaptive-Sync menu default setting is enabled (enabled by model. Using Auto-Sleep Mode (select products only) Your monitor has an energy-saving feature called Auto-Sleep Mode, a reduced power state. This section describes how to open the OSD menu. 2. 1. Modes of operation vary by default), the monitor enters a reduced power state when the computer signals...
User Guide
Page 27
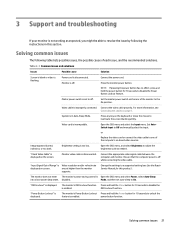
... that the computer power is Open the OSD menu and select Power, select Auto-Sleep into a low-power sleep state. Image appears blurred, indistinct, or too dark. The monitor does not enter The monitor's power saving control is off . 3 Support and troubleshooting If your monitor is not working as needed. Solving common issues The following the instructions in Auto-Sleep Mode. or Replace the video card or connect the video cable to Off and manually select the input. are set auto-sleep to resolve the...
... that the computer power is Open the OSD menu and select Power, select Auto-Sleep into a low-power sleep state. Image appears blurred, indistinct, or too dark. The monitor does not enter The monitor's power saving control is off . 3 Support and troubleshooting If your monitor is not working as needed. Solving common issues The following the instructions in Auto-Sleep Mode. or Replace the video card or connect the video cable to Off and manually select the input. are set auto-sleep to resolve the...
User Guide
Page 28
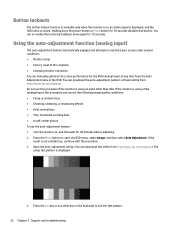
...; Monitor setup ● Factory reset of the computer ● Changing monitor resolution You can re-enable the button by holding it down the power button or Menu button for 20 minutes before adjusting. 2. Holding down again for the VGA (analog) input at any other than VGA. You can manually optimize the screen performance for 10 seconds. Using the auto-adjustment function (analog input) The auto-adjustment feature automatically engages and attempts to open the OSD menu, select Image, and then select Auto Adjustment...
...; Monitor setup ● Factory reset of the computer ● Changing monitor resolution You can re-enable the button by holding it down the power button or Menu button for 20 minutes before adjusting. 2. Holding down again for the VGA (analog) input at any other than VGA. You can manually optimize the screen performance for 10 seconds. Using the auto-adjustment function (analog input) The auto-adjustment feature automatically engages and attempts to open the OSD menu, select Image, and then select Auto Adjustment...

User Guide
Page 29
... HP dealer, reseller, or service provider. ● Use only a power source and connection appropriate for this can perform to clean the monitor screen or cabinet. IMPORTANT: Do not use a 50/50 mix of the products connected to determine the ampere rating (AMPS or A) for many years. These instructions provide steps you can run for each device. ● Install the monitor near an outlet that are covered...
... HP dealer, reseller, or service provider. ● Use only a power source and connection appropriate for this can perform to clean the monitor screen or cabinet. IMPORTANT: Do not use a 50/50 mix of the products connected to determine the ampere rating (AMPS or A) for many years. These instructions provide steps you can run for each device. ● Install the monitor near an outlet that are covered...

User Guide
Page 31
...://www.hp.com/ go/quickspecs/ and search for your specific monitor model to 240 V ac 50/60 Hz One HDMI port, one DisplayPort connector, and one USB Type-C DisplayPort connector Preset display resolutions The following display resolutions are the most commonly used modes and are set as required environmental operating conditions and power source ranges. Table A-1 Technical specifications Specification Measurement Display, wide-screen Type Viewable image size Maximum weight (unpacked) Dimensions (include base) Height (highest position) Height (lowest position) Depth Width Tilt...
...://www.hp.com/ go/quickspecs/ and search for your specific monitor model to 240 V ac 50/60 Hz One HDMI port, one DisplayPort connector, and one USB Type-C DisplayPort connector Preset display resolutions The following display resolutions are the most commonly used modes and are set as required environmental operating conditions and power source ranges. Table A-1 Technical specifications Specification Measurement Display, wide-screen Type Viewable image size Maximum weight (unpacked) Dimensions (include base) Height (highest position) Height (lowest position) Depth Width Tilt...

User Guide
Page 33
... power saver feature works only when the monitor is connected to initiate the reduced power state at a predetermined time. The reduced power state is initiated if the monitor detects the absence of these signals, the monitor screen is blank, the backlight is turned off, and the power light turns amber. See the computer manual for instructions on setting the energy saver mode (sometimes called "power management feature"). When the monitor Sleep Timer...
... power saver feature works only when the monitor is connected to initiate the reduced power state at a predetermined time. The reduced power state is initiated if the monitor detects the absence of these signals, the monitor screen is blank, the backlight is turned off, and the power light turns amber. See the computer manual for instructions on setting the energy saver mode (sometimes called "power management feature"). When the monitor Sleep Timer...


