
HP Pavilion dv5000 Notebook PC - Maintenance and Service Guide
Page 213
... series or family. Maintenance and Service Guide B-1 To update the software: 1. The BIOS initializes the operating system, determines how the computer will interact with your computer may be available on the system ROM. Install the updates. Some download packages contain a file named Readme.txt, which contains information regarding installing and troubleshooting the file. B Software Update and Recovery Updating Software Updated versions of the software provided with the hardware devices, and provides for a system BIOS update...
... series or family. Maintenance and Service Guide B-1 To update the software: 1. The BIOS initializes the operating system, determines how the computer will interact with your computer may be available on the system ROM. Install the updates. Some download packages contain a file named Readme.txt, which contains information regarding installing and troubleshooting the file. B Software Update and Recovery Updating Software Updated versions of the software provided with the hardware devices, and provides for a system BIOS update...

HP Pavilion dv5000 Notebook PC - Maintenance and Service Guide
Page 215
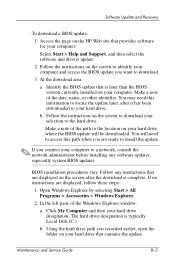
... Start > All Programs > Accessories > Windows Explorer. 2. Using the hard drive path you connect your hard drive that are displayed, follow these steps: 1. Maintenance and Service Guide B-3 Identify the BIOS update that is typically Local Disk (C:). Software Update and Recovery To download a BIOS update: 1. At the download area: a. The hard drive designation is later than the BIOS version currently installed on your computer to the location on your hard drive designation. Make a note of the Windows Explorer window: a. Make a note of the path to a network...
... Start > All Programs > Accessories > Windows Explorer. 2. Using the hard drive path you connect your hard drive that are displayed, follow these steps: 1. Maintenance and Service Guide B-3 Identify the BIOS update that is typically Local Disk (C:). Software Update and Recovery To download a BIOS update: 1. At the download area: a. The hard drive designation is later than the BIOS version currently installed on your computer to the location on your hard drive designation. Make a note of the Windows Explorer window: a. Make a note of the path to a network...
HP Pavilion dv5100 Notebook PC - Maintenance and Service Guide
Page 217
... the screen to a network, consult the network administrator before installing any instructions that contains the update. Identify the BIOS update that provides software for your computer. If no instructions are ready to locate the update later, after the download is typically Local Disk (C:). You will be downloaded. b. Maintenance and Service Guide B-3 You may need to access this information to install the update. ✎ If you are displayed, follow these steps: 1. Open Windows Explorer by selecting Start...
... the screen to a network, consult the network administrator before installing any instructions that contains the update. Identify the BIOS update that provides software for your computer. If no instructions are ready to locate the update later, after the download is typically Local Disk (C:). You will be downloaded. b. Maintenance and Service Guide B-3 You may need to access this information to install the update. ✎ If you are displayed, follow these steps: 1. Open Windows Explorer by selecting Start...

Notebook PC User Guide
Page 4
... Accessing the Quick Launch Buttons control panel 24 Setting tiling preferences 24 Setting advanced preferences 24 Displaying the Quick Launch Buttons icon 25 Setting button assignments on an external keyboard 25 Keypads ...26 Using the embedded numeric keypad 26 Enabling and disabling the embedded numeric keypad 26 Switching key functions on the embedded numeric keypad 27 Using an external numeric keypad 27 Enabling or disabling num lock mode as you work 27 3 Power Power control and light locations ...29 Power sources ...3. 1 Connecting the AC adapter...
... Accessing the Quick Launch Buttons control panel 24 Setting tiling preferences 24 Setting advanced preferences 24 Displaying the Quick Launch Buttons icon 25 Setting button assignments on an external keyboard 25 Keypads ...26 Using the embedded numeric keypad 26 Enabling and disabling the embedded numeric keypad 26 Switching key functions on the embedded numeric keypad 27 Using an external numeric keypad 27 Enabling or disabling num lock mode as you work 27 3 Power Power control and light locations ...29 Power sources ...3. 1 Connecting the AC adapter...

Notebook PC User Guide
Page 5
... optical disc 62 Removing an optical disc (with power 63 Removing an optical disc (without power 63 Using media activity hotkeys 65 Using the QuickPlay buttons 66 Using the audio features ...68 Using the audio-in (microphone) jack 69 Using the audio-out (headphone) jack 69 Using S/PDIF digital audio (select models only 69 Adjusting the volume 70 Using the video features ...71 Using the external monitor port 71 Using the S-Video-out jack 72 Remote control (select models only 73 HP Mobile Remote Control (PC Card version 74 Inserting the battery (PC Card version...
... optical disc 62 Removing an optical disc (with power 63 Removing an optical disc (without power 63 Using media activity hotkeys 65 Using the QuickPlay buttons 66 Using the audio features ...68 Using the audio-in (microphone) jack 69 Using the audio-out (headphone) jack 69 Using S/PDIF digital audio (select models only 69 Adjusting the volume 70 Using the video features ...71 Using the external monitor port 71 Using the S-Video-out jack 72 Remote control (select models only 73 HP Mobile Remote Control (PC Card version 74 Inserting the battery (PC Card version...

Notebook PC User Guide
Page 32
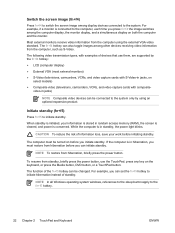
video-in jacks) NOTE Composite video devices can be turned on both the computer and the monitor. If the computer is in random access memory (RAM), the screen is cleared, and power is conserved. NOTE To restore from standby, briefly press the power button, use them, are supported by using the external VGA video standard. The following video transmission types, with examples of devices that use the TouchPad, press any key on select models) ● Composite video (televisions, camcorders...
video-in jacks) NOTE Composite video devices can be turned on both the computer and the monitor. If the computer is in random access memory (RAM), the screen is cleared, and power is conserved. NOTE To restore from standby, briefly press the power button, use them, are supported by using the external VGA video standard. The following video transmission types, with examples of devices that use the TouchPad, press any key on select models) ● Composite video (televisions, camcorders...

Notebook PC User Guide
Page 122
.... 112 Chapter 8 Memory Modules ENWW Video memory settings (select models only) NOTE Video memory capacity and settings vary by advanced users. Use the arrow keys to choose your preference and exit the Setup Utility, press f10 and then follow the instructions on . 3. The computer starts up or is off , turn it through the operating system. ● If the computer is displayed in hibernation, press the power button. On select models, you are...
.... 112 Chapter 8 Memory Modules ENWW Video memory settings (select models only) NOTE Video memory capacity and settings vary by advanced users. Use the arrow keys to choose your preference and exit the Setup Utility, press f10 and then follow the instructions on . 3. The computer starts up or is off , turn it through the operating system. ● If the computer is displayed in hibernation, press the power button. On select models, you are...

Notebook PC User Guide
Page 138
... the computer. ● Do not use the same password for a Setup Utility feature and for creating and saving passwords: ● When creating passwords, follow requirements set in a secure place. A password set by an outsider. NOTE Select models include a separate numeric keypad, which functions exactly like the keyboard number keys. ● Must be entered at a Setup Utility prompt. The following tables list Windows and Setup Utility passwords and describe their functions. 128 Chapter 11 Security ENWW
... the computer. ● Do not use the same password for a Setup Utility feature and for creating and saving passwords: ● When creating passwords, follow requirements set in a secure place. A password set by an outsider. NOTE Select models include a separate numeric keypad, which functions exactly like the keyboard number keys. ● Must be entered at a Setup Utility prompt. The following tables list Windows and Setup Utility passwords and describe their functions. 128 Chapter 11 Security ENWW

Notebook PC User Guide
Page 140
... configuration settings and system identification information in a secure place. Use the arrow keys to select Security > Administrator Password, and then press enter. ● To set an administrator password, type your password in the Enter New Password and Confirm New Password fields, and then press enter. ● To change , or delete this password: 1. Make sure you record your power-on password, you turn on password* CAUTION If you forget the administrator password, you cannot access the Setup Utility...
... configuration settings and system identification information in a secure place. Use the arrow keys to select Security > Administrator Password, and then press enter. ● To set an administrator password, type your password in the Enter New Password and Confirm New Password fields, and then press enter. ● To change , or delete this password: 1. Make sure you record your power-on password, you turn on password* CAUTION If you forget the administrator password, you cannot access the Setup Utility...

Notebook PC User Guide
Page 145
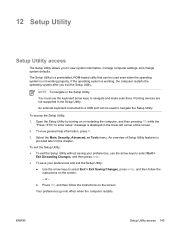
..., use the keyboard arrow keys to select Exit > Exit Saving Changes, press enter, and then follow the instructions on or restarting the computer, and then pressing f10 while the "Press to view system information, manage computer settings, and change system defaults. To access the Setup Utility: 1. An overview of the screen. 2. ENWW Setup Utility access 135 Select the Main, Security, System Configuration, or Diagnostics menu. Pointing devices are not supported in...
..., use the keyboard arrow keys to select Exit > Exit Saving Changes, press enter, and then follow the instructions on or restarting the computer, and then pressing f10 while the "Press to view system information, manage computer settings, and change system defaults. To access the Setup Utility: 1. An overview of the screen. 2. ENWW Setup Utility access 135 Select the Main, Security, System Configuration, or Diagnostics menu. Pointing devices are not supported in...

Notebook PC User Guide
Page 178
... IEEE 1394 port 10 infrared communication 35 infrared lens 7 Internet connection setup 116 J jacks audio-in (microphone) 9, 68, 69 audio-out (headphone) 8, 68, 69 RJ-11 (modem) 9 RJ-45 (network) 10 S-Video-out 10, 71, 72 K keyboard hotkeys 19 maintenance 155 keyboard, external setting button assignments 25 keypad keys 2 168 Index ENWW country-specific modem cable adapter 121 critical low-battery condition 45 critical updates, software 132 Customer Care 163 D default power settings 36 default settings, Setup Utility 137 device driver installation 151 digital cards.
... IEEE 1394 port 10 infrared communication 35 infrared lens 7 Internet connection setup 116 J jacks audio-in (microphone) 9, 68, 69 audio-out (headphone) 8, 68, 69 RJ-11 (modem) 9 RJ-45 (network) 10 S-Video-out 10, 71, 72 K keyboard hotkeys 19 maintenance 155 keyboard, external setting button assignments 25 keypad keys 2 168 Index ENWW country-specific modem cable adapter 121 critical low-battery condition 45 critical updates, software 132 Customer Care 163 D default power settings 36 default settings, Setup Utility 137 device driver installation 151 digital cards.

Notebook PC User Guide
Page 179
..., Setup Utility 136, 139 latches battery pack release 11 display release 7 lights battery 6, 30 caps lock 6 IDE drive 6, 52 mute 6 num lock 6 power 6, 30 wireless 6, 8 LightScribe 56 local area network (LAN) cable required 125 connecting cable 125 lock, security cable 10 low-battery condition 45 M maintenance battery pack 154 battery pack disposal 154 Disk Cleanup 156 Disk Defragmenter 156 display 155 drives 156 hardware 153 HP Software Update 141 keyboard 155 TouchPad 155 media activity hotkeys 65 Media button 5, 66 media controls, hotkeys 20, 23 memory adding or replacing memory modules 107...
..., Setup Utility 136, 139 latches battery pack release 11 display release 7 lights battery 6, 30 caps lock 6 IDE drive 6, 52 mute 6 num lock 6 power 6, 30 wireless 6, 8 LightScribe 56 local area network (LAN) cable required 125 connecting cable 125 lock, security cable 10 low-battery condition 45 M maintenance battery pack 154 battery pack disposal 154 Disk Cleanup 156 Disk Defragmenter 156 display 155 drives 156 hardware 153 HP Software Update 141 keyboard 155 TouchPad 155 media activity hotkeys 65 Media button 5, 66 media controls, hotkeys 20, 23 memory adding or replacing memory modules 107...

Notebook PC User Guide
Page 180
... (network) jack 10 S S-Video 22 S-Video-out jack 10, 71, 72 S/PDIF digital audio 69 screen blank 160 screen brightness hotkeys 20, 23 screen image, switching 20, 22 screen saver 50 scroll zone, TouchPad 17 scrolling zones, TouchPad 3 Secure Digital (SD) Memory Card 10, 93 Secure Digital Input/Output (SD I/ O) 10, 93 security features 127 password guidelines 128 Windows passwords 129 wireless 117 security cable 133 security cable slot 10 security passwords 40 serial number, computer 14 service tag 14 Setup Utility accessing...
... (network) jack 10 S S-Video 22 S-Video-out jack 10, 71, 72 S/PDIF digital audio 69 screen blank 160 screen brightness hotkeys 20, 23 screen image, switching 20, 22 screen saver 50 scroll zone, TouchPad 17 scrolling zones, TouchPad 3 Secure Digital (SD) Memory Card 10, 93 Secure Digital Input/Output (SD I/ O) 10, 93 security features 127 password guidelines 128 Windows passwords 129 wireless 117 security cable 133 security cable slot 10 security passwords 40 serial number, computer 14 service tag 14 Setup Utility accessing...

User Guide
Page 5
... optical disc 62 Removing an optical disc (with power 63 Removing an optical disc (without power 64 Using media activity hotkeys 65 Using the QuickPlay buttons 66 Using the audio features...68 Using the audio-in (microphone) jack 69 Using the audio-out (headphone) jack 69 Using S/PDIF digital audio (select models only 69 Adjusting the volume 70 Using the video features...71 Using the external monitor port 71 Using the S-Video-out jack 72 Remote Control (Select Models Only 73 HP Mobile Remote Control (PC Card version 74 Inserting the battery (PC Card version...
... optical disc 62 Removing an optical disc (with power 63 Removing an optical disc (without power 64 Using media activity hotkeys 65 Using the QuickPlay buttons 66 Using the audio features...68 Using the audio-in (microphone) jack 69 Using the audio-out (headphone) jack 69 Using S/PDIF digital audio (select models only 69 Adjusting the volume 70 Using the video features...71 Using the external monitor port 71 Using the S-Video-out jack 72 Remote Control (Select Models Only 73 HP Mobile Remote Control (PC Card version 74 Inserting the battery (PC Card version...
User Guide
Page 32
... of devices that use the TouchPad, press any key on the keyboard, or press the Media button, DVD button, or a TouchPad button. NOTE In all Windows operating system windows, references to the sleep button apply to initiate standby. video-in jacks, on before you can set the fn+f5 hotkey to the system only by the fn+f4 hotkey: ● LCD (computer display) ● External VGA (most external monitors) ● S-Video (televisions, camcorders, VCRs, and video capture cards with...
... of devices that use the TouchPad, press any key on the keyboard, or press the Media button, DVD button, or a TouchPad button. NOTE In all Windows operating system windows, references to the sleep button apply to initiate standby. video-in jacks, on before you can set the fn+f5 hotkey to the system only by the fn+f4 hotkey: ● LCD (computer display) ● External VGA (most external monitors) ● S-Video (televisions, camcorders, VCRs, and video capture cards with...
User Guide
Page 59
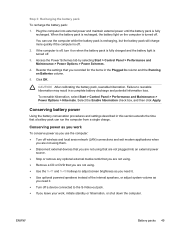
... Start > Control Panel > Performance and Maintenance > Power Options > Hibernate. Reenter the settings that a battery pack can use the computer: ● Turn off wireless and local area network (LAN) connections and exit modem applications when you are not using them. ● Disconnect external devices that you are not using . ● Use the fn+f7 and fn+f8 hotkeys to adjust screen brightness as you need it. ● Use optional powered speakers instead of the internal speakers, or adjust system volume as...
... Start > Control Panel > Performance and Maintenance > Power Options > Hibernate. Reenter the settings that a battery pack can use the computer: ● Turn off wireless and local area network (LAN) connections and exit modem applications when you are not using them. ● Disconnect external devices that you are not using . ● Use the fn+f7 and fn+f8 hotkeys to adjust screen brightness as you need it. ● Use optional powered speakers instead of the internal speakers, or adjust system volume as...

User Guide
Page 122
... advanced users. Use the arrow keys to choose your preference and exit the Setup Utility, press f10 and then follow the instructions on . 3. To change the shared video memory setting, use the navigation and selection information at the bottom of the screen. 4. Press f10 while the "Press to enter Setup" message is restored from hibernation. 2. To set your Shared Video Memory preference. 6. On select models, you are displayed. 5. Memory information and settings...
... advanced users. Use the arrow keys to choose your preference and exit the Setup Utility, press f10 and then follow the instructions on . 3. To change the shared video memory setting, use the navigation and selection information at the bottom of the screen. 4. Press f10 while the "Press to enter Setup" message is restored from hibernation. 2. To set your Shared Video Memory preference. 6. On select models, you are displayed. 5. Memory information and settings...
User Guide
Page 153
... preferences, use the keyboard arrow keys to navigate the Setup Utility. An external keyboard connected to select Exit > Exit Saving Changes, press enter, and then follow the instructions on the screen. To view general help information, press f1. 3. Your preferences go into effect when the computer restarts. ENWW Setup Utility access 143 Open the Setup Utility by turning on the screen. - 12 Setup Utility Setup Utility access The Setup Utility allows you exit the Setup Utility. If the operating system...
... preferences, use the keyboard arrow keys to navigate the Setup Utility. An external keyboard connected to select Exit > Exit Saving Changes, press enter, and then follow the instructions on the screen. To view general help information, press f1. 3. Your preferences go into effect when the computer restarts. ENWW Setup Utility access 143 Open the Setup Utility by turning on the screen. - 12 Setup Utility Setup Utility access The Setup Utility allows you exit the Setup Utility. If the operating system...
User Guide
Page 186
... Slot cards, ExpressCards, PC Cards external monitor port 9, 71 F firewall software 141 fn key hotkeys 19 identifying 2 fn+f5 key 30 function keys hotkeys 19 identifying 2 defined 33 enabling/disabling 33 initiated during critical low- See Digital Media Slot cards, ExpressCards, PC Cards Digital Media Slot 9 Digital Media Slot cards inserting 94 removing 95 stopping 95 supported types 93 Disk Cleanup software 164 Disk Defragmenter software 164 display image, switching 20, 22 maintenance 163 screen brightness hotkeys 20, 23 display release latch 7, 11 drive media 35 DriveLock password changing...
... Slot cards, ExpressCards, PC Cards external monitor port 9, 71 F firewall software 141 fn key hotkeys 19 identifying 2 fn+f5 key 30 function keys hotkeys 19 identifying 2 defined 33 enabling/disabling 33 initiated during critical low- See Digital Media Slot cards, ExpressCards, PC Cards Digital Media Slot 9 Digital Media Slot cards inserting 94 removing 95 stopping 95 supported types 93 Disk Cleanup software 164 Disk Defragmenter software 164 display image, switching 20, 22 maintenance 163 screen brightness hotkeys 20, 23 display release latch 7, 11 drive media 35 DriveLock password changing...

User Guide
Page 187
..., Setup Utility 144, 147 latches battery pack release 10 display release 7, 11 lights battery 6, 30 caps lock 6 IDE drive 6, 52 mute 6 num lock 6 power 6, 30 wireless 6, 7 LightScribe 56 local area network (LAN) cable required 129 connecting cable 129 lock, security cable 9 low-battery condition 45 M maintenance battery pack 162 battery pack disposal 162 Disk Cleanup 164 Disk Defragmenter 164 display 163 drives 164 hardware 161 HP Software Update 149 keyboard 163 TouchPad 163 media activity hotkeys 65 Media button 5, 66 media controls, hotkeys 20, 23 memory adding or replacing memory modules...
..., Setup Utility 144, 147 latches battery pack release 10 display release 7, 11 lights battery 6, 30 caps lock 6 IDE drive 6, 52 mute 6 num lock 6 power 6, 30 wireless 6, 7 LightScribe 56 local area network (LAN) cable required 129 connecting cable 129 lock, security cable 9 low-battery condition 45 M maintenance battery pack 162 battery pack disposal 162 Disk Cleanup 164 Disk Defragmenter 164 display 163 drives 164 hardware 161 HP Software Update 149 keyboard 163 TouchPad 163 media activity hotkeys 65 Media button 5, 66 media controls, hotkeys 20, 23 memory adding or replacing memory modules...


