
Setup Utility - Windows Vista and Windows 7
Page 10
... boot from Internal Network Adapter. ● Boot Order―Set the boot order for the f9 and f10 functions of the Setup Utility in DC mode. Enable/disable the processor C6 sleep state. Enable/disable the capacitive button tapping sound. Enable/disable the processor Virtualization Technology. System Configuration menu Select Language Support Button Sound (select models only) Virtualization Technology (select models only) Processor C6 State (select models only) LAN Power Saving (select models only) Card Reader/1394 Power Saving (select models only) Fan Always On Boot Options...
... boot from Internal Network Adapter. ● Boot Order―Set the boot order for the f9 and f10 functions of the Setup Utility in DC mode. Enable/disable the processor C6 sleep state. Enable/disable the capacitive button tapping sound. Enable/disable the processor Virtualization Technology. System Configuration menu Select Language Support Button Sound (select models only) Virtualization Technology (select models only) Processor C6 State (select models only) LAN Power Saving (select models only) Card Reader/1394 Power Saving (select models only) Fan Always On Boot Options...

Wireless (Select Models Only) - Windows 7
Page 23
... installing software, running utilities, or changing Windows settings. Select Start > Control Panel > System and Security. 2. Cannot connect to expand the list and show all adapters. 4. Cannot connect to a WLAN If you have an integrated WLAN device, or the driver for more information on your computer: NOTE: Windows includes the User Account Control feature to improve the security of your computer. Identify the WLAN device from the Network adapters list. The listing for a WLAN device...
... installing software, running utilities, or changing Windows settings. Select Start > Control Panel > System and Security. 2. Cannot connect to expand the list and show all adapters. 4. Cannot connect to a WLAN If you have an integrated WLAN device, or the driver for more information on your computer: NOTE: Windows includes the User Account Control feature to improve the security of your computer. Identify the WLAN device from the Network adapters list. The listing for a WLAN device...

Software Update, Backup and Recovery - Windows Vista
Page 5
... a system BIOS update by identifying the BIOS version currently installed on the HP Web site. NOTE: Windows® includes the User Account Control feature to improve the security of your computer model, product category, and series or family. You may be prompted for your permission or password for tasks such as installing applications, running utilities, or changing Windows settings. Updating software Updated versions of the software provided with the hardware devices, and...
... a system BIOS update by identifying the BIOS version currently installed on the HP Web site. NOTE: Windows® includes the User Account Control feature to improve the security of your computer model, product category, and series or family. You may be prompted for your permission or password for tasks such as installing applications, running utilities, or changing Windows settings. Updating software Updated versions of the software provided with the hardware devices, and...

Software Update, Backup and Recovery - Windows Vista
Page 6
... keys to select the Main menu. If the Setup Utility does not open with the system information displayed, use the arrow keys to select Exit > Exit Discarding Changes, and then press enter. Do not insert, remove, connect, or disconnect any device, cable, or cord. Identify the BIOS update that provides software for displaying BIOS information: 1. Open the Setup Utility by opening the Setup Utility. To exit the Setup Utility, use the Setup Utility for your computer. To download a BIOS update: 1. Do not download or install a BIOS update...
... keys to select the Main menu. If the Setup Utility does not open with the system information displayed, use the arrow keys to select Exit > Exit Discarding Changes, and then press enter. Do not insert, remove, connect, or disconnect any device, cable, or cord. Identify the BIOS update that provides software for displaying BIOS information: 1. Open the Setup Utility by opening the Setup Utility. To exit the Setup Utility, use the Setup Utility for your computer. To download a BIOS update: 1. Do not download or install a BIOS update...

Software Update, Backup and Recovery - Windows Vista
Page 8
... your operating system. 5. When the list of the device. 4 Updating software To do so, restart your specific product from the models listed. 4. Click Install now to step 6. 3. After the file is displayed, click an updated driver to download the driver and install it later. If you may be able to open a window containing additional information. 6. Select your computer. Updating programs and drivers To download and install software other than a BIOS update, follow the instructions provided...
... your operating system. 5. When the list of the device. 4 Updating software To do so, restart your specific product from the models listed. 4. Click Install now to step 6. 3. After the file is displayed, click an updated driver to download the driver and install it later. If you may be able to open a window containing additional information. 6. Select your computer. Updating programs and drivers To download and install software other than a BIOS update, follow the instructions provided...
Drives - Windows 7
Page 18
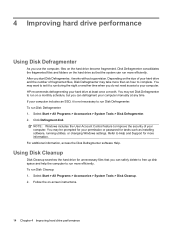
... on the hard drive so that you can safely delete to free up disk space and help the computer to run during the night or another time when you do not need access to Help and Support for tasks such as installing software, running utilities, or changing Windows settings. You may set it to run on the size of your hard drive and the number of your hard drive at...
... on the hard drive so that you can safely delete to free up disk space and help the computer to run during the night or another time when you do not need access to Help and Support for tasks such as installing software, running utilities, or changing Windows settings. You may set it to run on the size of your hard drive and the number of your hard drive at...

Drives - Windows 7
Page 31
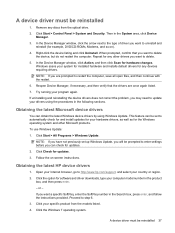
... hardware changes in the System area, click Device Manager. 3. Click Start > All Programs > Windows Update. Open your specific product from the optical drive. 2. Click your Internet browser, go to step 6. 3. Remove any other Microsoft® products. If uninstalling and reinstalling the device drivers does not correct the problem, you want to enter settings before you can check for any discs from the models listed. 4. Obtaining HP device drivers 1. Proceed to http://www.hp.com/support...
... hardware changes in the System area, click Device Manager. 3. Click Start > All Programs > Windows Update. Open your specific product from the optical drive. 2. Click your Internet browser, go to step 6. 3. Remove any other Microsoft® products. If uninstalling and reinstalling the device drivers does not correct the problem, you want to enter settings before you can check for any discs from the models listed. 4. Obtaining HP device drivers 1. Proceed to http://www.hp.com/support...

Drives - Windows 7
Page 33
...12, 26 changing region setting 9 copying 11 playing 7 removing 13 DVD drive 3 DVD region settings 9 H hard disk drive HP ProtectSmart Hard Drive Protection 15 installing 20 removing 19 replacing 19 hard drive HP ProtectSmart Hard Drive Protection 15 installing 20 removing 19 replacing 19 HP ProtectSmart Hard Drive Protection 15 L light, drive 16 M maintenance Disk Cleanup 14 Disk Defragmenter 14 O optical disc removing 13 optical drive 3 R region codes, DVD 9 S software Disk Cleanup 14 Disk Defragmenter 14 solid-state drive (SSD) 1 T troubleshooting burning discs 26 device driver 27 disc play...
...12, 26 changing region setting 9 copying 11 playing 7 removing 13 DVD drive 3 DVD region settings 9 H hard disk drive HP ProtectSmart Hard Drive Protection 15 installing 20 removing 19 replacing 19 hard drive HP ProtectSmart Hard Drive Protection 15 installing 20 removing 19 replacing 19 HP ProtectSmart Hard Drive Protection 15 L light, drive 16 M maintenance Disk Cleanup 14 Disk Defragmenter 14 O optical disc removing 13 optical drive 3 R region codes, DVD 9 S software Disk Cleanup 14 Disk Defragmenter 14 solid-state drive (SSD) 1 T troubleshooting burning discs 26 device driver 27 disc play...

Notebook Tour - Windows 7
Page 8
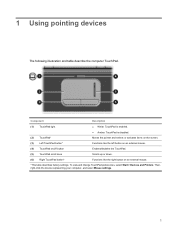
... view or change pointing device preferences, select Start > Devices and Printers. 2 Components Top components TouchPad Component Description (1) TouchPad light ● White: TouchPad is enabled. ● Amber: TouchPad is disabled. (2) TouchPad* Moves the pointer and selects or activates items on the screen. (3) Left TouchPad button* Functions like the left button on an external mouse. (4) TouchPad on/off button Enables/disables the TouchPad. (5) TouchPad scroll zone Scrolls up or down. (6) Right TouchPad button* Functions like the right button on an external mouse. *This table...
... view or change pointing device preferences, select Start > Devices and Printers. 2 Components Top components TouchPad Component Description (1) TouchPad light ● White: TouchPad is enabled. ● Amber: TouchPad is disabled. (2) TouchPad* Moves the pointer and selects or activates items on the screen. (3) Left TouchPad button* Functions like the left button on an external mouse. (4) TouchPad on/off button Enables/disables the TouchPad. (5) TouchPad scroll zone Scrolls up or down. (6) Right TouchPad button* Functions like the right button on an external mouse. *This table...
Notebook Tour - Windows 7
Page 11
... with the fn key. (5) Play/pause button (6) Next/fast forward button Plays or pauses media. ● Plays the next track or chapter when the button is in Hibernation, briefly press the button to exit Hibernation. You can also tap the plus (+) sign. To learn more about changing factory settings, refer to the user guides located in order to establish a wireless connection. (14) Fingerprint reader Allows a fingerprint...
... with the fn key. (5) Play/pause button (6) Next/fast forward button Plays or pauses media. ● Plays the next track or chapter when the button is in Hibernation, briefly press the button to exit Hibernation. You can also tap the plus (+) sign. To learn more about changing factory settings, refer to the user guides located in order to establish a wireless connection. (14) Fingerprint reader Allows a fingerprint...
Notebook Tour - Windows 7
Page 21
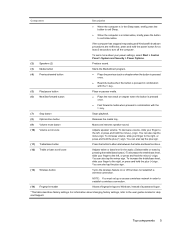
.... An optional device may need this information when traveling internationally. Have this computer. The regulatory label is affixed to locate documents, drivers, and support for this information available when you troubleshoot system problems or travel internationally with your notebook. ◦ Serial number (s/n) (2). This number provides specific information about the computer. The service tag label is affixed inside the hard drive bay. 15 This is the alphanumeric identifier you use...
.... An optional device may need this information when traveling internationally. Have this computer. The regulatory label is affixed to locate documents, drivers, and support for this information available when you troubleshoot system problems or travel internationally with your notebook. ◦ Serial number (s/n) (2). This number provides specific information about the computer. The service tag label is affixed inside the hard drive bay. 15 This is the alphanumeric identifier you use...

Notebook Tour - Windows 7
Page 23
...bass up 3 battery 4 caps lock 3 Digital Media Slot 8 drive 4 integrated webcam 7 mute 3 num lock 4 optical drive 10 power 3 TouchPad 2 treble 3 treble down 3 treble up 3 volume down 3 volume mute 3 volume up 3 wireless 3 M media activity buttons, identifying 5 media button, identifying 5 memory module 12 microphone (audio-in) jack 10 Microsoft Certificate of Authenticity label 15 Mini Card compartment, identifying 12 monitor port, external 11 mute button, identifying 5 mute light, identifying 3 N next/fast forward button, identifying 5 num lock light, identifying 4 O operating system Microsoft...
...bass up 3 battery 4 caps lock 3 Digital Media Slot 8 drive 4 integrated webcam 7 mute 3 num lock 4 optical drive 10 power 3 TouchPad 2 treble 3 treble down 3 treble up 3 volume down 3 volume mute 3 volume up 3 wireless 3 M media activity buttons, identifying 5 media button, identifying 5 memory module 12 microphone (audio-in) jack 10 Microsoft Certificate of Authenticity label 15 Mini Card compartment, identifying 12 monitor port, external 11 mute button, identifying 5 mute light, identifying 3 N next/fast forward button, identifying 5 num lock light, identifying 4 O operating system Microsoft...
Pointing Devices and Keyboard - Windows 7
Page 5
... (1) TouchPad light ● White: TouchPad is enabled. ● Amber: TouchPad is disabled. (2) TouchPad* Moves the pointer and selects or activates items on the screen. (3) Left TouchPad button* Functions like the left button on an external mouse. (4) TouchPad on/off button Enables/disables the TouchPad. (5) TouchPad scroll zone Scrolls up or down. (6) Right TouchPad button* Functions like the right button on an external mouse. *This table describes factory settings. To view and change TouchPad preferences, select Start > Devices and Printers. 1 Using pointing devices The...
... (1) TouchPad light ● White: TouchPad is enabled. ● Amber: TouchPad is disabled. (2) TouchPad* Moves the pointer and selects or activates items on the screen. (3) Left TouchPad button* Functions like the left button on an external mouse. (4) TouchPad on/off button Enables/disables the TouchPad. (5) TouchPad scroll zone Scrolls up or down. (6) Right TouchPad button* Functions like the right button on an external mouse. *This table describes factory settings. To view and change TouchPad preferences, select Start > Devices and Printers. 1 Using pointing devices The...
Pointing Devices and Keyboard - Windows 7
Page 6
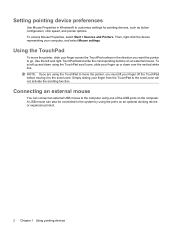
... pointer options. To scroll up or down using the TouchPad scroll zone, slide your finger across the TouchPad surface in Windows® to the system by using the ports on an optional docking device or expansion product. 2 Chapter 1 Using pointing devices Setting pointing device preferences Use Mouse Properties in the direction you must lift your computer, and select Mouse settings. To access Mouse Properties, select Start > Devices and Printers. A USB mouse can connect an external USB mouse to move...
... pointer options. To scroll up or down using the TouchPad scroll zone, slide your finger across the TouchPad surface in Windows® to the system by using the ports on an optional docking device or expansion product. 2 Chapter 1 Using pointing devices Setting pointing device preferences Use Mouse Properties in the direction you must lift your computer, and select Mouse settings. To access Mouse Properties, select Start > Devices and Printers. A USB mouse can connect an external USB mouse to move...
Multimedia - Windows 7
Page 20
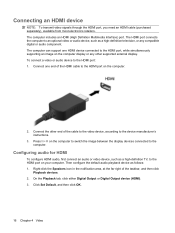
... connect a video or audio device to the computer. Press fn+f4 on the computer. 2. Connect one HDMI device connected to the device manufacturer's instructions. 3. Configuring audio for HDMI To configure HDMI audio, first connect an audio or video device, such as a high-definition TV, to an optional video or audio device, such as follows: 1. Click Set Default, and then click OK. 16 Chapter 4 Video The HDMI port connects the computer to the HDMI port on the computer display or any compatible digital or audio...
... connect a video or audio device to the computer. Press fn+f4 on the computer. 2. Connect one HDMI device connected to the device manufacturer's instructions. 3. Configuring audio for HDMI To configure HDMI audio, first connect an audio or video device, such as a high-definition TV, to an optional video or audio device, such as follows: 1. Click Set Default, and then click OK. 16 Chapter 4 Video The HDMI port connects the computer to the HDMI port on the computer display or any compatible digital or audio...
Multimedia - Windows 7
Page 41
... your system for installed hardware and installs default drivers for any devices requiring drivers. A device driver must be prompted to enter settings before you want a specific SoftPaq, enter the SoftPaq number in the Search box, press enter, and follow the instructions provided. Remove any discs from the models listed. 4. Click Start > Control Panel > System and Security. Repeat for any other Microsoft products. In the Device Manager window, click Action, and then click Scan for updates. 3. Windows scans your...
... your system for installed hardware and installs default drivers for any devices requiring drivers. A device driver must be prompted to enter settings before you want a specific SoftPaq, enter the SoftPaq number in the Search box, press enter, and follow the instructions provided. Remove any discs from the models listed. 4. Click Start > Control Panel > System and Security. Repeat for any other Microsoft products. In the Device Manager window, click Action, and then click Scan for updates. 3. Windows scans your...

Multimedia - Windows 7
Page 43
...drive 21 DVD burning 27 changing region setting 26 playing 24 removing 28 DVD drive 21 DVD region settings 26 E earbuds 3 external audio devices, connecting 12 external monitor port 15 H HDMI configuring 16 connecting 16 HDMI port 16 headphone (audio-out) jacks 3 headphones 3 high-definition devices, connecting 16 HP MediaSmart software 9 starting 4 using 9 I internal digital dual array microphones, identifying 2 issues, resolving 32 J jacks audio-in (microphone) 3 audio-out (headphone) 3 TV antenna/cable 2 M media activity buttons 7 media activity hotkeys 8 media button 4 MediaSmart software...
...drive 21 DVD burning 27 changing region setting 26 playing 24 removing 28 DVD drive 21 DVD region settings 26 E earbuds 3 external audio devices, connecting 12 external monitor port 15 H HDMI configuring 16 connecting 16 HDMI port 16 headphone (audio-out) jacks 3 headphones 3 high-definition devices, connecting 16 HP MediaSmart software 9 starting 4 using 9 I internal digital dual array microphones, identifying 2 issues, resolving 32 J jacks audio-in (microphone) 3 audio-out (headphone) 3 TV antenna/cable 2 M media activity buttons 7 media activity hotkeys 8 media button 4 MediaSmart software...
Power Management - Windows 7
Page 5
... display. ● Press a key on the keyboard or a button on battery power and 30 minutes of networking connection or perform any of the following ways: ● Press fn+f5. ● Briefly press the power button. ● Close the display. ● Click Start, click the arrow next to a disc or an external media card. If the computer is initiated, the power lights blink and the screen clears. CAUTION: To prevent possible audio and video...
... display. ● Press a key on the keyboard or a button on battery power and 30 minutes of networking connection or perform any of the following ways: ● Press fn+f5. ● Briefly press the power button. ● Close the display. ● Click Start, click the arrow next to a disc or an external media card. If the computer is initiated, the power lights blink and the screen clears. CAUTION: To prevent possible audio and video...
Power Management - Windows 7
Page 20
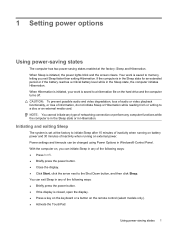
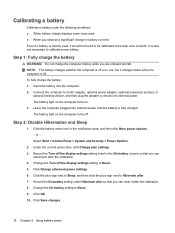
... computer is off the display settings setting listed in battery run time Even if a battery is fully charged. Under the current power plan, click Change plan settings. 3. Select Start > Control Panel > System and Security > Power Options. 2. Record the Turn off . Insert the battery into external power. Change the Turn off . Click Change advanced power settings. 6. Click Save changes. 16 Chapter 3 Using battery power Calibrating a battery Calibrate a battery under Hibernate after so that you can reset it should not need to be calibrated...
... computer is off the display settings setting listed in battery run time Even if a battery is fully charged. Under the current power plan, click Change plan settings. 3. Select Start > Control Panel > System and Security > Power Options. 2. Record the Turn off . Insert the battery into external power. Change the Turn off . Click Change advanced power settings. 6. Click Save changes. 16 Chapter 3 Using battery power Calibrating a battery Calibrate a battery under Hibernate after so that you can reset it should not need to be calibrated...
Power Management - Windows 7
Page 21
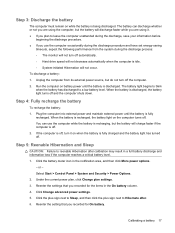
.... 4. Reenter the settings that you are using it on battery power until the battery is off. 2. Run the computer on when the battery is fully charged and the battery light has turned off. or - Select Start > Control Panel > System and Security > Power Options. 2. Calibrating a battery 17 The battery can use the computer occasionally during the discharge process: ◦ The monitor will not turn off automatically. ◦ Hard drive speed will charge faster if...
.... 4. Reenter the settings that you are using it on battery power until the battery is off. 2. Run the computer on when the battery is fully charged and the battery light has turned off. or - Select Start > Control Panel > System and Security > Power Options. 2. Calibrating a battery 17 The battery can use the computer occasionally during the discharge process: ◦ The monitor will not turn off automatically. ◦ Hard drive speed will charge faster if...


