
HP Pavilion g7 Notebook PC - Maintenance and Service Guide
Page 6
... 42 Service tag ...42 Computer feet ...43 Battery ...44 Optical drive ...45 Hard drive ...47 RTC battery ...49 Memory module ...50 WLAN module ...51 Keyboard ...53 Top cover ...57 Power button board 60 TouchPad button board 62 TouchPad LED board 63 Bluetooth module ...65 Speakers ...67 LED board ...68 USB board ...70 Power connector cable 71 System board ...73 Optical drive cable 77 Fan and heat sink ...79 Processor ...86 Display assembly ...89 5 Setup Utility (BIOS) and System Diagnostics 97 Using Setup Utility ...97 Starting Setup Utility 97 Changing the language of Setup Utility 97...
... 42 Service tag ...42 Computer feet ...43 Battery ...44 Optical drive ...45 Hard drive ...47 RTC battery ...49 Memory module ...50 WLAN module ...51 Keyboard ...53 Top cover ...57 Power button board 60 TouchPad button board 62 TouchPad LED board 63 Bluetooth module ...65 Speakers ...67 LED board ...68 USB board ...70 Power connector cable 71 System board ...73 Optical drive cable 77 Fan and heat sink ...79 Processor ...86 Display assembly ...89 5 Setup Utility (BIOS) and System Diagnostics 97 Using Setup Utility ...97 Starting Setup Utility 97 Changing the language of Setup Utility 97...

HP Pavilion g7 Notebook PC - Maintenance and Service Guide
Page 25
This number provides specific information about the product's hardware components. This number describes the duration of the warranty period for the computer. Item (1) (2) Description Serial number (s/n) Part number/Product number (p/n) (3) Model description: (4) Warranty period Function This is an alphanumeric identifier that is the alphanumeric identifier needed . This is unique to determine what components and parts are needed to locate documents, drivers, and support for the computer. Service tag 17...
This number provides specific information about the product's hardware components. This number describes the duration of the warranty period for the computer. Item (1) (2) Description Serial number (s/n) Part number/Product number (p/n) (3) Model description: (4) Warranty period Function This is an alphanumeric identifier that is the alphanumeric identifier needed . This is unique to determine what components and parts are needed to locate documents, drivers, and support for the computer. Service tag 17...

HP Pavilion g7 Notebook PC - Maintenance and Service Guide
Page 50
..., drivers, and support for the computer. 42 Chapter 4 Removal and replacement procedures This number describes the duration of each product. There are needed to each screw size and location during removal and replacement. Make special note of the warranty period for the computer. Item (1) (2) Description Serial number (s/n) Part number/Product number (p/n) (3) Model description: (4) Warranty period Function This is the alphanumeric identifier needed . This number provides specific information about the product's hardware...
..., drivers, and support for the computer. 42 Chapter 4 Removal and replacement procedures This number describes the duration of each product. There are needed to each screw size and location during removal and replacement. Make special note of the warranty period for the computer. Item (1) (2) Description Serial number (s/n) Part number/Product number (p/n) (3) Model description: (4) Warranty period Function This is the alphanumeric identifier needed . This number provides specific information about the product's hardware...

HP Pavilion g7 Notebook PC - Maintenance and Service Guide
Page 105
... extended memory. Errors can be used with your change takes effect immediately. Use the arrow keys to select a language, and then press enter. 4. NOTE: Use extreme care when making changes in Setup Utility. To save your language selected is enabled. Using Setup Utility 97 Turn on the system (such as disk drives, display, keyboard, mouse, and printer). Start Setup Utility. 2. Press f10 to select Exit > Exit Saving Changes, and then press enter. Starting Setup Utility NOTE: An external keyboard or mouse connected to a USB port can...
... extended memory. Errors can be used with your change takes effect immediately. Use the arrow keys to select a language, and then press enter. 4. NOTE: Use extreme care when making changes in Setup Utility. To save your language selected is enabled. Using Setup Utility 97 Turn on the system (such as disk drives, display, keyboard, mouse, and printer). Start Setup Utility. 2. Press f10 to select Exit > Exit Saving Changes, and then press enter. Starting Setup Utility NOTE: An external keyboard or mouse connected to a USB port can...

HP Pavilion g7 Notebook PC - Maintenance and Service Guide
Page 107
...: 1. Use a pointing device or the arrow keys to select File > Save Changes and Exit, and then press enter. To save your changes from the current session: If the Setup Utility menus are not changed when you restore the factory settings. Use the arrow keys to select File > Restore Defaults. 4. Most BIOS updates on -screen instructions. - Turn on or restart the computer, and then press esc while the "Press the ESC key for Startup Menu...
...: 1. Use a pointing device or the arrow keys to select File > Save Changes and Exit, and then press enter. To save your changes from the current session: If the Setup Utility menus are not changed when you restore the factory settings. Use the arrow keys to select File > Restore Defaults. 4. Most BIOS updates on -screen instructions. - Turn on or restart the computer, and then press esc while the "Press the ESC key for Startup Menu...
HP Pavilion g7 Notebook PC - Maintenance and Service Guide
Page 108
... the BIOS version currently installed on your changes, click the Exit icon in the lower-left corner of the screen, and then follow the on-screen instructions. - Start Setup Utility. 2. BIOS version information (also known as ROM date and System BIOS) can be displayed by pressing fn +esc (if you are ready to download. 3. Windows XP-Select Start > Help and Support, and then select the software and drivers update. 2. Make a note...
... the BIOS version currently installed on your changes, click the Exit icon in the lower-left corner of the screen, and then follow the on-screen instructions. - Start Setup Utility. 2. BIOS version information (also known as ROM date and System BIOS) can be displayed by pressing fn +esc (if you are ready to download. 3. Windows XP-Select Start > Help and Support, and then select the software and drivers update. 2. Make a note...

HP Pavilion g7 Notebook PC - Maintenance and Service Guide
Page 109
... ESC key for Startup Menu" message is functioning properly. NOTE: If you need to determine if the computer hardware is displayed in the lower-left corner of the memory modules. Double-click the file that are displayed on the screen after the download is running, press esc. Using System Diagnostics System Diagnostics allows you recorded earlier, open the folder on your hard drive that the start-up...
... ESC key for Startup Menu" message is functioning properly. NOTE: If you need to determine if the computer hardware is displayed in the lower-left corner of the memory modules. Double-click the file that are displayed on the screen after the download is running, press esc. Using System Diagnostics System Diagnostics allows you recorded earlier, open the folder on your hard drive that the start-up...

HP Pavilion g7 Notebook PC - Maintenance and Service Guide
Page 113
... models only), without the need a set of recovery discs or a recovery flash drive that was preinstalled at the factory. HP recommends that you use this computer must be achieved using HP Recovery Manager. Restore 105 This chapter provides information on the following topics: ● Creating a set of recovery discs or a recovery flash drive (Recovery Manager software feature) ● Performing a system restore (from the partition, recovery discs, or a recovery flash drive) ● Backing up your information ● Recovering a program or driver Restore In the event of hard drive...
... models only), without the need a set of recovery discs or a recovery flash drive that was preinstalled at the factory. HP recommends that you use this computer must be achieved using HP Recovery Manager. Restore 105 This chapter provides information on the following topics: ● Creating a set of recovery discs or a recovery flash drive (Recovery Manager software feature) ● Performing a system restore (from the partition, recovery discs, or a recovery flash drive) ● Backing up your information ● Recovering a program or driver Restore In the event of hard drive...

HP Pavilion g7 Notebook PC - Maintenance and Service Guide
Page 128
... Bluetooth module cable removal 66 spare part number 21, 30, 65 bottom components 16 button components 9 buttons optical drive eject 15 power 9 TouchPad 12 TouchPad on/off 12 C Cable Kit contents 25 spare part number 21, 25, 33 cables, service considerations 37 caps lock light 11 chipset, product description 2 components bottom 16 button 9 display 13 front 14 keys 10 left-side 14 lights 11 right-side 15 TouchPad 12 computer feet locations 43 spare part number 23...
... Bluetooth module cable removal 66 spare part number 21, 30, 65 bottom components 16 button components 9 buttons optical drive eject 15 power 9 TouchPad 12 TouchPad on/off 12 C Cable Kit contents 25 spare part number 21, 25, 33 cables, service considerations 37 caps lock light 11 chipset, product description 2 components bottom 16 button 9 display 13 front 14 keys 10 left-side 14 lights 11 right-side 15 TouchPad 12 computer feet locations 43 spare part number 23...

HP Pavilion g7 Notebook PC - Maintenance and Service Guide
Page 129
... Windows applications 10 Windows logo 10 L LED board removal 68 spare part number 23, 34, 68 left-side components 14 light components 11 lights AC adapter 15 caps lock 11 drive 15 optical drive 15 power 11, 15 TouchPad 11, 12 webcam 13 wireless 11 M mass storage device precautions 38 removal 47 spare part numbers memory module product description removal 50 spare part numbers 33, 50 28, 47 3 24, 31, microphone location 13 product description 4 microphone jack 14 model name 1 monitor port 14 N network jack...
... Windows applications 10 Windows logo 10 L LED board removal 68 spare part number 23, 34, 68 left-side components 14 light components 11 lights AC adapter 15 caps lock 11 drive 15 optical drive 15 power 11, 15 TouchPad 11, 12 webcam 13 wireless 11 M mass storage device precautions 38 removal 47 spare part numbers memory module product description removal 50 spare part numbers 33, 50 28, 47 3 24, 31, microphone location 13 product description 4 microphone jack 14 model name 1 monitor port 14 N network jack...

HP Pavilion g7 Notebook PC - Maintenance and Service Guide
Page 130
...specific countries and regions 113 set requirements 112 spare part numbers 29, 30 power light 11, 15 power requirements, product description 6 processor product description 1 removal 86 spare part numbers 22, 31, 32, 86 product description audio 4 chipset 2 display panel 3 Ethernet 4 external media cards 5 graphics 2 hard drives 4 keyboard 6 memory module 3 microphone 4 operating system 6 optical drive 4 pointing device 6 ports 6 power requirements 6 processors 1 product name 1 security 6 serviceability 7 video 4 wireless 4 product name 1 R recycling battery 114 display 114 removal/replacement...
...specific countries and regions 113 set requirements 112 spare part numbers 29, 30 power light 11, 15 power requirements, product description 6 processor product description 1 removal 86 spare part numbers 22, 31, 32, 86 product description audio 4 chipset 2 display panel 3 Ethernet 4 external media cards 5 graphics 2 hard drives 4 keyboard 6 memory module 3 microphone 4 operating system 6 optical drive 4 pointing device 6 ports 6 power requirements 6 processors 1 product name 1 security 6 serviceability 7 video 4 wireless 4 product name 1 R recycling battery 114 display 114 removal/replacement...

Service Guide
Page 54
Item (1) (2) Description Serial number (s/n) Part number/Product number (p/n) (3) Model description: (4) Warranty period Function This is an alphanumeric identifier that must be removed, replaced, or loosened when servicing the computer. There are needed to each screw size and location during removal and replacement. This is unique to locate documents, drivers, and support for the computer. 46 Chapter 4 Removal and replacement procedures This number describes the duration of each product. The part number helps a service technician...
Item (1) (2) Description Serial number (s/n) Part number/Product number (p/n) (3) Model description: (4) Warranty period Function This is an alphanumeric identifier that must be removed, replaced, or loosened when servicing the computer. There are needed to each screw size and location during removal and replacement. This is unique to locate documents, drivers, and support for the computer. 46 Chapter 4 Removal and replacement procedures This number describes the duration of each product. The part number helps a service technician...

Service Guide
Page 109
... making changes in Setup Utility. Use the arrow keys to a USB port can prevent the computer from operating properly. Using Setup Utility 101 Your change and exit Setup Utility, use the arrow keys to enter Setup Utility. Turn on the system (such as disk drives, display, keyboard, mouse, and printer). Use the arrow keys to select a language, and then press enter. 4. Errors can be used with your change takes effect immediately. Setup Utility includes settings for Startup Menu" message is enabled. 5 Setup Utility (BIOS) and System Diagnostics Using Setup Utility Setup Utility...
... making changes in Setup Utility. Use the arrow keys to a USB port can prevent the computer from operating properly. Using Setup Utility 101 Your change and exit Setup Utility, use the arrow keys to enter Setup Utility. Turn on the system (such as disk drives, display, keyboard, mouse, and printer). Use the arrow keys to select a language, and then press enter. 4. Errors can be used with your change takes effect immediately. Setup Utility includes settings for Startup Menu" message is enabled. 5 Setup Utility (BIOS) and System Diagnostics Using Setup Utility Setup Utility...

Service Guide
Page 111
... then press esc while the "Press the ESC key for Startup Menu" message is displayed at the factory, follow the on-screen instructions. - Follow the on the HP Web site. To save your changes from the current session: If the Setup Utility menus are not changed when you restore the factory settings. Use the arrow keys to select File > Restore Defaults. 4. Updating the BIOS Updated versions of the BIOS may be available on...
... then press esc while the "Press the ESC key for Startup Menu" message is displayed at the factory, follow the on-screen instructions. - Follow the on the HP Web site. To save your changes from the current session: If the Setup Utility menus are not changed when you restore the factory settings. Use the arrow keys to select File > Restore Defaults. 4. Updating the BIOS Updated versions of the BIOS may be available on...

Service Guide
Page 112
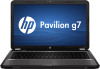
... on-screen instructions. - To exit Setup Utility without saving your computer and access the BIOS update you need to know the version of the system BIOS currently installed. Use a pointing device or the arrow keys to select File > Ignore Changes and Exit, and then press enter. You will need this path when you are ready to your hard drive where the BIOS update is connected to an optional power source. Windows 7-Select Start > Help and Support...
... on-screen instructions. - To exit Setup Utility without saving your computer and access the BIOS update you need to know the version of the system BIOS currently installed. Use a pointing device or the arrow keys to select File > Ignore Changes and Exit, and then press enter. You will need this path when you are ready to your hard drive where the BIOS update is connected to an optional power source. Windows 7-Select Start > Help and Support...

Service Guide
Page 113
... these steps: 1. Windows XP-Open Windows Explorer by selecting Start > Computer. If the test detects a damaged sector, it reports an error, replace the memory modules immediately. ● Battery test-This test analyzes the condition of the memory modules. BIOS installation procedures vary. NOTE: If you to a good sector. ● Memory test-This test analyzes the physical condition of the battery. The hard drive designation is displayed, press f2...
... these steps: 1. Windows XP-Open Windows Explorer by selecting Start > Computer. If the test detects a damaged sector, it reports an error, replace the memory modules immediately. ● Battery test-This test analyzes the condition of the memory modules. BIOS installation procedures vary. NOTE: If you to a good sector. ● Memory test-This test analyzes the physical condition of the battery. The hard drive designation is displayed, press f2...

Service Guide
Page 117
...operating system and HP to help you will need a set of recovery discs or a recovery flash drive immediately after software setup. If the recovery partition is present, a Recovery drive is listed in the window. This chapter provides information on the following topics: ● Creating a set of recovery discs or a recovery flash drive (Recovery Manager software feature) ● Performing a system restore (from the partition, recovery discs, or a recovery flash drive) ● Backing up your information ● Recovering a program or driver Restore In the event of a recovery partition...
...operating system and HP to help you will need a set of recovery discs or a recovery flash drive immediately after software setup. If the recovery partition is present, a Recovery drive is listed in the window. This chapter provides information on the following topics: ● Creating a set of recovery discs or a recovery flash drive (Recovery Manager software feature) ● Performing a system restore (from the partition, recovery discs, or a recovery flash drive) ● Backing up your information ● Recovering a program or driver Restore In the event of a recovery partition...

Service Guide
Page 132
... part numbers 49 Blu-ray ROM with LightScribe DVD ±R/RW Super Multi Double-Layer Drive spare part number 26, 36 spare part numbers 30, 40 Bluetooth module removal 69 spare part number 22, 32, 69 Bluetooth module cable removal 70 spare part number 22, 32, 69 bottom components 17 button components 10 buttons optical drive eject 16 power 10 TouchPad 13 TouchPad on/off 13 C Cable Kit contents 27 spare part number 22, 27, 35 cables, service considerations 41 caps lock light...
... part numbers 49 Blu-ray ROM with LightScribe DVD ±R/RW Super Multi Double-Layer Drive spare part number 26, 36 spare part numbers 30, 40 Bluetooth module removal 69 spare part number 22, 32, 69 Bluetooth module cable removal 70 spare part number 22, 32, 69 bottom components 17 button components 10 buttons optical drive eject 16 power 10 TouchPad 13 TouchPad on/off 13 C Cable Kit contents 27 spare part number 22, 27, 35 cables, service considerations 41 caps lock light...

Service Guide
Page 133
... Windows applications 11 Windows logo 11 L LED board removal 72 spare part number 25, 36, 72 left-side components 15 light components 12 lights AC adapter 16 caps lock 12 drive 16 optical drive 16 power 12, 16 TouchPad 12, 13 webcam 14 wireless 12 M mass storage device precautions 42 removal 51 spare part numbers memory module product description removal 54 spare part numbers 35, 54 microphone location 14 product description microphone jack 15 model name 1 monitor port 15 30, 51 4 26, 33, 5 N network jack...
... Windows applications 11 Windows logo 11 L LED board removal 72 spare part number 25, 36, 72 left-side components 15 light components 12 lights AC adapter 16 caps lock 12 drive 16 optical drive 16 power 12, 16 TouchPad 12, 13 webcam 14 wireless 12 M mass storage device precautions 42 removal 51 spare part numbers memory module product description removal 54 spare part numbers 35, 54 microphone location 14 product description microphone jack 15 model name 1 monitor port 15 30, 51 4 26, 33, 5 N network jack...

Service Guide
Page 134
... for specific countries and regions 117 set requirements 116 spare part numbers 31, 32 power light 12, 16 power requirements, product description 7 processor product description 1 removal 90 spare part numbers 23, 33, 34, 39, 90 product description audio 5 chipset 3 display panel 4 Ethernet 5 external media cards 6 graphics 3 hard drives 5 keyboard 7 memory module 4 microphone 5 operating system 7 optical drive 5 pointing device 7 ports 7 power requirements 7 processors 1 product name 1 security 7 serviceability 8 video 5 wireless 5 product name 1 R recycling battery 118 display 118 removal...
... for specific countries and regions 117 set requirements 116 spare part numbers 31, 32 power light 12, 16 power requirements, product description 7 processor product description 1 removal 90 spare part numbers 23, 33, 34, 39, 90 product description audio 5 chipset 3 display panel 4 Ethernet 5 external media cards 6 graphics 3 hard drives 5 keyboard 7 memory module 4 microphone 5 operating system 7 optical drive 5 pointing device 7 ports 7 power requirements 7 processors 1 product name 1 security 7 serviceability 8 video 5 wireless 5 product name 1 R recycling battery 118 display 118 removal...


