

Maintenance and Service Guide
Page 5
... ...11 Keyboard base components ...14 Miscellaneous parts ...16 4 Removal and replacement preliminary requirements 17 Tools required ...17 Service considerations ...17 Plastic parts ...17 Cables and connectors ...18 Drive handling ...18 Grounding guidelines ...19 Electrostatic discharge damage ...19 Packaging and transporting guidelines 20 Workstation guidelines 20 5 Slate removal and replacement procedures 22 Component replacement procedures ...22 Display panel assembly ...22 Power button board ...25 Volume control board ...26 Webcam/microphone module ...27 RTC battery...
... ...11 Keyboard base components ...14 Miscellaneous parts ...16 4 Removal and replacement preliminary requirements 17 Tools required ...17 Service considerations ...17 Plastic parts ...17 Cables and connectors ...18 Drive handling ...18 Grounding guidelines ...19 Electrostatic discharge damage ...19 Packaging and transporting guidelines 20 Workstation guidelines 20 5 Slate removal and replacement procedures 22 Component replacement procedures ...22 Display panel assembly ...22 Power button board ...25 Volume control board ...26 Webcam/microphone module ...27 RTC battery...

Maintenance and Service Guide
Page 6
... Diagnostics (UEFI) ...55 Downloading HP PC Hardware Diagnostics (UEFI) to a USB device 55 9 Specifications ...57 Dimensions ...57 Operating environment ...57 Input power ...58 10 Backing up, restoring, and recovering ...59 Creating recovery media and backups ...59 Creating HP Recovery media (select products only 59 Using Windows tools ...60 Restore and recovery ...61 Recovering using HP Recovery Manager 61 What you need to know before you get started 61 Using the HP Recovery partition (select products only 62 Using HP Recovery media to recover 62 Changing the computer boot order 63 vi
... Diagnostics (UEFI) ...55 Downloading HP PC Hardware Diagnostics (UEFI) to a USB device 55 9 Specifications ...57 Dimensions ...57 Operating environment ...57 Input power ...58 10 Backing up, restoring, and recovering ...59 Creating recovery media and backups ...59 Creating HP Recovery media (select products only 59 Using Windows tools ...60 Restore and recovery ...61 Recovering using HP Recovery Manager 61 What you need to know before you get started 61 Using the HP Recovery partition (select products only 62 Using HP Recovery media to recover 62 Changing the computer boot order 63 vi

Maintenance and Service Guide
Page 7
Removing the HP Recovery partition (select products only 64 11 Power cord set requirements ...65 Requirements for all countries ...65 Requirements for specific countries and regions 65 12 Recycling ...67 Index ...68 vii
Removing the HP Recovery partition (select products only 64 11 Power cord set requirements ...65 Requirements for all countries ...65 Requirements for specific countries and regions 65 12 Recycling ...67 Index ...68 vii

Maintenance and Service Guide
Page 10
.../g/n 1×1 Wi-Fi + Bluetooth 4.0 Combo Adapter Compatible with MiraCast-certified devices Supports Intel WiDi Supports Connected Standby Trusted platform module (TPM) 2.0 (firmware-based support) ● Headphone/microphone combo jack ● micro-HDMI v 1.4 supporting up to 1920×1080 @ 60Hz ● Pogo-pin (10-pin) docking connector (present on slate and keyboard base) ● USB type C 3.1 port Gen 1 supporting charging and data transfer ● USB 2.0 port Detachable, hardcase, keyboard base cover Full-sized, island...
.../g/n 1×1 Wi-Fi + Bluetooth 4.0 Combo Adapter Compatible with MiraCast-certified devices Supports Intel WiDi Supports Connected Standby Trusted platform module (TPM) 2.0 (firmware-based support) ● Headphone/microphone combo jack ● micro-HDMI v 1.4 supporting up to 1920×1080 @ 60Hz ● Pogo-pin (10-pin) docking connector (present on slate and keyboard base) ● USB type C 3.1 port Gen 1 supporting charging and data transfer ● USB 2.0 port Detachable, hardcase, keyboard base cover Full-sized, island...

Maintenance and Service Guide
Page 16
... . To remove a card: ▲ Press in on the card until it from the memory card reader. Also, some USB Type-C ports connect DisplayPort, VGA, HDMI, and other HP Type C products such as a high-definition television, any USB device with connectors facing the slate. 2. NOTE: USB Type-C ports charge other video devices to store, manage, share, or access information. Connects any compatible digital or audio component, or a highspeed High-Definition Multimedia Interface (HDMI) device. Connects an optional video or audio device, such as...
... . To remove a card: ▲ Press in on the card until it from the memory card reader. Also, some USB Type-C ports connect DisplayPort, VGA, HDMI, and other HP Type C products such as a high-definition television, any USB device with connectors facing the slate. 2. NOTE: USB Type-C ports charge other video devices to store, manage, share, or access information. Connects any compatible digital or audio component, or a highspeed High-Definition Multimedia Interface (HDMI) device. Connects an optional video or audio device, such as...

Maintenance and Service Guide
Page 30
..., plastic tool between the display back cover and the display panel assembly. 3. Use the case utility tool to the power button board and the power button board cable. 22 Chapter 5 Slate removal and replacement procedures 5 Slate removal and replacement procedures CAUTION: Components described in this chapter should only be removed, replaced, and/or loosened when servicing the slate. Disconnect all external devices from the display panel assembly. Failure to follow these parts can result in...
..., plastic tool between the display back cover and the display panel assembly. 3. Use the case utility tool to the power button board and the power button board cable. 22 Chapter 5 Slate removal and replacement procedures 5 Slate removal and replacement procedures CAUTION: Components described in this chapter should only be removed, replaced, and/or loosened when servicing the slate. Disconnect all external devices from the display panel assembly. Failure to follow these parts can result in...

Maintenance and Service Guide
Page 38
... removal and replacement procedures Remove the display panel assembly (see Display panel assembly on the WLAN module. NOTE: The #1/white WLAN antenna cable connects to the WLAN module #1/Aux terminal. 2. WLAN module Description Intel 3165NGWG ac 1×1 + Bluetooth 4.0 LE PCIe+USB NGFF 2230 Combo Adapter Realtek RTL8723BE 802.11b/g/n 1×1 Wi-Fi + Bluetooth 4.0 Combo Adapter Spare part number 806723-005 792610-005 CAUTION: To prevent an unresponsive system, replace the wireless module...
... removal and replacement procedures Remove the display panel assembly (see Display panel assembly on the WLAN module. NOTE: The #1/white WLAN antenna cable connects to the WLAN module #1/Aux terminal. 2. WLAN module Description Intel 3165NGWG ac 1×1 + Bluetooth 4.0 LE PCIe+USB NGFF 2230 Combo Adapter Realtek RTL8723BE 802.11b/g/n 1×1 Wi-Fi + Bluetooth 4.0 Combo Adapter Spare part number 806723-005 792610-005 CAUTION: To prevent an unresponsive system, replace the wireless module...
Maintenance and Service Guide
Page 40
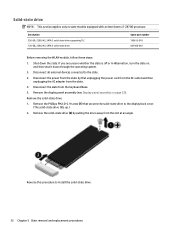
... slate from the slot at an angle. Shut down through the operating system. 2. Disconnect the power from the slate by pulling the drive away from the keyboard/base. 5. Description 256-GB, 2280, M2, SATA-3 solid-state drive supporting TLC 128-GB, 2280, M2, SATA-3 solid-state drive Spare part number 760615-018 827560-007 Before removing the WLAN module, follow these steps...
... slate from the slot at an angle. Shut down through the operating system. 2. Disconnect the power from the slate by pulling the drive away from the keyboard/base. 5. Description 256-GB, 2280, M2, SATA-3 solid-state drive supporting TLC 128-GB, 2280, M2, SATA-3 solid-state drive Spare part number 760615-018 827560-007 Before removing the WLAN module, follow these steps...

Maintenance and Service Guide
Page 44
Disconnect all external devices from the keyboard/base. 5. Remove the WLAN module (see Display panel assembly on page 22). 6. If you are unsure whether the slate is off the slate. Remove the display panel assembly (see WLAN module on slates with model numbers 12-b100 through the operating system. 2. Remove the solid-state drive (see Solid-state drive on slates with model number 12-b0XX: Equipped with an Intel Core...
Disconnect all external devices from the keyboard/base. 5. Remove the WLAN module (see Display panel assembly on page 22). 6. If you are unsure whether the slate is off the slate. Remove the display panel assembly (see WLAN module on slates with model numbers 12-b100 through the operating system. 2. Remove the solid-state drive (see Solid-state drive on slates with model number 12-b0XX: Equipped with an Intel Core...
Maintenance and Service Guide
Page 52
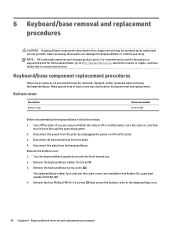
... the keyboard/base. Users accessing these steps: 1. Turn off or in Hibernation, turn the slate on supported parts for the keyboard/base, go to the keyboard/top cover. 44 Chapter 6 Keyboard/base removal and replacement procedures Keyboard/base component replacement procedures There are available in this chapter should only be removed, replaced, and/or loosened when servicing the keyboard/base. Make special note of each screw size and location during removal and replacement...
... the keyboard/base. Users accessing these steps: 1. Turn off or in Hibernation, turn the slate on supported parts for the keyboard/base, go to the keyboard/top cover. 44 Chapter 6 Keyboard/base removal and replacement procedures Keyboard/base component replacement procedures There are available in this chapter should only be removed, replaced, and/or loosened when servicing the keyboard/base. Make special note of each screw size and location during removal and replacement...

Maintenance and Service Guide
Page 61
... information regarding installing and troubleshooting the file. Determining the BIOS version To decide whether you must be available on convertible computers, your notebook. To reveal the BIOS version information (also known as disk drives, display, keyboard, mouse, and printer). NOTE: To start Setup Utility on the HP website. or - Errors can prevent the computer from operating properly. ▲ Turn on -screen instructions. To check for the types of devices installed, the startup sequence...
... information regarding installing and troubleshooting the file. Determining the BIOS version To decide whether you must be available on convertible computers, your notebook. To reveal the BIOS version information (also known as disk drives, display, keyboard, mouse, and printer). NOTE: To start Setup Utility on the HP website. or - Errors can prevent the computer from operating properly. ▲ Turn on -screen instructions. To check for the types of devices installed, the startup sequence...

Maintenance and Service Guide
Page 62
..., open the folder that contains the update. 4. Follow any device, cable, or cord. Click your hard drive. 54 Chapter 7 Using Setup Utility (BIOS) Click the question mark icon in the taskbar search box, and then select the HP Support Assistant app. - Do not download or install a BIOS update while the computer is connected to the BIOS version currently installed on the screen after it to a network, consult the network administrator before installing any software updates...
..., open the folder that contains the update. 4. Follow any device, cable, or cord. Click your hard drive. 54 Chapter 7 Using Setup Utility (BIOS) Click the question mark icon in the taskbar search box, and then select the HP Support Assistant app. - Do not download or install a BIOS update while the computer is connected to the BIOS version currently installed on the screen after it to a network, consult the network administrator before installing any software updates...

Maintenance and Service Guide
Page 63
... must use a Windows computer to download and create the HP UEFI support environment because only .exe files are two options to download HP PC Hardware Diagnostics to a USB device on page 55. When HP PC Hardware Diagnostics (UEFI) detects a failure that requires hardware replacement, a 24-digit Failure ID code is functioning properly. Hard drive c. In the HP PC Hardware Diagnostics section, click the Download link, and then select Run. NOTE: To start HP PC Hardware Diagnostics...
... must use a Windows computer to download and create the HP UEFI support environment because only .exe files are two options to download HP PC Hardware Diagnostics to a USB device on page 55. When HP PC Hardware Diagnostics (UEFI) detects a failure that requires hardware replacement, a 24-digit Failure ID code is functioning properly. Hard drive c. In the HP PC Hardware Diagnostics section, click the Download link, and then select Run. NOTE: To start HP PC Hardware Diagnostics...

Maintenance and Service Guide
Page 67
... of the Recovery partition and the Windows partition. IMPORTANT: For a tablet with the computer. See the Worldwide Telephone Numbers booklet included with a detachable keyboard, connect the keyboard to create HP Recovery media after you start the recovery process. Go to create system restore points and create backups of the HP Recovery partition on a tablet, the tablet battery must be used to the HP support assistant app. ▲ Type support in cases where the hard drive is disabled by default. 10 Backing...
... of the Recovery partition and the Windows partition. IMPORTANT: For a tablet with the computer. See the Worldwide Telephone Numbers booklet included with a detachable keyboard, connect the keyboard to create HP Recovery media after you start the recovery process. Go to create system restore points and create backups of the HP Recovery partition on a tablet, the tablet battery must be used to the HP support assistant app. ▲ Type support in cases where the hard drive is disabled by default. 10 Backing...

Maintenance and Service Guide
Page 68
.... HP Recovery Manager will be used to perform system recovery if the hard drive becomes corrupted. If you ever need to create recovery media after you successfully set of recovery media can be used to customize the system or restore the factory image if you have an optical drive with DVD writer capability, but you would like to create DVD recovery media, you can obtain recovery discs for the media that the computer is disabled by default. You...
.... HP Recovery Manager will be used to perform system recovery if the hard drive becomes corrupted. If you ever need to create recovery media after you successfully set of recovery media can be used to customize the system or restore the factory image if you have an optical drive with DVD writer capability, but you would like to create DVD recovery media, you can obtain recovery discs for the media that the computer is disabled by default. You...

Maintenance and Service Guide
Page 69
... level of HP Recovery media or if the HP Recovery media does not work, you can obtain recovery media for your system from backup, refreshing the computer, and resetting the computer to reclaim hard drive space, HP Recovery Manager offers the Remove Recovery Partition option. For more information, see Removing the HP Recovery partition (select products only) on page 61. Recovering using HP Recovery Manager on page 64. For more information, see Recovering using HP Recovery Manager HP Recovery Manager software allows you obtained from the HP Restore and recovery 61
... level of HP Recovery media or if the HP Recovery media does not work, you can obtain recovery media for your system from backup, refreshing the computer, and resetting the computer to reclaim hard drive space, HP Recovery Manager offers the Remove Recovery Partition option. For more information, see Removing the HP Recovery partition (select products only) on page 61. Recovering using HP Recovery Manager on page 64. For more information, see Recovering using HP Recovery Manager HP Recovery Manager software allows you obtained from the HP Restore and recovery 61

Maintenance and Service Guide
Page 70
... then quickly hold down button; This method can choose from one of the following recovery options: NOTE: Only the options available for your personal data. IMPORTANT: HP Recovery Manager does not automatically provide backups of recovery can use HP Recovery media to perform a system recovery without keyboards: Turn on -screen instructions. 62 Chapter 10 Backing up all information from the boot options menu. 3. Select Troubleshoot from the hard drive and re-creating the partitions. Using HP Recovery media to its original factory...
... then quickly hold down button; This method can choose from one of the following recovery options: NOTE: Only the options available for your personal data. IMPORTANT: HP Recovery Manager does not automatically provide backups of recovery can use HP Recovery media to perform a system recovery without keyboards: Turn on -screen instructions. 62 Chapter 10 Backing up all information from the boot options menu. 3. Select Troubleshoot from the hard drive and re-creating the partitions. Using HP Recovery media to its original factory...

Maintenance and Service Guide
Page 71
... keyboard, connect the keyboard to an optical drive or a USB flash drive. Insert the HP Recovery media. 2. For tablets without keyboards: ▲ Turn on -screen instructions. Follow the on or restart the tablet, and then quickly hold down button; Select the optical drive or USB flash drive from which you can change the selection to the keyboard dock before beginning these steps. 1. Restore and recovery 63 To change the computer boot order, which is the order of devices listed in HP Recovery Manager...
... keyboard, connect the keyboard to an optical drive or a USB flash drive. Insert the HP Recovery media. 2. For tablets without keyboards: ▲ Turn on -screen instructions. Follow the on or restart the tablet, and then quickly hold down button; Select the optical drive or USB flash drive from which you can change the selection to the keyboard dock before beginning these steps. 1. Restore and recovery 63 To change the computer boot order, which is the order of devices listed in HP Recovery Manager...

Maintenance and Service Guide
Page 76
... posts 9 antenna location 5 removal 42 spare part number 13, 42 audio jack cable removal 39 spare part number 13, 39 audio, product description 2 audio-in jack 7 audio-out jack 7 B backups 59 battery removal 38 spare part number 13, 38 BIOS determining version 53 downloading an update 54 starting the Setup Utility 53 updating 53 boot order changing 63 bottom cover removal 44 spare part number 15, 44 bottom-edge components 9 buttons power 6 volume 7 C cables removal 39 spare part numbers 39 cables, service considerations 18 chipset, product description 1 components bottom edge 9 display 5 left...
... posts 9 antenna location 5 removal 42 spare part number 13, 42 audio jack cable removal 39 spare part number 13, 39 audio, product description 2 audio-in jack 7 audio-out jack 7 B backups 59 battery removal 38 spare part number 13, 38 BIOS determining version 53 downloading an update 54 starting the Setup Utility 53 updating 53 boot order changing 63 bottom cover removal 44 spare part number 15, 44 bottom-edge components 9 buttons power 6 volume 7 C cables removal 39 spare part numbers 39 cables, service considerations 18 chipset, product description 1 components bottom edge 9 display 5 left...

Maintenance and Service Guide
Page 77
... part number 11, 25 power button board cable removal 39 spare part number 13, 39 power cord set requirements 65 spare part numbers 16 power requirements, product description 2 processor, product description 1 product description audio 2 chipset 1 display panel 1 graphics 1 memory 1 microphone 2 operating system 2, 3 ports 2 power requirements 2 processors 1 product name 1 security 2 sensors 2 serviceability 3 storage 2 video 2 wireless 2 product name 1 R recover options 61 recovery discs 60, 62 HP Recovery Manager 61 media 62 starting 62 supported discs 60 system 61 USB flash drive 62 using HP...
... part number 11, 25 power button board cable removal 39 spare part number 13, 39 power cord set requirements 65 spare part numbers 16 power requirements, product description 2 processor, product description 1 product description audio 2 chipset 1 display panel 1 graphics 1 memory 1 microphone 2 operating system 2, 3 ports 2 power requirements 2 processors 1 product name 1 security 2 sensors 2 serviceability 3 storage 2 video 2 wireless 2 product name 1 R recover options 61 recovery discs 60, 62 HP Recovery Manager 61 media 62 starting 62 supported discs 60 system 61 USB flash drive 62 using HP...


