

User Guide
Page 5
... ...7 Connecting the cables ...8 Identifying front panel controls ...11 Adjusting the monitor ...12 Turning on the monitor ...12 Removing the monitor stand ...13 Mounting the monitor ...13 Locating the rating label ...15 Installing a cable lock ...15 4 Operating the monitor ...16 Software and utilities ...16 The Information file ...16 The Image Color Matching file ...16 Installing the .INF and .ICM files ...17 Installing from the disc ...17 Downloading from the web ...17 Using the On-Screen Display (OSD) menu ...18 Using Auto-Sleep Mode ...19...
... ...7 Connecting the cables ...8 Identifying front panel controls ...11 Adjusting the monitor ...12 Turning on the monitor ...12 Removing the monitor stand ...13 Mounting the monitor ...13 Locating the rating label ...15 Installing a cable lock ...15 4 Operating the monitor ...16 Software and utilities ...16 The Information file ...16 The Image Color Matching file ...16 Installing the .INF and .ICM files ...17 Installing from the disc ...17 Downloading from the web ...17 Using the On-Screen Display (OSD) menu ...18 Using Auto-Sleep Mode ...19...
User Guide
Page 6
... (24 in) model specifications ...23 Preset display resolutions ...24 49.6 cm (19.53 in) models factory preset modes 24 58.4 cm (23 in) model factory preset modes 24 60.47 cm (23.8 in) model factory preset modes 25 61 cm (24 in) model factory preset modes 25 Entering user modes ...25 Energy saver feature ...26 Appendix B Support and troubleshooting ...27 Solving common problems ...27 Using the Auto-Adjustment Function (Analog Input 28 Optimizing Image Performance (Analog Input 29 Button lockouts ...30...
... (24 in) model specifications ...23 Preset display resolutions ...24 49.6 cm (19.53 in) models factory preset modes 24 58.4 cm (23 in) model factory preset modes 24 60.47 cm (23.8 in) model factory preset modes 25 61 cm (24 in) model factory preset modes 25 Entering user modes ...25 Energy saver feature ...26 Appendix B Support and troubleshooting ...27 Solving common problems ...27 Using the Auto-Adjustment Function (Analog Input 28 Optimizing Image Performance (Analog Input 29 Button lockouts ...30...
User Guide
Page 7
... LED backlight that consumes less energy ● Wide viewing angle to allow viewing from a sitting or standing position, or moving from side-to-side ● Tilt capability ● Removable stand for flexible monitor panel mounting solutions ● Video signal input to support VGA analog with VGA signal cable provided ● Video signal input to support HDMI digital (select models) ● Plug-and-play capability if supported by the operating system ● Security slot provision on DisplayPort input HP ProDisplay Monitors 1 includes custom scaling for maximum image size...
... LED backlight that consumes less energy ● Wide viewing angle to allow viewing from a sitting or standing position, or moving from side-to-side ● Tilt capability ● Removable stand for flexible monitor panel mounting solutions ● Video signal input to support VGA analog with VGA signal cable provided ● Video signal input to support HDMI digital (select models) ● Plug-and-play capability if supported by the operating system ● Security slot provision on DisplayPort input HP ProDisplay Monitors 1 includes custom scaling for maximum image size...

User Guide
Page 8
... HP ProDisplay Companion Stand ● Supports an optional HP Quick Release to enable mounting to an optional HP monitor arm or attaching an optional HP Chromebox, HP Thin Client (select models), or HP Desktop Mini Business PC NOTE: For safety and regulatory information, refer to http://www.hp.com/support, and select your documentation kit. Select Drivers & Downloads, and then follow the onscreen instructions. 2 Chapter 1 Product features ● Software...
... HP ProDisplay Companion Stand ● Supports an optional HP Quick Release to enable mounting to an optional HP monitor arm or attaching an optional HP Chromebox, HP Thin Client (select models), or HP Desktop Mini Business PC NOTE: For safety and regulatory information, refer to http://www.hp.com/support, and select your documentation kit. Select Drivers & Downloads, and then follow the onscreen instructions. 2 Chapter 1 Product features ● Software...

User Guide
Page 9
... trip over them so that they cannot be specifically labeled as a power strip or Uninterruptible Power Supply (UPS). When unplugging from surrounding light and bright surfaces that are inappropriately situated on a cord or cable. LCD monitors that may fall over . Consider placing the display in your safety, do not place anything on power cords or cables. For your documentation kit. To reduce the risk...
... trip over them so that they cannot be specifically labeled as a power strip or Uninterruptible Power Supply (UPS). When unplugging from surrounding light and bright surfaces that are inappropriately situated on a cord or cable. LCD monitors that may fall over . Consider placing the display in your safety, do not place anything on power cords or cables. For your documentation kit. To reduce the risk...
User Guide
Page 10
... connected to determine the ampere rating (AMPS or A) for each device. ● Install the monitor near an outlet that you move or ship the monitor. 4 Chapter 2 Safety and maintenance guidelines Do not walk on the power cord. Never disconnect the monitor by wiping the screen and the cabinet with a "burned-in image" are not covered under the HP warranty. ● Slots and openings...
... connected to determine the ampere rating (AMPS or A) for each device. ● Install the monitor near an outlet that you move or ship the monitor. 4 Chapter 2 Safety and maintenance guidelines Do not walk on the power cord. Never disconnect the monitor by wiping the screen and the cabinet with a "burned-in image" are not covered under the HP warranty. ● Slots and openings...
User Guide
Page 11
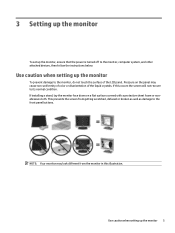
... front panel buttons. This prevents the screen from the monitor in this occurs the screen will not recover to the monitor, computer system, and other attached devices, then follow the instructions below. NOTE: Your monitor may cause non-uniformity of color or disorientation of the LCD panel. Use caution when setting up the monitor 5 3 Setting up the monitor To set up the monitor, ensure that the power is turned off...
... front panel buttons. This prevents the screen from the monitor in this occurs the screen will not recover to the monitor, computer system, and other attached devices, then follow the instructions below. NOTE: Your monitor may cause non-uniformity of color or disorientation of the LCD panel. Use caution when setting up the monitor 5 3 Setting up the monitor To set up the monitor, ensure that the power is turned off...
User Guide
Page 14
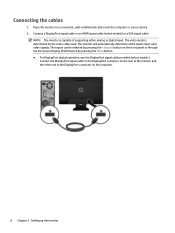
... models). Place the monitor in a convenient, well-ventilated location near the computer or source device. 2. Connect a DisplayPort signal cable or an HDMI signal cable (select models) or a VGA signal cable. The video mode is capable of the monitor and the other end to the DisplayPort connector on the front panel or through the On-Screen Display (OSD) feature by the video cable used. Connect the DisplayPort signal cable to the DisplayPort connector on the rear of supporting either analog or digital input. Connecting...
... models). Place the monitor in a convenient, well-ventilated location near the computer or source device. 2. Connect a DisplayPort signal cable or an HDMI signal cable (select models) or a VGA signal cable. The video mode is capable of the monitor and the other end to the DisplayPort connector on the front panel or through the On-Screen Display (OSD) feature by the video cable used. Connect the DisplayPort signal cable to the DisplayPort connector on the rear of supporting either analog or digital input. Connecting...

User Guide
Page 17
... forward through the OSD menu and decrease adjustment levels. If the OSD menu is inactive, press to select the highlighted menu item. Identifying front panel controls Control 1 2 3 4 5 Menu Minus Plus/Source OK/Auto Power Function Opens, selects or exits the OSD menu. Turns the monitor on , press to optimize the screen image. If the OSD menu is on or off. If the OSD menu is on , press to activate the source button that chooses the video signal input (VGA, DisplayPort, or...
... forward through the OSD menu and decrease adjustment levels. If the OSD menu is inactive, press to select the highlighted menu item. Identifying front panel controls Control 1 2 3 4 5 Menu Minus Plus/Source OK/Auto Power Function Opens, selects or exits the OSD menu. Turns the monitor on , press to optimize the screen image. If the OSD menu is on or off. If the OSD menu is on , press to activate the source button that chooses the video signal input (VGA, DisplayPort, or...
User Guide
Page 18
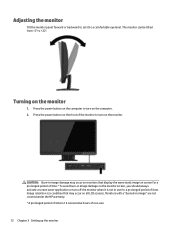
... turn on the monitor screen, you should always activate a screen saver application or turn on the monitor 1. Adjusting the monitor Tilt the monitor panel forward or backward to set it is a condition that may occur on all LCD screens. CAUTION: Burn-in image damage may occur on monitors that display the same static image on screen for a prolonged period of time.* To avoid burn-in image" are not covered under the HP...
... turn on the monitor screen, you should always activate a screen saver application or turn on the monitor 1. Adjusting the monitor Tilt the monitor panel forward or backward to set it is a condition that may occur on all LCD screens. CAUTION: Burn-in image damage may occur on monitors that display the same static image on screen for a prolonged period of time.* To avoid burn-in image" are not covered under the HP...

User Guide
Page 19
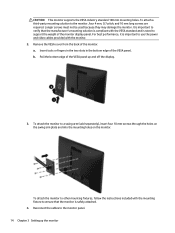
... preset display resolution. factory default is the current active signal, the status of the auto-switch source setting (on a flat surface covered by UL or CSA Listed wall mount bracket. 1. Press down on or off and the power and signal cables are both disconnected. 1. Remove the stand from the monitor. 2. CAUTION: Before beginning to install the panel on the release latch (1) with a screwdriver and slide the stand out of the monitor, then select Power Control > Power LED...
... preset display resolution. factory default is the current active signal, the status of the auto-switch source setting (on a flat surface covered by UL or CSA Listed wall mount bracket. 1. Press down on or off and the power and signal cables are both disconnected. 1. Remove the stand from the monitor. 2. CAUTION: Before beginning to install the panel on the release latch (1) with a screwdriver and slide the stand out of the monitor, then select Power Control > Power LED...
User Guide
Page 20
... screws must not be used because they may damage the monitor. Remove the VESA cover from the back of the VESA panel. a. To attach the monitor to other mounting fixtures, follow the instructions included with the mounting fixture to the monitor panel. 14 Chapter 3 Setting up and off the display. 3. Insert tools or fingers in the two slots in the bottom edge of the monitor. CAUTION: This monitor supports...
... screws must not be used because they may damage the monitor. Remove the VESA cover from the back of the VESA panel. a. To attach the monitor to other mounting fixtures, follow the instructions included with the mounting fixture to the monitor panel. 14 Chapter 3 Setting up and off the display. 3. Insert tools or fingers in the two slots in the bottom edge of the monitor. CAUTION: This monitor supports...

User Guide
Page 23
... Install Monitor Driver Software. 4. Click Download and follow the on-screen instructions to http://www.hp.com/support and select the appropriate country and language. 2. Ensure that the proper resolution and refresh rates appear in the Find my product search field, and click Go. 3. Select Drivers & Downloads, type your monitor from the disc in the computer optical drive. If necessary, select your monitor model in the Windows Display control panel. Click Driver - View the HP Monitor Software...
... Install Monitor Driver Software. 4. Click Download and follow the on-screen instructions to http://www.hp.com/support and select the appropriate country and language. 2. Ensure that the proper resolution and refresh rates appear in the Find my product search field, and click Go. 3. Select Drivers & Downloads, type your monitor from the disc in the computer optical drive. If necessary, select your monitor model in the Windows Display control panel. Click Driver - View the HP Monitor Software...
User Guide
Page 24
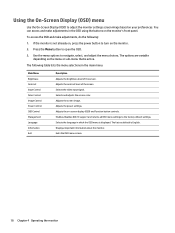
... default settings. Adjusts the contrast level of the screen. Selects and adjusts the screen color. Adjusts the screen image. Exits the OSD menu screen. 18 Chapter 4 Operating the monitor Adjusts the power settings. Using the On-Screen Display (OSD) menu Use the On-Screen Display (OSD) to adjust the monitor settings screen image based on the menu or sub-menu that is active. Main Menu Brightness Contrast Input Control Color Control Image Control Power Control OSD Control Management Language Information Exit Description Adjusts the brightness level of the screen Selects the video...
... default settings. Adjusts the contrast level of the screen. Selects and adjusts the screen color. Adjusts the screen image. Exits the OSD menu screen. 18 Chapter 4 Operating the monitor Adjusts the power settings. Using the On-Screen Display (OSD) menu Use the On-Screen Display (OSD) to adjust the monitor settings screen image based on the menu or sub-menu that is active. Main Menu Brightness Contrast Input Control Color Control Image Control Power Control OSD Control Management Language Information Exit Description Adjusts the brightness level of the screen Selects the video...
User Guide
Page 25
... Menu button to the monitor (for the display. In the OSD press Power Control > Auto-Sleep Mode > Off. Using Auto-Sleep Mode 19 When Auto-Sleep Mode is turned off and the power LED indicator turns amber. You can disable the Auto-Sleep Mode in this reduced power state sleep mode, the monitor screen is blanked, the backlight is enabled (enabled by default), the monitor will wake from the sleep mode when the host PC sends an active signal to open the OSD. Press one of either horizontal or vertical sync signal...
... Menu button to the monitor (for the display. In the OSD press Power Control > Auto-Sleep Mode > Off. Using Auto-Sleep Mode 19 When Auto-Sleep Mode is turned off and the power LED indicator turns amber. You can disable the Auto-Sleep Mode in this reduced power state sleep mode, the monitor screen is blanked, the backlight is enabled (enabled by default), the monitor will wake from the sleep mode when the host PC sends an active signal to open the OSD. Press one of either horizontal or vertical sync signal...

User Guide
Page 32
... The monitors support a reduced power state. The reduced power state will be entered into the reduced power state at a predetermined time. Upon detecting the absence of either the horizontal sync signal and/or the vertical sync signal. There is a brief warm up period before the monitor will utilize .5 watts of power. NOTE: The above power saver feature only works when connected to the computer manual for instructions on setting...
... The monitors support a reduced power state. The reduced power state will be entered into the reduced power state at a predetermined time. Upon detecting the absence of either the horizontal sync signal and/or the vertical sync signal. There is a brief warm up period before the monitor will utilize .5 watts of power. NOTE: The above power saver feature only works when connected to the computer manual for instructions on setting...

User Guide
Page 33
... input. Set Auto-Switch Input to inactivate the screen blanking utility. Connect the appropriate video signal cable between the computer and monitor. Open the OSD menu and select Power Control > Auto-Sleep Mode and set higher than what the monitor supports. The monitor's Power Button Lockout Press and hold the power button for 10 seconds to unlock the function is enabled. System is disabled. Video resolution and/or refresh rate are set auto-sleep to disable the power button lockout feature. Change the settings to adjust the brightness scale as needed. The monitor's OSD...
... input. Set Auto-Switch Input to inactivate the screen blanking utility. Connect the appropriate video signal cable between the computer and monitor. Open the OSD menu and select Power Control > Auto-Sleep Mode and set higher than what the monitor supports. The monitor's Power Button Lockout Press and hold the power button for 10 seconds to unlock the function is enabled. System is disabled. Video resolution and/or refresh rate are set auto-sleep to disable the power button lockout feature. Change the settings to adjust the brightness scale as needed. The monitor's OSD...

User Guide
Page 34
... optimize your model's user guide for the specific button name) and the auto-adjustment pattern software utility on the keyboard to produce a stable, centered image. 6. Insert the disc in the disc drive. Press the Auto button on the monitor front panel. ● You can also press the Menu button, then select Image Control > Auto-Adjustment from http://www.hp.com/support. 28 Appendix B Support and troubleshooting Select Open Auto-Adjustment Software. You may also optimize the screen performance for the VGA (analog) input...
... optimize your model's user guide for the specific button name) and the auto-adjustment pattern software utility on the keyboard to produce a stable, centered image. 6. Insert the disc in the disc drive. Press the Auto button on the monitor front panel. ● You can also press the Menu button, then select Image Control > Auto-Adjustment from http://www.hp.com/support. 28 Appendix B Support and troubleshooting Select Open Auto-Adjustment Software. You may also optimize the screen performance for the VGA (analog) input...
User Guide
Page 35
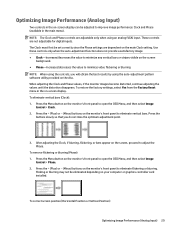
... the main Clock setting. Press the Menu button on -screen display. To correct screen position (Horizontal Position or Vertical Position): Optimizing Image Performance (Analog Input) 29 NOTE: The Clock and Phase controls are not adjustable for digital inputs. To restore the factory settings, select Yes from the Factory Reset menu in the on the monitor's front panel to open the OSD Menu, and then select Image Control > Clock. 2. To remove flickering or blurring (Phase): 1. Press the Menu button on your computer or graphics controller card installed. Flicking or...
... the main Clock setting. Press the Menu button on -screen display. To correct screen position (Horizontal Position or Vertical Position): Optimizing Image Performance (Analog Input) 29 NOTE: The Clock and Phase controls are not adjustable for digital inputs. To restore the factory settings, select Yes from the Factory Reset menu in the on the monitor's front panel to open the OSD Menu, and then select Image Control > Clock. 2. To remove flickering or blurring (Phase): 1. Press the Menu button on your computer or graphics controller card installed. Flicking or...

User Guide
Page 36
... the functionality of the monitor. NOTE: The monitor user guide, reference material, and drivers are available at http://www.hp.com/ support. Press the + (Plus) or - (Minus) buttons on the monitor's front panel to open the OSD Menu, and then select Image Control > Horizontal Position and/or Vertical Position. 2. Product support For additional information on the monitor's front panel to properly adjust the position of the image in the display area of that button. Select your country...
... the functionality of the monitor. NOTE: The monitor user guide, reference material, and drivers are available at http://www.hp.com/ support. Press the + (Plus) or - (Minus) buttons on the monitor's front panel to open the OSD Menu, and then select Image Control > Horizontal Position and/or Vertical Position. 2. Product support For additional information on the monitor's front panel to properly adjust the position of the image in the display area of that button. Select your country...


