

User Guide
Page 3
Text set off in this manner indicates that failure to equipment or loss of life. CAUTION: Text set off in this manner provides important supplemental information. iii NOTE: Text set off in this manner indicates that failure to follow directions could result in damage to follow directions could result in bodily harm or loss of information. WARNING! About This Guide This guide provides information on monitor features, setting up the monitor, and technical specifications.
Text set off in this manner indicates that failure to equipment or loss of life. CAUTION: Text set off in this manner provides important supplemental information. iii NOTE: Text set off in this manner indicates that failure to follow directions could result in damage to follow directions could result in bodily harm or loss of information. WARNING! About This Guide This guide provides information on monitor features, setting up the monitor, and technical specifications.

User Guide
Page 5
... 1 Product features ...1 HP ProDisplay Monitors ...1 2 Safety and maintenance guidelines ...3 Important safety information ...3 Maintenance guidelines ...4 Cleaning the monitor ...4 Shipping the monitor ...4 3 Setting up the monitor ...5 Use caution when setting up the monitor ...5 Attaching the stand base ...6 Identifying rear components ...7 Connecting the cables ...8 Identifying front panel controls ...11 Adjusting the monitor ...12 Turning on the monitor ...12 Removing the monitor stand ...13...
... 1 Product features ...1 HP ProDisplay Monitors ...1 2 Safety and maintenance guidelines ...3 Important safety information ...3 Maintenance guidelines ...4 Cleaning the monitor ...4 Shipping the monitor ...4 3 Setting up the monitor ...5 Use caution when setting up the monitor ...5 Attaching the stand base ...6 Identifying rear components ...7 Connecting the cables ...8 Identifying front panel controls ...11 Adjusting the monitor ...12 Turning on the monitor ...12 Removing the monitor stand ...13...

User Guide
Page 7
...; Plug-and-play capability if supported by the operating system ● Security slot provision on DisplayPort input HP ProDisplay Monitors 1 1 Product features HP ProDisplay Monitors The LCD (liquid crystal display) monitors have an active matrix, thin-film transistor (TFT) panel. The monitor models and features include: ● 49.6 cm (19.53 in several languages for easy setup and...
...; Plug-and-play capability if supported by the operating system ● Security slot provision on DisplayPort input HP ProDisplay Monitors 1 1 Product features HP ProDisplay Monitors The LCD (liquid crystal display) monitors have an active matrix, thin-film transistor (TFT) panel. The monitor models and features include: ● 49.6 cm (19.53 in several languages for easy setup and...

User Guide
Page 8
... for reduced power consumption ● Supports an optional HP Integrated Work Center Stand ● Supports an optional HP ProDisplay Companion Stand ● Supports an optional HP Quick Release to enable mounting to an optional HP monitor arm or attaching an optional HP Chromebox, HP Thin Client (select models), or HP Desktop Mini Business PC NOTE: For safety and regulatory...
... for reduced power consumption ● Supports an optional HP Integrated Work Center Stand ● Supports an optional HP ProDisplay Companion Stand ● Supports an optional HP Quick Release to enable mounting to an optional HP monitor arm or attaching an optional HP Chromebox, HP Thin Client (select models), or HP Desktop Mini Business PC NOTE: For safety and regulatory...

User Guide
Page 9
... Notices provided on your media disc, if one may cause disturbing reflections from the AC outlet. • If provided with the monitor. WARNING! LCD monitors that may accidentally step on a cord or cable. Care should be taken to route all power strips provide surge protection; Do... not pull on or trip over . This guide is an important safety feature. Consider placing the display in your HP LCD monitor. To reduce the risk of electric shock or damage to avoid interference from surrounding light and bright surfaces that are inappropriately situated ...
... Notices provided on your media disc, if one may cause disturbing reflections from the AC outlet. • If provided with the monitor. WARNING! LCD monitors that may accidentally step on a cord or cable. Care should be taken to route all power strips provide surge protection; Do... not pull on or trip over . This guide is an important safety feature. Consider placing the display in your HP LCD monitor. To reduce the risk of electric shock or damage to avoid interference from surrounding light and bright surfaces that are inappropriately situated ...
User Guide
Page 10
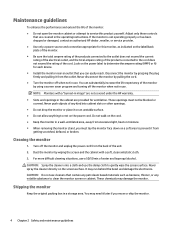
...behind the bezel and damage the electronics. You can substantially increase the life expectancy of the monitor by wiping the screen and the cabinet with a "burned-in image" are not covered under the HP warranty. ● Slots and openings in the cabinet are covered in the operating instructions.... It may damage the monitor. Never push objects of any volatile substance to prevent it on an unstable surface. ...
...behind the bezel and damage the electronics. You can substantially increase the life expectancy of the monitor by wiping the screen and the cabinet with a "burned-in image" are not covered under the HP warranty. ● Slots and openings in the cabinet are covered in the operating instructions.... It may damage the monitor. Never push objects of any volatile substance to prevent it on an unstable surface. ...

User Guide
Page 11
...other attached devices, then follow the instructions below. If installing a stand, lay the monitor face down on the panel may look different from getting scratched, defaced or broken as well as damage to the monitor, do not touch the surface of the liquid crystals. Use caution when setting up the... monitor, ensure that the power is turned off to its normal condition. If this illustration. Use ...
...other attached devices, then follow the instructions below. If installing a stand, lay the monitor face down on the panel may look different from getting scratched, defaced or broken as well as damage to the monitor, do not touch the surface of the liquid crystals. Use caution when setting up the... monitor, ensure that the power is turned off to its normal condition. If this illustration. Use ...
User Guide
Page 12
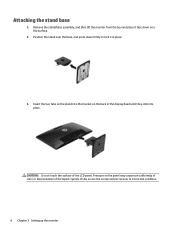
... screen will not recover to lock it face down firmly to its normal condition. 6 Chapter 3 Setting up the monitor Pressure on a flat surface. 2. Remove the stand/base assembly, and then lift the monitor from the box and place it in place. 3. Position the stand over the base, and press down on the...
... screen will not recover to lock it face down firmly to its normal condition. 6 Chapter 3 Setting up the monitor Pressure on a flat surface. 2. Remove the stand/base assembly, and then lift the monitor from the box and place it in place. 3. Position the stand over the base, and press down on the...
User Guide
Page 13
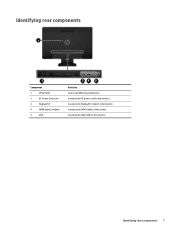
Connects the VGA cable to the monitor. Identifying rear components Component 1 VESA Panel 2 AC Power Connector 3 DisplayPort 4 HDMI (select models) 5 VGA Function Covers the VESA mounting holes Connects the AC power cord to the monitor. Identifying rear components 7 Connects the HDMI cable to the monitor. Connects the DisplayPort cable to the monitor.
Connects the VGA cable to the monitor. Identifying rear components Component 1 VESA Panel 2 AC Power Connector 3 DisplayPort 4 HDMI (select models) 5 VGA Function Covers the VESA mounting holes Connects the AC power cord to the monitor. Identifying rear components 7 Connects the HDMI cable to the monitor. Connects the DisplayPort cable to the monitor.
User Guide
Page 14
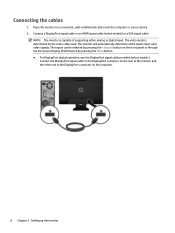
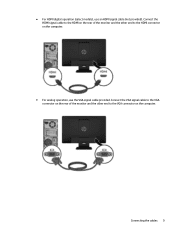
... cable (select models) or a VGA signal cable. Connect the DisplayPort signal cable to the DisplayPort connector on the computer. 8 Chapter 3 Setting up the monitor The inputs can be selected by pressing the +/source button on the rear of supporting either analog or digital input. The video mode is capable... of the monitor and the other end to the DisplayPort connector on the front panel or through the On-Screen Display (OSD) feature by the video cable...
... cable (select models) or a VGA signal cable. Connect the DisplayPort signal cable to the DisplayPort connector on the computer. 8 Chapter 3 Setting up the monitor The inputs can be selected by pressing the +/source button on the rear of supporting either analog or digital input. The video mode is capable... of the monitor and the other end to the DisplayPort connector on the front panel or through the On-Screen Display (OSD) feature by the video cable...
User Guide
Page 15
Connecting the cables 9 Connect the VGA signal cable to the VGA connector on the rear of the monitor and the other end to the HDMI connector on the computer. Connect the HDMI signal cable to the HDMI on the rear of the monitor and the other end to the VGA connector on the computer. ● For analog operation, use an HDMI signal cable (not provided). ● For HDMI digital operation (select models), use the VGA signal cable provided.
Connecting the cables 9 Connect the VGA signal cable to the VGA connector on the rear of the monitor and the other end to the HDMI connector on the computer. Connect the HDMI signal cable to the HDMI on the rear of the monitor and the other end to the VGA connector on the computer. ● For analog operation, use an HDMI signal cable (not provided). ● For HDMI digital operation (select models), use the VGA signal cable provided.
User Guide
Page 16
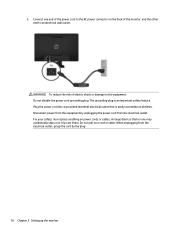
The grounding plug is easily accessible at all times. Arrange them . To reduce the risk of the monitor, and the other end to the equipment: Do not disable the power cord grounding plug. Plug the power cord into a grounded (earthed) electrical outlet that .... When unplugging from the electrical outlet, grasp the cord by unplugging the power cord from the equipment by the plug. 10 Chapter 3 Setting up the monitor Disconnect power from the electrical outlet. For your safety, do not place anything on a cord or cable. Do not pull on power cords or cables...
The grounding plug is easily accessible at all times. Arrange them . To reduce the risk of the monitor, and the other end to the equipment: Do not disable the power cord grounding plug. Plug the power cord into a grounded (earthed) electrical outlet that .... When unplugging from the electrical outlet, grasp the cord by unplugging the power cord from the equipment by the plug. 10 Chapter 3 Setting up the monitor Disconnect power from the electrical outlet. For your safety, do not place anything on a cord or cable. Do not pull on power cords or cables...

User Guide
Page 17
... auto adjustment feature to navigate forward through the OSD menu and decrease adjustment levels. NOTE: To view an OSD menu simulator, visit the HP Customer Self Repair Services Media Library at http://www.hp.com/go/sml. If the OSD menu is on or off. Identifying front panel controls 11 Turns the...
... auto adjustment feature to navigate forward through the OSD menu and decrease adjustment levels. NOTE: To view an OSD menu simulator, visit the HP Customer Self Repair Services Media Library at http://www.hp.com/go/sml. If the OSD menu is on or off. Identifying front panel controls 11 Turns the...
User Guide
Page 18
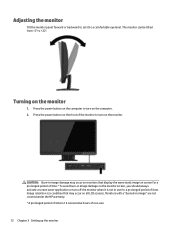
... application or turn off the monitor when it to a comfortable eye level. Adjusting the monitor Tilt the monitor panel forward or backward to set it is not in image" are not covered under the HP warranty. * A prolonged period of time is a condition that may occur on monitors that display the same static... image on screen for a prolonged period of time. The monitor can be tilted from -5° to +22°. CAUTION: Burn-...
... application or turn off the monitor when it to a comfortable eye level. Adjusting the monitor Tilt the monitor panel forward or backward to set it is not in image" are not covered under the HP warranty. * A prolonged period of time is a condition that may occur on monitors that display the same static... image on screen for a prolonged period of time. The monitor can be tilted from -5° to +22°. CAUTION: Burn-...

User Guide
Page 19
... and the power and signal cables are both disconnected. 1. NOTE: This apparatus is intended to be attached to disassemble the monitor, be enabled. Removing the monitor stand 13 NOTE: If pressing the power button has no effect, the power button lockout feature may be sure the...slot on ), the current preset display resolution, and the recommended preset display resolution. Disconnect and remove the signal and power cables from the monitor. When the monitor is the current active signal, the status of the auto-switch source setting (on a wall, a swing arm, or other mounting fixture....
... and the power and signal cables are both disconnected. 1. NOTE: This apparatus is intended to be attached to disassemble the monitor, be enabled. Removing the monitor stand 13 NOTE: If pressing the power button has no effect, the power button lockout feature may be sure the...slot on ), the current preset display resolution, and the recommended preset display resolution. Disconnect and remove the signal and power cables from the monitor. When the monitor is the current active signal, the status of the auto-switch source setting (on a wall, a swing arm, or other mounting fixture....
User Guide
Page 20
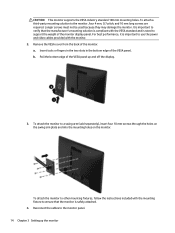
... mm, 0.7 pitch, and 10 mm long screws are required. To attach the monitor to other mounting fixtures, follow the instructions included with the monitor. 2. Longer screws must not be used because they may damage the monitor. a. To attach a third-party mounting solution to ensure that the manufacturer's mounting... solution is compliant with the VESA standard and is important to support the weight of the VESA panel up the monitor Pull the bottom edge of the monitor display panel. b. Remove the VESA cover from the back of the VESA panel. Reconnect the cables to a swing ...
... mm, 0.7 pitch, and 10 mm long screws are required. To attach the monitor to other mounting fixtures, follow the instructions included with the monitor. 2. Longer screws must not be used because they may damage the monitor. a. To attach a third-party mounting solution to ensure that the manufacturer's mounting... solution is compliant with the VESA standard and is important to support the weight of the VESA panel up the monitor Pull the bottom edge of the monitor display panel. b. Remove the VESA cover from the back of the VESA panel. Reconnect the cables to a swing ...
User Guide
Page 21
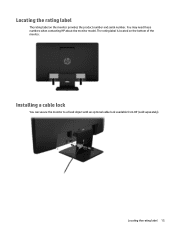
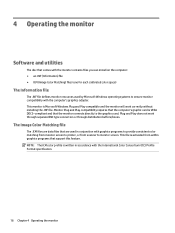
Installing a cable lock You can secure the monitor to a fixed object with an optional cable lock available from HP (sold separately). You may need these numbers when contacting HP about the monitor model. Locating the rating label 15 Locating the rating label The rating label on the bottom of the monitor. The rating label is located on the monitor provides the product number and serial number.
Installing a cable lock You can secure the monitor to a fixed object with an optional cable lock available from HP (sold separately). You may need these numbers when contacting HP about the monitor model. Locating the rating label 15 Locating the rating label The rating label on the bottom of the monitor. The rating label is located on the monitor provides the product number and serial number.
User Guide
Page 22
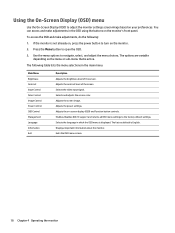
... Color Matching) files (one for each calibrated color space) The Information file The .INF file defines monitor resources used in conjunction with the International Color Consortium (ICC) Profile Format specification. 16 Chapter 4 Operating the monitor NOTE: The ICM color profile is Microsoft Windows Plug and Play compatible and the... to printer, or from within graphics programs that are used by Microsoft Windows operating systems to ensure monitor compatibility with the computer's graphics adapter. The Image Color Matching file The .ICM files are data files that support this feature. ...
... Color Matching) files (one for each calibrated color space) The Information file The .INF file defines monitor resources used in conjunction with the International Color Consortium (ICC) Profile Format specification. 16 Chapter 4 Operating the monitor NOTE: The ICM color profile is Microsoft Windows Plug and Play compatible and the... to printer, or from within graphics programs that are used by Microsoft Windows operating systems to ensure monitor compatibility with the computer's graphics adapter. The Image Color Matching file The .ICM files are data files that support this feature. ...

User Guide
Page 23
...the disc in the computer optical drive. View the HP Monitor Software Information file. 3. If necessary, select your operating system, and then click Next. 5. Display/Monitor to open the list of .INF and .ICM files from the HP monitors support website: 1. Installing from the disc To ... files on -screen instructions. 5. Go to the HP Monitor Software Information file on the disc. Ensure that your monitor model in the Find my product search field, and click Go. 3. Select your monitor from the list. 4. Select Install Monitor Driver Software. 4. Follow the on the computer from...
...the disc in the computer optical drive. View the HP Monitor Software Information file. 3. If necessary, select your operating system, and then click Next. 5. Display/Monitor to open the list of .INF and .ICM files from the HP monitors support website: 1. Installing from the disc To ... files on -screen instructions. 5. Go to the HP Monitor Software Information file on the disc. Ensure that your monitor model in the Find my product search field, and click Go. 3. Select your monitor from the list. 4. Select Install Monitor Driver Software. 4. Follow the on the computer from...
User Guide
Page 24
... the menu options to turn on your preferences. Adjusts the power settings. Displays important information about the monitor. If the monitor is displayed. The following : 1. Adjusts the on , press the power button to navigate, select, and adjust the menu choices. ...factory default settings. The factory default is active. The options are variable depending on the monitor's front panel. Adjusts the screen image. Exits the OSD menu screen. 18 Chapter 4 Operating the monitor Adjusts the contrast level of the screen. Selects and adjusts the screen color. To ...
... the menu options to turn on your preferences. Adjusts the power settings. Displays important information about the monitor. If the monitor is displayed. The following : 1. Adjusts the on , press the power button to navigate, select, and adjust the menu choices. ...factory default settings. The factory default is active. The options are variable depending on the monitor's front panel. Adjusts the screen image. Exits the OSD menu screen. 18 Chapter 4 Operating the monitor Adjusts the contrast level of the screen. Selects and adjusts the screen color. To ...


