

User Guide
Page 5
... ...7 Connecting the cables ...8 Identifying front panel controls ...11 Adjusting the monitor ...12 Turning on the monitor ...12 Removing the monitor stand ...13 Mounting the monitor ...13 Locating the rating label ...15 Installing a cable lock ...15 4 Operating the monitor ...16 Software and utilities ...16 The Information file ...16 The Image Color Matching file ...16 Installing the .INF and .ICM files ...17 Installing from the disc ...17 Downloading from the web ...17 Using the On-Screen Display (OSD) menu ...18 Using Auto-Sleep Mode ...19...
... ...7 Connecting the cables ...8 Identifying front panel controls ...11 Adjusting the monitor ...12 Turning on the monitor ...12 Removing the monitor stand ...13 Mounting the monitor ...13 Locating the rating label ...15 Installing a cable lock ...15 4 Operating the monitor ...16 Software and utilities ...16 The Information file ...16 The Image Color Matching file ...16 Installing the .INF and .ICM files ...17 Installing from the disc ...17 Downloading from the web ...17 Using the On-Screen Display (OSD) menu ...18 Using Auto-Sleep Mode ...19...
User Guide
Page 6
... (24 in) model specifications ...23 Preset display resolutions ...24 49.6 cm (19.53 in) models factory preset modes 24 58.4 cm (23 in) model factory preset modes 24 60.47 cm (23.8 in) model factory preset modes 25 61 cm (24 in) model factory preset modes 25 Entering user modes ...25 Energy saver feature ...26 Appendix B Support and troubleshooting ...27 Solving common problems ...27 Using the Auto-Adjustment Function (Analog Input 28 Optimizing Image Performance (Analog Input 29 Button lockouts ...30...
... (24 in) model specifications ...23 Preset display resolutions ...24 49.6 cm (19.53 in) models factory preset modes 24 58.4 cm (23 in) model factory preset modes 24 60.47 cm (23.8 in) model factory preset modes 25 61 cm (24 in) model factory preset modes 25 Entering user modes ...25 Energy saver feature ...26 Appendix B Support and troubleshooting ...27 Solving common problems ...27 Using the Auto-Adjustment Function (Analog Input 28 Optimizing Image Performance (Analog Input 29 Button lockouts ...30...

User Guide
Page 7
... HP ProDisplay Monitors The LCD (liquid crystal display) monitors have an active matrix, thin-film transistor (TFT) panel. includes custom scaling for maximum image size while preserving original aspect ratio ● Non-glare panel with an LED backlight that consumes less energy ● Wide viewing angle to allow viewing from a sitting or standing position, or moving from side-to-side ● Tilt capability ● Removable stand for flexible monitor panel mounting solutions ● Video signal input to support VGA analog...
... HP ProDisplay Monitors The LCD (liquid crystal display) monitors have an active matrix, thin-film transistor (TFT) panel. includes custom scaling for maximum image size while preserving original aspect ratio ● Non-glare panel with an LED backlight that consumes less energy ● Wide viewing angle to allow viewing from a sitting or standing position, or moving from side-to-side ● Tilt capability ● Removable stand for flexible monitor panel mounting solutions ● Video signal input to support VGA analog...

User Guide
Page 8
... your country. Select Drivers & Downloads, and then follow the onscreen instructions. 2 Chapter 1 Product features To locate updates to the user guide for reduced power consumption ● Supports an optional HP Integrated Work Center Stand ● Supports an optional HP ProDisplay Companion Stand ● Supports an optional HP Quick Release to enable mounting to an optional HP monitor arm or attaching an optional HP Chromebox, HP Thin Client (select models), or HP Desktop Mini Business PC...
... your country. Select Drivers & Downloads, and then follow the onscreen instructions. 2 Chapter 1 Product features To locate updates to the user guide for reduced power consumption ● Supports an optional HP Integrated Work Center Stand ● Supports an optional HP ProDisplay Companion Stand ● Supports an optional HP Quick Release to enable mounting to an optional HP monitor arm or attaching an optional HP Chromebox, HP Thin Client (select models), or HP Desktop Mini Business PC...

User Guide
Page 9
... monitor. Use the appropriate and correctly sized furniture designed to avoid interference from surrounding light and bright surfaces that is included, or in your HP LCD monitor. NOTE: This product is suitable for computer users, and provides important electrical and mechanical safety information. Consider placing the display in a controlled luminous environment to properly support your documentation kit. Do not pull on power cords or cables. Use a power...
... monitor. Use the appropriate and correctly sized furniture designed to avoid interference from surrounding light and bright surfaces that is included, or in your HP LCD monitor. NOTE: This product is suitable for computer users, and provides important electrical and mechanical safety information. Consider placing the display in a controlled luminous environment to properly support your documentation kit. Do not pull on power cords or cables. Use a power...
User Guide
Page 10
...-in image" are provided for each device. ● Install the monitor near an outlet that contain any volatile substance to gently wipe the screen surface. If the monitor is not operating properly or has been dropped or damaged, contact an authorized HP dealer, reseller, or service provider. ● Use only a power source and connection appropriate for this product yourself. You may need...
...-in image" are provided for each device. ● Install the monitor near an outlet that contain any volatile substance to gently wipe the screen surface. If the monitor is not operating properly or has been dropped or damaged, contact an authorized HP dealer, reseller, or service provider. ● Use only a power source and connection appropriate for this product yourself. You may need...

User Guide
Page 11
... to its normal condition. NOTE: Your monitor may cause non-uniformity of color or disorientation of the LCD panel. This prevents the screen from the monitor in this occurs the screen will not recover to the monitor, do not touch the surface of the liquid crystals. 3 Setting up the monitor To set up the monitor, ensure that the power is turned off to the front...
... to its normal condition. NOTE: Your monitor may cause non-uniformity of color or disorientation of the LCD panel. This prevents the screen from the monitor in this occurs the screen will not recover to the monitor, do not touch the surface of the liquid crystals. 3 Setting up the monitor To set up the monitor, ensure that the power is turned off to the front...
User Guide
Page 14
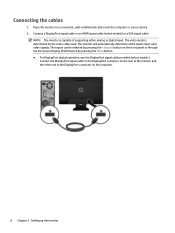
... the video cable used. Connect the DisplayPort signal cable to the DisplayPort connector on the computer. 8 Chapter 3 Setting up the monitor Place the monitor in a convenient, well-ventilated location near the computer or source device. 2. Connect a DisplayPort signal cable or an HDMI signal cable (select models) or a VGA signal cable. NOTE: The monitor is determined by pressing the Menu button. ● For DisplayPort digital operation, use the DisplayPort signal cable provided (select models). Connecting the cables 1. The monitor will automatically determine which inputs...
... the video cable used. Connect the DisplayPort signal cable to the DisplayPort connector on the computer. 8 Chapter 3 Setting up the monitor Place the monitor in a convenient, well-ventilated location near the computer or source device. 2. Connect a DisplayPort signal cable or an HDMI signal cable (select models) or a VGA signal cable. NOTE: The monitor is determined by pressing the Menu button. ● For DisplayPort digital operation, use the DisplayPort signal cable provided (select models). Connecting the cables 1. The monitor will automatically determine which inputs...

User Guide
Page 17
Turns the monitor on , press to select the highlighted menu item. If the OSD menu is on or off. Identifying front panel controls 11 Identifying front panel controls Control 1 2 3 4 5 Menu Minus Plus/Source OK/Auto Power Function Opens, selects or exits the OSD menu. If the OSD menu is on , press to optimize the screen image. NOTE: To view an OSD menu simulator, visit the HP Customer Self Repair Services Media Library at http://www.hp.com/go/sml. If...
Turns the monitor on , press to select the highlighted menu item. If the OSD menu is on or off. Identifying front panel controls 11 Identifying front panel controls Control 1 2 3 4 5 Menu Minus Plus/Source OK/Auto Power Function Opens, selects or exits the OSD menu. If the OSD menu is on , press to optimize the screen image. NOTE: To view an OSD menu simulator, visit the HP Customer Self Repair Services Media Library at http://www.hp.com/go/sml. If...
User Guide
Page 18
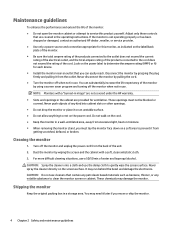
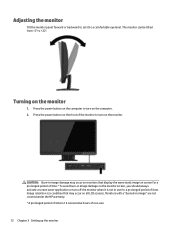
... a screen saver application or turn off the monitor when it to turn on all LCD screens. Press the power button on the computer to a comfortable eye level. Monitors with a "burned-in image" are not covered under the HP warranty. * A prolonged period of time is 12 consecutive hours of time.* To avoid burn-in image damage on the monitor 1. Adjusting the monitor Tilt the monitor panel forward or backward to set...
... a screen saver application or turn off the monitor when it to turn on all LCD screens. Press the power button on the computer to a comfortable eye level. Monitors with a "burned-in image" are not covered under the HP warranty. * A prolonged period of time is 12 consecutive hours of time.* To avoid burn-in image damage on the monitor 1. Adjusting the monitor Tilt the monitor panel forward or backward to set...

User Guide
Page 19
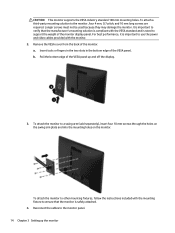
... the auto-switch source setting (on , a monitor status message is displayed for 10 seconds. Disconnect and remove the signal and power cables from the monitor. When the monitor is turned off ; Lay the monitor face down on the release latch (1) with a screwdriver and slide the stand out of the monitor, then select Power Control > Power LED > Off. NOTE: If pressing the power button has no effect, the power button lockout feature may be supported by a clean...
... the auto-switch source setting (on , a monitor status message is displayed for 10 seconds. Disconnect and remove the signal and power cables from the monitor. When the monitor is turned off ; Lay the monitor face down on the release latch (1) with a screwdriver and slide the stand out of the monitor, then select Power Control > Power LED > Off. NOTE: If pressing the power button has no effect, the power button lockout feature may be supported by a clean...
User Guide
Page 20
... 3 Setting up and off the display. 3. For best performance, it is safely attached. 4. Pull the bottom edge of the monitor display panel. To attach a third-party mounting solution to a swing arm (sold separately), insert four 10 mm screws through the holes on the swing arm plate and into the mounting holes on the monitor. Reconnect the cables to use the power and video cables provided...
... 3 Setting up and off the display. 3. For best performance, it is safely attached. 4. Pull the bottom edge of the monitor display panel. To attach a third-party mounting solution to a swing arm (sold separately), insert four 10 mm screws through the holes on the swing arm plate and into the mounting holes on the monitor. Reconnect the cables to use the power and video cables provided...

User Guide
Page 23
... determine that the proper resolution and refresh rates appear in the Windows Display control panel. Follow the on the driver. 7. Refer to download the software. Select Drivers & Downloads, type your system meets the program minimum requirements. 8. Click on -screen instructions. 5. Installing the .INF and .ICM files 17 Insert the disc in the event of an installation error. Display/Monitor to install the digitally signed monitor .INF and .ICM files manually from the disc...
... determine that the proper resolution and refresh rates appear in the Windows Display control panel. Follow the on the driver. 7. Refer to download the software. Select Drivers & Downloads, type your system meets the program minimum requirements. 8. Click on -screen instructions. 5. Installing the .INF and .ICM files 17 Insert the disc in the event of an installation error. Display/Monitor to install the digitally signed monitor .INF and .ICM files manually from the disc...
User Guide
Page 24
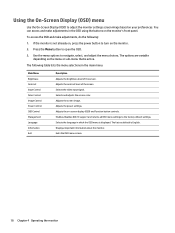
Press the Menu button to the factory default settings. The following : 1. Main Menu Brightness Contrast Input Control Color Control Image Control Power Control OSD Control Management Language Information Exit Description Adjusts the brightness level of the screen Selects the video input signal. Adjusts the screen image. Adjusts the on the menu or sub-menu that is not already on the monitor. 2. Enables/disables DDC/CI support and returns all OSD menu settings to open the OSD. 3. The factory default is displayed. Exits the OSD menu screen. 18 Chapter 4 Operating the monitor The ...
Press the Menu button to the factory default settings. The following : 1. Main Menu Brightness Contrast Input Control Color Control Image Control Power Control OSD Control Management Language Information Exit Description Adjusts the brightness level of the screen Selects the video input signal. Adjusts the screen image. Adjusts the on the menu or sub-menu that is not already on the monitor. 2. Enables/disables DDC/CI support and returns all OSD menu settings to open the OSD. 3. The factory default is displayed. Exits the OSD menu screen. 18 Chapter 4 Operating the monitor The ...
User Guide
Page 25
... 0.5 W of either horizontal or vertical sync signal). Press one of the five front bezel buttons to activate the buttons, and then press the Menu button to the monitor (for the display. The monitor will enter a reduced power state when the host PC signals low power mode (absence of power when in the OSD. Using Auto-Sleep Mode The display supports an OSD (On-Screen Display) option called Auto-Sleep Mode that allows you to enable or disable a reduced power state for...
... 0.5 W of either horizontal or vertical sync signal). Press one of the five front bezel buttons to activate the buttons, and then press the Menu button to the monitor (for the display. The monitor will enter a reduced power state when the host PC signals low power mode (absence of power when in the OSD. Using Auto-Sleep Mode The display supports an OSD (On-Screen Display) option called Auto-Sleep Mode that allows you to enable or disable a reduced power state for...

User Guide
Page 32
... reduced power state at a predetermined time. By selecting the settings in the reduced power state, the monitor will return to the computer manual for instructions on setting energy saver features (sometimes called power management features). NOTE: The above power saver feature only works when connected to enter the reduced power state, the power light blinks amber. 26 Appendix A Technical specifications Energy saver feature The monitors support a reduced power state...
... reduced power state at a predetermined time. By selecting the settings in the reduced power state, the monitor will return to the computer manual for instructions on setting energy saver features (sometimes called power management features). NOTE: The above power saver feature only works when connected to enter the reduced power state, the power light blinks amber. 26 Appendix A Technical specifications Energy saver feature The monitors support a reduced power state...

User Guide
Page 33
... brightness scale as needed. Connect the video cable properly. Press any key on the front panel for 10 seconds to disable the power button lockout feature. Open the OSD menu and select Brightness to inactivate the screen blanking utility. Video resolution and/or refresh rate are set auto-sleep to a supported setting (see Preset display resolutions on page 8 for 10 seconds to Off and manually select the input. The monitor's power saving control is flashing. The monitor's OSD Lockout function Press and hold the power button...
... brightness scale as needed. Connect the video cable properly. Press any key on the front panel for 10 seconds to disable the power button lockout feature. Open the OSD menu and select Brightness to inactivate the screen blanking utility. Video resolution and/or refresh rate are set auto-sleep to a supported setting (see Preset display resolutions on page 8 for 10 seconds to Off and manually select the input. The monitor's power saving control is flashing. The monitor's OSD Lockout function Press and hold the power button...

User Guide
Page 34
... press the Menu button, then select Image Control > Auto-Adjustment from http://www.hp.com/support. 28 Appendix B Support and troubleshooting The setup test pattern is displayed. 4. The disc menu is displayed. 5. If the monitor is not satisfactory, continue with the procedure. 3. Press the Auto button on the monitor front panel to optimize your model's user guide for 20 minutes before adjusting. 2. Using the Auto-Adjustment Function (Analog Input) When first setting up for the specific button name) and the auto-adjustment pattern software utility...
... press the Menu button, then select Image Control > Auto-Adjustment from http://www.hp.com/support. 28 Appendix B Support and troubleshooting The setup test pattern is displayed. 4. The disc menu is displayed. 5. If the monitor is not satisfactory, continue with the procedure. 3. Press the Auto button on the monitor front panel to optimize your model's user guide for 20 minutes before adjusting. 2. Using the Auto-Adjustment Function (Analog Input) When first setting up for the specific button name) and the auto-adjustment pattern software utility...
User Guide
Page 35
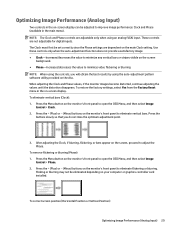
... the monitor images become distorted, continue adjusting the values until the distortion disappears. To remove flickering or blurring (Phase): 1. To correct screen position (Horizontal Position or Vertical Position): Optimizing Image Performance (Analog Input) 29 The Clock must first be set correctly since the Phase settings are not adjustable for digital inputs. These controls are dependent on -screen display. Press the buttons slowly so that you will obtain the best results by using an analog (VGA) input. NOTE: When using the controls...
... the monitor images become distorted, continue adjusting the values until the distortion disappears. To remove flickering or blurring (Phase): 1. To correct screen position (Horizontal Position or Vertical Position): Optimizing Image Performance (Analog Input) 29 The Clock must first be set correctly since the Phase settings are not adjustable for digital inputs. These controls are dependent on -screen display. Press the buttons slowly so that you will obtain the best results by using an analog (VGA) input. NOTE: When using the controls...

User Guide
Page 36
... which the problem occurred ● Error messages received 30 Appendix B Support and troubleshooting NOTE: The monitor user guide, reference material, and drivers are available at http://www.hp.com/ support. You can restore the functionality by holding the button down . Press the Menu button on the monitor's front panel to call : ● Monitor model number ● Monitor serial number ● Purchase date on the monitor's front panel to properly adjust the position of the image in...
... which the problem occurred ● Error messages received 30 Appendix B Support and troubleshooting NOTE: The monitor user guide, reference material, and drivers are available at http://www.hp.com/ support. You can restore the functionality by holding the button down . Press the Menu button on the monitor's front panel to call : ● Monitor model number ● Monitor serial number ● Purchase date on the monitor's front panel to properly adjust the position of the image in...


