

User Guide
Page 5
Table of contents 1 Product features ...1 HP ProDisplay Monitors ...1 2 Safety and maintenance guidelines ...3 Important safety information ...3 Maintenance guidelines ...4 Cleaning the monitor ...4 Shipping the monitor ...4 3 Setting up the monitor ...5 ...rear components ...7 Connecting the cables ...8 Identifying front panel controls ...11 Adjusting the monitor ...12 Turning on the monitor ...12 Removing the monitor stand ...13 Mounting the monitor ...13 Locating the rating label ...15 Installing a cable lock ...15 4 Operating the monitor ...16 Software and utilities ...16 The Information file...
Table of contents 1 Product features ...1 HP ProDisplay Monitors ...1 2 Safety and maintenance guidelines ...3 Important safety information ...3 Maintenance guidelines ...4 Cleaning the monitor ...4 Shipping the monitor ...4 3 Setting up the monitor ...5 ...rear components ...7 Connecting the cables ...8 Identifying front panel controls ...11 Adjusting the monitor ...12 Turning on the monitor ...12 Removing the monitor stand ...13 Mounting the monitor ...13 Locating the rating label ...15 Installing a cable lock ...15 4 Operating the monitor ...16 Software and utilities ...16 The Information file...
User Guide
Page 7
...digital (select models) ● Plug-and-play capability if supported by the operating system ● Security slot provision on DisplayPort input HP ProDisplay Monitors 1 includes custom scaling for maximum image size while preserving original aspect ratio ● Non-glare panel with an LED backlight that...a sitting or standing position, or moving from side-to-side ● Tilt capability ● Removable stand for flexible monitor panel mounting solutions ● Video signal input to support VGA analog with VGA signal cable provided ● Video signal input to support DisplayPort digital...
...digital (select models) ● Plug-and-play capability if supported by the operating system ● Security slot provision on DisplayPort input HP ProDisplay Monitors 1 includes custom scaling for maximum image size while preserving original aspect ratio ● Non-glare panel with an LED backlight that...a sitting or standing position, or moving from side-to-side ● Tilt capability ● Removable stand for flexible monitor panel mounting solutions ● Video signal input to support VGA analog with VGA signal cable provided ● Video signal input to support DisplayPort digital...

User Guide
Page 8
... for reduced power consumption ● Supports an optional HP Integrated Work Center Stand ● Supports an optional HP ProDisplay Companion Stand ● Supports an optional HP Quick Release to enable mounting to an optional HP monitor arm or attaching an optional HP Chromebox, HP Thin Client (select models), or HP Desktop Mini Business PC NOTE: For safety and regulatory...
... for reduced power consumption ● Supports an optional HP Integrated Work Center Stand ● Supports an optional HP ProDisplay Companion Stand ● Supports an optional HP Quick Release to enable mounting to an optional HP monitor arm or attaching an optional HP Chromebox, HP Thin Client (select models), or HP Desktop Mini Business PC NOTE: For safety and regulatory...
User Guide
Page 13
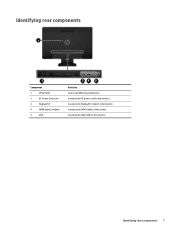
Identifying rear components Component 1 VESA Panel 2 AC Power Connector 3 DisplayPort 4 HDMI (select models) 5 VGA Function Covers the VESA mounting holes Connects the AC power cord to the monitor. Identifying rear components 7 Connects the VGA cable to the monitor. Connects the DisplayPort cable to the monitor. Connects the HDMI cable to the monitor.
Identifying rear components Component 1 VESA Panel 2 AC Power Connector 3 DisplayPort 4 HDMI (select models) 5 VGA Function Covers the VESA mounting holes Connects the AC power cord to the monitor. Identifying rear components 7 Connects the VGA cable to the monitor. Connects the DisplayPort cable to the monitor. Connects the HDMI cable to the monitor.

User Guide
Page 19
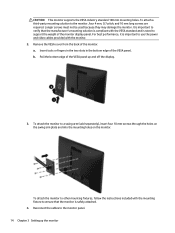
... ), the current preset display resolution, and the recommended preset display resolution. Disconnect and remove the signal and power cables from the monitor. Mounting the monitor The monitor panel can be enabled. See Removing the monitor stand on the front of the monitor, then select Power Control >... (1) with a screwdriver and slide the stand out of the auto-switch source setting (on a flat surface covered by UL or CSA Listed wall mount bracket. 1. The message shows which input (DisplayPort or VGA) is turned off ; NOTE: If pressing the power button has no effect, the...
... ), the current preset display resolution, and the recommended preset display resolution. Disconnect and remove the signal and power cables from the monitor. Mounting the monitor The monitor panel can be enabled. See Removing the monitor stand on the front of the monitor, then select Power Control >... (1) with a screwdriver and slide the stand out of the auto-switch source setting (on a flat surface covered by UL or CSA Listed wall mount bracket. 1. The message shows which input (DisplayPort or VGA) is turned off ; NOTE: If pressing the power button has no effect, the...
User Guide
Page 20
... use the power and video cables provided with the monitor. 2. CAUTION: This monitor supports the VESA industry standard 100 mm mounting holes. To attach a third-party mounting solution to a swing arm (sold separately), insert four 10 mm screws through the holes on the swing arm plate and ...into the mounting holes on the monitor. To attach the monitor to other mounting fixtures, follow the instructions included with the mounting fixture to ensure that the manufacturer's mounting solution is compliant with the VESA standard and is important to...
... use the power and video cables provided with the monitor. 2. CAUTION: This monitor supports the VESA industry standard 100 mm mounting holes. To attach a third-party mounting solution to a swing arm (sold separately), insert four 10 mm screws through the holes on the swing arm plate and ...into the mounting holes on the monitor. To attach the monitor to other mounting fixtures, follow the instructions included with the mounting fixture to ensure that the manufacturer's mounting solution is compliant with the VESA standard and is important to...


