
HP UPS R3000 User Guide
Page 18
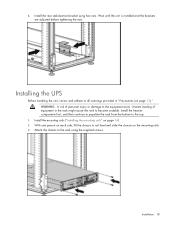
... person on the mounting rails. 3. Install the mounting rails ("Installing the mounting rails" on page 13)." Installation 18 Installing the UPS Before installing the unit, review and adhere to the equipment exists. Wait until the unit is installed and the brackets are adjusted before tightening the nuts. Attach the chassis to...
... person on the mounting rails. 3. Install the mounting rails ("Installing the mounting rails" on page 13)." Installation 18 Installing the UPS Before installing the unit, review and adhere to the equipment exists. Wait until the unit is installed and the brackets are adjusted before tightening the nuts. Attach the chassis to...
HP UPS R3000 User Guide
Page 24
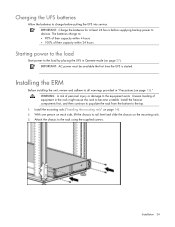
Installing the ERM Before installing the unit, review and adhere to the top. 1. WARNING: A risk of equipment in the rack might cause the rack to become unstable. Uneven loading of personal injury or ...
Installing the ERM Before installing the unit, review and adhere to the top. 1. WARNING: A risk of equipment in the rack might cause the rack to become unstable. Uneven loading of personal injury or ...
HP 3 Phase UPS User Guide
Page 8
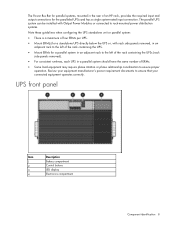
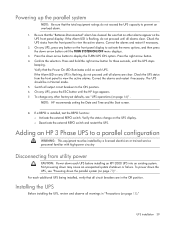
... and has a single system-rated input connection. The Power Bus Bar for parallel systems, mounted in a parallel system should have the same number of an HP rack, provides the required input and output connections for a parallel system in an adjacent rack to the left of the rack containing the UPSs (rack... in the rear of ERMs. • Some load equipment may require phase rotation or phase relationship coordination to ensure that your connected equipment operates correctly. Review your equipment manufacturer's power requirement documents to ensure proper operation.
... and has a single system-rated input connection. The Power Bus Bar for parallel systems, mounted in a parallel system should have the same number of an HP rack, provides the required input and output connections for a parallel system in an adjacent rack to the left of the rack containing the UPSs (rack... in the rear of ERMs. • Some load equipment may require phase rotation or phase relationship coordination to ensure that your connected equipment operates correctly. Review your equipment manufacturer's power requirement documents to ensure proper operation.

HP 3 Phase UPS User Guide
Page 17
..., install the rear mounting brackets. Tighten the hex nuts. WARNING: A risk of equipment in "Precautions (on page 13)." Installing the UPS Before installing the UPS, review and observe all warnings in the rack might cause the rack to become unstable. 5.
..., install the rear mounting brackets. Tighten the hex nuts. WARNING: A risk of equipment in "Precautions (on page 13)." Installing the UPS Before installing the UPS, review and observe all warnings in the rack might cause the rack to become unstable. 5.

HP 3 Phase UPS User Guide
Page 21
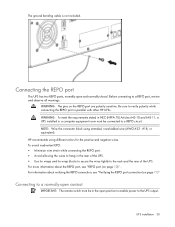
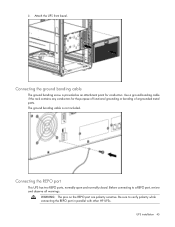
...wires to a normally-open contact IMPORTANT: The remote switch must be in the open and normally-closed. Connecting to hang in parallel with other HP UPSs. Connecting the REPO port This UPS has two REPO ports, normally-open position to enable power to the rack and the rear of the...requirements stated in NEC (NFPA 70) Articles 645-10 and 645-11, a UPS installed in a computer equipment room must be connected to a REPO port, review and observe all warnings. For information about the REPO port, see "Verifying the REPO port connection (on the REPO port are polarity sensitive. The ground...
...wires to a normally-open contact IMPORTANT: The remote switch must be in the open and normally-closed. Connecting to hang in parallel with other HP UPSs. Connecting the REPO port This UPS has two REPO ports, normally-open position to enable power to the rack and the rear of the...requirements stated in NEC (NFPA 70) Articles 645-10 and 645-11, a UPS installed in a computer equipment room must be connected to a REPO port, review and observe all warnings. For information about the REPO port, see "Verifying the REPO port connection (on the REPO port are polarity sensitive. The ground...
HP 3 Phase UPS User Guide
Page 30
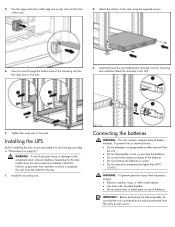
...wire strain while connecting the REPO port. • Avoid allowing the wires to hang in parallel with other HP UPSs. For information about the REPO port, see "Verifying the REPO port connection (on the REPO port ... installation 30 Before connecting to the rack and the rear of the UPS. WARNING: The pins on page 71)" . HP recommends using stranded, nonshielded wire (AWG #22 - #18, or equivalent). For more information about verifying the REPO connection... wrap blocks to secure the wires tightly to a REPO port, review and observe all warnings. The ground bonding cable is not included.
...wire strain while connecting the REPO port. • Avoid allowing the wires to hang in parallel with other HP UPSs. For information about the REPO port, see "Verifying the REPO port connection (on the REPO port ... installation 30 Before connecting to the rack and the rear of the UPS. WARNING: The pins on page 71)" . HP recommends using stranded, nonshielded wire (AWG #22 - #18, or equivalent). For more information about verifying the REPO connection... wrap blocks to secure the wires tightly to a REPO port, review and observe all warnings. The ground bonding cable is not included.
HP 3 Phase UPS User Guide
Page 39
... the external REPO switch. Check the UPS status from utility power CAUTION: Power down the parallel system (on the UPS display. Adding an HP 3 Phase UPS to activate the menu options, and then press the down arrow button to view the active alarms. Correct the alarms and ... ON/OFF menu displays. 3. Press and hold the right arrow button for three seconds, until the HP logo appears. 7. Confirm the selection. Installing the UPS Before installing the UPS, review and observe all output circuit breakers to view the active alarms. Correct the alarms and restart if necessary...
... the external REPO switch. Check the UPS status from utility power CAUTION: Power down the parallel system (on the UPS display. Adding an HP 3 Phase UPS to activate the menu options, and then press the down arrow button to view the active alarms. Correct the alarms and ... ON/OFF menu displays. 3. Press and hold the right arrow button for three seconds, until the HP logo appears. 7. Confirm the selection. Installing the UPS Before installing the UPS, review and observe all output circuit breakers to view the active alarms. Correct the alarms and restart if necessary...
HP 3 Phase UPS User Guide
Page 45
... cable The ground bonding screw is not included. Before connecting to verify polarity while connecting the REPO port in parallel with other HP UPSs. Be sure to a REPO port, review and observe all warnings. Use a ground bonding cable if the rack contains any conductors for conductors. UPS installation 45 Connecting the REPO...
... cable The ground bonding screw is not included. Before connecting to verify polarity while connecting the REPO port in parallel with other HP UPSs. Be sure to a REPO port, review and observe all warnings. Use a ground bonding cable if the rack contains any conductors for conductors. UPS installation 45 Connecting the REPO...

HP 3 Phase UPS User Guide
Page 60
... of the carton, lift the chassis and lower it to the top. 1. With one person on page 14). 2. Installing the ERM Before installing the ERM, review and observe all warnings in the Off position.
... of the carton, lift the chassis and lower it to the top. 1. With one person on page 14). 2. Installing the ERM Before installing the ERM, review and observe all warnings in the Off position.
HP UPS R1500 G3 Installation Instructions
Page 4
... brackets into the front of batteries. Connecting the batteries WARNING: The unit contains sealed lead-acid battery modules. Installing the UPS Before installing the unit, review and adhere to all warnings provided in the rack might cause the rack to recharge batteries after removal from the utility power source. Attach the...
... brackets into the front of batteries. Connecting the batteries WARNING: The unit contains sealed lead-acid battery modules. Installing the UPS Before installing the unit, review and adhere to all warnings provided in the rack might cause the rack to recharge batteries after removal from the utility power source. Attach the...

HP UPS R7000 Installation Instructions
Page 5
..., Windows Server® 2003, and Windows® Vista Enterprise operating systems using the supplied screws. Attach the chassis to the rack using the HP USB to serial converter NOTE: This procedure was tested on the chassis using hex nuts. 10. Install the heavier components first, and then continue... the floor in "Precautions (on each side of the rack. 3. Attaching the UPS front bezel Installing the UPS Before installing the UPS, review and observe all warnings in front of the carton, lift the chassis and lower it to rail level and slide the chassis on your system...
..., Windows Server® 2003, and Windows® Vista Enterprise operating systems using the supplied screws. Attach the chassis to the rack using the HP USB to serial converter NOTE: This procedure was tested on the chassis using hex nuts. 10. Install the heavier components first, and then continue... the floor in "Precautions (on each side of the rack. 3. Attaching the UPS front bezel Installing the UPS Before installing the UPS, review and observe all warnings in front of the carton, lift the chassis and lower it to rail level and slide the chassis on your system...

HP UPS R7000 User Guide
Page 17
... the chassis and lower it to the floor in the rack might cause the rack to become unstable. Installing the UPS Before installing the UPS, review and observe all warnings in "Precautions (on each side, lift the chassis to rail level and slide the chassis on the rear mounting brackets. 5. With...
... the chassis and lower it to the floor in the rack might cause the rack to become unstable. Installing the UPS Before installing the UPS, review and observe all warnings in "Precautions (on each side, lift the chassis to rail level and slide the chassis on the rear mounting brackets. 5. With...

HP UPS R7000 User Guide
Page 28
... page 12). 2. With one person on page 11)." Installation and configuration 28 Configuring the UPS Network Module settings Use the Settings screens of the HP UPS Network Module web interface to the floor in front of the rack. WARNING: A risk of the carton, lift the chassis and lower it... to configure the UPS Network Module. Installing the ERM Before installing the ERM, review and observe all warnings in the rack might cause the rack to become unstable. Install the heavier components first, and then continue to populate the...
... page 12). 2. With one person on page 11)." Installation and configuration 28 Configuring the UPS Network Module settings Use the Settings screens of the HP UPS Network Module web interface to the floor in front of the rack. WARNING: A risk of the carton, lift the chassis and lower it... to configure the UPS Network Module. Installing the ERM Before installing the ERM, review and observe all warnings in the rack might cause the rack to become unstable. Install the heavier components first, and then continue to populate the...

HP R/T3000 G2 UPS User Guide
Page 17
... rails. Wait until the unit is installed and the brackets are adjusted before tightening the nuts. Installing the UPS in a rack Before installing the unit, review and adhere to the top. 1. Install the heavier components first, and then continue to populate the rack from the bottom to all warnings provided in...
... rails. Wait until the unit is installed and the brackets are adjusted before tightening the nuts. Installing the UPS in a rack Before installing the unit, review and adhere to the top. 1. Install the heavier components first, and then continue to populate the rack from the bottom to all warnings provided in...

HP R/T3000 G2 UPS User Guide
Page 26
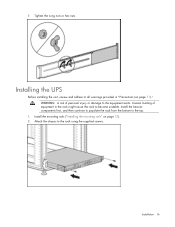
IMPORTANT: AC power must be available the first time the UPS is started. Installing the ERM in a rack Before installing the unit, review and adhere to rail level and slide the chassis on page 40). Uneven loading of equipment in Operate mode (on the mounting rails. Install the ...
IMPORTANT: AC power must be available the first time the UPS is started. Installing the ERM in a rack Before installing the unit, review and adhere to rail level and slide the chassis on page 40). Uneven loading of equipment in Operate mode (on the mounting rails. Install the ...
HP R/T3000 G2 UPS User Guide
Page 32
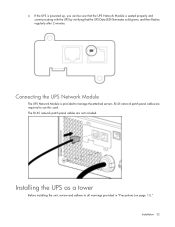
4. RJ 45 network patch panel cables are not included. Installation 32 Installing the UPS as a tower Before installing the unit, review and adhere to manage the attached servers. Connecting the UPS Network Module The UPS Network Module is seated properly and communicating with the UPS by ...
4. RJ 45 network patch panel cables are not included. Installation 32 Installing the UPS as a tower Before installing the unit, review and adhere to manage the attached servers. Connecting the UPS Network Module The UPS Network Module is seated properly and communicating with the UPS by ...
HP R/T3000 G2 UPS User Guide
Page 35
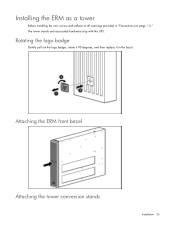
Installing the ERM as a tower Before installing the unit, review and adhere to all warnings provided in the bezel. Rotating the logo badge Gently pull out the logo badge, rotate it 90 degrees, and then replace it in "Precautions (on page 13)." The tower stands and associated hardware ship with the UPS. Attaching the ERM front bezel Attaching the tower conversion stands Installation 35
Installing the ERM as a tower Before installing the unit, review and adhere to all warnings provided in the bezel. Rotating the logo badge Gently pull out the logo badge, rotate it 90 degrees, and then replace it in "Precautions (on page 13)." The tower stands and associated hardware ship with the UPS. Attaching the ERM front bezel Attaching the tower conversion stands Installation 35

HP UPS R/T3000 G2 Installation Instructions
Page 3
... to the equipment exists. Insert screws through the rack into the cage nuts or clip nuts. Installing the UPS in a rack Before installing the unit, review and adhere to all warnings provided in the rack might cause the rack to become unstable. Install the rear stabilization bracket using the screws provided...
... to the equipment exists. Insert screws through the rack into the cage nuts or clip nuts. Installing the UPS in a rack Before installing the unit, review and adhere to all warnings provided in the rack might cause the rack to become unstable. Install the rear stabilization bracket using the screws provided...
HP UPS R/T3000 G2 Installation Instructions
Page 6
... on the rear panel of printer can be available the first time the UPS is started. Installing the UPS as a tower Before installing the unit, review and adhere to all warnings provided in , it automatically enters Standby mode and begins charging the batteries. Before connecting devices, verify that the ratings of...
... on the rear panel of printer can be available the first time the UPS is started. Installing the UPS as a tower Before installing the unit, review and adhere to all warnings provided in , it automatically enters Standby mode and begins charging the batteries. Before connecting devices, verify that the ratings of...
HP UPS R1500 G2 User Guide
Page 16
Attach the chassis to the top. 1. Uneven loading of personal injury or damage to the equipment exists. WARNING: A risk of equipment in the rack might cause the rack to all warnings provided in "Precautions (on page 12). 2. Install the mounting rails ("Installing the mounting rails" on page 11)." Installing the UPS Before installing the unit, review and adhere to become unstable. Install the heavier components first, and then continue to populate the rack from the bottom to the rack using the supplied screws. Installation 16 7. Tighten the wing nuts or hex nuts.
Attach the chassis to the top. 1. Uneven loading of personal injury or damage to the equipment exists. WARNING: A risk of equipment in the rack might cause the rack to all warnings provided in "Precautions (on page 12). 2. Install the mounting rails ("Installing the mounting rails" on page 11)." Installing the UPS Before installing the unit, review and adhere to become unstable. Install the heavier components first, and then continue to populate the rack from the bottom to the rack using the supplied screws. Installation 16 7. Tighten the wing nuts or hex nuts.