

Product Notices
Page 31
... and financial savings of the power management feature can increase power consumption. The power management feature enables the computer to initiate a low-power or "sleep" mode after 30 minutes of user inactivity ENERGY STAR-qualified computers exit the low power sleep mode and ENERGY STAR-qualified displays resume operation when the user resumes use the default power management settings that enables additional display features and functions. HP REACH EО...
... and financial savings of the power management feature can increase power consumption. The power management feature enables the computer to initiate a low-power or "sleep" mode after 30 minutes of user inactivity ENERGY STAR-qualified computers exit the low power sleep mode and ENERGY STAR-qualified displays resume operation when the user resumes use the default power management settings that enables additional display features and functions. HP REACH EО...
User Guide
Page 5
... the monitor stand ...6 Mounting the monitor head ...7 Removing the monitor stand 7 Attaching the monitor head to a mounting device 8 Video connection combinations ...9 Connecting the cables ...10 Connecting USB devices ...15 Adjusting the monitor ...16 Turning on the monitor ...17 HP watermark and image retention policy 17 Installing a security cable ...18 2 Using the monitor ...19 Downloading software and utilities ...19 HP Device Bridge ...19 The Information file ...19 The Image Color Matching file ...19 Using the OSD menu ...20 Using the function buttons ...21 Selecting the input source...
... the monitor stand ...6 Mounting the monitor head ...7 Removing the monitor stand 7 Attaching the monitor head to a mounting device 8 Video connection combinations ...9 Connecting the cables ...10 Connecting USB devices ...15 Adjusting the monitor ...16 Turning on the monitor ...17 HP watermark and image retention policy 17 Installing a security cable ...18 2 Using the monitor ...19 Downloading software and utilities ...19 HP Device Bridge ...19 The Information file ...19 The Image Color Matching file ...19 Using the OSD menu ...20 Using the function buttons ...21 Selecting the input source...
User Guide
Page 6
... ...27 Adjusting blue light output ...27 Using Auto-Sleep Mode ...27 Changing the Power Mode setting ...28 Using PbP ...28 3 Support and troubleshooting ...30 Solving common issues ...30 Button lockouts ...31 Contacting support ...31 Preparing to call technical support ...31 Locating the serial number and product number 32 4 Maintaining the monitor ...33 Maintenance guidelines ...33 Cleaning the monitor ...33 Shipping the monitor ...34 Appendix A Technical specifications ...35 110.24 cm (43.4 in) model specifications ...35 Preset display resolutions ...36...
... ...27 Adjusting blue light output ...27 Using Auto-Sleep Mode ...27 Changing the Power Mode setting ...28 Using PbP ...28 3 Support and troubleshooting ...30 Solving common issues ...30 Button lockouts ...31 Contacting support ...31 Preparing to call technical support ...31 Locating the serial number and product number 32 4 Maintaining the monitor ...33 Maintenance guidelines ...33 Cleaning the monitor ...33 Shipping the monitor ...34 Appendix A Technical specifications ...35 110.24 cm (43.4 in) model specifications ...35 Preset display resolutions ...36...
User Guide
Page 9
... cords and cables connected to the equipment: • Plug the power cord into a grounded (earthed) 3-pin outlet. • Disconnect power from the screen. To reduce the risk of electric shock or damage to the monitor so that you use another cord, use with the monitor. Important safety information 1 The Safety & Comfort Guide is suitable for computer users. For information about the correct power cord set to use only a power source and connection...
... cords and cables connected to the equipment: • Plug the power cord into a grounded (earthed) 3-pin outlet. • Disconnect power from the screen. To reduce the risk of electric shock or damage to the monitor so that you use another cord, use with the monitor. Important safety information 1 The Safety & Comfort Guide is suitable for computer users. For information about the correct power cord set to use only a power source and connection...
User Guide
Page 10
... all digital inputs ● VESA® mounting bracket for attaching the monitor to a wall-mount device or swing arm ● Low blue light mode settings to create a more relaxing and less stimulating image ● Energy saver feature to meet requirements for lower resolutions ● Antiglare panel with an LED backlight ● Wide viewing angle to allow viewing from a sitting or standing position, or when moving from side to side ● Integrated HP...
... all digital inputs ● VESA® mounting bracket for attaching the monitor to a wall-mount device or swing arm ● Low blue light mode settings to create a more relaxing and less stimulating image ● Energy saver feature to meet requirements for lower resolutions ● Antiglare panel with an LED backlight ● Wide viewing angle to allow viewing from a sitting or standing position, or when moving from side to side ● Integrated HP...
User Guide
Page 13
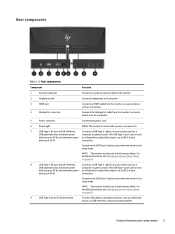
.... 5 Power connector Connects the power cord. 6 Power light White: The monitor is connected to power or powered on. 7 USB Type-C #1 port with DP Alt Mode, Connects a USB Type-C cable to a source device such as a USB upstream data, maximum power computer or game console. For detailed instructions, see Changing the Power Mode setting on page 28. 9 USB Type-A ports (4) (downstream) Connect USB cables to peripheral devices, such as a USB 3.0 data delivery of 45 W connection. NOTE: The monitor must be set to 65 W, and minimum power as a DisplayPort audio/video input...
.... 5 Power connector Connects the power cord. 6 Power light White: The monitor is connected to power or powered on. 7 USB Type-C #1 port with DP Alt Mode, Connects a USB Type-C cable to a source device such as a USB upstream data, maximum power computer or game console. For detailed instructions, see Changing the Power Mode setting on page 28. 9 USB Type-A ports (4) (downstream) Connect USB cables to peripheral devices, such as a USB 3.0 data delivery of 45 W connection. NOTE: The monitor must be set to 65 W, and minimum power as a DisplayPort audio/video input...
User Guide
Page 14
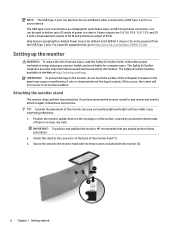
... up the monitor WARNING! Position the monitor upside-down on the top edge on the panel may cause nonuniformity of color or disorientation of foam or a clean, dry cloth. The Safety & Comfort Guide is available on a source device. The USB Type-C port can function as a DisplayPort audio/video input, a USB 3.0 upstream connection, or it again, follow these procedures. 2. If you have removed the monitor stand for computer users. Power outputs...
... up the monitor WARNING! Position the monitor upside-down on the top edge on the panel may cause nonuniformity of color or disorientation of foam or a clean, dry cloth. The Safety & Comfort Guide is available on a source device. The USB Type-C port can function as a DisplayPort audio/video input, a USB 3.0 upstream connection, or it again, follow these procedures. 2. If you have removed the monitor stand for computer users. Power outputs...
User Guide
Page 25
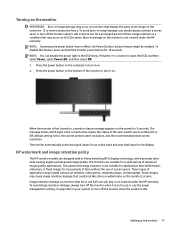
... fixed images for 5 seconds. Press the Menu button to turn off the monitor when it on all LCD screens. This panel technology, however, is not suitable for the display. NOTE: You can disable the power light in damage on the monitor is not covered under the HP warranty. Static images may include camera surveillance, video games, marketing logos, and templates. Turning on the monitor IMPORTANT: Burn-in use the power management setting, if supported...
... fixed images for 5 seconds. Press the Menu button to turn off the monitor when it on all LCD screens. This panel technology, however, is not suitable for the display. NOTE: You can disable the power light in damage on the monitor is not covered under the HP warranty. Static images may include camera surveillance, video games, marketing logos, and templates. Turning on the monitor IMPORTANT: Burn-in use the power management setting, if supported...
User Guide
Page 28
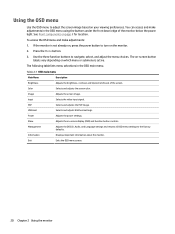
... on, press the power button to adjust the screen image based on your viewing preferences. Adjusts the screen image. Adjusts the power settings. Displays important information about the monitor. Using the OSD menu Use the OSD menu to turn on the monitor. 2. Use the three function buttons to the factory defaults. To access the OSD menu and make adjustments in the OSD main menu. Selects the video input signal. Adjusts the DDC/CI, Audio, and Language settings and returns all OSD menu settings to navigate, select, and adjust the menu choices. Adjusts the on page 4 for...
... on, press the power button to adjust the screen image based on your viewing preferences. Adjusts the screen image. Adjusts the power settings. Displays important information about the monitor. Using the OSD menu Use the OSD menu to turn on the monitor. 2. Use the three function buttons to the factory defaults. To access the OSD menu and make adjustments in the OSD main menu. Selects the video input signal. Adjusts the DDC/CI, Audio, and Language settings and returns all OSD menu settings to navigate, select, and adjust the menu choices. Adjusts the on page 4 for...
User Guide
Page 29
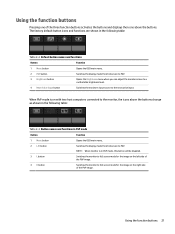
... of the PbP image. Using the function buttons 21 The factory default button icons and functions are shown in the following table: Table 2-3 Button names and functions in PbP mode Button Function 1 Menu button Opens the OSD main menu, 2 L/R button Switches the display mode from full screen to PbP. 3 Brightness button Opens the Brightness menu where you can adjust the monitor screen to a comfortable brightness level. 4 Next Active Input button Switches the monitor's input source to the next active input. NOTE: When monitor is on the...
... of the PbP image. Using the function buttons 21 The factory default button icons and functions are shown in the following table: Table 2-3 Button names and functions in PbP mode Button Function 1 Menu button Opens the OSD main menu, 2 L/R button Switches the display mode from full screen to PbP. 3 Brightness button Opens the Brightness menu where you can adjust the monitor screen to a comfortable brightness level. 4 Next Active Input button Switches the monitor's input source to the next active input. NOTE: When monitor is on the...
User Guide
Page 32
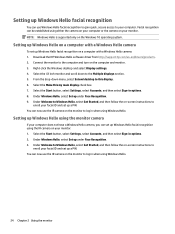
... now use Windows Hello facial recognition to gain quick, secure access to log in when using Windows Hello. 24 Chapter 2 Using the monitor Under Windows Hello, select Set up Windows Hello facial recognition on the Windows 10 operating system. Select the Make this display. 6. Right-click the Windows desktop and select Display settings. 4. Download the HP Windows Hello software driver from http://support.hp.com/us-en/drivers/products. 2. Connect the monitor to the computer and turn...
... now use Windows Hello facial recognition to gain quick, secure access to log in when using Windows Hello. 24 Chapter 2 Using the monitor Under Windows Hello, select Set up Windows Hello facial recognition on the Windows 10 operating system. Select the Make this display. 6. Right-click the Windows desktop and select Display settings. 4. Download the HP Windows Hello software driver from http://support.hp.com/us-en/drivers/products. 2. Connect the monitor to the computer and turn...
User Guide
Page 33
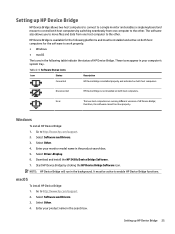
... the status of HP Device Bridge; therefore, the software cannot function properly. Select Software and Drivers. 3. Download and install the HP S430c Device Bridge Software. 7. HP Device Bridge is installed properly and activated on both host computers. Start HP Device Bridge by switching seamlessly from one computer to the other . Setting up HP Device Bridge HP Device Bridge allows two host computers to connect to a single monitor and enables...
... the status of HP Device Bridge; therefore, the software cannot function properly. Select Software and Drivers. 3. Download and install the HP S430c Device Bridge Software. 7. HP Device Bridge is installed properly and activated on both host computers. Start HP Device Bridge by switching seamlessly from one computer to the other . Setting up HP Device Bridge HP Device Bridge allows two host computers to connect to a single monitor and enables...
User Guide
Page 34
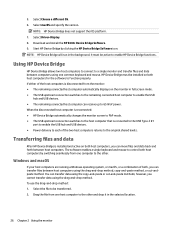
... other . 5. NOTE: HP Device Bridge will run in full screen mode. ● The USB upstream connection switches to the remaining connected host computer to each of power. Select the file to function properly. The software enables a single keyboard and mouse to control both host computers for the software to be installed on both host computers by clicking the HP Device Bridge Software icon. Select Driver-Display. 8.
... other . 5. NOTE: HP Device Bridge will run in full screen mode. ● The USB upstream connection switches to the remaining connected host computer to each of power. Select the file to function properly. The software enables a single keyboard and mouse to control both host computers for the software to be installed on both host computers by clicking the HP Device Bridge Software icon. Select Driver-Display. 8.
User Guide
Page 35
... Windows 1. Select Quit. Adjusting blue light output Decreasing the blue light emitted by default. Press one of the OSD buttons under the front bezel edge of either horizontal or vertical sync signal. Select a setting: ● Low Blue Light: TÜV (Technischer Überwachungsverein, or Technical Inspection Association) certified. Select Back to return to be copied. 2. In the Main menu, select Exit to open the OSD. Auto-Sleep Mode is enabled, the monitor enters a reduced power...
... Windows 1. Select Quit. Adjusting blue light output Decreasing the blue light emitted by default. Press one of the OSD buttons under the front bezel edge of either horizontal or vertical sync signal. Select a setting: ● Low Blue Light: TÜV (Technischer Überwachungsverein, or Technical Inspection Association) certified. Select Back to return to be copied. 2. In the Main menu, select Exit to open the OSD. Auto-Sleep Mode is enabled, the monitor enters a reduced power...
User Guide
Page 36
...) connected to the monitor, press one video input source is On, Automatic. Press the Menu button to activate the buttons. 2. If your display supports Performance mode, then to keep the USB ports enabled even when the monitor is assigned to the USB Type-C #1 port. Select Power, select Power Mode, and then select Performance. 3. For detailed instructions, see Changing the Power Mode setting on the left or right) and which video source is in sleep mode, to Performance mode. In the OSD...
...) connected to the monitor, press one video input source is On, Automatic. Press the Menu button to activate the buttons. 2. If your display supports Performance mode, then to keep the USB ports enabled even when the monitor is assigned to the USB Type-C #1 port. Select Power, select Power Mode, and then select Performance. 3. For detailed instructions, see Changing the Power Mode setting on the left or right) and which video source is in sleep mode, to Performance mode. In the OSD...
User Guide
Page 38
... possible cause of Range" is Video resolution and/or refresh rate displayed on the screen. Connect the video cable properly. are set auto-sleep to Off and manually select the input. The monitor is turned off but the monitor is plugged into sleep mode. Power Button Lockout function. Open the OSD menu and select the Input menu. Open the OSD menu and select Brightness to a supported setting. "OSD Lockout" is disconnected. Power cord is displayed. Video card is displayed on the front bezel for more information. "Check Video Cable" is...
... possible cause of Range" is Video resolution and/or refresh rate displayed on the screen. Connect the video cable properly. are set auto-sleep to Off and manually select the input. The monitor is turned off but the monitor is plugged into sleep mode. Power Button Lockout function. Open the OSD menu and select the Input menu. Open the OSD menu and select Brightness to a supported setting. "OSD Lockout" is disconnected. Power cord is displayed. Video card is displayed on the front bezel for more information. "Check Video Cable" is...
User Guide
Page 39
... computer is connected to contact HP and open . Install HP Device Bridge. Preparing to call technical support If you cannot solve a problem using the troubleshooting tips in sleep mode. Right-click the Windows desktop and check to call : ● Monitor model number ● Monitor serial number ● Purchase date on page 25. For detailed instructions, see if HP Device Bridge is not open a support case. Right-click the Windows desktop and select Display settings. You can...
... computer is connected to contact HP and open . Install HP Device Bridge. Preparing to call technical support If you cannot solve a problem using the troubleshooting tips in sleep mode. Right-click the Windows desktop and check to call : ● Monitor model number ● Monitor serial number ● Purchase date on page 25. For detailed instructions, see if HP Device Bridge is not open a support case. Right-click the Windows desktop and select Display settings. You can...
User Guide
Page 41
... authorized HP dealer, reseller, or service provider. ● Use only a power source and connection appropriate for each device. ● Install the monitor near an outlet that the total ampere rating of the products connected to service this product yourself. Disconnect any volatile substance to clean the monitor screen or cabinet. For more difficult cleaning situations, use a 50/50 mix of the monitor: ● Do not open the monitor cabinet...
... authorized HP dealer, reseller, or service provider. ● Use only a power source and connection appropriate for each device. ● Install the monitor near an outlet that the total ampere rating of the products connected to service this product yourself. Disconnect any volatile substance to clean the monitor screen or cabinet. For more difficult cleaning situations, use a 50/50 mix of the monitor: ● Do not open the monitor cabinet...
User Guide
Page 44
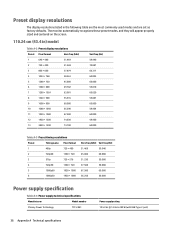
...monitor automatically recognizes these preset modes, and they will appear properly sized and centered on the screen. 110.24 cm (43.4 in the following table are the most commonly used modes and are set as factory defaults. Preset display resolutions The display resolutions listed in ) model Table A-2 Preset display resolutions Preset Pixel ... 56.250 50.000 Power supply specification Table A-4 Power supply technical specifications Manufacturer Model number Chicony Power Technology TPC-CA61 Power supply rating 19.5 V dc @ 14.36 A-280 W (with USB Type-C port) 36 Appendix A Technical...
...monitor automatically recognizes these preset modes, and they will appear properly sized and centered on the screen. 110.24 cm (43.4 in the following table are the most commonly used modes and are set as factory defaults. Preset display resolutions The display resolutions listed in ) model Table A-2 Preset display resolutions Preset Pixel ... 56.250 50.000 Power supply specification Table A-4 Power supply technical specifications Manufacturer Model number Chicony Power Technology TPC-CA61 Power supply rating 19.5 V dc @ 14.36 A-280 W (with USB Type-C port) 36 Appendix A Technical...
User Guide
Page 45
Upon detecting the absence of either the horizontal sync signal or the vertical sync signal. When the monitor is turned off, and the power light turns amber. Energy saver feature The monitor supports a reduced power state. The reduced power state is initiated if the monitor detects the absence of these signals, the monitor screen is blanked, the backlight is in the reduced power state, the monitor uses
Upon detecting the absence of either the horizontal sync signal or the vertical sync signal. When the monitor is turned off, and the power light turns amber. Energy saver feature The monitor supports a reduced power state. The reduced power state is initiated if the monitor detects the absence of these signals, the monitor screen is blanked, the backlight is in the reduced power state, the monitor uses


