
User Guide
Page 5
...monitor ...19 Downloading software and utilities ...19 HP Device Bridge ...19 The Information file ...19 The Image Color Matching file ...19 Using the OSD menu ...20 Using the function buttons ...21 Selecting the input source ...22 Using the camera ...23 Setting up Windows Hello facial recognition ......24 Setting up Windows Hello on a computer with a Windows Hello camera 24 Setting up Windows Hello using the monitor camera 24 Setting up HP Device Bridge ...25 Windows ...25 macOS ...25 ...
...monitor ...19 Downloading software and utilities ...19 HP Device Bridge ...19 The Information file ...19 The Image Color Matching file ...19 Using the OSD menu ...20 Using the function buttons ...21 Selecting the input source ...22 Using the camera ...23 Setting up Windows Hello facial recognition ......24 Setting up Windows Hello on a computer with a Windows Hello camera 24 Setting up Windows Hello using the monitor camera 24 Setting up HP Device Bridge ...25 Windows ...25 macOS ...25 ...
User Guide
Page 10
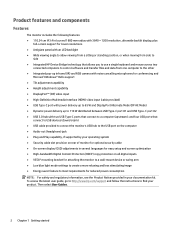
...; Wide viewing angle to allow viewing from a sitting or standing position, or when moving from side to side ● Integrated HP Device Bridge technology that allows you to use a single keyboard and mouse across two connected computers to control software and transfer files and... data from one computer to the other ● Integrated pop-up infrared (IR) and RGB camera with noise cancelling microphones for conferencing and Microsoft Windows® Hello support ● Tilt adjustment capability ● Height adjustment capability ● ...
...; Wide viewing angle to allow viewing from a sitting or standing position, or when moving from side to side ● Integrated HP Device Bridge technology that allows you to use a single keyboard and mouse across two connected computers to control software and transfer files and... data from one computer to the other ● Integrated pop-up infrared (IR) and RGB camera with noise cancelling microphones for conferencing and Microsoft Windows® Hello support ● Tilt adjustment capability ● Height adjustment capability ● ...

User Guide
Page 11
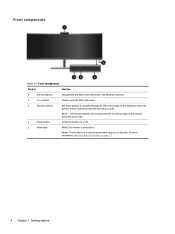
Product features and components 3 Webcam components Table 1-1 Webcam components and their descriptions Component Description 1 Microphones Noise-cancelling microphones. 2 IR transmitters Illuminate objects with IR light. 3 Webcam light On: The webcam is in use. 4 RGB camera Transmits your image in a video conference. 5 IR camera Transmits IR image for Windows Hello.
Product features and components 3 Webcam components Table 1-1 Webcam components and their descriptions Component Description 1 Microphones Noise-cancelling microphones. 2 IR transmitters Illuminate objects with IR light. 3 Webcam light On: The webcam is in use. 4 RGB camera Transmits your image in a video conference. 5 IR camera Transmits IR image for Windows Hello.
User Guide
Page 12
... buttons that are located under the front bezel edge of inactivity. Front components Table 1-2 Front components Control Function 1 Pop-up webcam Integrated IR and RGB camera and noise-cancelling microphones. 2 Menu button Press to open .
... buttons that are located under the front bezel edge of inactivity. Front components Table 1-2 Front components Control Function 1 Pop-up webcam Integrated IR and RGB camera and noise-cancelling microphones. 2 Menu button Press to open .
User Guide
Page 25
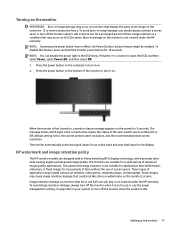
.... To avoid image retention damage, always turn off the monitor when the system is idle. default setting is not covered under the HP warranty. NOTE: If pressing the power button has no effect, the Power Button Lockout feature might be in use 24 hours per ...screen. The monitor automatically scans the signal inputs for an active input and uses that input for 5 seconds. These types of applications may include camera surveillance, video games, marketing logos, and templates. NOTE: You can disable the power light in image damage, you should always activate a screen...
.... To avoid image retention damage, always turn off the monitor when the system is idle. default setting is not covered under the HP warranty. NOTE: If pressing the power button has no effect, the Power Button Lockout feature might be in use 24 hours per ...screen. The monitor automatically scans the signal inputs for an active input and uses that input for 5 seconds. These types of applications may include camera surveillance, video games, marketing logos, and templates. NOTE: You can disable the power light in image damage, you should always activate a screen...
User Guide
Page 31
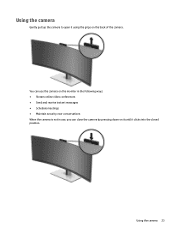
Using the camera 23 Using the camera Gently pull up the camera to open it clicks into the closed position. You can use the camera on the monitor in the following ways: ● Stream online video conferences ● Send and receive instant messages ● Schedule meetings ● Maintain security over conversations When the camera is not in use, you can close the camera by pressing down on it until it using the grips on the back of the camera.
Using the camera 23 Using the camera Gently pull up the camera to open it clicks into the closed position. You can use the camera on the monitor in the following ways: ● Stream online video conferences ● Send and receive instant messages ● Schedule meetings ● Maintain security over conversations When the camera is not in use, you can close the camera by pressing down on it until it using the grips on the back of the camera.
User Guide
Page 32
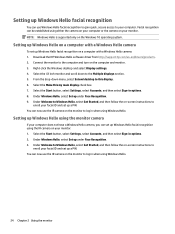
... can now use the IR camera on your monitor. Under Welcome to Windows Hello, select Get Started, and then follow the on-screen instructions to enroll your facial ID and set up Windows Hello facial recognition on the computer and monitor. 3. Download the HP Windows Hello software driver from ...under Face Recognition. 9. Select the 43 inch monitor and scroll down menu, select Extend desktop to log in when using either the camera on your computer or the camera on the monitor to this my main display check box. 7. Select the Start button, select Settings, select Accounts, and then ...
... can now use the IR camera on your monitor. Under Welcome to Windows Hello, select Get Started, and then follow the on-screen instructions to enroll your facial ID and set up Windows Hello facial recognition on the computer and monitor. 3. Download the HP Windows Hello software driver from ...under Face Recognition. 9. Select the 43 inch monitor and scroll down menu, select Extend desktop to log in when using either the camera on your computer or the camera on the monitor to this my main display check box. 7. Select the Start button, select Settings, select Accounts, and then ...
User Guide
Page 38
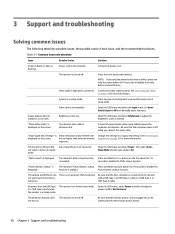
... button for 10 seconds to adjust the brightness scale as needed. The monitor is enabled. Press and hold the power button for more information. The camera and USB ports do There is displayed on . No power from the USB Type- The monitor is turned off . The desktop computer does The monitor...
... button for 10 seconds to adjust the brightness scale as needed. The monitor is enabled. Press and hold the power button for more information. The camera and USB ports do There is displayed on . No power from the USB Type- The monitor is turned off . The desktop computer does The monitor...
