Limited Warranty and Support Guide
Page 10
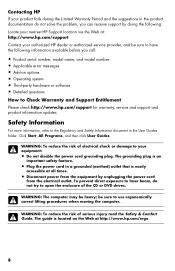
... name, and model number • Applicable error messages • Add-on the Web at http://www.hp.com/ergo 8 WARNING: To reduce the risk of the CD or DVD drives. Safety Information For more information, refer to use ergonomically correct lifting procedures when moving the computer. The grounding...service provider, and be sure to have the following information available before you can receive support by doing the following: Locate your nearest HP Support location via the Web at all times. • Disconnect power from the equipment by unplugging the power cord from the electrical outlet...
... name, and model number • Applicable error messages • Add-on the Web at http://www.hp.com/ergo 8 WARNING: To reduce the risk of the CD or DVD drives. Safety Information For more information, refer to use ergonomically correct lifting procedures when moving the computer. The grounding...service provider, and be sure to have the following information available before you can receive support by doing the following: Locate your nearest HP Support location via the Web at all times. • Disconnect power from the equipment by unplugging the power cord from the electrical outlet...

Limited Warranty and Support Guide - Refurbished
Page 13
Click the Start button, All Programs, and then click User Guides. be heavy; WARNING: To reduce the risk of the CD or DVD drives. WARNING: To reduce the risk of electrical shock or damage to open the enclosure of serious injury read the Safety & Comfort Guide. WARNING: The...Safety Information For more information, refer to the Regulatory and Safety Information document in a grounded (earthed) outlet that is easily accessible at http://www.hp.com/ergo 11 The grounding plug is located on the Web at all times. • Disconnect power from the equipment by unplugging the power cord...
Click the Start button, All Programs, and then click User Guides. be heavy; WARNING: To reduce the risk of the CD or DVD drives. WARNING: To reduce the risk of electrical shock or damage to open the enclosure of serious injury read the Safety & Comfort Guide. WARNING: The...Safety Information For more information, refer to the Regulatory and Safety Information document in a grounded (earthed) outlet that is easily accessible at http://www.hp.com/ergo 11 The grounding plug is located on the Web at all times. • Disconnect power from the equipment by unplugging the power cord...

Upgrading and Servicing
Page 1
Removing and Replacing a CD/DVD Drive ........2 Removing the CD/DVD Drive 2 Installing a New CD/DVD Drive 4 Removing and Replacing a Hard Disk Drive .....8 Removing the Hard Disk Drive 8 Installing a New Hard Disk Drive 10 Upgrading or Replacing Memory 14 Removing the Memory 14 Installing a New Memory Card 18 Troubleshooting 22 Removing and Replacing a Computer Stand ..24 Removing the Stand 24 Installing a New Stand 25 UPGRADING AND SERVICING GUIDE HP TouchSmart310 Computer features may vary by model.
Removing and Replacing a CD/DVD Drive ........2 Removing the CD/DVD Drive 2 Installing a New CD/DVD Drive 4 Removing and Replacing a Hard Disk Drive .....8 Removing the Hard Disk Drive 8 Installing a New Hard Disk Drive 10 Upgrading or Replacing Memory 14 Removing the Memory 14 Installing a New Memory Card 18 Troubleshooting 22 Removing and Replacing a Computer Stand ..24 Removing the Stand 24 Installing a New Stand 25 UPGRADING AND SERVICING GUIDE HP TouchSmart310 Computer features may vary by model.

Upgrading and Servicing
Page 3
... any internal parts or electronic components. You might damage your computer or be injured by model. Removing and replacing a CD-DVD drive HP TouchSmart310 Computer features may vary by the spinning fan blades. Avoid touching sharp edge inside the computer. Do not bang... Phillips screwdriver #1 Small screws are easily lost. Remove screws over a surface that allows you to shock impact. IMPORTANT: A CD/DVD drive is applied. CAUTION: Static electricity can damage the electronic components inside the computer. Keep your hands away from the moving fan. &#...
... any internal parts or electronic components. You might damage your computer or be injured by model. Removing and replacing a CD-DVD drive HP TouchSmart310 Computer features may vary by the spinning fan blades. Avoid touching sharp edge inside the computer. Do not bang... Phillips screwdriver #1 Small screws are easily lost. Remove screws over a surface that allows you to shock impact. IMPORTANT: A CD/DVD drive is applied. CAUTION: Static electricity can damage the electronic components inside the computer. Keep your hands away from the moving fan. &#...

Upgrading and Servicing
Page 4
Removing and Replacing a CD/DVD Drive Removing and Replacing a CD/DVD Drive 10 - 15 minutes Removing the CD/DVD Drive 1 Remove items such as CDs, DVDs, and USB storage devices from the computer. 2 Close all open programs and shut down your operating system. 3 Unplug the computer by disconnecting the power cord ... the computer. 5 Lay the computer down on a flat surface, covered with a soft cloth to protect the screen from scratches or other damage. 6 Locate the CD/DVD drive on the side of the computer. 4 Unplug all attached cables from the back of the computer. 2 628371-001 -
Removing and Replacing a CD/DVD Drive Removing and Replacing a CD/DVD Drive 10 - 15 minutes Removing the CD/DVD Drive 1 Remove items such as CDs, DVDs, and USB storage devices from the computer. 2 Close all open programs and shut down your operating system. 3 Unplug the computer by disconnecting the power cord ... the computer. 5 Lay the computer down on a flat surface, covered with a soft cloth to protect the screen from scratches or other damage. 6 Locate the CD/DVD drive on the side of the computer. 4 Unplug all attached cables from the back of the computer. 2 628371-001 -

Upgrading and Servicing
Page 5
Removing and Replacing a CD/DVD Drive 3 Touching the CD/DVD drive could damage it is exposed. CAUTION: Be sure to gently push out the CD/DVD tray. 8 Loosen the two captive screws on the CD/DVD tray with a #1 Phillips screwdriver. 10 Remove the CD/DVD drive tray from the computer. 7 Insert the tip of a large paper clip into the hole on the CD/DVD drive bezel to release the CD-DVD drive tray. 9 Insert a flathead screwdriver into the slot to push out the entire CD/DVD drive tray. Do not pull out the CD/ DVD drive so that it . 628371-001 -
Removing and Replacing a CD/DVD Drive 3 Touching the CD/DVD drive could damage it is exposed. CAUTION: Be sure to gently push out the CD/DVD tray. 8 Loosen the two captive screws on the CD/DVD tray with a #1 Phillips screwdriver. 10 Remove the CD/DVD drive tray from the computer. 7 Insert the tip of a large paper clip into the hole on the CD/DVD drive bezel to release the CD-DVD drive tray. 9 Insert a flathead screwdriver into the slot to push out the entire CD/DVD drive tray. Do not pull out the CD/ DVD drive so that it . 628371-001 -

Upgrading and Servicing
Page 6
... bracket and the screws. Removing and Replacing a CD/DVD Drive Installing a New CD/DVD Drive NOTE: The replacement CD/DVD drive may not look exactly the same as the original drive due to the new CD/DVD drive. 4 628371-001 - You will fasten the CD/DVD bracket to different manufacturers or models. Hewlett-Packard always ... Remove the bracket on one bracket the side of the CD/DVD drive. 3 Align the screw holes on the bracket with the screw holes on the CD/DVD drive. 12 Remove the bracket from the second side of the CD/DVD tray. Save the bracket and the screws. 2 Replace one ...
... bracket and the screws. Removing and Replacing a CD/DVD Drive Installing a New CD/DVD Drive NOTE: The replacement CD/DVD drive may not look exactly the same as the original drive due to the new CD/DVD drive. 4 628371-001 - You will fasten the CD/DVD bracket to different manufacturers or models. Hewlett-Packard always ... Remove the bracket on one bracket the side of the CD/DVD drive. 3 Align the screw holes on the bracket with the screw holes on the CD/DVD drive. 12 Remove the bracket from the second side of the CD/DVD tray. Save the bracket and the screws. 2 Replace one ...

Upgrading and Servicing
Page 7
4 Replace the second bracket on the other side of the CD/DVD drive. 7 Insert a flathead screwdriver into the slot to push the CD/DVD drive in further. 5 Align the screw holes on the bracket with the screw holes on the drive and replace the two screws. 8 Tighten the two captive screws. 6 Slide the CD/DVD drive assembly partially into the computer. 9 Push the CD/DVD drive all the way in until the bezel on the tray is flush with the side of the computer. 628371-001 - Removing and Replacing a CD/DVD Drive 5
4 Replace the second bracket on the other side of the CD/DVD drive. 7 Insert a flathead screwdriver into the slot to push the CD/DVD drive in further. 5 Align the screw holes on the bracket with the screw holes on the drive and replace the two screws. 8 Tighten the two captive screws. 6 Slide the CD/DVD drive assembly partially into the computer. 9 Push the CD/DVD drive all the way in until the bezel on the tray is flush with the side of the computer. 628371-001 - Removing and Replacing a CD/DVD Drive 5

Upgrading and Servicing
Page 8
Removing and Replacing a CD/DVD Drive 10 Place the computer in an upright position. 12 Plug the power cord into the back of the computer. 11 Reconnect all the cables. 13 Press the power button to turn on the computer. 6 628371-001 -
Removing and Replacing a CD/DVD Drive 10 Place the computer in an upright position. 12 Plug the power cord into the back of the computer. 11 Reconnect all the cables. 13 Press the power button to turn on the computer. 6 628371-001 -

Upgrading and Servicing
Page 10
Removing and Replacing a Hard Disk Drive 15-20 MINUTES Removing the Hard Disk Drive 1 Remove items such as CDs, DVDs, and USB storage devices from the computer. 2 Close all open programs and shut down your operating system. 3 Unplug the computer by disconnecting the power cord ... to remove the screw at the back of the computer that attaches the stand cover to the stand. 8 628371-001 - Removing and Replacing a Hard Disk Drive
Removing and Replacing a Hard Disk Drive 15-20 MINUTES Removing the Hard Disk Drive 1 Remove items such as CDs, DVDs, and USB storage devices from the computer. 2 Close all open programs and shut down your operating system. 3 Unplug the computer by disconnecting the power cord ... to remove the screw at the back of the computer that attaches the stand cover to the stand. 8 628371-001 - Removing and Replacing a Hard Disk Drive

Upgrading and Servicing
Page 17
Upgrading or Replacing Memory 15 7 Lift the bottom edges of the stand cover to remove it from the stand. 9 Lift the stand to remove it from the computer. 8 Remove the four screws that attach the stand to the back of the computer, using a flathead or Torx screwdriver. 10 Insert a large paper clip into the hole on the CD/DVD drive cover to release the CD/DVD drive tray. 11 Pull the CD/DVD drive tray out slightly and use a #1 Phillips screwdriver to loosen the two captive screws. 628371-001 -
Upgrading or Replacing Memory 15 7 Lift the bottom edges of the stand cover to remove it from the stand. 9 Lift the stand to remove it from the computer. 8 Remove the four screws that attach the stand to the back of the computer, using a flathead or Torx screwdriver. 10 Insert a large paper clip into the hole on the CD/DVD drive cover to release the CD/DVD drive tray. 11 Pull the CD/DVD drive tray out slightly and use a #1 Phillips screwdriver to loosen the two captive screws. 628371-001 -

Upgrading and Servicing
Page 18
Upgrading or Replacing Memory Touching the CD/DVD drive could damage it is exposed. Do not pull out the CD/ DVD drive so that it . 16 Remove the back cover. 16 628371-001 - 12 Insert a flathead screwdriver into the slot to gently push out the CD/DVD tray. 14 Remove the four screws from the back cover. 13 Remove the CD/DVD drive tray from the computer. 15 Insert your fingers into the CD/DVD Drive slot to push out the entire CD/DVD drive tray. CAUTION: Be sure to lift the back cover off the computer.
Upgrading or Replacing Memory Touching the CD/DVD drive could damage it is exposed. Do not pull out the CD/ DVD drive so that it . 16 Remove the back cover. 16 628371-001 - 12 Insert a flathead screwdriver into the slot to gently push out the CD/DVD tray. 14 Remove the four screws from the back cover. 13 Remove the CD/DVD drive tray from the computer. 15 Insert your fingers into the CD/DVD Drive slot to push out the entire CD/DVD drive tray. CAUTION: Be sure to lift the back cover off the computer.

Upgrading and Servicing
Page 22
10 Replace the stand. 13 Tighten the screw that secures the stand cover to the back of the computer. 11 Use a flathead or Torx screwdriver to replace the four screws on the stand. 14 Slide the CD/DVD drive assembly partially into the computer. 12 Replace the stand cover on the stand at the back of the computer. 15 Insert a flathead screwdriver into the slot to push the CD/DVD drive in further. 20 628371-001 - Upgrading or Replacing Memory
10 Replace the stand. 13 Tighten the screw that secures the stand cover to the back of the computer. 11 Use a flathead or Torx screwdriver to replace the four screws on the stand. 14 Slide the CD/DVD drive assembly partially into the computer. 12 Replace the stand cover on the stand at the back of the computer. 15 Insert a flathead screwdriver into the slot to push the CD/DVD drive in further. 20 628371-001 - Upgrading or Replacing Memory

Upgrading and Servicing
Page 23
Upgrading or Replacing Memory 21 16 Tighten the two captive screws. 19 Reconnect all the cables. 17 Push the CD/DVD drive all the way in until the bezel on the tray is flush with the side of the computer. 20 Plug in the power cord. 18 Place the computer in an upright position. 21 Press the power button to turn on the computer. 628371-001 -
Upgrading or Replacing Memory 21 16 Tighten the two captive screws. 19 Reconnect all the cables. 17 Push the CD/DVD drive all the way in until the bezel on the tray is flush with the side of the computer. 20 Plug in the power cord. 18 Place the computer in an upright position. 21 Press the power button to turn on the computer. 628371-001 -

Getting Started Guide
Page 9
...edition.) b. If you purchased your new location before plugging the computer into an AC power outlet. To reduce the risk of the CD or DVD drives. • The power supply is currently running. (Click Start > Control Panel and double-click System. Connect the television cable or the ...telephone line cord to the surge protection device, and then connect the device to http://www.hp.com/support. a. Open your computer is preset for your computer. WARNING! These can increase the inside temperature, or can be heavy; ...
...edition.) b. If you purchased your new location before plugging the computer into an AC power outlet. To reduce the risk of the CD or DVD drives. • The power supply is currently running. (Click Start > Control Panel and double-click System. Connect the television cable or the ...telephone line cord to the surge protection device, and then connect the device to http://www.hp.com/support. a. Open your computer is preset for your computer. WARNING! These can increase the inside temperature, or can be heavy; ...
Getting Started Guide
Page 12
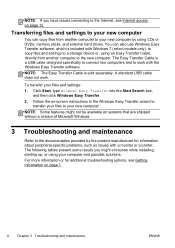
... Windows Easy Transfer software, which is included with a monitor or a printer. Transferring files and settings to the documentation provided by using CDs or DVDs, memory sticks, and external hard drives. Click Start, type Windows Easy Transfer into the Start Search box, and then click Windows Easy Transfer. 2. For more information or for...
... Windows Easy Transfer software, which is included with a monitor or a printer. Transferring files and settings to the documentation provided by using CDs or DVDs, memory sticks, and external hard drives. Click Start, type Windows Easy Transfer into the Start Search box, and then click Windows Easy Transfer. 2. For more information or for...
Getting Started Guide
Page 20
... version of device you use the System Recovery program. Microsoft System Restore If you want to update or rollback. (For example, DVD/CD-ROM drives). 4. Click System protection, System Restore, click Next, and then follow the on -screen instructions. To add restore points manually:...Start. 2. You can also set restore points manually. To start a System Restore: 1. Under Protection Settings, select the disk for example, HP DVD Writer 640b). 5. Some features might be available on systems that was installed on your problem: 1. To update a driver, click Update Driver,...
... version of device you use the System Recovery program. Microsoft System Restore If you want to update or rollback. (For example, DVD/CD-ROM drives). 4. Click System protection, System Restore, click Next, and then follow the on -screen instructions. To add restore points manually:...Start. 2. You can also set restore points manually. To start a System Restore: 1. Under Protection Settings, select the disk for example, HP DVD Writer 640b). 5. Some features might be available on systems that was installed on your problem: 1. To update a driver, click Update Driver,...

Getting Started Guide
Page 27
...be available on your computer at the factory. Back up the boot menu. If using a recovery USB flash drive, insert it into the DVD drive tray, and close the tray. If using recovery DVDs, insert recovery disc #1 into a USB port. 3. If the computer works, click Start, click the Arrow...recovery media for approximately 5 seconds, or until the computer turns off. 4. When the Recovery Manager is working, create a backup DVD or backup USB flash drive containing all recovery media from the system. 12. Create recovery media from the disc. This image contains the operating system and ...
...be available on your computer at the factory. Back up the boot menu. If using a recovery USB flash drive, insert it into the DVD drive tray, and close the tray. If using recovery DVDs, insert recovery disc #1 into a USB port. 3. If the computer works, click Start, click the Arrow...recovery media for approximately 5 seconds, or until the computer turns off. 4. When the Recovery Manager is working, create a backup DVD or backup USB flash drive containing all recovery media from the system. 12. Create recovery media from the disc. This image contains the operating system and ...

Getting Started Guide
Page 7
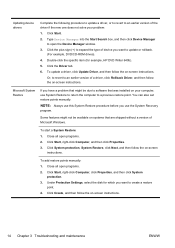
If you purchased your new location before plugging the computer into an AC power outlet. WARNING! WARNING! The power supply is preset for the country/region in which you move, check the voltage requirements for your computer. NOTE: Some features might not be available on systems that are shipped without a version of the CD or DVD drives. Disconnect power from the equipment by unplugging the power cord from the electrical outlet. To prevent direct exposure to a laser beam, do not try to open the enclosure of Microsoft Windows. Getting Started 3 WARNING!
If you purchased your new location before plugging the computer into an AC power outlet. WARNING! WARNING! The power supply is preset for the country/region in which you move, check the voltage requirements for your computer. NOTE: Some features might not be available on systems that are shipped without a version of the CD or DVD drives. Disconnect power from the equipment by unplugging the power cord from the electrical outlet. To prevent direct exposure to a laser beam, do not try to open the enclosure of Microsoft Windows. Getting Started 3 WARNING!

Getting Started Guide
Page 37
...System Recovery from the disc. If you are using recovery media: 1. When the Recovery Manager is powering on either blank DVD discs or a USB flash drive (one set of Microsoft Windows. Create recovery media from the system. 11. If the computer is not responding, press ...a USB port. 3. Or, if the computer is working, create a backup DVD, or backup USB flash drive, containing all recovery discs, or the recovery USB flash drive, from the recovery image stored on your hard disk drive. Disconnect all peripheral devices from the computer. 2. If the Recovery Manager asks ...
...System Recovery from the disc. If you are using recovery media: 1. When the Recovery Manager is powering on either blank DVD discs or a USB flash drive (one set of Microsoft Windows. Create recovery media from the system. 11. If the computer is not responding, press ...a USB port. 3. Or, if the computer is working, create a backup DVD, or backup USB flash drive, containing all recovery discs, or the recovery USB flash drive, from the recovery image stored on your hard disk drive. Disconnect all peripheral devices from the computer. 2. If the Recovery Manager asks ...


