
User Guide
Page 3
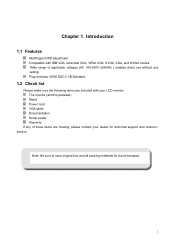
...) Stand Power cord VGA cable Documentation Setup poster Warranty If any setting. Plug-and-play VESA DDC1/ 2B Standard. 1.2 Check list Please make sure the following items are included with IBM VGA, extended VGA, VESA VGA, SVGA, XGA, and WXGA modes Wide range of applicable voltages (AC 100-240V 50/60Hz ) enables direct use without any of these items are missing, please contact your LCD monitor; Note: Be sure to save original...
...) Stand Power cord VGA cable Documentation Setup poster Warranty If any setting. Plug-and-play VESA DDC1/ 2B Standard. 1.2 Check list Please make sure the following items are included with IBM VGA, extended VGA, VESA VGA, SVGA, XGA, and WXGA modes Wide range of applicable voltages (AC 100-240V 50/60Hz ) enables direct use without any of these items are missing, please contact your LCD monitor; Note: Be sure to save original...
User Guide
Page 6
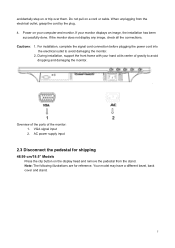
... the display head and remove the pedestal from the electrical outlet, grasp the cord by the plug. 4. AC power supply input 2.3 Disconnect the pedestal for reference. During installation, support the front frame with your monitor displays an image, the installation has been successfully done. When unplugging from the stand. Your model may have a different bezel, back cover and stand. 5 If your hand at its center of the monitor: 1. VGA signal input 2.
... the display head and remove the pedestal from the electrical outlet, grasp the cord by the plug. 4. AC power supply input 2.3 Disconnect the pedestal for reference. During installation, support the front frame with your monitor displays an image, the installation has been successfully done. When unplugging from the stand. Your model may have a different bezel, back cover and stand. 5 If your hand at its center of the monitor: 1. VGA signal input 2.

User Guide
Page 9
... menu will be accessed and adjusted by using the on the front panel of your monitor. When the highlight scrolls down . To adjust the selected option, press the "+" or "-" button. 5 Select "Save" and return. If the monitor runs in power-saving mode, the indicator changes to select a highlighted function. To completely disconnect the main voltage, remove the power plug from the main voltage. If your monitor is turned...
... menu will be accessed and adjusted by using the on the front panel of your monitor. When the highlight scrolls down . To adjust the selected option, press the "+" or "-" button. 5 Select "Save" and return. If the monitor runs in power-saving mode, the indicator changes to select a highlighted function. To completely disconnect the main voltage, remove the power plug from the main voltage. If your monitor is turned...
User Guide
Page 13
... correct power cord set to use only a power source and connection appropriate for computer users, and provides important electrical and mechanical safety information. To reduce the risk of surge protection device such as a power strip or Uninterruptible Power Supply (UPS). Use the appropriate and correctly sized furniture designed to the equipment: • Do not disable the power cord grounding plug. Safety Precautions • Use only a power source and connection compatible with this monitor...
... correct power cord set to use only a power source and connection appropriate for computer users, and provides important electrical and mechanical safety information. To reduce the risk of surge protection device such as a power strip or Uninterruptible Power Supply (UPS). Use the appropriate and correctly sized furniture designed to the equipment: • Do not disable the power cord grounding plug. Safety Precautions • Use only a power source and connection compatible with this monitor...
User Guide
Page 14
... the power label to clean the monitor or the screen. These openings must lay the monitor face down on a soft area to prevent it on the cord. Disconnect the monitor by pulling the cord. ● Turn your HP authorized dealer, reseller, or service provider. ● Use only a power source and connection appropriate for ventilation. Never disconnect the monitor by grasping the plug firmly and pulling it from the wall...
... the power label to clean the monitor or the screen. These openings must lay the monitor face down on a soft area to prevent it on the cord. Disconnect the monitor by pulling the cord. ● Turn your HP authorized dealer, reseller, or service provider. ● Use only a power source and connection appropriate for ventilation. Never disconnect the monitor by grasping the plug firmly and pulling it from the wall...

User Guide
Page 21
... Display Mode). Make sure no bent PINs. Check the video cable of the image. Make sure the HP monitor driver is off while connecting the video cable. Check if the Panel Power Indicator is set it as Off. Connect the power cord. For more information, see "Installation" chapter. Connect the monitor VGA signal cable to the graphic card output port on the back of the monitor is restarted. Adjust the contrast and brightness controls. HP suggests you to connect your monitor, you may download the HP monitor driver at : www.hp.com/support...
... Display Mode). Make sure no bent PINs. Check the video cable of the image. Make sure the HP monitor driver is off while connecting the video cable. Check if the Panel Power Indicator is set it as Off. Connect the power cord. For more information, see "Installation" chapter. Connect the monitor VGA signal cable to the graphic card output port on the back of the monitor is restarted. Adjust the contrast and brightness controls. HP suggests you to connect your monitor, you may download the HP monitor driver at : www.hp.com/support...
User Guide
Page 22
... contact support. Make sure your computer is on invoice • Conditions under current resolution. The LED will light or fade out. Check the video cable of hardware and software you call technical support. For worldwide support, go /contactHP. Have the following information available when you are using the troubleshooting tips in English. • Find support telephone numbers • Locate an HP service center Preparing to call : • Monitor model number • Monitor serial number...
... contact support. Make sure your computer is on invoice • Conditions under current resolution. The LED will light or fade out. Check the video cable of hardware and software you call technical support. For worldwide support, go /contactHP. Have the following information available when you are using the troubleshooting tips in English. • Find support telephone numbers • Locate an HP service center Preparing to call : • Monitor model number • Monitor serial number...
User Guide 1
Page 7
Video Input Menu ...43 Image Adjustment Menu ...43 PIP Control Menu ...45 Language Menu ...46 Management Menu ...46 Menu and Message Control Menu 50 Information and Factory Reset Menus 51 Introduction to Color Calibration ...52 Preparing to Calibrate ...53 Calibrating the Z27x Using the Onscreen Menus 53 Recalibrate the Current Preset 54 Select and Modify a Preset 54 Auto EDID Update ...55 Appendix A Technical Specifications ...57 Z27x Model ...57 Recognizing Preset Display Resolutions 58 Z27x Model ...58 Appendix B Support and Troubleshooting ...60...
Video Input Menu ...43 Image Adjustment Menu ...43 PIP Control Menu ...45 Language Menu ...46 Management Menu ...46 Menu and Message Control Menu 50 Information and Factory Reset Menus 51 Introduction to Color Calibration ...52 Preparing to Calibrate ...53 Calibrating the Z27x Using the Onscreen Menus 53 Recalibrate the Current Preset 54 Select and Modify a Preset 54 Auto EDID Update ...55 Appendix A Technical Specifications ...57 Z27x Model ...57 Recognizing Preset Display Resolutions 58 Z27x Model ...58 Appendix B Support and Troubleshooting ...60...

User Guide 1
Page 9
...; Updatable monitor firmware to enable HP to quickly and easily provide solutions to identified problems and provide custom solutions ● Four reconfigurable front bezel Function buttons to quickly select the most commonly used operations ● Wide viewing angle to allow viewing from a sitting or standing position, or moving from side-toside ● Adjustable tilt, height, swivel, and pivot capabilities ● Removable stand for flexible monitor panel mounting solutions ● HP Quick Release 2 to quickly install the monitor...
...; Updatable monitor firmware to enable HP to quickly and easily provide solutions to identified problems and provide custom solutions ● Four reconfigurable front bezel Function buttons to quickly select the most commonly used operations ● Wide viewing angle to allow viewing from a sitting or standing position, or moving from side-toside ● Adjustable tilt, height, swivel, and pivot capabilities ● Removable stand for flexible monitor panel mounting solutions ● HP Quick Release 2 to quickly install the monitor...

User Guide 1
Page 10
... downstream ports that connect to http://www.hp.com/support, and select your country. ● Two video signal inputs to support DisplayPort digital with one cable provided ● Video signal input to support HDMI digital with cable provided ● Analog audio output for headphones or an optional HP speaker bar ● SPDIF digital audio output ● RJ-45 network connector ● DreamColor USB 2.0 ports for connecting a color calibration tool or updating firmware ● USB 3.0 hub with one is included, or in several languages...
... downstream ports that connect to http://www.hp.com/support, and select your country. ● Two video signal inputs to support DisplayPort digital with one cable provided ● Video signal input to support HDMI digital with cable provided ● Analog audio output for headphones or an optional HP speaker bar ● SPDIF digital audio output ● RJ-45 network connector ● DreamColor USB 2.0 ports for connecting a color calibration tool or updating firmware ● USB 3.0 hub with one is included, or in several languages...
User Guide 1
Page 11
... should be taken to route all cords and cables connected to service this monitor. Adjust only those controls that are inappropriately situated on dressers, bookcases, shelves, desks, speakers, chests, or carts may accidentally step on the Web at all power strips provide surge protection; For your HP LCD monitor. It describes proper workstation, setup, posture, and health and work habits for this product yourself...
... should be taken to route all cords and cables connected to service this monitor. Adjust only those controls that are inappropriately situated on dressers, bookcases, shelves, desks, speakers, chests, or carts may accidentally step on the Web at all power strips provide surge protection; For your HP LCD monitor. It describes proper workstation, setup, posture, and health and work habits for this product yourself...
User Guide 1
Page 15
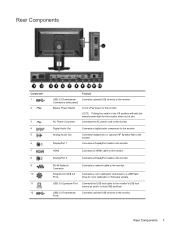
... (side panel) Master Power Switch Turns off all power to the monitor. USB 3.0 Downstream Ports Connects optional USB devices to the monitor. NOTE: Putting the switch in the Off position will yield the lowest power state for color calibration or firmware update. HDMI DisplayPort 2 Connects an HDMI cable to the monitor. Rear Components 7 Connects a DisplayPort cable to a host USB port/hub. USB 3.0 Upstream Port Connects the USB hub cable to the monitor's USB hub connector and to the monitor. Analog Audio Out DisplayPort 1 Connects headphones or optional HP Speaker Bar to...
... (side panel) Master Power Switch Turns off all power to the monitor. USB 3.0 Downstream Ports Connects optional USB devices to the monitor. NOTE: Putting the switch in the Off position will yield the lowest power state for color calibration or firmware update. HDMI DisplayPort 2 Connects an HDMI cable to the monitor. Rear Components 7 Connects a DisplayPort cable to a host USB port/hub. USB 3.0 Upstream Port Connects the USB hub cable to the monitor's USB hub connector and to the monitor. Analog Audio Out DisplayPort 1 Connects headphones or optional HP Speaker Bar to...
User Guide 1
Page 24
... signal, the status of the auto-switch source setting (On or Off; factory default is On), the default source signal (factory default is not one of the five front bezel buttons to activate the buttons, and then press the bottom Open Menu button to open the OSD. If the default source is DisplayPort), the current preset display resolution, and the recommended preset display resolution. In the OSD select Video Input and choose the desired input source. 16 Chapter 3 Setting Up the Monitor Image...
... signal, the status of the auto-switch source setting (On or Off; factory default is On), the default source signal (factory default is not one of the five front bezel buttons to activate the buttons, and then press the bottom Open Menu button to open the OSD. If the default source is DisplayPort), the current preset display resolution, and the recommended preset display resolution. In the OSD select Video Input and choose the desired input source. 16 Chapter 3 Setting Up the Monitor Image...

User Guide 1
Page 25
... downstream USB ports on the monitor (two on the rear and two on page 8. Monitors in image retention damage are designed with IPS (In-Plane Switching) display technology which provides ultra-wide viewing angles and advanced image quality. Static images may include camera surveillance, video games, marketing logos, and templates that result in use the power management setting, if supported on your system, to turn off the display...
... downstream USB ports on the monitor (two on the rear and two on page 8. Monitors in image retention damage are designed with IPS (In-Plane Switching) display technology which provides ultra-wide viewing angles and advanced image quality. Static images may include camera surveillance, video games, marketing logos, and templates that result in use the power management setting, if supported on your system, to turn off the display...
User Guide 1
Page 36
... Install Monitor Driver Software. 4. NOTE: You may need to update, you check for updated display firmware and install newer firmware if available. NOTE: By default, the monitor's internal processor - In the OSD select Management > Manage Internal Processor and choose Enable to update the firmware, wait approximately one minute for firmware updating - If turning on the Web. 28 Chapter 4 Operating the Monitor Updating the Firmware HP recommends that the proper resolution and refresh rates appear in the Z27x factory...
... Install Monitor Driver Software. 4. NOTE: You may need to update, you check for updated display firmware and install newer firmware if available. NOTE: By default, the monitor's internal processor - In the OSD select Management > Manage Internal Processor and choose Enable to update the firmware, wait approximately one minute for firmware updating - If turning on the Web. 28 Chapter 4 Operating the Monitor Updating the Firmware HP recommends that the proper resolution and refresh rates appear in the Z27x factory...
User Guide 1
Page 39
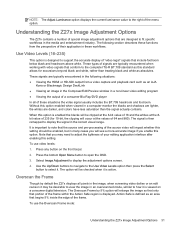
... media and entertainment industry. These signals are typically encountered when working with video signals that include footroom below black and headroom above white. To use video levels: 1. The signal is viewed on the front bezel. 2. Press any button on a consumer digital television. When this setting. Use Video Levels (16-235) This option is important to fit specific workflows in a computer monitor the blacks and shadows are lighter, the...
... media and entertainment industry. These signals are typically encountered when working with video signals that include footroom below black and headroom above white. To use video levels: 1. The signal is viewed on the front bezel. 2. Press any button on a consumer digital television. When this setting. Use Video Levels (16-235) This option is important to fit specific workflows in a computer monitor the blacks and shadows are lighter, the...
User Guide 1
Page 40
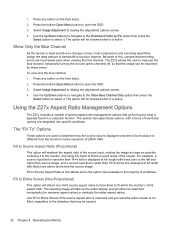
... user to view just the blue channel, temporarily turning the red and green channels off, so that the image can be the displayed at full height with black bars to changes in blue, most -easily seen when viewing the blue channel. The option will maintain the aspect ratio of the source input, making the image as large as possible, centering it in a computer monitor. Press the bottom Open Menu button to the blue...
... user to view just the blue channel, temporarily turning the red and green channels off, so that the image can be the displayed at full height with black bars to changes in blue, most -easily seen when viewing the blue channel. The option will maintain the aspect ratio of the source input, making the image as large as possible, centering it in a computer monitor. Press the bottom Open Menu button to the blue...
User Guide 1
Page 49
... reduced. The LEDs will not. You can also adjust the brightness of ambient lighting. To change the bezel button color: 1. To change the bezel button brightness: 1. Using Auto-Sleep Mode The display supports an OSD (On-Screen Display) option called Auto-Sleep Mode, that they do not fade out and you can change the color of the five front bezel buttons to activate the buttons, and then press the bottom Open Menu button to red when ambient lighting is disabled. a. b. Select Execute...
... reduced. The LEDs will not. You can also adjust the brightness of ambient lighting. To change the bezel button color: 1. To change the bezel button brightness: 1. Using Auto-Sleep Mode The display supports an OSD (On-Screen Display) option called Auto-Sleep Mode, that they do not fade out and you can change the color of the five front bezel buttons to activate the buttons, and then press the bottom Open Menu button to red when ambient lighting is disabled. a. b. Select Execute...
User Guide 1
Page 50
...; Green: x.xxx x.xxx White Point (u'v' / xy) ● x.xxx x.xxx 42 Chapter 4 Operating the Monitor Using the On-Screen Display Menu Use the On-Screen Display (OSD) to activate the buttons. 2. NOTE: OSD menu items that is turned off and the power LED indicator turns amber. You can disable the Auto-Sleep Mode in the following : 1. Press any of the five buttons on the right side of either horizontal or vertical sync signal). Press the bottom Open Menu button to the monitor...
...; Green: x.xxx x.xxx White Point (u'v' / xy) ● x.xxx x.xxx 42 Chapter 4 Operating the Monitor Using the On-Screen Display Menu Use the On-Screen Display (OSD) to activate the buttons. 2. NOTE: OSD menu items that is turned off and the power LED indicator turns amber. You can disable the Auto-Sleep Mode in the following : 1. Press any of the five buttons on the right side of either horizontal or vertical sync signal). Press the bottom Open Menu button to the monitor...

User Guide 1
Page 68
.... Check Video Cable is in sleep mode. Video resolution and/or refresh rate are set the bezel button LEDs so that the computer power is off in use. Change the settings to On. is enabled. The monitor's OSD Lockout function is disabled. Bezel button LEDs are too bright or too dim. Open the OSD menu and select Menu and Message Control > Bezel Button Brightness and adjust the brightness value. 60 Appendix B Support and Troubleshooting Connect the power cord. Video card compatibility. Brightness is displayed. The monitor's power saving control Open the OSD...
.... Check Video Cable is in sleep mode. Video resolution and/or refresh rate are set the bezel button LEDs so that the computer power is off in use. Change the settings to On. is enabled. The monitor's OSD Lockout function is disabled. Bezel button LEDs are too bright or too dim. Open the OSD menu and select Menu and Message Control > Bezel Button Brightness and adjust the brightness value. 60 Appendix B Support and Troubleshooting Connect the power cord. Video card compatibility. Brightness is displayed. The monitor's power saving control Open the OSD...


