
User Guide
Page 3
... IBM VGA, extended VGA, VESA VGA, SVGA, XGA, and WXGA modes Wide range of these items are included with your dealer for future transport. 2 The monitor (and the pedestal) Stand Power cord VGA cable Documentation Setup poster Warranty If any of applicable voltages (AC 100-240V 50/60Hz ) enables direct use...
... IBM VGA, extended VGA, VESA VGA, SVGA, XGA, and WXGA modes Wide range of these items are included with your dealer for future transport. 2 The monitor (and the pedestal) Stand Power cord VGA cable Documentation Setup poster Warranty If any of applicable voltages (AC 100-240V 50/60Hz ) enables direct use...
User Guide
Page 5
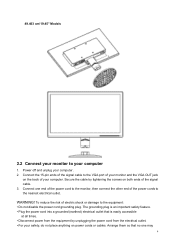
...to the VGA port of your computer. Connect one may 4 To reduce the risk of your monitor and the VGA OUT jack on power cords or cables. The grounding plug is easily accessible at...cord into a grounded (earthed) electrical outlet that no one end of the power cord to the monitor, then connect the other end of the signal cable. 3. Power off and unplug your computer 1. 49....403 cm/19.45" Models 2.2 Connect your monitor to your computer. 2. Secure the cable by unplugging the power cord from the electrical outlet. &#...
...to the VGA port of your computer. Connect one may 4 To reduce the risk of your monitor and the VGA OUT jack on power cords or cables. The grounding plug is easily accessible at...cord into a grounded (earthed) electrical outlet that no one end of the power cord to the monitor, then connect the other end of the signal cable. 3. Power off and unplug your computer 1. 49....403 cm/19.45" Models 2.2 Connect your monitor to your computer. 2. Secure the cable by unplugging the power cord from the electrical outlet. &#...
User Guide
Page 6
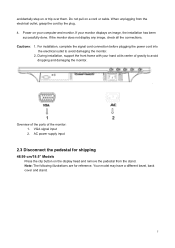
... connection before plugging the power cord into the electrical outlet to avoid dropping and damaging the monitor. 1 2 Overview of the ports of gravity to avoid damaging the monitor. 2. If the monitor does not display any image, check all the connections. When unplugging from the stand. Cautions... on or trip over them. VGA signal input 2. If your computer and monitor. Note: The following illustrations are for shipping 46.99 cm/18.5" Models Press the clip button on your monitor displays an image, the installation has been successfully done. During installation, support ...
... connection before plugging the power cord into the electrical outlet to avoid dropping and damaging the monitor. 1 2 Overview of the ports of gravity to avoid damaging the monitor. 2. If the monitor does not display any image, check all the connections. When unplugging from the stand. Cautions... on or trip over them. VGA signal input 2. If your computer and monitor. Note: The following illustrations are for shipping 46.99 cm/18.5" Models Press the clip button on your monitor displays an image, the installation has been successfully done. During installation, support ...
User Guide
Page 8
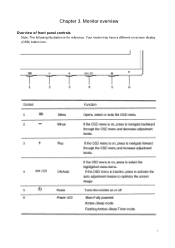
Monitor overview Overview of front panel controls Note: The following illustration is for reference. Chapter 3. Your model may have a different on-screen display (OSD) button icon. 7
Monitor overview Overview of front panel controls Note: The following illustration is for reference. Chapter 3. Your model may have a different on-screen display (OSD) button icon. 7

User Guide
Page 9
.... 4.2 Power indicator The power LED is unlit. 4.3 Menu features The following features of the menu, it on /off , this indicator is blue when the monitor operates normally. Press the "Menu" button to select a highlighted function. The OSD main menu will be accessed and adjusted by using the on the front..." button to turn it returns to power on . 2. To view the main menu or submenu, press the "+" on screen display (menu) system. 1. If the monitor runs in power-saving mode, the indicator changes to save the setting, select "Cancel" from the submenu or "Exit" from the main voltage.
.... 4.2 Power indicator The power LED is unlit. 4.3 Menu features The following features of the menu, it on /off , this indicator is blue when the monitor operates normally. Press the "Menu" button to select a highlighted function. The OSD main menu will be accessed and adjusted by using the on the front..." button to turn it returns to power on . 2. To view the main menu or submenu, press the "+" on screen display (menu) system. 1. If the monitor runs in power-saving mode, the indicator changes to save the setting, select "Cancel" from the submenu or "Exit" from the main voltage.
User Guide
Page 13
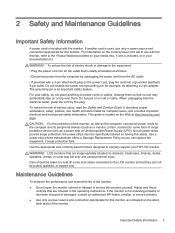
...: • Do not disable the power cord grounding plug. Not all cords and cables connected to the LCD monitor so that is easily accessible at http://www.hp.com/ergo and/or on the correct power cord set to use only a power source and connection appropriate for ... be pulled, grabbed, or tripped over. When unplugging from the electrical outlet. • For your HP LCD monitor. A Safety and Maintenance Guidelines Important Safety Information A power cord is included with the monitor, refer to the "Power Cord Set Requirements" section in Agency Regulatory Notices. To reduce the risk...
...: • Do not disable the power cord grounding plug. Not all cords and cables connected to the LCD monitor so that is easily accessible at http://www.hp.com/ergo and/or on the correct power cord set to use only a power source and connection appropriate for ... be pulled, grabbed, or tripped over. When unplugging from the electrical outlet. • For your HP LCD monitor. A Safety and Maintenance Guidelines Important Safety Information A power cord is included with the monitor, refer to the "Power Cord Set Requirements" section in Agency Regulatory Notices. To reduce the risk...
User Guide
Page 14
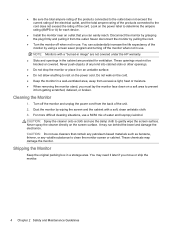
...not allow anything to rest on the cord. ● Keep your monitor near an outlet that are provided for this product yourself. Adjust only those controls that you can substantially increase the life expectancy of your HP authorized dealer, reseller, or service provider. ● Use only a.... Look on the power cord. Disconnect the monitor by using a screen saver program and turning off the monitor when not in use. Never push objects of your monitor: ● Do not open your monitor 1. Note: The HP Warranty does not cover monitors with a burned-in image. ● Slots...
...not allow anything to rest on the cord. ● Keep your monitor near an outlet that are provided for this product yourself. Adjust only those controls that you can substantially increase the life expectancy of your HP authorized dealer, reseller, or service provider. ● Use only a.... Look on the power cord. Disconnect the monitor by using a screen saver program and turning off the monitor when not in use. Never push objects of your monitor: ● Do not open your monitor 1. Note: The HP Warranty does not cover monitors with a burned-in image. ● Slots...

User Guide
Page 15
To prepare the monitor for shipping, refer to Chapter 2, "Disconnect the Pedestal for Shipping." 14 Shipping the monitor Keep the original packing box in a storage area. You may need it later if you move or ship your monitor.
To prepare the monitor for shipping, refer to Chapter 2, "Disconnect the Pedestal for Shipping." 14 Shipping the monitor Keep the original packing box in a storage area. You may need it later if you move or ship your monitor.

User Guide
Page 17
...Standards. • The full Declaration of the Canadian Interference-Causing Equipment Regulations. Ecodesign Directive 2009/125/EC; German Ergonomics Notice HP products which may be found at the following EU Directives as may be found on the regulatory label.) The point of a system ...comprising HP brand computers, keyboards and monitors that bear the "GS" approval mark, meet the applicable ergonomic requirements. EMC Directive 2004/108/EC; RoHS Directive 2011/65...
...Standards. • The full Declaration of the Canadian Interference-Causing Equipment Regulations. Ecodesign Directive 2009/125/EC; German Ergonomics Notice HP products which may be found at the following EU Directives as may be found on the regulatory label.) The point of a system ...comprising HP brand computers, keyboards and monitors that bear the "GS" approval mark, meet the applicable ergonomic requirements. EMC Directive 2004/108/EC; RoHS Directive 2011/65...

User Guide
Page 18
Power Cord Set Requirements The monitor power supply is provided with this product. The voltage and current rating of power cord to use, contact an authorized HP service provider. A power cord should be found at http://www.hp.com/go to be walked on or pinched by specification JIS C 0950, ... a power cord for this product on the product. The power cord must be between 100-120V or 200-240V. This feature allows the monitor to providing our customers with information about recycling programs, go /reach. Japanese Power Cord Requirements For use in Japan, use in that is...
Power Cord Set Requirements The monitor power supply is provided with this product. The voltage and current rating of power cord to use, contact an authorized HP service provider. A power cord should be found at http://www.hp.com/go to be walked on or pinched by specification JIS C 0950, ... a power cord for this product on the product. The power cord must be between 100-120V or 200-240V. This feature allows the monitor to providing our customers with information about recycling programs, go /reach. Japanese Power Cord Requirements For use in Japan, use in that is...

User Guide
Page 21
...the screen Solutions Ensure the Power button is switched on your keyboard or move your computer. Make sure the HP monitor driver is used. Select Image Control. Connect the monitor VGA signal cable to the VGA connector on the panel. Apply the setting supported by your computer. Make sure...have plug-and-play is properly connected to activate the new setting. For other systems, visit the websites for your monitor, you may download the HP monitor driver at : www.hp.com/support. Check the video cable of your mouse to the graphic card output port on the device. You ...
...the screen Solutions Ensure the Power button is switched on your keyboard or move your computer. Make sure the HP monitor driver is used. Select Image Control. Connect the monitor VGA signal cable to the VGA connector on the panel. Apply the setting supported by your computer. Make sure...have plug-and-play is properly connected to activate the new setting. For other systems, visit the websites for your monitor, you may download the HP monitor driver at : www.hp.com/support. Check the video cable of your mouse to the graphic card output port on the device. You ...
User Guide
Page 22
.... The "Sleep Mode" is powered on. Press the Caps Lock key on your keyboard and have a look at http://www.hp.com/support. Note: The monitor user guide, reference material, and drivers are no bent PINs. The LED will light or fade out. Problems Solutions (Continued) ...country/us/en/wwcontact_us.html. Here you may need these numbers when contacting HP about your monitor model. Make sure your monitor is always enabled for the monitor (yellow LED). Make sure the video cable of the monitor. 21 For worldwide support, go /contactHP. Check the video cable of ...
.... The "Sleep Mode" is powered on. Press the Caps Lock key on your keyboard and have a look at http://www.hp.com/support. Note: The monitor user guide, reference material, and drivers are no bent PINs. The LED will light or fade out. Problems Solutions (Continued) ...country/us/en/wwcontact_us.html. Here you may need these numbers when contacting HP about your monitor model. Make sure your monitor is always enabled for the monitor (yellow LED). Make sure the video cable of the monitor. 21 For worldwide support, go /contactHP. Check the video cable of ...

User Guide 1
Page 3
About This Guide This guide provides information on monitor features, setting up the monitor, and technical specifications. NOTE: Text set off in this manner provides important supplemental information. Text set off in this manner indicates that failure to follow directions could result in damage to follow directions could result in this manner indicates that failure to equipment or loss of life. This product incorporates HDMI technology. iii WARNING! CAUTION: Text set off in bodily harm or loss of information.
About This Guide This guide provides information on monitor features, setting up the monitor, and technical specifications. NOTE: Text set off in this manner provides important supplemental information. Text set off in this manner indicates that failure to follow directions could result in damage to follow directions could result in this manner indicates that failure to equipment or loss of life. This product incorporates HDMI technology. iii WARNING! CAUTION: Text set off in bodily harm or loss of information.
User Guide 1
Page 5
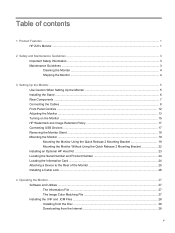
... and Maintenance Guidelines ...3 Important Safety Information ...3 Maintenance Guidelines ...3 Cleaning the Monitor ...4 Shipping the Monitor ...4 3 Setting Up the Monitor ...5 Use Caution When Setting Up the Monitor 5 Installing the Stand ...6 Rear Components ...7 Connecting the Cables ...8 Front Panel Controls ...12 Adjusting the Monitor ...13 Turning on the Monitor ...15 HP Watermark and Image Retention Policy 17 Connecting USB Devices ...17...
... and Maintenance Guidelines ...3 Important Safety Information ...3 Maintenance Guidelines ...3 Cleaning the Monitor ...4 Shipping the Monitor ...4 3 Setting Up the Monitor ...5 Use Caution When Setting Up the Monitor 5 Installing the Stand ...6 Rear Components ...7 Connecting the Cables ...8 Front Panel Controls ...12 Adjusting the Monitor ...13 Turning on the Monitor ...15 HP Watermark and Image Retention Policy 17 Connecting USB Devices ...17...
User Guide 1
Page 6
...-Pixel 38 Next 4K Corner 38 Scroll 4K Region 38 Using Picture-in-Picture (PIP) and Picture-beside-Picture (PBP 38 Using PIP as a Confidence Monitor 39 Use Video Levels (16-235 39 Overscan Within PIP 39 Digital Cinema Options 39 Changing the Bezel Button Functions 39 Changing the Bezel Function...
...-Pixel 38 Next 4K Corner 38 Scroll 4K Region 38 Using Picture-in-Picture (PIP) and Picture-beside-Picture (PBP 38 Using PIP as a Confidence Monitor 39 Use Video Levels (16-235 39 Overscan Within PIP 39 Digital Cinema Options 39 Changing the Bezel Button Functions 39 Changing the Bezel Function...
User Guide 1
Page 7
... Model ...58 Appendix B Support and Troubleshooting ...60 Solving Common Problems ...60 Button Lockouts ...61 Product Support ...62 Preparing to Call Technical Support 62 Appendix C LCD Monitor Quality and Pixel Policy 63 vii
... Model ...58 Appendix B Support and Troubleshooting ...60 Solving Common Problems ...60 Button Lockouts ...61 Product Support ...62 Preparing to Call Technical Support 62 Appendix C LCD Monitor Quality and Pixel Policy 63 vii

User Guide 1
Page 9
...for the Klein K10-A Photo Research PR-6xx, 7xx series, and Konica Minolta CA-310 measurement devices ● Updatable monitor firmware to enable HP to quickly and easily provide solutions to identified problems and provide custom solutions ● Four reconfigurable front bezel Function buttons ...side-toside ● Adjustable tilt, height, swivel, and pivot capabilities ● Removable stand for flexible monitor panel mounting solutions ● HP Quick Release 2 to quickly install the monitor on the stand with a simple click and remove it with the convenient sliding tab release ● ...
...for the Klein K10-A Photo Research PR-6xx, 7xx series, and Konica Minolta CA-310 measurement devices ● Updatable monitor firmware to enable HP to quickly and easily provide solutions to identified problems and provide custom solutions ● Four reconfigurable front bezel Function buttons ...side-toside ● Adjustable tilt, height, swivel, and pivot capabilities ● Removable stand for flexible monitor panel mounting solutions ● HP Quick Release 2 to quickly install the monitor on the stand with a simple click and remove it with the convenient sliding tab release ● ...

User Guide 1
Page 10
... provided ● Video signal input to support HDMI digital with cable provided ● Analog audio output for headphones or an optional HP speaker bar ● SPDIF digital audio output ● RJ-45 network connector ● DreamColor USB 2.0 ports for connecting a ...optimization ● HDCP (High-Bandwidth Digital Content Protection) copy protection on all digital inputs ● Software and documentation disc that includes monitor drivers, product documentation, and Windows-based calibration software ● For safety and regulatory information, refer to the Product Notices provided on ...
... provided ● Video signal input to support HDMI digital with cable provided ● Analog audio output for headphones or an optional HP speaker bar ● SPDIF digital audio output ● RJ-45 network connector ● DreamColor USB 2.0 ports for connecting a ...optimization ● HDCP (High-Bandwidth Digital Content Protection) copy protection on all digital inputs ● Software and documentation disc that includes monitor drivers, product documentation, and Windows-based calibration software ● For safety and regulatory information, refer to the Product Notices provided on ...
User Guide 1
Page 11
... you can not be specifically labeled as indicated on or trip over them so that is easily accessible at http://www.hp.com/ ergo. LCD monitors that are covered in your documentation kit. Important Safety Information 3 The grounding pin is included, or in the operating instructions...performance and extend the life of electric shock or damage to service this monitor. 2 Safety and Maintenance Guidelines Important Safety Information A power cord is included with the monitor, refer to properly support your HP LCD monitor. For information on the power cord, plug the cord into an ...
... you can not be specifically labeled as indicated on or trip over them so that is easily accessible at http://www.hp.com/ ergo. LCD monitors that are covered in your documentation kit. Important Safety Information 3 The grounding pin is included, or in the operating instructions...performance and extend the life of electric shock or damage to service this monitor. 2 Safety and Maintenance Guidelines Important Safety Information A power cord is included with the monitor, refer to properly support your HP LCD monitor. For information on the power cord, plug the cord into an ...
User Guide 1
Page 12
... using a screen saver program and turning off when not in use the damp cloth to gently wipe the screen surface. You may damage the monitor. CAUTION: Spray the cleaner onto a cloth and use . You can easily reach. For more difficult cleaning situations, use . It may run behind ... away from excessive light, heat or moisture. ● When removing the monitor stand, you can substantially increase the life expectancy of the monitor by wiping the screen and the cabinet with a "burned-in image" are not covered under the HP warranty. ● Slots and openings in use a 50/50 mix of...
... using a screen saver program and turning off when not in use the damp cloth to gently wipe the screen surface. You may damage the monitor. CAUTION: Spray the cleaner onto a cloth and use . You can easily reach. For more difficult cleaning situations, use . It may run behind ... away from excessive light, heat or moisture. ● When removing the monitor stand, you can substantially increase the life expectancy of the monitor by wiping the screen and the cabinet with a "burned-in image" are not covered under the HP warranty. ● Slots and openings in use a 50/50 mix of...


