

User Guide
Page 2
... your product. First Edition: January 2018 Document Part Number: L16682-001 HP shall not be construed as constituting an additional warranty. To access the latest user guide, go to http://www.hp.com/ support, and follow the instructions to find your product. © Copyright 2018 HP Development Company, L.P. Product notice This guide describes features that are common to change without notice.
... your product. First Edition: January 2018 Document Part Number: L16682-001 HP shall not be construed as constituting an additional warranty. To access the latest user guide, go to http://www.hp.com/ support, and follow the instructions to find your product. © Copyright 2018 HP Development Company, L.P. Product notice This guide describes features that are common to change without notice.
User Guide
Page 4
Contents 1 Getting Started 1 Important safety information 1 Product features and components 2 Features 2 Rear components 3 Front bezel controls 4 Setting up the monitor 5 Installing the monitor stand 5 Connecting the cables 5 Adjusting the monitor 6 Turning on the monitor 7 HP Watermark and Image Retention Policy 8 Installing a security cable 8 2 Using the Monitor 9 Downloading the monitor drivers 9 Using the On-Screen Display (OSD) menu 9 Assigning the Function buttons 10 Adjusting to Low Blue Light Mode 10 Using Auto-Sleep Mode 10 iii
Contents 1 Getting Started 1 Important safety information 1 Product features and components 2 Features 2 Rear components 3 Front bezel controls 4 Setting up the monitor 5 Installing the monitor stand 5 Connecting the cables 5 Adjusting the monitor 6 Turning on the monitor 7 HP Watermark and Image Retention Policy 8 Installing a security cable 8 2 Using the Monitor 9 Downloading the monitor drivers 9 Using the On-Screen Display (OSD) menu 9 Assigning the Function buttons 10 Adjusting to Low Blue Light Mode 10 Using Auto-Sleep Mode 10 iii
User Guide
Page 5
3 Support and troubleshooting 11 Solving common problems 11 Using the auto-adjustment function (analog input 12 Optimizing image performance (analog input 13 Button lockouts 14 Product support 14 Preparing to call technical support 14 Locating the serial number and product number 15 4 Maintaining the monitor 16 Maintenance guidelines 16 Cleaning the monitor 16 Shipping the monitor 16 A Technical specifications 17 Preset display resolutions 17 Entering user modes 18 Energy saver feature 18 B Accessibility 19 Supported assistive technologies 19 Contacting...
3 Support and troubleshooting 11 Solving common problems 11 Using the auto-adjustment function (analog input 12 Optimizing image performance (analog input 13 Button lockouts 14 Product support 14 Preparing to call technical support 14 Locating the serial number and product number 15 4 Maintaining the monitor 16 Maintenance guidelines 16 Cleaning the monitor 16 Shipping the monitor 16 A Technical specifications 17 Preset display resolutions 17 Entering user modes 18 Energy saver feature 18 B Accessibility 19 Supported assistive technologies 19 Contacting...
User Guide
Page 6
... the power label to properly support your HP LCD monitor. Look on the Web at all power cords for each device. 1 Getting Started Important safety information An AC power cord is included with the monitor, refer to the Product Notices provided in a controlled luminous environment to the cord does not exceed the rating of the cord. It describes proper workstation, setup, posture, and health and work habits...
... the power label to properly support your HP LCD monitor. Look on the Web at all power cords for each device. 1 Getting Started Important safety information An AC power cord is included with the monitor, refer to the Product Notices provided in a controlled luminous environment to the cord does not exceed the rating of the cord. It describes proper workstation, setup, posture, and health and work habits...
User Guide
Page 7
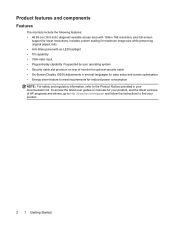
... lower resolutions; Product features and components Features The monitors include the following features: • 46.99 cm (18.5-inch) diagonal viewable screen area with an LED backlight • Tilt capability • VGA video input • Plug-and-play capability if supported by your operating system • Security cable slot provision on rear of HP programs and drivers, go to http://www.hp.com/support and follow the instructions...
... lower resolutions; Product features and components Features The monitors include the following features: • 46.99 cm (18.5-inch) diagonal viewable screen area with an LED backlight • Tilt capability • VGA video input • Plug-and-play capability if supported by your operating system • Security cable slot provision on rear of HP programs and drivers, go to http://www.hp.com/support and follow the instructions...
User Guide
Page 9
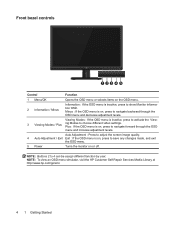
... backward through the OSD menu and increase adjustment levels. NOTE: Buttons 2 to choose different video settings. Front bezel controls 123 4 5 Control Function 1 Menu/OK Opens the OSD menu or selects items on the OSD menu. 2 Information / Minus Information : If the OSD menu is on, press to save any changes made, and exit the OSD menu. 5 Power Turns the monitor on or off. Auto Adjustment : Press to adjust the screen image quality. 4 Auto Adjustment / Exit Exit : If the OSD menu is inactive, press...
... backward through the OSD menu and increase adjustment levels. NOTE: Buttons 2 to choose different video settings. Front bezel controls 123 4 5 Control Function 1 Menu/OK Opens the OSD menu or selects items on the OSD menu. 2 Information / Minus Information : If the OSD menu is on, press to save any changes made, and exit the OSD menu. 5 Power Turns the monitor on or off. Auto Adjustment : Press to adjust the screen image quality. 4 Auto Adjustment / Exit Exit : If the OSD menu is inactive, press...
User Guide
Page 10
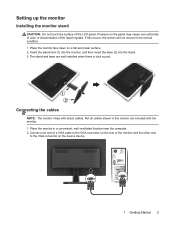
... sound. 1 2 Connecting the cables NOTE: The monitor ships with the monitor. 1. Place the monitor face down on the panel may cause non-uniformity of color or disorientation of the monitor and the other end to its normal condition. 1. Connect one end of the LCD panel. Pressure on a flat and clean surface. 2. Setting up the monitor Installing the monitor stand CAUTION: Do not touch the surface of a VGA cable to the VGA connector on the source...
... sound. 1 2 Connecting the cables NOTE: The monitor ships with the monitor. 1. Place the monitor face down on the panel may cause non-uniformity of color or disorientation of the monitor and the other end to its normal condition. 1. Connect one end of the LCD panel. Pressure on a flat and clean surface. 2. Setting up the monitor Installing the monitor stand CAUTION: Do not touch the surface of a VGA cable to the VGA connector on the source...
User Guide
Page 11
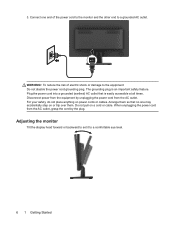
...: Do not disable the power cord grounding plug. Do not pull on or trip over them. Adjusting the monitor Tilt the display head forward or backward to set it to a grounded AC outlet. Arrange them so that is an important safety feature. Connect one may accidentally step on a cord or cable. To reduce the risk of the power cord to the monitor and the other...
...: Do not disable the power cord grounding plug. Do not pull on or trip over them. Adjusting the monitor Tilt the display head forward or backward to set it to a grounded AC outlet. Arrange them so that is an important safety feature. Connect one may accidentally step on a cord or cable. To reduce the risk of the power cord to the monitor and the other...
User Guide
Page 12
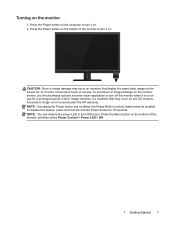
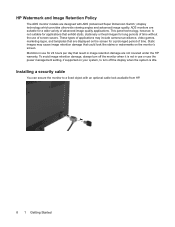
... disable the power LED in image is not covered under the HP warranty. Press the Menu button on the monitor screen, you should always activate a screen saver application or turn off the monitor when it is a condition that display the same static image on . To avoid burn-in use for a prolonged period of the monitor, and then select Power Control > Power LED > Off. 1 Getting Started 7 To disable this feature, press and hold the monitor Power button...
... disable the power LED in image is not covered under the HP warranty. Press the Menu button on the monitor screen, you should always activate a screen saver application or turn off the monitor when it is a condition that display the same static image on . To avoid burn-in use for a prolonged period of the monitor, and then select Power Control > Power LED > Off. 1 Getting Started 7 To disable this feature, press and hold the monitor Power button...
User Guide
Page 13
... Dimension Switch ) display technology which provides ultra-wide viewing angles and advanced image quality. Static images may include camera surveillance, video games, marketing logos, and templates that result in use or use the power management setting, if supported on the monitor's screen. These types of applications may cause image retention damage that exhibit static, stationary or fixed images for long periods of time. Monitors in use of advanced image quality...
... Dimension Switch ) display technology which provides ultra-wide viewing angles and advanced image quality. Static images may include camera surveillance, video games, marketing logos, and templates that result in use or use the power management setting, if supported on the monitor's screen. These types of applications may cause image retention damage that exhibit static, stationary or fixed images for long periods of time. Monitors in use of advanced image quality...
User Guide
Page 14
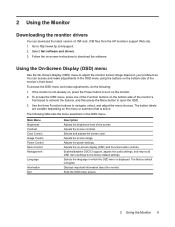
...) menu Use the On-Screen Display (OSD) menu to navigate, select, and adjust the menu choices. If the monitor is active. Main Menu Brightness Contrast Color Control Image Control Power Control Menu Control Management Language Information Exit Description Adjusts the brightness level of .INF and .ICM files from the HP monitors support Web site. 1. Displays important information about the monitor. Adjusts the screen image. Use the three Function buttons to adjust the monitor screen image based on the monitor. 2. 2 Using the Monitor Downloading the monitor drivers...
...) menu Use the On-Screen Display (OSD) menu to navigate, select, and adjust the menu choices. If the monitor is active. Main Menu Brightness Contrast Color Control Image Control Power Control Menu Control Management Language Information Exit Description Adjusts the brightness level of .INF and .ICM files from the HP monitors support Web site. 1. Displays important information about the monitor. Adjusts the screen image. Use the three Function buttons to adjust the monitor screen image based on the monitor. 2. 2 Using the Monitor Downloading the monitor drivers...
User Guide
Page 15
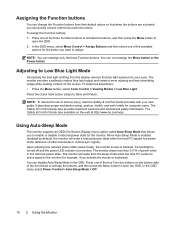
... buttons: 1. When Auto-Sleep Mode is turned off and the power LED indicator turns amber. The monitor will enter a reduced power state when the host PC signals low power mode (absence of serious injury, read the Safety & Comfort Guide provided with your eyes. NOTE: To reduce the risk of either horizontal or vertical sync signal). You can disable Auto-Sleep Mode in this adjustment, • Press the Menu button, select Color Control > Viewing Modes > Low Blue Light. In the OSD menu, select Menu Control > Assign Buttons...
... buttons: 1. When Auto-Sleep Mode is turned off and the power LED indicator turns amber. The monitor will enter a reduced power state when the host PC signals low power mode (absence of serious injury, read the Safety & Comfort Guide provided with your eyes. NOTE: To reduce the risk of either horizontal or vertical sync signal). You can disable Auto-Sleep Mode in this adjustment, • Press the Menu button, select Color Control > Viewing Modes > Low Blue Light. In the OSD menu, select Menu Control > Assign Buttons...
User Guide
Page 16
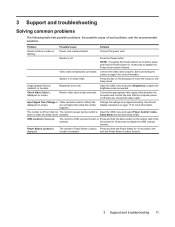
... the mouse to disable the Power button lockout feature. Sleep Mode and set higher than what the monitor supports. Connect the video cable properly. The monitor is Video resolution and/or refresh rate displayed on screen. function is flashing. 3 Support and troubleshooting Solving common problems The following table lists possible problems, the possible cause of the enabled. Power cord is in sleep mode. Connect the power cord. NOTE: If pressing the Power button has no effect, press and hold the Menu button on page...
... the mouse to disable the Power button lockout feature. Sleep Mode and set higher than what the monitor supports. Connect the video cable properly. The monitor is Video resolution and/or refresh rate displayed on screen. function is flashing. 3 Support and troubleshooting Solving common problems The following table lists possible problems, the possible cause of the enabled. Power cord is in sleep mode. Connect the power cord. NOTE: If pressing the Power button has no effect, press and hold the Menu button on page...
User Guide
Page 17
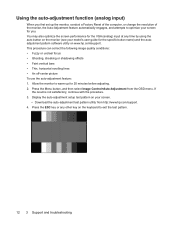
... ESC key or any time by using the auto button on the monitor (see your model's user guide for the specific button name) and the autoadjustment pattern software utility on your screen for 20 minutes before adjusting. 2. Using the auto-adjustment function (analog input) When you first set up for you. Display the auto-adjustment setup test pattern on www.hp.com/support. This procedure can correct the following image quality conditions: • Fuzzy or...
... ESC key or any time by using the auto button on the monitor (see your model's user guide for the specific button name) and the autoadjustment pattern software utility on your screen for 20 minutes before adjusting. 2. Using the auto-adjustment function (analog input) When you first set up for you. Display the auto-adjustment setup test pattern on www.hp.com/support. This procedure can correct the following image quality conditions: • Fuzzy or...
User Guide
Page 18
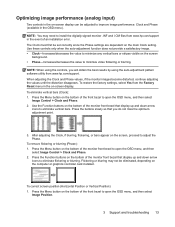
... using the auto-adjustment pattern software utility from the Factory Reset menu in the OSD menu). Use the Function buttons on the bottom of the monitor front bezel that you will obtain the best results by using the controls, you do not miss the optimum adjustment point. 3. After adjusting the Clock, if blurring, flickering, or bars appear on the screen, proceed to eliminate vertical bars. Optimizing image performance (analog input) Two controls in the on-screen display...
... using the auto-adjustment pattern software utility from the Factory Reset menu in the OSD menu). Use the Function buttons on the bottom of the monitor front bezel that you will obtain the best results by using the controls, you do not miss the optimum adjustment point. 3. After adjusting the Clock, if blurring, flickering, or bars appear on the screen, proceed to eliminate vertical bars. Optimizing image performance (analog input) Two controls in the on-screen display...
User Guide
Page 19
... available when you call: • Monitor model number • Monitor serial number • Purchase date on , displaying an active signal, and the OSD is not active. The Horizontal Position shifts the image left or right; This functionality is only available when the monitor is available in English. • Locate an HP service center Preparing to call technical support If you cannot solve a problem using your Product, and then follow...
... available when you call: • Monitor model number • Monitor serial number • Purchase date on , displaying an active signal, and the OSD is not active. The Horizontal Position shifts the image left or right; This functionality is only available when the monitor is available in English. • Locate an HP service center Preparing to call technical support If you cannot solve a problem using your Product, and then follow...
User Guide
Page 21
... authorized HP dealer, reseller, or service provider. • Use only a power source and connection appropriate for ventilation. You can substantially increase the life expectancy of any petroleum-based materials such as indicated on the screen surface. You may need it from getting scratched, defaced, or broken. Dust the monitor by unplugging the power cord from excessive light, heat, or moisture. • When removing the monitor stand...
... authorized HP dealer, reseller, or service provider. • Use only a power source and connection appropriate for ventilation. You can substantially increase the life expectancy of any petroleum-based materials such as indicated on the screen surface. You may need it from getting scratched, defaced, or broken. Dust the monitor by unplugging the power cord from excessive light, heat, or moisture. • When removing the monitor stand...
User Guide
Page 22
....004 60.000 59.810 60.020 60.000 A Technical specifications 17 A Technical specifications NOTE: The product specifications provided in the user guide might have changed between the time of manufacturing and delivery of your specific monitor model to 140° F Preset display resolutions The display resolutions listed below are the most commonly used modes and are set as factory defaults. For the latest specifications or additional specifications on the screen.
....004 60.000 59.810 60.020 60.000 A Technical specifications 17 A Technical specifications NOTE: The product specifications provided in the user guide might have changed between the time of manufacturing and delivery of your specific monitor model to 140° F Preset display resolutions The display resolutions listed below are the most commonly used modes and are set as factory defaults. For the latest specifications or additional specifications on the screen.
User Guide
Page 23
... enter the reduced power state, the power light blinks amber. 18 A Technical specifications It this occurs, you can be entered and stored. Upon detecting the absence of these modes and saved in the monitor's Energy Saver utility, you may occasionally call for instructions on -screen display. NOTE: The above power saver feature only works when the monitor is turned amber. Entering user modes The video controller signal may need to a computer...
... enter the reduced power state, the power light blinks amber. 18 A Technical specifications It this occurs, you can be entered and stored. Upon detecting the absence of these modes and saved in the monitor's Energy Saver utility, you may occasionally call for instructions on -screen display. NOTE: The above power saver feature only works when the monitor is turned amber. Entering user modes The video controller signal may need to a computer...
User Guide
Page 24
.... If you have an issue with disabilities, either on your source device that is connected to the monitor to tell us at (888) 259-5707, Monday through Friday, 6 a.m. B Accessibility HP designs, produces, and markets products and services that product. Supported assistive technologies HP products support a wide variety of our products and services and welcome feedback from users. NOTE: For additional information about...
.... If you have an issue with disabilities, either on your source device that is connected to the monitor to tell us at (888) 259-5707, Monday through Friday, 6 a.m. B Accessibility HP designs, produces, and markets products and services that product. Supported assistive technologies HP products support a wide variety of our products and services and welcome feedback from users. NOTE: For additional information about...


