
User Guide
Page 4
... Information 2 Safety Precautions 2 Maintenance Guidelines 3 Cleaning the Monitor 3 3. Troubleshooting Solving Common Problems 19 Getting Support from the Internet 10 Front-Panel Controls 11 Using the On-Screen Display (OSD 12 Selecting Video Input Connectors 16 Identifying Monitor Conditions 16 Adjusting Screen Quality 17 Power-Saver Feature 17 Sleep Timer Mode 18 A. Operating the Monitor CD Software and Utilities 10 Installing Drivers 10 Installing the monitor driver software from the CD 10 Downloading updated drivers from hp.com 20 Preparing to Call Technical...
... Information 2 Safety Precautions 2 Maintenance Guidelines 3 Cleaning the Monitor 3 3. Troubleshooting Solving Common Problems 19 Getting Support from the Internet 10 Front-Panel Controls 11 Using the On-Screen Display (OSD 12 Selecting Video Input Connectors 16 Identifying Monitor Conditions 16 Adjusting Screen Quality 17 Power-Saver Feature 17 Sleep Timer Mode 18 A. Operating the Monitor CD Software and Utilities 10 Installing Drivers 10 Installing the monitor driver software from the CD 10 Downloading updated drivers from hp.com 20 Preparing to Call Technical...

User Guide
Page 5
... display • Maximum graphics resolution: 1920 x 1080 @ 60Hz Plus full-screen support for lower resolutions • VGA analog signal • DVI digital signal • Easy viewing from a sitting or standing position, or while moving from one is included, or in several languages for a locking security cable (security cable sold separately) • Plug and Play capability, if supported by your computer system • On-Screen Display (OSD) adjustments in your country. HP LCD Monitors 1 To locate updates to the user guide...
... display • Maximum graphics resolution: 1920 x 1080 @ 60Hz Plus full-screen support for lower resolutions • VGA analog signal • DVI digital signal • Easy viewing from a sitting or standing position, or while moving from one is included, or in several languages for a locking security cable (security cable sold separately) • Plug and Play capability, if supported by your computer system • On-Screen Display (OSD) adjustments in your country. HP LCD Monitors 1 To locate updates to the user guide...

User Guide
Page 6
... electrical outlet, and the total ampere rating of surge protection device such as indicated on the Web at all cords and cables connected to the equipment: • Do not disable the power cord grounding feature. Safety Precautions • Use only a power source and connection compatible with the monitor, refer to some form of the products connected to properly support your media disc, if one is...
... electrical outlet, and the total ampere rating of surge protection device such as indicated on the Web at all cords and cables connected to the equipment: • Do not disable the power cord grounding feature. Safety Precautions • Use only a power source and connection compatible with the monitor, refer to some form of the products connected to properly support your media disc, if one is...

User Guide
Page 7
... total ampere rating of the products connected to rest on the power label to service this monitor, as the screen. Disconnect the monitor by grasping the plug firmly and pulling it from the outlet. Never disconnect the monitor by using a screen saver program and turning off the monitor and the computer. 2. CAUTION: Do not use . Do not walk on the cord. • Keep the monitor in use benzene...
... total ampere rating of the products connected to rest on the power label to service this monitor, as the screen. Disconnect the monitor by grasping the plug firmly and pulling it from the outlet. Never disconnect the monitor by using a screen saver program and turning off the monitor and the computer. 2. CAUTION: Do not use . Do not walk on the cord. • Keep the monitor in use benzene...

User Guide
Page 8
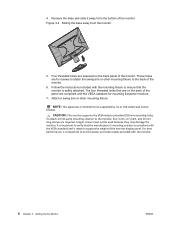
... or wall-mount it. Connect the monitor cables after you have installed the monitor. Figure 3-1 Attaching the Monitor Column 4 Chapter 3. Unpack the monitor. Store the packing box. 2. Place the monitor in place. Press the column onto the monitor support column until it for desktop use 1. Prepare a flat area to the LCD screen; Avoid touching or applying pressure to assemble the monitor. 3. Installing the Monitor You can cause damage. 2. Set the monitor screen face down...
... or wall-mount it. Connect the monitor cables after you have installed the monitor. Figure 3-1 Attaching the Monitor Column 4 Chapter 3. Unpack the monitor. Store the packing box. 2. Place the monitor in place. Press the column onto the monitor support column until it for desktop use 1. Prepare a flat area to the LCD screen; Avoid touching or applying pressure to assemble the monitor. 3. Installing the Monitor You can cause damage. 2. Set the monitor screen face down...

User Guide
Page 9
... surface. Disconnect the power cable and any other cables from the monitor. 3. 3. Lift the monitor to the equipment, check that it locks in upright position Preparing the monitor for wall-mounting 1. Refer to the instructions supplied with the wall-mounting fixture and check that the wall-mounting fixture is capable of supporting the monitor. 2. ENWW Installing the Monitor 5 Figure 3-2 Attaching the Base 4. Place the monitor face down on a flat, stable surface. Figure 3-3 Monitor in position. WARNING! To...
... surface. Disconnect the power cable and any other cables from the monitor. 3. 3. Lift the monitor to the equipment, check that it locks in upright position Preparing the monitor for wall-mounting 1. Refer to the instructions supplied with the wall-mounting fixture and check that the wall-mounting fixture is capable of supporting the monitor. 2. ENWW Installing the Monitor 5 Figure 3-2 Attaching the Base 4. Place the monitor face down on a flat, stable surface. Figure 3-3 Monitor in position. WARNING! To...
User Guide
Page 10
... Listed wall mount bracket. For best performance, it away from the monitor 5. It is important to verify that the monitor is important to support the weight of the monitor. 6. NOTE: This apparatus is rated to use the power and video cables provided with the VESA standard and is intended to the back of the monitor display panel. Attach a swing arm or other mounting fixture to be used because...
... Listed wall mount bracket. For best performance, it away from the monitor 5. It is important to verify that the monitor is important to support the weight of the monitor. 6. NOTE: This apparatus is rated to use the power and video cables provided with the VESA standard and is intended to the back of the monitor display panel. Attach a swing arm or other mounting fixture to be used because...
User Guide
Page 12
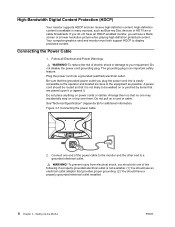
... do not have a properly grounded electrical outlet installed. 8 Chapter 3. See"Technical Specification" (Appendix B) for additional information. Figure 3-7 Connecting the power cable 2. To reduce the risk of electric shock or damage to display protected content. Your computer graphics card and monitor must both support HDCP to your equipment: Do not disable the power cord grounding plug. Connect one may accidentally step on or pinched by...
... do not have a properly grounded electrical outlet installed. 8 Chapter 3. See"Technical Specification" (Appendix B) for additional information. Figure 3-7 Connecting the power cable 2. To reduce the risk of electric shock or damage to display protected content. Your computer graphics card and monitor must both support HDCP to your equipment: Do not disable the power cord grounding plug. Connect one may accidentally step on or pinched by...
User Guide
Page 14
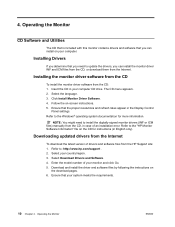
... install the monitor driver software from the CD, in the Display Control Panel settings. Click Install Monitor Driver Software. 4. Refer to the Windows® operating system documentation for instructions (in your country/region. 3. Select Download Drivers and Software. 4. Enter the model number of drivers and software files from the HP Support site: 1. Download and install the driver and software files by following the instructions on -screen instructions. 5. The CD menu appears. 2. Insert the CD in English only). Refer to update the drivers, you can install...
... install the monitor driver software from the CD, in the Display Control Panel settings. Click Install Monitor Driver Software. 4. Refer to the Windows® operating system documentation for instructions (in your country/region. 3. Select Download Drivers and Software. 4. Enter the model number of drivers and software files from the HP Support site: 1. Download and install the driver and software files by following the instructions on -screen instructions. 5. The CD menu appears. 2. Insert the CD in English only). Refer to update the drivers, you can install...

User Guide
Page 15
Front-Panel Controls The monitor buttons are located on the bottom of the monitor depending on the model. Icon 1 Power 2 OK 3+ 4- 5 Menu 54 321 Description Turns the monitor on , press to optimize the screen image. If the OSD menu is inactive, press to activate the volume adjustment bar, press - If the OSD menu is on, press to select the highlighted menu item. or + to activate the source button that chooses the video signal input (VGA or DVI) If...
Front-Panel Controls The monitor buttons are located on the bottom of the monitor depending on the model. Icon 1 Power 2 OK 3+ 4- 5 Menu 54 321 Description Turns the monitor on , press to optimize the screen image. If the OSD menu is inactive, press to activate the volume adjustment bar, press - If the OSD menu is on, press to select the highlighted menu item. or + to activate the source button that chooses the video signal input (VGA or DVI) If...

User Guide
Page 17
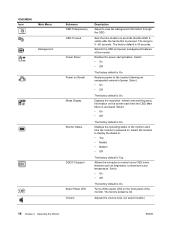
... Contrast Ratio Horizontal OSD Position Vertical OSD Position Turns Dynamic Contrast Ratio On or Off. The factory default range is Off. Adjusts the contrast level of the display. Selects the screen color. sets your own red color levels • Green Color - image fills the entire screen and may look sharper or soft. Using the On-Screen Display (OSD) 13 sets your own green color levels • Blue Color - Selects the method on how displayed information on the screen background. The factory default is 90. Changes the viewing position of the OSD menu...
... Contrast Ratio Horizontal OSD Position Vertical OSD Position Turns Dynamic Contrast Ratio On or Off. The factory default range is Off. Adjusts the contrast level of the display. Selects the screen color. sets your own red color levels • Green Color - image fills the entire screen and may look sharper or soft. Using the On-Screen Display (OSD) 13 sets your own green color levels • Blue Color - Selects the method on how displayed information on the screen background. The factory default is 90. Changes the viewing position of the OSD menu...
User Guide
Page 18
... OSD and power management features of power. Displays the resolution, refresh rate and frequency Information on . Displays the operating status of the monitor each time the monitor Is powered on the screen each time the OSD Main Menu is accessed. Allows the computer to : • Top • Middle • Bottom • Off The factory default is On. Turns off the power LED on Recall Mode Display Monitor Status DDC/CI Support Bezel Power LED Volume Description Adjust to view...
... OSD and power management features of power. Displays the resolution, refresh rate and frequency Information on . Displays the operating status of the monitor each time the monitor Is powered on the screen each time the OSD Main Menu is accessed. Allows the computer to : • Top • Middle • Bottom • Off The factory default is On. Turns off the power LED on Recall Mode Display Monitor Status DDC/CI Support Bezel Power LED Volume Description Adjust to view...
User Guide
Page 19
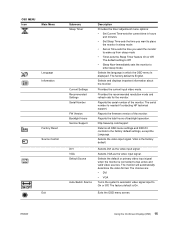
... the firmware version of the monitor. Provides the current input video mode. Provides the recommended resolution mode and refresh rate for the monitor. VGA is connected to wake up from sleep mode • Timer-sets the Sleep Timer feature On or Off. Selects VGA as the video input signal. The factory default is On. ENWW Using the On-Screen Display (OSD) 15 OSD MENU Icon Main Menu Language Information Factory Reset Source Control Exit Submenu Sleep Timer Current Settings Recommended Settings Serial Number FW Version Backlight Hours Service Support DVI VGA Default Source Auto...
... the firmware version of the monitor. Provides the current input video mode. Provides the recommended resolution mode and refresh rate for the monitor. VGA is connected to wake up from sleep mode • Timer-sets the Sleep Timer feature On or Off. Selects VGA as the video input signal. The factory default is On. ENWW Using the On-Screen Display (OSD) 15 OSD MENU Icon Main Menu Language Information Factory Reset Source Control Exit Submenu Sleep Timer Current Settings Recommended Settings Serial Number FW Version Backlight Hours Service Support DVI VGA Default Source Auto...
User Guide
Page 20
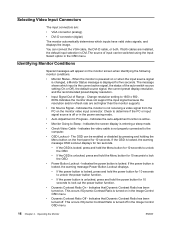
... turned on in the Image Control OSD menu. 16 Chapter 4. This occurs if Dynamic Contrast Ratio is turned on . Selecting Video Input Connectors The input connectors are set higher than the monitor supports. • No Source Signal - Change resolution setting to 1600 x 900 . 60Hz.Indicates the monitor does not support the input signal because the resolution and/or refresh rate are : • VGA connector (analog) • DVI-D connector (digital) The monitor automatically determines which input is unlocked, press and hold the Menu button for 10 seconds to unlock the power button...
... turned on in the Image Control OSD menu. 16 Chapter 4. This occurs if Dynamic Contrast Ratio is turned on . Selecting Video Input Connectors The input connectors are set higher than the monitor supports. • No Source Signal - Change resolution setting to 1600 x 900 . 60Hz.Indicates the monitor does not support the input signal because the resolution and/or refresh rate are : • VGA connector (analog) • DVI-D connector (digital) The monitor automatically determines which input is unlocked, press and hold the Menu button for 10 seconds to unlock the power button...
User Guide
Page 21
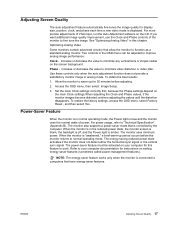
... monitor screen is blank, the backlight is off, and the Power light is blue and the monitor uses the normal watts of power. Adjusting Screen Quality The auto adjustment feature automatically fine-tunes the image quality for display size, position, clock, and phase each time a new video mode is connected to your computer for this chapter. If you want additional image quality improvement, use the Clock and Phase controls of VGA input, run the Auto Adjustment software on...
... monitor screen is blank, the backlight is off, and the Power light is blue and the monitor uses the normal watts of power. Adjusting Screen Quality The auto adjustment feature automatically fine-tunes the image quality for display size, position, clock, and phase each time a new video mode is connected to your computer for this chapter. If you want additional image quality improvement, use the Clock and Phase controls of VGA input, run the Auto Adjustment software on...
User Guide
Page 22
... menu. Press the OK button again to enter the time for the monitor to reset the sleep timer mode. 5. If you will cause the timer to reset to lock in the time chosen. 10. For example, 1:15 p.m. A power failure or loss of the backlight bulbs in the monitor. This also extends the life of power to the monitor will need to power on the monitor front panel...
... menu. Press the OK button again to enter the time for the monitor to reset the sleep timer mode. 5. If you will cause the timer to reset to lock in the time chosen. 10. For example, 1:15 p.m. A power failure or loss of the backlight bulbs in the monitor. This also extends the life of power to the monitor will need to power on the monitor front panel...
User Guide
Page 23
... the resolution your monitor is properly connected to the video card output connector on the screen • Use Windows shut-down mode. Screen image is properly connected to a grounded power outlet and to the computer. • Inspect the monitor's video cable and make sure that may cause electrical interference as far away from the monitor as possible. • Use the maximum refresh rate your are not using . Missing one of the primary colors (RED, GREEN, or BLUE...
... the resolution your monitor is properly connected to the video card output connector on the screen • Use Windows shut-down mode. Screen image is properly connected to a grounded power outlet and to the computer. • Inspect the monitor's video cable and make sure that may cause electrical interference as far away from the monitor as possible. • Use the maximum refresh rate your are not using . Missing one of the primary colors (RED, GREEN, or BLUE...
User Guide
Page 24
... problem occurred • Error messages received • Hardware configuration • Name and version of hardware and software you are using Locating the Rating Label The rating label on the monitor provides the product number and serial number. Have the following information available when you call technical support. You may need these numbers when contacting HP about your monitor. Getting Support from hp.com Before you contact customer service...
... problem occurred • Error messages received • Hardware configuration • Name and version of hardware and software you are using Locating the Rating Label The rating label on the monitor provides the product number and serial number. Have the following information available when you call technical support. You may need these numbers when contacting HP about your monitor. Getting Support from hp.com Before you contact customer service...
User Guide
Page 25
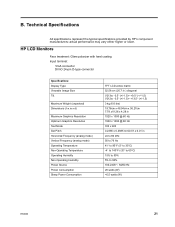
HP LCD Monitors Face treatment: Glare polarizer with hard coating Input terminal: VGA connector DVI-D 24-pin D-type connector Specifications: Display Type: Viewable Image Size Tilt Maximum Weight (unpacked) Dimensions (h x w x d) Maximum Graphics Resolution Optimum Graphics Resolution Text Mode Dot Pitch Horizontal Frequency (analog mode) Vertical Frequency (analog mode) Operating Temperature Non-Operating Temperature Operating Humidity Non-Operating Humidity Power Source Power Consumption Sleep Power Consumption TFT LCD active matrix 52.58 cm (20.7 in.) diagonal V213a: -3.5 ...
HP LCD Monitors Face treatment: Glare polarizer with hard coating Input terminal: VGA connector DVI-D 24-pin D-type connector Specifications: Display Type: Viewable Image Size Tilt Maximum Weight (unpacked) Dimensions (h x w x d) Maximum Graphics Resolution Optimum Graphics Resolution Text Mode Dot Pitch Horizontal Frequency (analog mode) Vertical Frequency (analog mode) Operating Temperature Non-Operating Temperature Operating Humidity Non-Operating Humidity Power Source Power Consumption Sleep Power Consumption TFT LCD active matrix 52.58 cm (20.7 in.) diagonal V213a: -3.5 ...
User Guide
Page 27
.... This is common to all LCD displays used in normal operating mode at : http://www.hp.com/support. A defective whole pixel is always turned on (a bright spot on a bright background). A pixel consists of approximately 50 cm (16 inches). To locate defective pixels, the monitor should be viewed under normal operating conditions and in products supplied by one blue subpixel. LCD Monitor Quality and Pixel Policy Your LCD Monitor uses high-precision technology, manufactured...
.... This is common to all LCD displays used in normal operating mode at : http://www.hp.com/support. A defective whole pixel is always turned on (a bright spot on a bright background). A pixel consists of approximately 50 cm (16 inches). To locate defective pixels, the monitor should be viewed under normal operating conditions and in products supplied by one blue subpixel. LCD Monitor Quality and Pixel Policy Your LCD Monitor uses high-precision technology, manufactured...


