

User Guide
Page 4
... 3 Cleaning the Monitor 3 3. Technical Specifications HP LCD Monitors 21 Preset Video Modes 22 LCD Monitor Quality and Pixel Policy 23 ENWW 1 Setting Up the Monitor Unpacking the Monitor 4 Installing the Monitor 4 Connecting Monitor Cables 7 Connecting the Audio Cable 7 High-Bandwidth Digital Content Protection (HDCP 8 Connecting the Power Cable 8 Adjusting the Tilt 9 4. Troubleshooting Solving Common Problems 19 Getting Support from the Internet 10 Front-Panel Controls 11 Using the On-Screen Display (OSD 12 Selecting Video Input Connectors 16 Identifying Monitor...
... 3 Cleaning the Monitor 3 3. Technical Specifications HP LCD Monitors 21 Preset Video Modes 22 LCD Monitor Quality and Pixel Policy 23 ENWW 1 Setting Up the Monitor Unpacking the Monitor 4 Installing the Monitor 4 Connecting Monitor Cables 7 Connecting the Audio Cable 7 High-Bandwidth Digital Content Protection (HDCP 8 Connecting the Power Cable 8 Adjusting the Tilt 9 4. Troubleshooting Solving Common Problems 19 Getting Support from the Internet 10 Front-Panel Controls 11 Using the On-Screen Display (OSD 12 Selecting Video Input Connectors 16 Identifying Monitor...

User Guide
Page 5
... Drivers & Downloads, and then follow the on your media disc, if one side of the monitor to the other • Tilt adjustment • Removable base • Built in stereo speakers • Security lock slot for a locking security cable (security cable sold separately) • Plug and Play capability, if supported by your computer system • On-Screen Display (OSD) adjustments in several languages for lower resolutions • VGA analog signal • DVI digital signal • Easy viewing from...
... Drivers & Downloads, and then follow the on your media disc, if one side of the monitor to the other • Tilt adjustment • Removable base • Built in stereo speakers • Security lock slot for a locking security cable (security cable sold separately) • Plug and Play capability, if supported by your computer system • On-Screen Display (OSD) adjustments in several languages for lower resolutions • VGA analog signal • DVI digital signal • Easy viewing from...

User Guide
Page 6
... monitor, as indicated on the Web at all power strips provide surge protection; the power strips must be specifically labeled as a power strip or Uninterruptible Power Supply (UPS). Look on a cord or cable. Use the appropriate and correctly sized furniture designed to use only a power source and connection appropriate for each device. 2 Chapter 2. Safety and Maintenance Guidelines ENWW For information on the correct power cord set to properly support...
... monitor, as indicated on the Web at all power strips provide surge protection; the power strips must be specifically labeled as a power strip or Uninterruptible Power Supply (UPS). Look on a cord or cable. Use the appropriate and correctly sized furniture designed to use only a power source and connection appropriate for each device. 2 Chapter 2. Safety and Maintenance Guidelines ENWW For information on the correct power cord set to properly support...

User Guide
Page 7
... plug firmly and pulling it from excessive light, heat or moisture. • When removing the monitor base, you must not be blocked or covered. ENWW Maintenance Guidelines 3 If the monitor is not operating properly or has been dropped or damaged, contact an authorized HP dealer, reseller, or service provider. • Use only a power source and connection appropriate for each device. • Install the monitor near a power...
... plug firmly and pulling it from excessive light, heat or moisture. • When removing the monitor base, you must not be blocked or covered. ENWW Maintenance Guidelines 3 If the monitor is not operating properly or has been dropped or damaged, contact an authorized HP dealer, reseller, or service provider. • Use only a power source and connection appropriate for each device. • Install the monitor near a power...

User Guide
Page 8
... monitor for installation. doing so can install the monitor on a flat, soft, protected table or desk surface with the support column overhanging the edge. Setting Up the Monitor Unpacking the Monitor 1. Unpack the monitor. Prepare a flat area to the LCD screen; Connect the monitor cables after you have installed the monitor. Avoid touching or applying pressure to assemble the monitor. Press the column onto the monitor support column until it . Setting Up the Monitor ENWW Turn...
... monitor for installation. doing so can install the monitor on a flat, soft, protected table or desk surface with the support column overhanging the edge. Setting Up the Monitor Unpacking the Monitor 1. Unpack the monitor. Prepare a flat area to the LCD screen; Connect the monitor cables after you have installed the monitor. Avoid touching or applying pressure to assemble the monitor. Press the column onto the monitor support column until it . Setting Up the Monitor ENWW Turn...

User Guide
Page 9
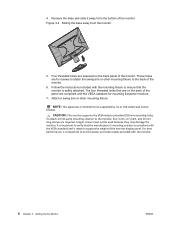
... the instructions supplied with the wall-mounting fixture and check that the wall-mounting fixture is capable of the wall-mounting fixture. Figure 3-3 Monitor in position. Lift the monitor to the equipment, check that it locks in upright position Preparing the monitor for wall-mounting 1. ENWW Installing the Monitor 5 To reduce the risk of personal injury or of damage to an upright position and place on a flat, protected surface. Disconnect the power cable and...
... the instructions supplied with the wall-mounting fixture and check that the wall-mounting fixture is capable of the wall-mounting fixture. Figure 3-3 Monitor in position. Lift the monitor to the equipment, check that it locks in upright position Preparing the monitor for wall-mounting 1. ENWW Installing the Monitor 5 To reduce the risk of personal injury or of damage to an upright position and place on a flat, protected surface. Disconnect the power cable and...
User Guide
Page 10
4. CAUTION: This monitor supports the VESA industry standard 100 mm mounting holes. To attach a third-party mounting solution to the monitor, four 4 mm, 0.7 pitch, and 10 mm long screws are for mounting flat-panel monitors. 7. Remove the base and slide it is important to ensure that the monitor is intended to the back of the monitor. 6. Follow the instructions included with the mounting fixture to use the power and video cables provided...
4. CAUTION: This monitor supports the VESA industry standard 100 mm mounting holes. To attach a third-party mounting solution to the monitor, four 4 mm, 0.7 pitch, and 10 mm long screws are for mounting flat-panel monitors. 7. Remove the base and slide it is important to ensure that the monitor is intended to the back of the monitor. 6. Follow the instructions included with the mounting fixture to use the power and video cables provided...
User Guide
Page 12
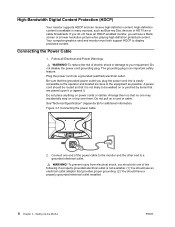
..., you should use an electrical outlet adapter that the grounded power outlet you will see a blank screen or a lower resolution picture when playing high-definition protected content. Connect one may accidentally step on or pinched by items that no one end of the power cable to the monitor and the other end to your equipment: Do not disable the power cord grounding plug. Follow...
..., you should use an electrical outlet adapter that the grounded power outlet you will see a blank screen or a lower resolution picture when playing high-definition protected content. Connect one may accidentally step on or pinched by items that no one end of the power cable to the monitor and the other end to your equipment: Do not disable the power cord grounding plug. Follow...
User Guide
Page 14
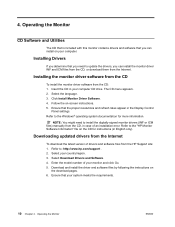
... proper resolutions and refresh rates appear in English only). Enter the model number of your country/region. 3. Download and install the driver and software files by following the instructions on -screen instructions. 5. 4. Select the language. 3. Select Download Drivers and Software. 4. Installing Drivers If you can install on the CD for more information. NOTE: You might need to the Windows® operating system documentation for instructions (in the Display Control Panel settings. Operating the Monitor ENWW Operating the Monitor CD Software...
... proper resolutions and refresh rates appear in English only). Enter the model number of your country/region. 3. Download and install the driver and software files by following the instructions on -screen instructions. 5. 4. Select the language. 3. Select Download Drivers and Software. 4. Installing Drivers If you can install on the CD for more information. NOTE: You might need to the Windows® operating system documentation for instructions (in the Display Control Panel settings. Operating the Monitor ENWW Operating the Monitor CD Software...

User Guide
Page 15
... the OSD menu and decrease adjustment levels. If the OSD menu is inactive, press to activate the auto adjustment feature to activate the volume adjustment bar, press - Front-Panel Controls The monitor buttons are located on the model. The Power button is on , press to navigate backward through the OSD menu and increase adjustment levels. If the OSD menu is inactive, press to activate the source button that chooses the video signal input (VGA or DVI) If the OSD menu...
... the OSD menu and decrease adjustment levels. If the OSD menu is inactive, press to activate the auto adjustment feature to activate the volume adjustment bar, press - Front-Panel Controls The monitor buttons are located on the model. The Power button is on , press to navigate backward through the OSD menu and increase adjustment levels. If the OSD menu is inactive, press to activate the source button that chooses the video signal input (VGA or DVI) If the OSD menu...

User Guide
Page 17
... Horizontal OSD Position Vertical OSD Position Turns Dynamic Contrast Ratio On or Off. Using the On-Screen Display (OSD) 13 The factory default range is Off. Uses standard colors (default). Selects and adjusts your own green color levels • Blue Color - sets your own color scales: • Red Color - Adjusts the position of the screen. Adjusts the contrast level of the screen Image up and down. Selects the screen color. sets your own red color levels • Green Color - Select: • Fill to the left and right. Changes the viewing position...
... Horizontal OSD Position Vertical OSD Position Turns Dynamic Contrast Ratio On or Off. Using the On-Screen Display (OSD) 13 The factory default range is Off. Uses standard colors (default). Selects and adjusts your own green color levels • Blue Color - sets your own color scales: • Red Color - Adjusts the position of the screen. Adjusts the contrast level of the screen Image up and down. Selects the screen color. sets your own red color levels • Green Color - Select: • Fill to the left and right. Changes the viewing position...
User Guide
Page 18
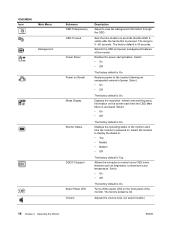
... factory default is On. Displays the resolution, refresh rate and frequency Information on the screen each time the monitor Is powered on the front panel of the monitor each time the OSD Main Menu is accessed. Select the location to display the status to: • Top • Middle • Bottom • Off The factory default is pressed. Adjusts the volume level, (on Recall Mode Display Monitor Status DDC/CI Support Bezel Power LED Volume Description Adjust to...
... factory default is On. Displays the resolution, refresh rate and frequency Information on the screen each time the monitor Is powered on the front panel of the monitor each time the OSD Main Menu is accessed. Select the location to display the status to: • Top • Middle • Bottom • Off The factory default is pressed. Adjusts the volume level, (on Recall Mode Display Monitor Status DDC/CI Support Bezel Power LED Volume Description Adjust to...
User Guide
Page 19
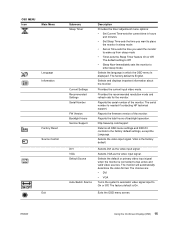
... firmware version of backlight operation. VGA is On. Selects VGA as the video input signal. The factory default Is English. Provides the recommended resolution mode and refresh rate for the monitor. Reports the total hours of the monitor. The monitor will automatically determine the video format. The factory default is the factory default. OSD MENU Icon Main Menu Language Information Factory Reset Source Control Exit Submenu Sleep Timer Current Settings Recommended Settings Serial Number FW Version Backlight Hours Service Support DVI VGA Default Source Auto-Switch...
... firmware version of backlight operation. VGA is On. Selects VGA as the video input signal. The factory default Is English. Provides the recommended resolution mode and refresh rate for the monitor. Reports the total hours of the monitor. The monitor will automatically determine the video format. The factory default is the factory default. OSD MENU Icon Main Menu Language Information Factory Reset Source Control Exit Submenu Sleep Timer Current Settings Recommended Settings Serial Number FW Version Backlight Hours Service Support DVI VGA Default Source Auto-Switch...
User Guide
Page 20
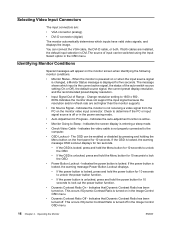
... support the input signal because the resolution and/or refresh rate are : • VGA connector (analog) • DVI-D connector (digital) The monitor automatically determines which input is DVI.The source of Range - The OSD can be enabled or disabled by pressing and holding the Menu button on the monitor screen when identifying the following monitor conditions: • Monitor Status - Change resolution setting to determine if the PC or input signal source is entering a sleep mode. • Check Video Cable - If the OSD is locked, the warning message OSD Lockout displays...
... support the input signal because the resolution and/or refresh rate are : • VGA connector (analog) • DVI-D connector (digital) The monitor automatically determines which input is DVI.The source of Range - The OSD can be enabled or disabled by pressing and holding the Menu button on the monitor screen when identifying the following monitor conditions: • Monitor Status - Change resolution setting to determine if the PC or input signal source is entering a sleep mode. • Check Video Cable - If the OSD is locked, the warning message OSD Lockout displays...
User Guide
Page 21
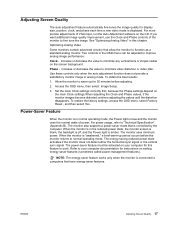
... horizontal sync signal or the vertical sync signal. The power-saver feature must be adjusted to fine tune the image. Access the OSD menu, then select Image Setup. 3. To restore the factory settings, access the OSD menu, select Factory Reset , and then select Yes . Power-Saver Feature When the monitor is in normal operating mode, the Power light is blue and the monitor uses the normal watts of VGA input, run the Auto Adjustment software on the CD. For more precise adjustments of power. Optimizing Analog Video...
... horizontal sync signal or the vertical sync signal. The power-saver feature must be adjusted to fine tune the image. Access the OSD menu, then select Image Setup. 3. To restore the factory settings, access the OSD menu, select Factory Reset , and then select Yes . Power-Saver Feature When the monitor is in normal operating mode, the Power light is blue and the monitor uses the normal watts of VGA input, run the Auto Adjustment software on the CD. For more precise adjustments of power. Optimizing Analog Video...
User Guide
Page 22
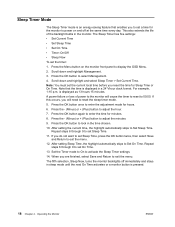
.... Press the OK button to display the OSD Menu. 2. The fifth selection, Sleep Now, turns the monitor backlights off at the same time every day. Note that enables you will cause the timer to reset to power on the monitor front panel to lock in the time chosen. 10. If this occurs, you to reset the sleep timer mode. 5. Set the Timer mode to On to Set Sleep Time. Scroll...
.... Press the OK button to display the OSD Menu. 2. The fifth selection, Sleep Now, turns the monitor backlights off at the same time every day. Note that enables you will cause the timer to reset to power on the monitor front panel to lock in the time chosen. 10. If this occurs, you to reset the sleep timer mode. 5. Set the Timer mode to On to Set Sleep Time. Scroll...
User Guide
Page 23
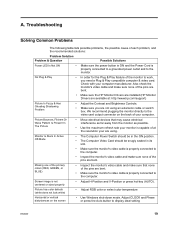
... maximum refresh rate your monitor is properly connected to the video card output connector on the screen • Use Windows shut-down mode. Missing one of the primary colors (RED, GREEN, or BLUE) • Inspect the monitor's video cable and make sure none of at : http://www.hp.com/support) Picture Is Fuzzy & Has Ghosting Shadowing Problem • Adjust the Contrast and Brightness Controls. • Make sure you need a Plug & Play compatible computer & video card. We recommend plugging the monitor directly to the computer. Picture Bounces, Flickers...
... maximum refresh rate your monitor is properly connected to the video card output connector on the screen • Use Windows shut-down mode. Missing one of the primary colors (RED, GREEN, or BLUE) • Inspect the monitor's video cable and make sure none of at : http://www.hp.com/support) Picture Is Fuzzy & Has Ghosting Shadowing Problem • Adjust the Contrast and Brightness Controls. • Make sure you need a Plug & Play compatible computer & video card. We recommend plugging the monitor directly to the computer. Picture Bounces, Flickers...
User Guide
Page 24
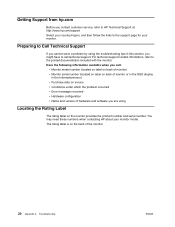
... follow the links to the support page for your monitor model. The rating label is on the back of hardware and software you might have to call : • Monitor model number (located on label on back of monitor) • Monitor serial number (located on label on back of monitor or in the OSD display in this section, you are using the troubleshooting tips in the Informationmenu) •...
... follow the links to the support page for your monitor model. The rating label is on the back of hardware and software you might have to call : • Monitor model number (located on label on back of monitor) • Monitor serial number (located on label on back of monitor or in the OSD display in this section, you are using the troubleshooting tips in the Informationmenu) •...
User Guide
Page 25
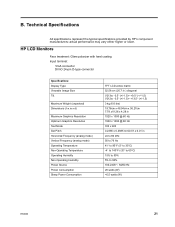
... provided by HP's component manufacturers; HP LCD Monitors Face treatment: Glare polarizer with hard coating Input terminal: VGA connector DVI-D 24-pin D-type connector Specifications: Display Type: Viewable Image Size Tilt Maximum Weight (unpacked) Dimensions (h x w x d) Maximum Graphics Resolution Optimum Graphics Resolution Text Mode Dot Pitch Horizontal Frequency (analog mode) Vertical Frequency (analog mode) Operating Temperature Non-Operating Temperature Operating Humidity Non-Operating Humidity Power Source Power Consumption Sleep Power Consumption TFT LCD active matrix...
... provided by HP's component manufacturers; HP LCD Monitors Face treatment: Glare polarizer with hard coating Input terminal: VGA connector DVI-D 24-pin D-type connector Specifications: Display Type: Viewable Image Size Tilt Maximum Weight (unpacked) Dimensions (h x w x d) Maximum Graphics Resolution Optimum Graphics Resolution Text Mode Dot Pitch Horizontal Frequency (analog mode) Vertical Frequency (analog mode) Operating Temperature Non-Operating Temperature Operating Humidity Non-Operating Humidity Power Source Power Consumption Sleep Power Consumption TFT LCD active matrix...
User Guide
Page 27
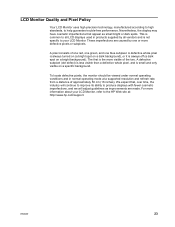
... two. These imperfections are made. LCD Monitor Quality and Pixel Policy Your LCD Monitor uses high-precision technology, manufactured according to high standards, to the HP Web site at a supported resolution and refresh rate, from a distance of approximately 50 cm (16 inches). Nevertheless, the display may have cosmetic imperfections that , over time, the industry will adjust guidelines as small bright or dark spots. A defective subpixel...
... two. These imperfections are made. LCD Monitor Quality and Pixel Policy Your LCD Monitor uses high-precision technology, manufactured according to high standards, to the HP Web site at a supported resolution and refresh rate, from a distance of approximately 50 cm (16 inches). Nevertheless, the display may have cosmetic imperfections that , over time, the industry will adjust guidelines as small bright or dark spots. A defective subpixel...


