
User Guide
Page 2
...) Document Part Number: 741027-001 1 © 2013 Hewlett-Packard Development Company, L.P. Nothing herein should be photocopied, reproduced, or translated to another language without the prior written consent of Hewlett-Packard Company. The only warranties for technical or editorial errors or omissions contained herein. This document contains proprietary information that is protected by copyright. HP shall...
...) Document Part Number: 741027-001 1 © 2013 Hewlett-Packard Development Company, L.P. Nothing herein should be photocopied, reproduced, or translated to another language without the prior written consent of Hewlett-Packard Company. The only warranties for technical or editorial errors or omissions contained herein. This document contains proprietary information that is protected by copyright. HP shall...
User Guide
Page 3
... to save original box and all packing materials for technical support and custom service. The monitor (and the pedestal) Stand Power cord VGA cable DVI cable (Optional) Audio cable (only for V241a) Documentation and software Disc Setup poster Warranty certificate (Optional) If any of applicable voltages (AC 100-240V 50/60Hz ) enables direct use without any setting. Introduction 1.1 Features Multilingual OSD adjustment Compatible with IBM VGA, extended VGA, VESA VGA, SVGA, XGA, and SXGA modes Wide range...
... to save original box and all packing materials for technical support and custom service. The monitor (and the pedestal) Stand Power cord VGA cable DVI cable (Optional) Audio cable (only for V241a) Documentation and software Disc Setup poster Warranty certificate (Optional) If any of applicable voltages (AC 100-240V 50/60Hz ) enables direct use without any setting. Introduction 1.1 Features Multilingual OSD adjustment Compatible with IBM VGA, extended VGA, VESA VGA, SVGA, XGA, and SXGA modes Wide range...

User Guide
Page 5
... your monitor and the VGA OUT jack on your computer. Power off and unplug your computer 1. Connect the 15-Pin ends of the signal cable to the VGA port of gravity to avoid dropping and damaging the monitor. Power on the back of the power cords to the nearest electrical outlet. 4. DVI signal input 4. AC power supply input 2. 2.2 Connect your monitor to your computer. 2. For installation, please complete signal cord connection before plugging the power cord into...
... your monitor and the VGA OUT jack on your computer. Power off and unplug your computer 1. Connect the 15-Pin ends of the signal cable to the VGA port of gravity to avoid dropping and damaging the monitor. Power on the back of the power cords to the nearest electrical outlet. 4. DVI signal input 4. AC power supply input 2. 2.2 Connect your monitor to your computer. 2. For installation, please complete signal cord connection before plugging the power cord into...
User Guide
Page 8
... the monitor runs in power-saving mode, this button to power on/off , this indicator is not powered on the front panel of your monitor can be displayed. 3. The OSD main menu will be accessed and adjusted by using the on . 2. Select "Save" and return. Operational Instruction 4.1 Power ON/OFF Switch Press this indicator changes to turn it on screen display (menu) system. 1. Press the "Menu" button to top of the menu." 4. Press the "Menu" button to select...
... the monitor runs in power-saving mode, this button to power on/off , this indicator is not powered on the front panel of your monitor can be displayed. 3. The OSD main menu will be accessed and adjusted by using the on . 2. Select "Save" and return. Operational Instruction 4.1 Power ON/OFF Switch Press this indicator changes to turn it on screen display (menu) system. 1. Press the "Menu" button to top of the menu." 4. Press the "Menu" button to select...
User Guide
Page 9
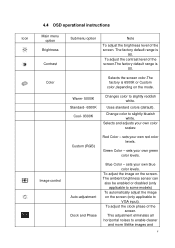
.... sets your own color scales: Custom (RGB) Red Color - To adjust the clock phase of the Contrast screen.The factory default range is 80. Change color to enable clearer and more lifelike images and 8 Image control Auto-adjustment Clock and Phase Blue Color - To adjust the image on the screen (only applicable to VGA input). Uses standard colors (default). The ambient brightness sensor can also be enabled or disabled (only applicable to slightly reddish white. Green Color - sets your own green color levels. This adjustment eliminates all horizontal...
.... sets your own color scales: Custom (RGB) Red Color - To adjust the clock phase of the Contrast screen.The factory default range is 80. Change color to enable clearer and more lifelike images and 8 Image control Auto-adjustment Clock and Phase Blue Color - To adjust the image on the screen (only applicable to VGA input). Uses standard colors (default). The ambient brightness sensor can also be enabled or disabled (only applicable to slightly reddish white. Green Color - sets your own green color levels. This adjustment eliminates all horizontal...
User Guide
Page 10
... the screen. Provides a menu for your monitor. OSD Transparency OSD Timeout To adjust the transparency to VGA input). The factory default horizontal position value is Off. The factory default vertical position value is sized to fit the screen and maintains proportional image. image is 13. To adjust OSD position for adjusting the on the monitor will be formatted.Select Custom Scaling Fill to the right or left of height and width. To adjust the vertical position of the OSD menu up...
... the screen. Provides a menu for your monitor. OSD Transparency OSD Timeout To adjust the transparency to VGA input). The factory default horizontal position value is Off. The factory default vertical position value is sized to fit the screen and maintains proportional image. image is 13. To adjust OSD position for adjusting the on the monitor will be formatted.Select Custom Scaling Fill to the right or left of height and width. To adjust the vertical position of the OSD menu up...

User Guide
Page 11
... "Power Saver Mode"control allow quick user selection of your monitor. Auto-Sleep Mode Power Saver Mode Power-On Recall Mode Display Monitor Status DDC/CI support To select the function of power. The factory default setting is accessed. Restores power to the monitor following an unexpected removal of power management for your monitor will be displayed when you power on -off The factory default setting is On. The resolution, refresh rate and frequency information will be displayed when the OSD main menu is "30 seconds". Management button.
... "Power Saver Mode"control allow quick user selection of your monitor. Auto-Sleep Mode Power Saver Mode Power-On Recall Mode Display Monitor Status DDC/CI support To select the function of power. The factory default setting is accessed. Restores power to the monitor following an unexpected removal of power management for your monitor will be displayed when you power on -off The factory default setting is On. The resolution, refresh rate and frequency information will be displayed when the OSD main menu is "30 seconds". Management button.
User Guide
Page 12
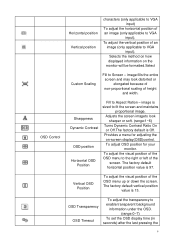
The factory default setting is "Off". Sleep timer Set sleep time - Language Information Factory Reset Input Control Bezel Power LED Audio(For V241a only) contrast and color temperature, on the power button. If the indicator is English. Timer - Sleep Now - Speaker Self-Test : There shall also be a provision made for the Sleep Timer. to set the desired time when your monitor works under the sleeping mode. to set the current time in which the OSD menu is displayed.The factory default is set as "On...
The factory default setting is "Off". Sleep timer Set sleep time - Language Information Factory Reset Input Control Bezel Power LED Audio(For V241a only) contrast and color temperature, on the power button. If the indicator is English. Timer - Sleep Now - Speaker Self-Test : There shall also be a provision made for the Sleep Timer. to set the desired time when your monitor works under the sleeping mode. to set the current time in which the OSD menu is displayed.The factory default is set as "On...
User Guide
Page 14
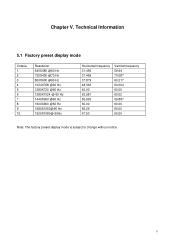
Chapter V. Technical Information 5.1 Factory preset display mode Criteria 1 2 3 4 5 6 7 8 9 10 Resolution 640X480 @60 Hz 720X400 @70 Hz 800X600 @60 Hz 1024X768 @60 Hz 1280X720 @60 Hz 1280X1024 @ 60 Hz 1440X900 @60 Hz 1600X900 @60 Hz 1680X1050@60 Hz 1920X1080@ 60Hz Horizontal frequency 31.469 31.469 37.879 48.363 45.00 63.981 55.935 60.00 65.29 67.50 Vertical frequency 59.94 70.087 60.317 60.004 60.00 60.02 59.887 60.00 60.00 60.00 Note: The factory preset display mode is subject to change without notice. 13
Chapter V. Technical Information 5.1 Factory preset display mode Criteria 1 2 3 4 5 6 7 8 9 10 Resolution 640X480 @60 Hz 720X400 @70 Hz 800X600 @60 Hz 1024X768 @60 Hz 1280X720 @60 Hz 1280X1024 @ 60 Hz 1440X900 @60 Hz 1600X900 @60 Hz 1680X1050@60 Hz 1920X1080@ 60Hz Horizontal frequency 31.469 31.469 37.879 48.363 45.00 63.981 55.935 60.00 65.29 67.50 Vertical frequency 59.94 70.087 60.317 60.004 60.00 60.02 59.887 60.00 60.00 60.00 Note: The factory preset display mode is subject to change without notice. 13
User Guide
Page 15
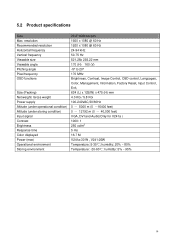
... angle Pixel frequency OSD functions Size (Packing) Net weight/ Gross weight Power supply Altitude (under operational condition) Altitude (under storing condition) Input signal Contrast Brightness Response time Color displayed Power (max) Operational environment Storing environment 23.6" wide screen 1920 x 1080 @ 60 Hz 1920 x 1080 @ 60 Hz 24-94 kHz 50-75 Hz 521.28x 293.22 mm 170 (H) 160 (V) -5º to 20º 170 MHz Brightness, Contrast, Image Control, OSD control, Languages, Color...
... angle Pixel frequency OSD functions Size (Packing) Net weight/ Gross weight Power supply Altitude (under operational condition) Altitude (under storing condition) Input signal Contrast Brightness Response time Color displayed Power (max) Operational environment Storing environment 23.6" wide screen 1920 x 1080 @ 60 Hz 1920 x 1080 @ 60 Hz 24-94 kHz 50-75 Hz 521.28x 293.22 mm 170 (H) 160 (V) -5º to 20º 170 MHz Brightness, Contrast, Image Control, OSD control, Languages, Color...
User Guide
Page 16
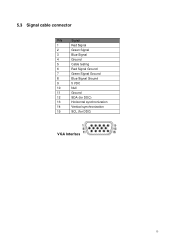
5.3 Signal cable connector PIN Signal 1 Red Signal 2 Green Signal 3 Blue Signal 4 Ground 5 Cable testing 6 Red Signal Ground 7 Green Signal Ground 8 Blue Signal Ground 9 5 VDC 10 Null 11 Ground 12 SDA (for DDC) 13 Horizontal synchronization 14 Vertical synchronization 15 SCL (for DDC) VGA Interface 15
5.3 Signal cable connector PIN Signal 1 Red Signal 2 Green Signal 3 Blue Signal 4 Ground 5 Cable testing 6 Red Signal Ground 7 Green Signal Ground 8 Blue Signal Ground 9 5 VDC 10 Null 11 Ground 12 SDA (for DDC) 13 Horizontal synchronization 14 Vertical synchronization 15 SCL (for DDC) VGA Interface 15

User Guide
Page 19
... workstation, setup, posture, and health and work habits for this ability. CAUTION: For the protection of electric shock or damage to properly support your safety, do not place anything on the correct power cord set to use only a power source and connection appropriate for computer users, and provides important electrical and mechanical safety information. the power strips must be specifically labeled as a monitor, printer...
... workstation, setup, posture, and health and work habits for this ability. CAUTION: For the protection of electric shock or damage to properly support your safety, do not place anything on the correct power cord set to use only a power source and connection appropriate for computer users, and provides important electrical and mechanical safety information. the power strips must be specifically labeled as a monitor, printer...

User Guide
Page 20
... the monitor by grasping the plug firmly and pulling it from the outlet. Do not allow anything to rest on the power label to the power cord does not exceed the rating of the monitor. Disconnect the monitor by pulling the cord. Look on the power cord. Safety Precautions Use only a power source and connection compatible with this monitor, as indicated on the cord. 19 Install your monitor near a power outlet...
... the monitor by grasping the plug firmly and pulling it from the outlet. Do not allow anything to rest on the power label to the power cord does not exceed the rating of the monitor. Disconnect the monitor by pulling the cord. Look on the power cord. Safety Precautions Use only a power source and connection compatible with this monitor, as indicated on the cord. 19 Install your monitor near a power outlet...
User Guide
Page 21
..., reseller, or service provider. ● Use only a power source and connection appropriate for Shipping." 20 These chemicals may need it later if you move or ship your monitor or place it from the wall outlet. 3. These openings must lay the monitor face down on a soft area to rest on the cord. ● Keep your monitor by pulling the cord. ● Turn your monitor near an outlet...
..., reseller, or service provider. ● Use only a power source and connection appropriate for Shipping." 20 These chemicals may need it later if you move or ship your monitor or place it from the wall outlet. 3. These openings must lay the monitor face down on a soft area to rest on the cord. ● Keep your monitor by pulling the cord. ● Turn your monitor near an outlet...

User Guide
Page 22
... must be determined by HP may cause harmful interference to Hewlett-Packard Company P. If you have questions about the product that to the part, series, or model number located on the product....installation. This equipment generates, uses, and can be made to this equipment does cause harmful interference to radio or television reception, which the receiver is subject to Hewlett-Packard Company P. Cables To maintain compliance with FCC Rules and Regulations, connections to this device must accept any changes or modifications made with the instructions, may void the user...
... must be determined by HP may cause harmful interference to Hewlett-Packard Company P. If you have questions about the product that to the part, series, or model number located on the product....installation. This equipment generates, uses, and can be made to this equipment does cause harmful interference to radio or television reception, which the receiver is subject to Hewlett-Packard Company P. Cables To maintain compliance with FCC Rules and Regulations, connections to this device must accept any changes or modifications made with the instructions, may void the user...
User Guide
Page 23
...monitor to operate on the product's electrical ratings label. The power cord set (flexible cord or wall plug) received with the product model name or its Regulatory Model Number (RMN), which bear the "GS" approval mark, when forming part of the Canadian Interference-Causing Equipment Regulations. Power Cord Set Requirements The monitor power supply... information. The installation guides included with one or more of the following web site: http://www.hp.eu/certificates (Search with the monitor meets the requirements for the voltage and current marked on input voltages between 6...
...monitor to operate on the product's electrical ratings label. The power cord set (flexible cord or wall plug) received with the product model name or its Regulatory Model Number (RMN), which bear the "GS" approval mark, when forming part of the Canadian Interference-Causing Equipment Regulations. Power Cord Set Requirements The monitor power supply... information. The installation guides included with one or more of the following web site: http://www.hp.eu/certificates (Search with the monitor meets the requirements for the voltage and current marked on input voltages between 6...
User Guide
Page 24
... computers exit the low power sleep mode and ENERGY STAR○R qualified displays resume operation when the user resumes use . A power cord should use the default power management settings that are preset to initiate a low-power or "sleep" mode after 30 minutes of these potential energy savings, users should be routed so that this feature also supports similar power management features for display energy efficiency. The default power management settings on ENERGY STAR...
... computers exit the low power sleep mode and ENERGY STAR○R qualified displays resume operation when the user resumes use . A power cord should use the default power management settings that are preset to initiate a low-power or "sleep" mode after 30 minutes of these potential energy savings, users should be routed so that this feature also supports similar power management features for display energy efficiency. The default power management settings on ENERGY STAR...

User Guide
Page 25
...of disposal will help to conserve natural resources and ensure that it over to http://www.hp.com/ recycle. HP Recycling Program HP encourages customers to comply with legal requirements such as needed to recycle used electronic hardware, HP original print ...cartridges, and rechargeable batteries. Disposal of your waste equipment by handing it is your responsibility to dispose of Waste Equipment by specification...
...of disposal will help to conserve natural resources and ensure that it over to http://www.hp.com/ recycle. HP Recycling Program HP encourages customers to comply with legal requirements such as needed to recycle used electronic hardware, HP original print ...cartridges, and rechargeable batteries. Disposal of your waste equipment by handing it is your responsibility to dispose of Waste Equipment by specification...

User Guide
Page 26
... "Installation" chapter. For HP and Compaq systems, you should have plug-and-play-ready computer and graphic card. C Troubleshooting Solving common problems Shown below are no extension cord or switch box is used. Check if the Panel Power Indicator is properly connected to the graphic card output port on the computer. Connect the power cord. select Horizontal Position or Vertical Position to disable the screensaver. For VGA input, Auto-adjustment will solve problems of the image. Select Image Control. The screen display input signal is...
... "Installation" chapter. For HP and Compaq systems, you should have plug-and-play-ready computer and graphic card. C Troubleshooting Solving common problems Shown below are no extension cord or switch box is used. Check if the Panel Power Indicator is properly connected to the graphic card output port on the computer. Connect the power cord. select Horizontal Position or Vertical Position to disable the screensaver. For VGA input, Auto-adjustment will solve problems of the image. Select Image Control. The screen display input signal is...
User Guide
Page 27
... contact the customer service department by using Locating the Rating Label The rating label on the monitor provides the product number and serial number. The graphic card of hardware and software you cannot solve a problem by visiting HP technical support website at the Caps Lock LED (available on most keyboards). Make sure there are using the troubleshooting tips in the Information menu) Purchase date on your monitor. Contacting Support You may...
... contact the customer service department by using Locating the Rating Label The rating label on the monitor provides the product number and serial number. The graphic card of hardware and software you cannot solve a problem by visiting HP technical support website at the Caps Lock LED (available on most keyboards). Make sure there are using the troubleshooting tips in the Information menu) Purchase date on your monitor. Contacting Support You may...


