
User Guide
Page 1
HP V241a/V241 LED Backlit Monitor User Guide
HP V241a/V241 LED Backlit Monitor User Guide
User Guide
Page 3
...-and-play VESA DDC1/ 2B Standard. Note: Be sure to save original box and all packing materials for technical support and custom service. Chapter I. The monitor (and the pedestal) Stand Power cord VGA cable DVI cable (Optional) Audio cable (only for V241a) Documentation and software Disc Setup poster Warranty certificate (Optional... future transport. 2 Compatible with Windows 9x / 2000 / XP / 7 / 8/Vista operation systems 1.2 Check list Please make sure the following items are missing, please contact your LCD monitor;
...-and-play VESA DDC1/ 2B Standard. Note: Be sure to save original box and all packing materials for technical support and custom service. Chapter I. The monitor (and the pedestal) Stand Power cord VGA cable DVI cable (Optional) Audio cable (only for V241a) Documentation and software Disc Setup poster Warranty certificate (Optional... future transport. 2 Compatible with Windows 9x / 2000 / XP / 7 / 8/Vista operation systems 1.2 Check list Please make sure the following items are missing, please contact your LCD monitor;

User Guide
Page 5
... complete signal cord connection before plugging the power cord into the electrical outlet to the nearest electrical outlet. 4. AC power supply input 2. If the monitor does not display any image, check all the connections. Cautions: 1. Connect the 15-Pin ends of the signal cable to the VGA port of ...on your computer. Connect one end of power cord to the monitor, then connect the other end of the power cords to avoid damaging the monitor. 2. Overview of the ports on both ends of the signal cable. 3. 2.2 Connect your monitor to your hand at its center of gravity to avoid dropping ...
... complete signal cord connection before plugging the power cord into the electrical outlet to the nearest electrical outlet. 4. AC power supply input 2. If the monitor does not display any image, check all the connections. Cautions: 1. Connect the 15-Pin ends of the signal cable to the VGA port of ...on your computer. Connect one end of power cord to the monitor, then connect the other end of the power cords to avoid damaging the monitor. 2. Overview of the ports on both ends of the signal cable. 3. 2.2 Connect your monitor to your hand at its center of gravity to avoid dropping ...
User Guide
Page 7
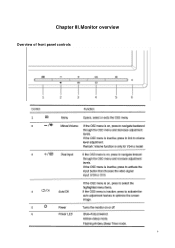
Chapter III. Monitor overview Overview of front panel controls 6
Chapter III. Monitor overview Overview of front panel controls 6
User Guide
Page 8
..., press the "Power" button to amber. Press the "Menu" button to select a highlighted function. Select "Save" and return. When the highlight scrolls down . If the monitor runs in power-saving mode, this button to scroll down to the bottom of the menu, it returns to top of your... monitor can be displayed. 3. The OSD main menu will be accessed and adjusted by using the on the front panel of the menu." 4. Then press the "...
..., press the "Power" button to amber. Press the "Menu" button to select a highlighted function. Select "Save" and return. When the highlight scrolls down . If the monitor runs in power-saving mode, this button to scroll down to the bottom of the menu, it returns to top of your... monitor can be displayed. 3. The OSD main menu will be accessed and adjusted by using the on the front panel of the menu." 4. Then press the "...
User Guide
Page 10
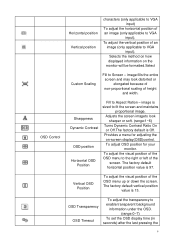
image is 13. To adjust OSD position for adjusting the on the monitor will be formatted.Select Custom Scaling Fill to Screen - Vertical OSD Position To adjust the visual position of an image (only applicable to VGA input). ... entire screen and may look sharper or soft. (range:1~6) Turns Dynamic Contrast Ratio On or Off.The factory default is 97. Provides a menu for your monitor. The factory default vertical position value is sized to fit the screen and maintains proportional image. To adjust the vertical position of the OSD menu...
image is 13. To adjust OSD position for adjusting the on the monitor will be formatted.Select Custom Scaling Fill to Screen - Vertical OSD Position To adjust the visual position of an image (only applicable to VGA input). ... entire screen and may look sharper or soft. (range:1~6) Turns Dynamic Contrast Ratio On or Off.The factory default is 97. Provides a menu for your monitor. The factory default vertical position value is sized to fit the screen and maintains proportional image. To adjust the vertical position of the OSD menu...

User Guide
Page 11
...Bottom Off The factory default setting is accessed. The "Power Saver Mode"control allow quick user selection of power management for your monitor will be displayed when you power on -off The factory default setting is On. The resolution, refresh rate and frequency information will... menu is "Top" Controlling some OSD menu functions, such as the factory default on your monitor. Management button. Restores power to the monitor following an unexpected removal of your monitor. The operational status of power. The factory default setting is On. To enable the energy-saving...
...Bottom Off The factory default setting is accessed. The "Power Saver Mode"control allow quick user selection of power management for your monitor will be displayed when you power on -off The factory default setting is On. The resolution, refresh rate and frequency information will... menu is "Top" Controlling some OSD menu functions, such as the factory default on your monitor. Management button. Restores power to the monitor following an unexpected removal of your monitor. The operational status of power. The factory default setting is On. To enable the energy-saving...
User Guide
Page 12
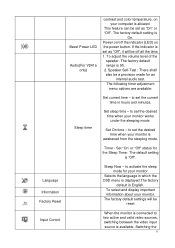
... the sleeping mode. to set as "Off", it will be set as "On" or "Off". The factory default settings will be a provision made for your monitor Selects the language in which the OSD menu is displayed.The factory default is set the current time in hours and minutes. to set the... desired time when your monitor is available. The default setting is 90. 2. Set "On' or "Off" status for the Sleep Timer. If the indicator is English. Language Information Factory Reset...
... the sleeping mode. to set as "Off", it will be set as "On" or "Off". The factory default settings will be a provision made for your monitor Selects the language in which the OSD menu is displayed.The factory default is set the current time in hours and minutes. to set the... desired time when your monitor is available. The default setting is 90. 2. Set "On' or "Off" status for the Sleep Timer. If the indicator is English. Language Information Factory Reset...

User Guide
Page 19
...power strips provide surge protection; Use a power strip whose manufacturer offers a Damage Replacement Policy so you can not be specifically labeled as a monitor, printer and scanner) to properly support your safety, do not place anything on a cord or cable. A Safety and Maintenance Guidelines Important... from the equipment by unplugging the power cord from the electrical outlet, grasp the cord by the plug. Warning! For your HP LCD monitor. CAUTION: For the protection of electric shock or damage to the "Power Cord Set Requirements" section in Agency Regulatory Notices. ...
...power strips provide surge protection; Use a power strip whose manufacturer offers a Damage Replacement Policy so you can not be specifically labeled as a monitor, printer and scanner) to properly support your safety, do not place anything on a cord or cable. A Safety and Maintenance Guidelines Important... from the equipment by unplugging the power cord from the electrical outlet, grasp the cord by the plug. Warning! For your HP LCD monitor. CAUTION: For the protection of electric shock or damage to the "Power Cord Set Requirements" section in Agency Regulatory Notices. ...

User Guide
Page 20
... a power outlet that you can easily reach. Disconnect the monitor by pulling the cord. Do not allow anything to rest on the cord. 19 Do not walk on the power cord. Never disconnect the monitor by grasping the plug firmly and pulling it from the outlet. Safety Precautions Use only a power ...source and connection compatible with this monitor, as indicated on the power label to determine the ampere rating (Amps or A) for each device. Be sure the total ampere rating of the products ...
... a power outlet that you can easily reach. Disconnect the monitor by pulling the cord. Do not allow anything to rest on the cord. 19 Do not walk on the power cord. Never disconnect the monitor by grasping the plug firmly and pulling it from the outlet. Safety Precautions Use only a power ...source and connection compatible with this monitor, as indicated on the power label to determine the ampere rating (Amps or A) for each device. Be sure the total ampere rating of the products ...
User Guide
Page 21
Check the power label to the cord does not exceed the rating of your monitor: ● Do not open your monitor in a well-ventilated area, away from the outlet. You can easily reach. Note: The HP Warranty does not cover monitors with a burned-in image. ● Slots and openings in the cabinet ...are covered in use. Never push objects of your monitor near an outlet that are provided for ventilation. Do not walk on the...
Check the power label to the cord does not exceed the rating of your monitor: ● Do not open your monitor in a well-ventilated area, away from the outlet. You can easily reach. Note: The HP Warranty does not cover monitors with a burned-in image. ● Slots and openings in the cabinet ...are covered in use. Never push objects of your monitor near an outlet that are provided for ventilation. Do not walk on the...
User Guide
Page 23
European Union Regulatory Notice Products bearing the CE marking comply with one or more of the following web site: http://www.hp.eu/certificates (Search with the monitor meets the requirements for use in the country where you should be rated for the product and for regulatory matters is ...sectional area of the wire must be a minimum of 0.75 mm² or 18 AWG, and the length of a system comprising HP brand computers, keyboards and monitors that country. CAN ICES-3(B)/NMB-3(B) Avis Canadien Cet appareil numérique de la classe B respecte toutes les exigences du Règlement...
European Union Regulatory Notice Products bearing the CE marking comply with one or more of the following web site: http://www.hp.eu/certificates (Search with the monitor meets the requirements for use in the country where you should be rated for the product and for regulatory matters is ...sectional area of the wire must be a minimum of 0.75 mm² or 18 AWG, and the length of a system comprising HP brand computers, keyboards and monitors that country. CAN ICES-3(B)/NMB-3(B) Avis Canadien Cet appareil numérique de la classe B respecte toutes les exigences du Règlement...

User Guide
Page 26
... will solve problems of the image. Please contact the manufacturer of your monitor, you may download the HP monitor driver at : www.hp.com/support. B: Factory Preset Display Mode). Make sure latest applicable driver for your monitor. Select Image Control. Make sure no bent PINs. Check the video cable... of your graphic card. Blurred and ghost image. Make sure the HP monitor driver is used. Be sure that the computer power is properly connected to disable the screensaver. Power on and the power ...
... will solve problems of the image. Please contact the manufacturer of your monitor, you may download the HP monitor driver at : www.hp.com/support. B: Factory Preset Display Mode). Make sure latest applicable driver for your monitor. Select Image Control. Make sure no bent PINs. Check the video cable... of your graphic card. Blurred and ghost image. Make sure the HP monitor driver is used. Be sure that the computer power is properly connected to disable the screensaver. Power on and the power ...
User Guide
Page 27
... need these numbers when contacting HP about your monitor model. The LED will light or fade out. For technical support contact information, refer to call : Monitor model number (located on label on back of monitor) Monitor serial number (located on label on back of monitor or in the OSD display... and serial number. Preparing to your computer is always enabled for the monitor (yellow LED). Follow the link to visit pages applicable to Call Technical Support If you cannot solve a problem by visiting HP technical support website at the Caps Lock LED (available on . The ...
... need these numbers when contacting HP about your monitor model. The LED will light or fade out. For technical support contact information, refer to call : Monitor model number (located on label on back of monitor) Monitor serial number (located on label on back of monitor or in the OSD display... and serial number. Preparing to your computer is always enabled for the monitor (yellow LED). Follow the link to visit pages applicable to Call Technical Support If you cannot solve a problem by visiting HP technical support website at the Caps Lock LED (available on . The ...


