

User Guide
Page 2
... forth in the United States and/or other countries. Nothing herein should be liable for HP products and services are either trademarks or registered trademarks of HP Company. No part of this document may be photocopied, reproduced, or translated to another language... without the prior written consent of Microsoft Corporation in the express warranty statements accompanying such products and services. © 2017 HP Development Company, L.P. This document contains proprietary information that is protected by copyright. First Edition (February 2017) Document Part Number: ...
... forth in the United States and/or other countries. Nothing herein should be liable for HP products and services are either trademarks or registered trademarks of HP Company. No part of this document may be photocopied, reproduced, or translated to another language... without the prior written consent of Microsoft Corporation in the express warranty statements accompanying such products and services. © 2017 HP Development Company, L.P. This document contains proprietary information that is protected by copyright. First Edition (February 2017) Document Part Number: ...
User Guide
Page 3
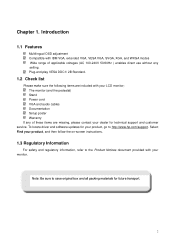
..., please contact your dealer for your product, go to save original box and all packing materials for future transport. 2 Note: Be sure to http://www.hp.com/support.
..., please contact your dealer for your product, go to save original box and all packing materials for future transport. 2 Note: Be sure to http://www.hp.com/support.
User Guide
Page 4
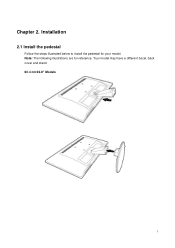
Chapter 2. Your model may have a different bezel, back cover and stand. 60.4 cm/23.8" Models 3 Note: The following illustrations are for your model. Installation 2.1 Install the pedestal Follow the steps illustrated below to install the pedestal for reference.
Chapter 2. Your model may have a different bezel, back cover and stand. 60.4 cm/23.8" Models 3 Note: The following illustrations are for your model. Installation 2.1 Install the pedestal Follow the steps illustrated below to install the pedestal for reference.
User Guide
Page 5
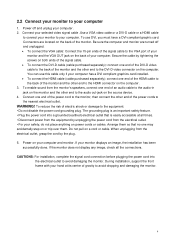
Connect your selected video signal cable .Use a VGA video cable or a DVI-D cable or a HDMI cable to connect your monitor to your computer 1. Be sure the computer and monitor are located on the back of gravity to avoid dropping and damaging the monitor. 4 Connectors are turned off and unplug your computer. 2. The grounding plug is easily accessible at its center of your computer. To enable sound from the monitor's speakers, connect one end of the power cord to the monitor, then connect the other end to the HDMI connector on the computer. If your monitor and the...
Connect your selected video signal cable .Use a VGA video cable or a DVI-D cable or a HDMI cable to connect your monitor to your computer 1. Be sure the computer and monitor are located on the back of gravity to avoid dropping and damaging the monitor. 4 Connectors are turned off and unplug your computer. 2. The grounding plug is easily accessible at its center of your computer. To enable sound from the monitor's speakers, connect one end of the power cord to the monitor, then connect the other end to the HDMI connector on the computer. If your monitor and the...

User Guide
Page 6
HDMI signal input 5. Audio Line-In input 6. DVI-D signal input 4. Kensington Lock Slot 2. AC power supply input 5 VGA signal input 3. Overview of the ports of the monitor: 1.
HDMI signal input 5. Audio Line-In input 6. DVI-D signal input 4. Kensington Lock Slot 2. AC power supply input 5 VGA signal input 3. Overview of the ports of the monitor: 1.

User Guide
Page 7
To attach the display head to remove it from the display. 2. For the best performance, use the power and video cables provided with the monitor. 6 Note: The monitor supports the VESA industry standard 100mm mounting holes. 2.3 Disconnect the pedestal for reference. Your model may have a different bezel, back cover and stand. Note: The following illustrations are for shipping or mounting the display head 60.4 cm/23.8" Models 1. Press and hold the clips on the display head and slide the stand to a wall, swing arm or other mounting fixture, follow the manufacturer's mounting...
To attach the display head to remove it from the display. 2. For the best performance, use the power and video cables provided with the monitor. 6 Note: The monitor supports the VESA industry standard 100mm mounting holes. 2.3 Disconnect the pedestal for reference. Your model may have a different bezel, back cover and stand. Note: The following illustrations are for shipping or mounting the display head 60.4 cm/23.8" Models 1. Press and hold the clips on the display head and slide the stand to a wall, swing arm or other mounting fixture, follow the manufacturer's mounting...

User Guide
Page 8
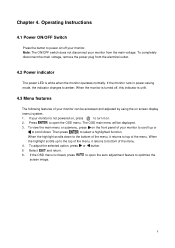
Chapter 3. Press to access input selection (short press for 2-3 seconds). Your model may have a different on or off. If the OSD is for VGA input only). Monitor overview Overview of front panel controls Note: The following illustration is closed, press to open the auto adjustment (for reference. Closed the OSD menu, cancel recall. (Settings will be saved automatically after adjustments are made.) Minus/Plus adjustments, change within several selections. Control 1 2 3 4 5 Function Power Auto Exit Left/Right Enter Turns the monitor on -screen display (OSD) button icon. Opens...
Chapter 3. Press to access input selection (short press for 2-3 seconds). Your model may have a different on or off. If the OSD is for VGA input only). Monitor overview Overview of front panel controls Note: The following illustration is closed, press to open the auto adjustment (for reference. Closed the OSD menu, cancel recall. (Settings will be saved automatically after adjustments are made.) Minus/Plus adjustments, change within several selections. Control 1 2 3 4 5 Function Power Auto Exit Left/Right Enter Turns the monitor on -screen display (OSD) button icon. Opens...
User Guide
Page 9
The OSD main menu will be accessed and adjusted by using the on screen display (menu) system. 1. To completely disconnect the main voltage, remove the power plug from the main voltage. If your monitor is not powered on /off , this indicator is unlit. 4.3 Menu features The following features of the menu, it on the front panel of your monitor can be displayed. 3. To adjust the selected option, press or button. 5 Select and return. 6. Chapter 4. Note: The ON/OFF switch does not disconnect your monitor. Press to open the auto adjustment feature to bottom of the menu. ...
The OSD main menu will be accessed and adjusted by using the on screen display (menu) system. 1. To completely disconnect the main voltage, remove the power plug from the main voltage. If your monitor is not powered on /off , this indicator is unlit. 4.3 Menu features The following features of the menu, it on the front panel of your monitor can be displayed. 3. To adjust the selected option, press or button. 5 Select and return. 6. Chapter 4. Note: The ON/OFF switch does not disconnect your monitor. Press to open the auto adjustment feature to bottom of the menu. ...
User Guide
Page 10
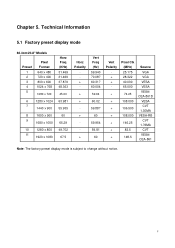
Technical Information 5.1 Factory preset display mode 60.4cm/23.8" Models Preset 1 2 3 4 5 Pixel Format 640 x 480 720 x 400 800 x 600 1024 x 768 1280 x 720 6 1280 x 1024 7 1440 x 900 8 1600 x 900 9 1680 x 1050 10 1280 x 800 11 1920 x 1080 Horz Freq (KHz) 31.469 31.469 37.879 48.363 45.00 63.981 55.935 60 65.29 49.702 67.5 Horz Polarity + - + + - + - - + Vert Freq (Hz) 59.940 70.087 60.317 60.004 59.94 60.02 59.887 60 59.954 59.81 60 Vert Polarity + + - + + + + + + + Pixel Clk (MHz) 25.175 28.322 40.000 65.000 74.25 108.000 106.500 108.000 146.25 83.5 148.5 Source VGA VGA VESA ...
Technical Information 5.1 Factory preset display mode 60.4cm/23.8" Models Preset 1 2 3 4 5 Pixel Format 640 x 480 720 x 400 800 x 600 1024 x 768 1280 x 720 6 1280 x 1024 7 1440 x 900 8 1600 x 900 9 1680 x 1050 10 1280 x 800 11 1920 x 1080 Horz Freq (KHz) 31.469 31.469 37.879 48.363 45.00 63.981 55.935 60 65.29 49.702 67.5 Horz Polarity + - + + - + - - + Vert Freq (Hz) 59.940 70.087 60.317 60.004 59.94 60.02 59.887 60 59.954 59.81 60 Vert Polarity + + - + + + + + + + Pixel Clk (MHz) 25.175 28.322 40.000 65.000 74.25 108.000 106.500 108.000 146.25 83.5 148.5 Source VGA VGA VESA ...
User Guide
Page 11
resolution Recommended resolution Horizontal frequency Vertical frequency Viewable size Viewable angle Tilt angle Pixel frequency OSD functions Size (Packing) Net weight/ Gross weight Power supply Altitude (under operational condition) Altitude (under storing condition) Input signal Speaker Contrast Brightness Response time Color displayed Power (max) Operational environment Storing environment 60.4cm/23.8" wide screen Models 1920 x 1080 @ 60 Hz 1920 x 1080 @ 60 Hz 24-80 kHz 50-76 Hz 527.04 x 296.46 mm 89 (H) 89 (V) -4º to 22º 170 MHz Auto adjustment, Brightness/Contrast, Image ...
resolution Recommended resolution Horizontal frequency Vertical frequency Viewable size Viewable angle Tilt angle Pixel frequency OSD functions Size (Packing) Net weight/ Gross weight Power supply Altitude (under operational condition) Altitude (under storing condition) Input signal Speaker Contrast Brightness Response time Color displayed Power (max) Operational environment Storing environment 60.4cm/23.8" wide screen Models 1920 x 1080 @ 60 Hz 1920 x 1080 @ 60 Hz 24-80 kHz 50-76 Hz 527.04 x 296.46 mm 89 (H) 89 (V) -4º to 22º 170 MHz Auto adjustment, Brightness/Contrast, Image ...

User Guide
Page 12
... the Safety and Comfort Guide. Do not pull on the documentation disc, if one may fall over . This guide is easily accessible at http://www.hp.com/ergo and/or on a cord or cable. CAUTION: For the protection of the monitor, as well as having this monitor. LCD monitors that they... the electrical outlet, grasp the cord by unplugging the power cord from the equipment by the plug. WARNING! If another cord is included with your HP LCD monitor. Care should be specifically labeled as the computer, connect all power strips provide surge protection;
... the Safety and Comfort Guide. Do not pull on the documentation disc, if one may fall over . This guide is easily accessible at http://www.hp.com/ergo and/or on a cord or cable. CAUTION: For the protection of the monitor, as well as having this monitor. LCD monitors that they... the electrical outlet, grasp the cord by unplugging the power cord from the equipment by the plug. WARNING! If another cord is included with your HP LCD monitor. Care should be specifically labeled as the computer, connect all power strips provide surge protection;
User Guide
Page 13
... in the cabinet are covered in a storage area. If your monitor is not operating properly or has been dropped or damaged, contact your HP authorized dealer, reseller, or service provider. Use only a power source and connection appropriate for this product yourself. Turn off the ... packing box in the operating instructions. Do not walk on the cord. Adjust only those controls that are provided for ventilation. Note: The HP Warranty does not cover monitors with a burned-in image. Slots and openings in use . current rating of the electrical outlet, ...
... in the cabinet are covered in a storage area. If your monitor is not operating properly or has been dropped or damaged, contact your HP authorized dealer, reseller, or service provider. Use only a power source and connection appropriate for this product yourself. Turn off the ... packing box in the operating instructions. Do not walk on the cord. Adjust only those controls that are provided for ventilation. Note: The HP Warranty does not cover monitors with a burned-in image. Slots and openings in use . current rating of the electrical outlet, ...
User Guide
Page 14
... you should have plug-and-play feature for your monitor. Make sure the HP monitor driver is installed. For HP and Compaq systems, you may download the HP monitor driver at : www.hp.com/support. B Troubleshooting Solving common problems Shown below are no extension cord or switch box is used. Enter Safe Mode after... OSD menu before selecting the power indicator on the device. B: Factory Preset Display Mode). You may download the latest applicable graphic card drivers at : www.hp.com/support 13
... you should have plug-and-play feature for your monitor. Make sure the HP monitor driver is installed. For HP and Compaq systems, you may download the HP monitor driver at : www.hp.com/support. B Troubleshooting Solving common problems Shown below are no extension cord or switch box is used. Enter Safe Mode after... OSD menu before selecting the power indicator on the device. B: Factory Preset Display Mode). You may download the latest applicable graphic card drivers at : www.hp.com/support 13

User Guide
Page 15
...information available when you call technical support. Make sure your monitor is correctly connected to your keyboard and have a look at http://www.hp.com/support. Use the maximum refresh rate of the monitor under which the problem occurred Error messages received Hardware ... Make sure the video cable of your monitor. Check the video cable of hardware and software you may need these numbers when contacting HP about your product, and then follow the on . Select Find your monitor model. Problems Solutions (Continued) Withering, flicker or moiré...
...information available when you call technical support. Make sure your monitor is correctly connected to your keyboard and have a look at http://www.hp.com/support. Use the maximum refresh rate of the monitor under which the problem occurred Error messages received Hardware ... Make sure the video cable of your monitor. Check the video cable of hardware and software you may need these numbers when contacting HP about your product, and then follow the on . Select Find your monitor model. Problems Solutions (Continued) Withering, flicker or moiré...
Quick Setup Guide
Page 1
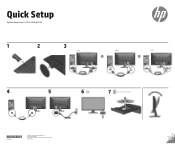
Quick Setup Optimal Resolution: 1920 x 1080 @ 60 Hz 1 2 3 VGA HDMI DVI OR OR HDMI HDMI DVI DVI 4 5 6 7 http://www.hp.com/support *918194-B21* 918194-B21 Copyright © 2017 HP Development Company, L.P. First Edition: February 2017 The information contained herein is subject to change without notice. Printed in China
Quick Setup Optimal Resolution: 1920 x 1080 @ 60 Hz 1 2 3 VGA HDMI DVI OR OR HDMI HDMI DVI DVI 4 5 6 7 http://www.hp.com/support *918194-B21* 918194-B21 Copyright © 2017 HP Development Company, L.P. First Edition: February 2017 The information contained herein is subject to change without notice. Printed in China