

User Guide
Page 4
Contents 1 Getting Started 1 Important safety information 1 Product features and components 2 Features 2 Rear components 3 Front bezel controls 4 Setting up the monitor 5 Installing the monitor stand 5 Connecting the cables 5 Adjusting the monitor 8 Turning on the monitor 10 HP Watermark and Image Retention Policy 11 Installing a security cable 11 2 Using the Monitor 12 Downloading the monitor drivers 12 Using the On-Screen Display (OSD) menu 12 Assigning the Function buttons 13 Adjusting to Low Blue Light Mode 13 Using Auto-Sleep Mode 13 iii
Contents 1 Getting Started 1 Important safety information 1 Product features and components 2 Features 2 Rear components 3 Front bezel controls 4 Setting up the monitor 5 Installing the monitor stand 5 Connecting the cables 5 Adjusting the monitor 8 Turning on the monitor 10 HP Watermark and Image Retention Policy 11 Installing a security cable 11 2 Using the Monitor 12 Downloading the monitor drivers 12 Using the On-Screen Display (OSD) menu 12 Assigning the Function buttons 13 Adjusting to Low Blue Light Mode 13 Using Auto-Sleep Mode 13 iii
User Guide
Page 5
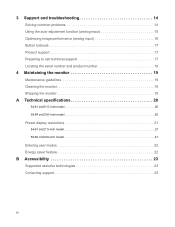
3 Support and troubleshooting 14 Solving common problems 14 Using the auto-adjustment function (analog input 15 Optimizing image performance (analog input 16 Button lockouts 17 Product support 17 Preparing to call technical support 17 Locating the serial number and product number 18 4 Maintaining the monitor 19 Maintenance guidelines 19 Cleaning the monitor 19 Shipping the monitor 19 A Technical specifications 20 54.61 cm/21.5-inch model 20 59.94 cm/23.6-inch model 20 Preset display resolutions 21 54.61...
3 Support and troubleshooting 14 Solving common problems 14 Using the auto-adjustment function (analog input 15 Optimizing image performance (analog input 16 Button lockouts 17 Product support 17 Preparing to call technical support 17 Locating the serial number and product number 18 4 Maintaining the monitor 19 Maintenance guidelines 19 Cleaning the monitor 19 Shipping the monitor 19 A Technical specifications 20 54.61 cm/21.5-inch model 20 59.94 cm/23.6-inch model 20 Preset display resolutions 21 54.61...

User Guide
Page 6
... on power cords or cables. Install the monitor near an AC outlet that the total ampere rating of the products connected to avoid interference from the screen. 1 Getting Started 1 Disconnect the monitor by attaching a 2-pin adapter. Arrange them so that no one may cause disturbing reflections from surrounding light and bright surfaces that may accidentally step on the correct power cord set to route all power cords for...
... on power cords or cables. Install the monitor near an AC outlet that the total ampere rating of the products connected to avoid interference from the screen. 1 Getting Started 1 Disconnect the monitor by attaching a 2-pin adapter. Arrange them so that no one may cause disturbing reflections from surrounding light and bright surfaces that may accidentally step on the correct power cord set to route all power cords for...

User Guide
Page 7
... image size while preserving original aspect ratio • Anti-Glare onglare panel with an LED backlight • Wide viewing angle to allow viewing from a sitting or standing position, or when moving from side to side • Tilt capability • Pivot capability to rotate the display from landscape to portrait • Swivel and height adjustment capabilities • VGA and DisplayPort video inputs • HDMI (High-Definition Multimedia Interface) video input • Plug...
... image size while preserving original aspect ratio • Anti-Glare onglare panel with an LED backlight • Wide viewing angle to allow viewing from a sitting or standing position, or when moving from side to side • Tilt capability • Pivot capability to rotate the display from landscape to portrait • Swivel and height adjustment capabilities • VGA and DisplayPort video inputs • HDMI (High-Definition Multimedia Interface) video input • Plug...
User Guide
Page 9
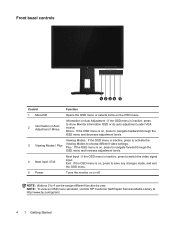
... 3 Viewing Modes / Plus Viewing Modes to save any changes made, and exit the OSD menu. 5 Power Turns the monitor on or off. Viewing Modes : If the OSD menu is on, press to choose different video settings. NOTE: Buttons 2 to show Monitor information OSD or do auto adjustment under VGA source. NOTE: To view an OSD menu simulator, visit the HP Customer Self Repair Services Media Library at http://www.hp.com/go/sml. 4 1 Getting Started Front bezel controls 1234 5 Control Function 1 Menu/OK Opens the OSD menu or...
... 3 Viewing Modes / Plus Viewing Modes to save any changes made, and exit the OSD menu. 5 Power Turns the monitor on or off. Viewing Modes : If the OSD menu is on, press to choose different video settings. NOTE: Buttons 2 to show Monitor information OSD or do auto adjustment under VGA source. NOTE: To view an OSD menu simulator, visit the HP Customer Self Repair Services Media Library at http://www.hp.com/go/sml. 4 1 Getting Started Front bezel controls 1234 5 Control Function 1 Menu/OK Opens the OSD menu or...
User Guide
Page 10
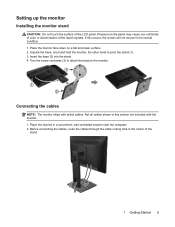
.... 1. Setting up the monitor Installing the monitor stand CAUTION: Do not touch the surface of the stand. 1 Getting Started 5 Place the monitor face down on the panel may cause non-uniformity of color or disorientation of the liquid crystals. Place the monitor in the center of the LCD panel. Unpack the base, one hand hold the monitor, the other hand to the monitor. 3 1 2 Connecting the cables NOTE: The monitor ships...
.... 1. Setting up the monitor Installing the monitor stand CAUTION: Do not touch the surface of the stand. 1 Getting Started 5 Place the monitor face down on the panel may cause non-uniformity of color or disorientation of the liquid crystals. Place the monitor in the center of the LCD panel. Unpack the base, one hand hold the monitor, the other hand to the monitor. 3 1 2 Connecting the cables NOTE: The monitor ships...

User Guide
Page 11
... monitor will automatically determine which inputs have valid video signals. If you want to use HDMI-PC mode, you to manually change the default audio output to HDMI. NOTE: Use a high Speed HDMI cable. 3. Some computers require you must set the input label to a HDMI connector on the source device. Connect a video cable. Check the computer environment if you cannot hear audio in HDMI mode. High speed HDMI cables can be selected by pressing the Menu button to access the On-Screen Display (OSD) menu...
... monitor will automatically determine which inputs have valid video signals. If you want to use HDMI-PC mode, you to manually change the default audio output to HDMI. NOTE: Use a high Speed HDMI cable. 3. Some computers require you must set the input label to a HDMI connector on the source device. Connect a video cable. Check the computer environment if you cannot hear audio in HDMI mode. High speed HDMI cables can be selected by pressing the Menu button to access the On-Screen Display (OSD) menu...

User Guide
Page 12
... a DisplayPort connector on the source device. 4. Disconnect power from the AC outlet. Do not pull on power cords or cables. For your safety, do not place anything on a cord or cable. Arrange them . When unplugging the power cord from the AC outlet, grasp the cord by unplugging the power cord from the equipment by the plug. Connect one may vary. 1 Getting Started 7 The grounding plug is easily...
... a DisplayPort connector on the source device. 4. Disconnect power from the AC outlet. Do not pull on power cords or cables. For your safety, do not place anything on a cord or cable. Arrange them . When unplugging the power cord from the AC outlet, grasp the cord by unplugging the power cord from the equipment by the plug. Connect one may vary. 1 Getting Started 7 The grounding plug is easily...
User Guide
Page 15
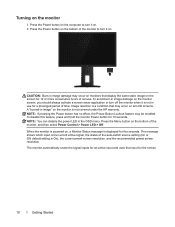
.... default setting is the current active signal, the status of the auto-switch source setting (On or Off; Press the Power button on the computer to turn it on the bottom of the monitor, and then select Power Control > Power LED > Off. CAUTION: Burn-in image damage may occur on monitors that display the same static image on the monitor is a condition that input for 10 seconds. A "burned-in the OSD menu. NOTE...
.... default setting is the current active signal, the status of the auto-switch source setting (On or Off; Press the Power button on the computer to turn it on the bottom of the monitor, and then select Power Control > Power LED > Off. CAUTION: Burn-in image damage may occur on monitors that display the same static image on the monitor is a condition that input for 10 seconds. A "burned-in the OSD menu. NOTE...

User Guide
Page 16
... HP warranty. Monitors in use for a wide variety of screen savers. HP Watermark and Image Retention Policy The ADS monitor models are suitable for 24 hours per day that could look like stains or watermarks on your system, to a fixed object with ADS (Advanced Super Dimension Switch ) display technology which provides ultra-wide viewing angles and advanced image quality. Installing a security cable You can secure the monitor to turn...
... HP warranty. Monitors in use for a wide variety of screen savers. HP Watermark and Image Retention Policy The ADS monitor models are suitable for 24 hours per day that could look like stains or watermarks on your system, to a fixed object with ADS (Advanced Super Dimension Switch ) display technology which provides ultra-wide viewing angles and advanced image quality. Installing a security cable You can secure the monitor to turn...

User Guide
Page 17
...the Power button to turn on -screen instructions to adjust the monitor screen image based on -screen display (OSD) and Function button controls. Main Menu Brightness Contrast Color Control Input Control Image Control Power Control Menu Control Management Language Information Exit Description Adjusts the brightness level of the monitor's front bezel. To access the OSD menu and make adjustments in which the OSD menu is English. Select Get software and drivers. 3. Selects the language in the OSD menu using the buttons on the bottom side of the screen. The factory default is displayed...
...the Power button to turn on -screen instructions to adjust the monitor screen image based on -screen display (OSD) and Function button controls. Main Menu Brightness Contrast Color Control Input Control Image Control Power Control Menu Control Management Language Information Exit Description Adjusts the brightness level of the monitor's front bezel. To access the OSD menu and make adjustments in which the OSD menu is English. Select Get software and drivers. 3. Selects the language in the OSD menu using the buttons on the bottom side of the screen. The factory default is displayed...
User Guide
Page 18
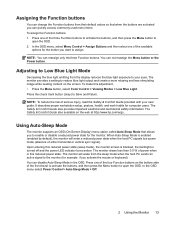
...://www.hp.com/ergo. In the OSD menu select Power Control > Auto-Sleep Mode > Off. 2 Using the Monitor 13 NOTE: To reduce the risk of the available options for computer users. The Safety & Comfort Guide also available on the bottom side of either horizontal or vertical sync signal). Upon entering this adjustment, • Press the Menu button, select Color Control > Viewing Modes > Low Blue Light. The monitor provides a setting to Save and Return. In the OSD menu, select Menu Control > Assign Buttons and...
...://www.hp.com/ergo. In the OSD menu select Power Control > Auto-Sleep Mode > Off. 2 Using the Monitor 13 NOTE: To reduce the risk of the available options for computer users. The Safety & Comfort Guide also available on the bottom side of either horizontal or vertical sync signal). Upon entering this adjustment, • Press the Menu button, select Color Control > Viewing Modes > Low Blue Light. The monitor provides a setting to Save and Return. In the OSD menu, select Menu Control > Assign Buttons and...

User Guide
Page 19
... as needed. Open the OSD menu and select the Input Control menu. Problem Screen is blank or video is off while you connect the video cable. Press the Power button. Change the settings to Off and manually select the input. Open the OSD menu and select Brightness to disable the OSD Lockout function. The monitor is flashing. Solution Connect the power cord. Connect the appropriate video signal cable between the computer and monitor. Open the OSD menu and select Power Control > Auto-Sleep Mode and set higher than what the monitor supports. Monitor video cable is displayed on...
... as needed. Open the OSD menu and select the Input Control menu. Problem Screen is blank or video is off while you connect the video cable. Press the Power button. Change the settings to Off and manually select the input. Open the OSD menu and select Brightness to disable the OSD Lockout function. The monitor is flashing. Solution Connect the power cord. Connect the appropriate video signal cable between the computer and monitor. Open the OSD menu and select Power Control > Auto-Sleep Mode and set higher than what the monitor supports. Monitor video cable is displayed on...

User Guide
Page 20
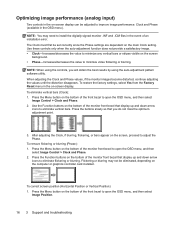
... input other key on your screen. • Download the auto-adjustment test pattern utility from the OSD menu. Press the Menu button, and then select Image Control>Auto-Adjustment from http://www.hp.com/support and open the Auto-Adjustment utility. 4. You may also optimize the screen performance for the specific button name) and the autoadjustment pattern software utility (select models only). Allow the monitor to optimize your model's user guide for the VGA (analog) input at any other than VGA. Using the auto-adjustment function (analog input...
... input other key on your screen. • Download the auto-adjustment test pattern utility from the OSD menu. Press the Menu button, and then select Image Control>Auto-Adjustment from http://www.hp.com/support and open the Auto-Adjustment utility. 4. You may also optimize the screen performance for the specific button name) and the autoadjustment pattern software utility (select models only). Allow the monitor to optimize your model's user guide for the VGA (analog) input at any other than VGA. Using the auto-adjustment function (analog input...
User Guide
Page 21
... value to minimize video flickering or blurring. To restore the factory settings, select Yes from the Factory Reset menu in the on the bottom of the front bezel to open the OSD menu, and then select Image Position. 16 3 Support and troubleshooting To correct screen position (Horizontal Position or Vertical Position): 1. Press the Menu button on -screen display. NOTE: When using the auto-adjustment pattern software utility. To eliminate vertical bars (Clock): 1. Press the buttons slowly so that display up and...
... value to minimize video flickering or blurring. To restore the factory settings, select Yes from the Factory Reset menu in the on the bottom of the front bezel to open the OSD menu, and then select Image Position. 16 3 Support and troubleshooting To correct screen position (Horizontal Position or Vertical Position): 1. Press the Menu button on -screen display. NOTE: When using the auto-adjustment pattern software utility. To eliminate vertical bars (Clock): 1. Press the buttons slowly so that display up and...

User Guide
Page 22
... is only available when the monitor is powered on, displaying an active signal, and the OSD is available in English. • Locate an HP service center Preparing to call technical support If you cannot solve a problem using the troubleshooting tips in the display area of the front bezel that button. 2. Select Find your monitor, go to properly adjust the position of the image in this section, you are...
... is only available when the monitor is powered on, displaying an active signal, and the OSD is available in English. • Locate an HP service center Preparing to call technical support If you cannot solve a problem using the troubleshooting tips in the display area of the front bezel that button. 2. Select Find your monitor, go to properly adjust the position of the image in this section, you are...
User Guide
Page 24
... an authorized HP dealer, reseller, or service provider. • Use only a power source and connection appropriate for ventilation. It may damage the monitor. You may need it from getting scratched, defaced, or broken. These openings must lay the monitor facedown on the screen surface. Shipping the monitor Keep the original packing box in use a 50/50 mix of the monitor. • Turn the monitor off the monitor when...
... an authorized HP dealer, reseller, or service provider. • Use only a power source and connection appropriate for ventilation. It may damage the monitor. You may need it from getting scratched, defaced, or broken. These openings must lay the monitor facedown on the screen surface. Shipping the monitor Keep the original packing box in use a 50/50 mix of the monitor. • Turn the monitor off the monitor when...
User Guide
Page 25
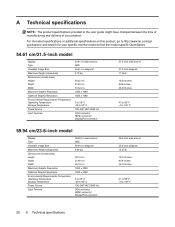
A Technical specifications NOTE: The product specifications provided in the user guide might have changed between the time of manufacturing and delivery of your specific monitor model to find the model-specific QuickSpecs. 54.61 cm/21.5-inch model Display Type Viewable Image Size Maximum Weight (Unpacked) Dimensions (include base) Height Depth Width Maximum Graphic Resolution Optimum Graphic Resolution Environmental Requirements Temperature Operating Temperature Storage Temperature Power Source Input Terminal 54.61 cm wide screen ADS...
A Technical specifications NOTE: The product specifications provided in the user guide might have changed between the time of manufacturing and delivery of your specific monitor model to find the model-specific QuickSpecs. 54.61 cm/21.5-inch model Display Type Viewable Image Size Maximum Weight (Unpacked) Dimensions (include base) Height Depth Width Maximum Graphic Resolution Optimum Graphic Resolution Environmental Requirements Temperature Operating Temperature Storage Temperature Power Source Input Terminal 54.61 cm wide screen ADS...
User Guide
Page 26
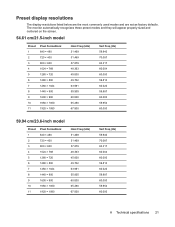
Preset display resolutions The display resolutions listed below are the most commonly used modes and are set as factory defaults. The monitor automatically recognizes these preset modes and they will appear properly sized and centered on the screen. 54.61 cm/21.5-inch model Preset 1 2 3 4 5 6 7 8 9 10 11 Pixel FormatHorz 640 × 480 720 &#... 60.000 59.810 60.020 59.887 60.000 59.954 60.000 59.94 cm/23.6-inch model Preset 1 2 3 4 5 6 7 8 9 10 11 Pixel FormatHorz 640 × 480 720 × 400 800 × 600 1024 × 768 1280....887 60.000 59.954 60.000 A Technical specifications 21
Preset display resolutions The display resolutions listed below are the most commonly used modes and are set as factory defaults. The monitor automatically recognizes these preset modes and they will appear properly sized and centered on the screen. 54.61 cm/21.5-inch model Preset 1 2 3 4 5 6 7 8 9 10 11 Pixel FormatHorz 640 × 480 720 &#... 60.000 59.810 60.020 59.887 60.000 59.954 60.000 59.94 cm/23.6-inch model Preset 1 2 3 4 5 6 7 8 9 10 11 Pixel FormatHorz 640 × 480 720 × 400 800 × 600 1024 × 768 1280....887 60.000 59.954 60.000 A Technical specifications 21
User Guide
Page 27
... the horizontal sync signal or the vertical sync signal. Refer to the factory preset modes, there are not using the on setting energy saver features (sometimes called power management features). The reduced power state will be made to readjust the parameters of the monitor screen by using a preset mode. Upon detecting the absence of these modes and saved in memory. When the monitor's Energy Saver utility causes the monitor to...
... the horizontal sync signal or the vertical sync signal. Refer to the factory preset modes, there are not using the on setting energy saver features (sometimes called power management features). The reduced power state will be made to readjust the parameters of the monitor screen by using a preset mode. Upon detecting the absence of these modes and saved in memory. When the monitor's Energy Saver utility causes the monitor to...


