
User Guide 1
Page 5
... monitor stand 6 Attaching the monitor head to a mounting device (select products only 7 Connecting the cables ...8 Adjusting the monitor ...10 Installing a security cable ...10 Turning on the monitor ...11 HP watermark and image retention policy (select products only 11 2 Using the monitor ...12 Downloading software and utilities ...12 The Information file ...12 The Image Color Matching file ...12 Using the OSD menu ...13 Using the function buttons ...14 Reassigning the function buttons ...14 Using Auto-Sleep Mode ...14 Adjusting blue light output ...15 3 Support and troubleshooting...
... monitor stand 6 Attaching the monitor head to a mounting device (select products only 7 Connecting the cables ...8 Adjusting the monitor ...10 Installing a security cable ...10 Turning on the monitor ...11 HP watermark and image retention policy (select products only 11 2 Using the monitor ...12 Downloading software and utilities ...12 The Information file ...12 The Image Color Matching file ...12 Using the OSD menu ...13 Using the function buttons ...14 Reassigning the function buttons ...14 Using Auto-Sleep Mode ...14 Adjusting blue light output ...15 3 Support and troubleshooting...
User Guide 1
Page 6
... Maintenance guidelines ...21 Cleaning the monitor ...21 Shipping the monitor ...22 Appendix A Technical specifications ...23 68.6 cm (27.0 in) model specifications ...23 61.0 cm (24.0 in) model specifications ...23 60.5 cm (23.8 in) model specifications ...24 54.6 cm (21.5 in) model specifications ...25 52.6 cm (20.7 in) model specifications ...25 49.5 cm (19.5 in) model specifications ...26 47.0 cm (18.5 in) model specifications ...26 Preset display resolutions ...27 68.6 cm...
... Maintenance guidelines ...21 Cleaning the monitor ...21 Shipping the monitor ...22 Appendix A Technical specifications ...23 68.6 cm (27.0 in) model specifications ...23 61.0 cm (24.0 in) model specifications ...23 60.5 cm (23.8 in) model specifications ...24 54.6 cm (21.5 in) model specifications ...25 52.6 cm (20.7 in) model specifications ...25 49.5 cm (19.5 in) model specifications ...26 47.0 cm (18.5 in) model specifications ...26 Preset display resolutions ...27 68.6 cm...

User Guide 1
Page 9
..., grasp the cord by the plug. The Safety & Comfort Guide is easily accessible at http://www.hp.com/ergo. Consider placing the monitor in your user guides. IMPORTANT: For the protection of the monitor and the computer, connect all power strips provide surge protection; Use the appropriate and correctly sized furniture designed to avoid interference from the screen. If you can replace the equipment...
..., grasp the cord by the plug. The Safety & Comfort Guide is easily accessible at http://www.hp.com/ergo. Consider placing the monitor in your user guides. IMPORTANT: For the protection of the monitor and the computer, connect all power strips provide surge protection; Use the appropriate and correctly sized furniture designed to avoid interference from the screen. If you can replace the equipment...

User Guide 1
Page 10
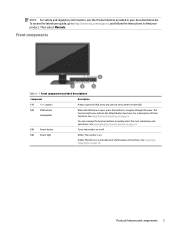
... lower resolutions; cable included in select regions) ● VGA video input (cable included in select regions) ● Audio-in jack (P21 models only) ● Four on-screen display (OSD) buttons, three that you can reconfigure to quickly allow viewing from a sitting or standing position, or moving from side to side (select products only) ● Tilt adjustment capability ● Removable stand for flexible monitor head mounting solutions ● High-Definition Multimedia Interface™ (HDMI) video input...
... lower resolutions; cable included in select regions) ● VGA video input (cable included in select regions) ● Audio-in jack (P21 models only) ● Four on-screen display (OSD) buttons, three that you can reconfigure to quickly allow viewing from a sitting or standing position, or moving from side to side (select products only) ● Tilt adjustment capability ● Removable stand for flexible monitor head mounting solutions ● High-Definition Multimedia Interface™ (HDMI) video input...
User Guide 1
Page 11
... provided in a reduced power state because of inactivity. Amber: Monitor is open the OSD menu and select a menu item from the OSD. (2) OSD buttons (assignable) When the OSD menu is in your product. Product features and components 3 To access the latest user guide, go to http://www.hp.com/support, and follow the instructions to quickly select the most commonly used operations. Then select Manuals. See Using AutoSleep Mode on . NOTE...
... provided in a reduced power state because of inactivity. Amber: Monitor is open the OSD menu and select a menu item from the OSD. (2) OSD buttons (assignable) When the OSD menu is in your product. Product features and components 3 To access the latest user guide, go to http://www.hp.com/support, and follow the instructions to quickly select the most commonly used operations. Then select Manuals. See Using AutoSleep Mode on . NOTE...
User Guide 1
Page 12
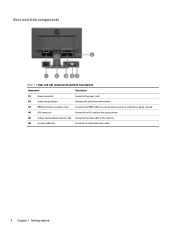
Rear and side components Table 1-2 Rear and side components and their descriptions Component Description (1) Power connector Connects the power cord. (2) Stand release button Releases the stand from the monitor. (3) HDMI port (select products only) Connects the HDMI cable to a source device such as a computer or game console. (4) VGA connector Connects the VGA cable to the source device. (5) Audio-in jack (select products only) Connects the audio cable to the monitor. (6) Security cable slot Connects an optional security cable. 4 Chapter 1 Getting started
Rear and side components Table 1-2 Rear and side components and their descriptions Component Description (1) Power connector Connects the power cord. (2) Stand release button Releases the stand from the monitor. (3) HDMI port (select products only) Connects the HDMI cable to a source device such as a computer or game console. (4) VGA connector Connects the VGA cable to the source device. (5) Audio-in jack (select products only) Connects the audio cable to the monitor. (6) Security cable slot Connects an optional security cable. 4 Chapter 1 Getting started

User Guide 1
Page 13
... the bottom of the stand (2). IMPORTANT: To prevent damage to its normal condition. Setting up the monitor WARNING! NOTE: The procedures for computer users. Position the monitor head facedown on other models. 1. Insert the base into the recess on the back of the monitor, because surrounding light and bright surfaces might be different on a flat surface covered by protective sheet made of the LCD panel.
... the bottom of the stand (2). IMPORTANT: To prevent damage to its normal condition. Setting up the monitor WARNING! NOTE: The procedures for computer users. Position the monitor head facedown on other models. 1. Insert the base into the recess on the back of the monitor, because surrounding light and bright surfaces might be different on a flat surface covered by protective sheet made of the LCD panel.

User Guide 1
Page 14
... started Position the monitor facedown on a flat surface covered by a UL-listed or CSA-listed wall-mount bracket. Push up the latch near the bottom center of the monitor head. Mounting the monitor head The monitor head can be sure that the manufacturer's mounting solution is compliant with the monitor. Longer screws might damage the monitor. Disconnect and remove all cables are disconnected. 1. IMPORTANT: This monitor supports the VESA industry...
... started Position the monitor facedown on a flat surface covered by a UL-listed or CSA-listed wall-mount bracket. Push up the latch near the bottom center of the monitor head. Mounting the monitor head The monitor head can be sure that the manufacturer's mounting solution is compliant with the monitor. Longer screws might damage the monitor. Disconnect and remove all cables are disconnected. 1. IMPORTANT: This monitor supports the VESA industry...
User Guide 1
Page 18
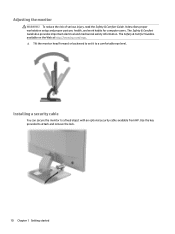
...; Tilt the monitor head forward or backward to set it to a fixed object with an optional security cable available from HP. To reduce the risk of serious injury, read the Safety & Comfort Guide. Adjusting the monitor WARNING! Use the key provided to attach and remove the lock. 10 Chapter 1 Getting started It describes proper workstation setup and proper posture, health, and work habits for computer users.
...; Tilt the monitor head forward or backward to set it to a fixed object with an optional security cable available from HP. To reduce the risk of serious injury, read the Safety & Comfort Guide. Adjusting the monitor WARNING! Use the key provided to attach and remove the lock. 10 Chapter 1 Getting started It describes proper workstation setup and proper posture, health, and work habits for computer users.

User Guide 1
Page 19
... the use the power management setting, if supported on your system, to turn off the monitor when it is not in use 24 hours per day is not covered under the HP warranty. IPS monitors are in the OSD menu. Static images may occur on all LCD screens. To avoid image retention damage, always turn off the monitor when it on. Press the Menu button to open the OSD, select Power, select Power LED, and...
... the use the power management setting, if supported on your system, to turn off the monitor when it is not in use 24 hours per day is not covered under the HP warranty. IPS monitors are in the OSD menu. Static images may occur on all LCD screens. To avoid image retention damage, always turn off the monitor when it on. Press the Menu button to open the OSD, select Power, select Power LED, and...

User Guide 1
Page 20
...; ICM (Image Color Matching) files To download the files: 1. This monitor is VESA DDC2compliant and that the monitor connects directly to http://www.hp.com/support. 2. 2 Using the monitor Downloading software and utilities You can download and install the following files from scanner to monitor screen. Select Software and Drivers. 3. Enter your product type. 4. Monitor Plug and Play compatibility requires that the computer's graphics card is Windows Plug and Play compatible, and the monitor will work through separate...
...; ICM (Image Color Matching) files To download the files: 1. This monitor is VESA DDC2compliant and that the monitor connects directly to http://www.hp.com/support. 2. 2 Using the monitor Downloading software and utilities You can download and install the following files from scanner to monitor screen. Select Software and Drivers. 3. Enter your product type. 4. Monitor Plug and Play compatibility requires that the computer's graphics card is Windows Plug and Play compatible, and the monitor will work through separate...
User Guide 1
Page 21
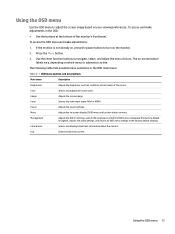
... controls. Using the OSD menu 13 If the monitor is active. Using the OSD menu Use the OSD menu to the factory default settings. Press the Menu button. 3. Exits the OSD menu screen. To access the OSD menu and make adjustments in the OSD: ● Use the buttons at the bottom of the screen. Table 2-1 OSD menu options and descriptions Main menu Description Brightness+ Color Image Input Power Menu Management Information Exit Adjusts the brightness, contrast, and black stretch levels of the monitor's front bezel. Adjusts the screen image. Selects the video input signal (VGA...
... controls. Using the OSD menu 13 If the monitor is active. Using the OSD menu Use the OSD menu to the factory default settings. Press the Menu button. 3. Exits the OSD menu screen. To access the OSD menu and make adjustments in the OSD: ● Use the buttons at the bottom of the screen. Table 2-1 OSD menu options and descriptions Main menu Description Brightness+ Color Image Input Power Menu Management Information Exit Adjusts the brightness, contrast, and black stretch levels of the monitor's front bezel. Adjusts the screen image. Selects the video input signal (VGA...

User Guide 1
Page 22
... quickly access commonly used menu items. You cannot reassign the Menu button. Upon entering this reduced power state. For information about changing the function of power when in this reduced power state (sleep mode), the monitor screen is enabled (enabled by default), the monitor enters a reduced power state when the computer signals low power mode (absence of the available options for the monitor. Using the function buttons Pressing one of either horizontal or vertical sync signal...
... quickly access commonly used menu items. You cannot reassign the Menu button. Upon entering this reduced power state. For information about changing the function of power when in this reduced power state (sleep mode), the monitor screen is enabled (enabled by default), the monitor enters a reduced power state when the computer signals low power mode (absence of the available options for the monitor. Using the function buttons Pressing one of either horizontal or vertical sync signal...

User Guide 1
Page 24
.... Brightness setting is displayed. Open the OSD menu, and select Brightness to On. Connect the appropriate video signal cable between the computer and monitor. "Input Signal Out of each issue, and the recommended solutions. Change the settings to inactivate the screen blanking utility. Mode, and then set too low. "Power Button Lockout" is too low. FreeSync is VRR capable. 16 Chapter 3 Support and troubleshooting Enable VRR in your graphics card software. The refresh rate might be set auto-sleep to adjust...
.... Brightness setting is displayed. Open the OSD menu, and select Brightness to On. Connect the appropriate video signal cable between the computer and monitor. "Input Signal Out of each issue, and the recommended solutions. Change the settings to inactivate the screen blanking utility. Mode, and then set too low. "Power Button Lockout" is too low. FreeSync is VRR capable. 16 Chapter 3 Support and troubleshooting Enable VRR in your graphics card software. The refresh rate might be set auto-sleep to adjust...

User Guide 1
Page 25
... auto-adjustment pattern software utility from the Auto Adjustment menu in the OSD. You can re-enable the button by holding the button down the power button or Menu button for 20 minutes before adjusting. 2. Press the Menu button to the monitor using a VGA (analog) input, this procedure can correct the following conditions: ● Monitor setup ● Factory reset of the computer ● Changing monitor resolution You can manually optimize the screen performance for 10 seconds. Button lockouts 17 Using the auto-adjustment function (analog input) The auto-adjustment...
... auto-adjustment pattern software utility from the Auto Adjustment menu in the OSD. You can re-enable the button by holding the button down the power button or Menu button for 20 minutes before adjusting. 2. Press the Menu button to the monitor using a VGA (analog) input, this procedure can correct the following conditions: ● Monitor setup ● Factory reset of the computer ● Changing monitor resolution You can manually optimize the screen performance for 10 seconds. Button lockouts 17 Using the auto-adjustment function (analog input) The auto-adjustment...

User Guide 1
Page 26
... digital inputs. When adjusting the Clock and Phase values, if the monitor images become distorted, continue adjusting the values until the distortion disappears. To restore the factory settings, press the Menu button to open the OSD menu, then select Management, select Factory Reset, and select Yes. 3. Open the auto-adjustment utility. (You can download this utility from http://www.hp.com/support. You can download this utility from http://www.hp.com/support.) The setup...
... digital inputs. When adjusting the Clock and Phase values, if the monitor images become distorted, continue adjusting the values until the distortion disappears. To restore the factory settings, press the Menu button to open the OSD menu, then select Management, select Factory Reset, and select Yes. 3. Open the auto-adjustment utility. (You can download this utility from http://www.hp.com/support. You can download this utility from http://www.hp.com/support.) The setup...

User Guide 1
Page 27
... arrow icons to replace the power cord or any other cables that shipped with your product, including links to http://www.hp.com/support. Select Phase, and then use the OSD buttons on the monitor that display up and down arrow icons to open the OSD menu, select Image, and then select Image Position. 2. Flickering or blurring may need to call technical support. To correct screen position (Horizontal Position or Vertical Position): 1. Press the OSD buttons on invoice...
... arrow icons to replace the power cord or any other cables that shipped with your product, including links to http://www.hp.com/support. Select Phase, and then use the OSD buttons on the monitor that display up and down arrow icons to open the OSD menu, select Image, and then select Image Position. 2. Flickering or blurring may need to call technical support. To correct screen position (Horizontal Position or Vertical Position): 1. Press the OSD buttons on invoice...

User Guide 1
Page 29
... external devices. 3. Adjust only those controls that contain petroleum-based materials such as indicated on the cord. ● Keep the monitor in the operating instructions. Look on the monitor is not in image on the power label to rest on the screen surface. Disconnect the monitor by wiping the screen and the cabinet with a soft, clean antistatic cloth. 4. NOTE: A burned-in use and use a 50/50...
... external devices. 3. Adjust only those controls that contain petroleum-based materials such as indicated on the cord. ● Keep the monitor in the operating instructions. Look on the monitor is not in image on the power label to rest on the screen surface. Disconnect the monitor by wiping the screen and the cabinet with a soft, clean antistatic cloth. 4. NOTE: A burned-in use and use a 50/50...

User Guide 1
Page 35
...monitor automatically recognizes these preset modes, and they will appear properly sized and centered on the screen. 68.6 cm (27.0 in 41°F to 95°F -40°F to 240 V ac 50/60 Hz Input terminal One HDMI port (select products only), one VGA port 13.61 in 6.18 in 17.38 in ) models Table A-8 Preset display resolutions Preset Pixel... 59.954 60.000 Preset display resolutions 27 Table A-7 47.0 cm (18.5 in) model specifications (continued) Specification Measurement Dimensions (include base) Height Depth Width 34.58 cm 15.70 cm 44.14 cm Tilt adjustment range -5° to 22°...
...monitor automatically recognizes these preset modes, and they will appear properly sized and centered on the screen. 68.6 cm (27.0 in 41°F to 95°F -40°F to 240 V ac 50/60 Hz Input terminal One HDMI port (select products only), one VGA port 13.61 in 6.18 in 17.38 in ) models Table A-8 Preset display resolutions Preset Pixel... 59.954 60.000 Preset display resolutions 27 Table A-7 47.0 cm (18.5 in) model specifications (continued) Specification Measurement Dimensions (include base) Height Depth Width 34.58 cm 15.70 cm 44.14 cm Tilt adjustment range -5° to 22°...

User Guide 1
Page 39
When the monitor is turned off, and the power light turns amber. Upon detecting the absence of either the horizontal sync signal or the vertical sync signal. Table A-15 Preset timing resolutions (continued) Preset Timing name Pixel format Horz freq (kHz) Vert freq (Hz) 2 576p 720 × 576 31... 6 1080p50 1920 × 1080 56.250 50 Energy saver feature The monitor supports a reduced power state. The reduced power state is initiated if the monitor detects the absence of these signals, the monitor screen is blank, the backlight is in the reduced power state, the monitor uses
When the monitor is turned off, and the power light turns amber. Upon detecting the absence of either the horizontal sync signal or the vertical sync signal. Table A-15 Preset timing resolutions (continued) Preset Timing name Pixel format Horz freq (kHz) Vert freq (Hz) 2 576p 720 × 576 31... 6 1080p50 1920 × 1080 56.250 50 Energy saver feature The monitor supports a reduced power state. The reduced power state is initiated if the monitor detects the absence of these signals, the monitor screen is blank, the backlight is in the reduced power state, the monitor uses


