
User Guide 1
Page 3
... this guide. CAUTION: Indicates a hazardous situation that, if not avoided, could result in this guide This guide provides technical specifications and information about monitor features, setting up the monitor, and using the software. TIP: Provides helpful hints for example, messages related to hardware or software. Also contains essential information to explain a concept...
... this guide. CAUTION: Indicates a hazardous situation that, if not avoided, could result in this guide This guide provides technical specifications and information about monitor features, setting up the monitor, and using the software. TIP: Provides helpful hints for example, messages related to hardware or software. Also contains essential information to explain a concept...
User Guide 1
Page 5
...up the monitor ...5 Attaching the monitor stand ...5 Mounting the monitor head ...6 Removing the monitor stand 6 Attaching the monitor head to a mounting device (select products only 7 Connecting the cables ...8 Adjusting the monitor ...10 Installing a security cable ...10 Turning on the monitor ...11 HP watermark and... image retention policy (select products only 11 2 Using the monitor ...12 Downloading software and utilities ...12 The Information...
...up the monitor ...5 Attaching the monitor stand ...5 Mounting the monitor head ...6 Removing the monitor stand 6 Attaching the monitor head to a mounting device (select products only 7 Connecting the cables ...8 Adjusting the monitor ...10 Installing a security cable ...10 Turning on the monitor ...11 HP watermark and... image retention policy (select products only 11 2 Using the monitor ...12 Downloading software and utilities ...12 The Information...
User Guide 1
Page 6
... Maintenance guidelines ...21 Cleaning the monitor ...21 Shipping the monitor ...22 Appendix A Technical specifications ...23 68.6 cm (27.0 in) model specifications ...23 61.0 cm (24.0 in) model specifications ...23 60.5 cm (23.8 in) ...30 47.0 cm (18.5 in) models ...30 Preset timing resolutions ...30 Energy saver feature ...31 Appendix B Accessibility ...32 HP and accessibility ...32 Finding the technology tools you need 32 The HP commitment ...32 International Association of Accessibility Professionals (IAAP 32 Finding the best assistive technology 33 Assessing your needs ...33 Accessibility...
... Maintenance guidelines ...21 Cleaning the monitor ...21 Shipping the monitor ...22 Appendix A Technical specifications ...23 68.6 cm (27.0 in) model specifications ...23 61.0 cm (24.0 in) model specifications ...23 60.5 cm (23.8 in) ...30 47.0 cm (18.5 in) models ...30 Preset timing resolutions ...30 Energy saver feature ...31 Appendix B Accessibility ...32 HP and accessibility ...32 Finding the technology tools you need 32 The HP commitment ...32 International Association of Accessibility Professionals (IAAP 32 Finding the best assistive technology 33 Assessing your needs ...33 Accessibility...

User Guide 1
Page 9
...pin attachment plug, plug the cord into an AC outlet that is easily accessible at http://www.hp.com/ergo. the power strip must be specifically labeled as a monitor, printer, scanner) to avoid interference from the computer by the plug. Use the appropriate and ... & Comfort Guide also provides important electrical and mechanical safety information. 1 Getting started Important safety information A power cord is included with the monitor, see the Product Notices provided in a controlled luminous environment to a surge protection device such as a power strip or uninterruptible power supply ...
...pin attachment plug, plug the cord into an AC outlet that is easily accessible at http://www.hp.com/ergo. the power strip must be specifically labeled as a monitor, printer, scanner) to avoid interference from the computer by the plug. Use the appropriate and ... & Comfort Guide also provides important electrical and mechanical safety information. 1 Getting started Important safety information A power cord is included with the monitor, see the Product Notices provided in a controlled luminous environment to a surge protection device such as a power strip or uninterruptible power supply ...

User Guide 1
Page 10
...angle on IPS models to allow selection of the most commonly used operations ● Plug and Play capability if supported by your monitor might include the following features: ● The following models, which include full-screen support for lower resolutions; NOTE: Adaptive ...videos by display. ● Energy saver feature to side (select products only) ● Tilt adjustment capability ● Removable stand for flexible monitor head mounting solutions ● High-Definition Multimedia Interface™ (HDMI) video input (select products only; cable included in select regions) &#...
...angle on IPS models to allow selection of the most commonly used operations ● Plug and Play capability if supported by your monitor might include the following features: ● The following models, which include full-screen support for lower resolutions; NOTE: Adaptive ...videos by display. ● Energy saver feature to side (select products only) ● Tilt adjustment capability ● Removable stand for flexible monitor head mounting solutions ● High-Definition Multimedia Interface™ (HDMI) video input (select products only; cable included in select regions) &#...
User Guide 1
Page 11
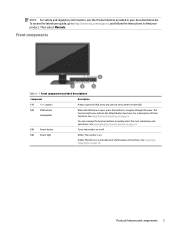
.... (2) OSD buttons (assignable) When the OSD menu is in your product. To access the latest user guide, go to http://www.hp.com/support, and follow the instructions to navigate through the menu. Front components Table 1-1 Front components and their descriptions Component Description (1) Menu... select the most commonly used operations. See Reassigning the function buttons on page 14. (3) Power button Turns the monitor on or off. (4) Power light White: The monitor is on page 14. NOTE: For safety and regulatory information, see Using the function buttons on page 14. ...
.... (2) OSD buttons (assignable) When the OSD menu is in your product. To access the latest user guide, go to http://www.hp.com/support, and follow the instructions to navigate through the menu. Front components Table 1-1 Front components and their descriptions Component Description (1) Menu... select the most commonly used operations. See Reassigning the function buttons on page 14. (3) Power button Turns the monitor on or off. (4) Power light White: The monitor is on page 14. NOTE: For safety and regulatory information, see Using the function buttons on page 14. ...
User Guide 1
Page 12
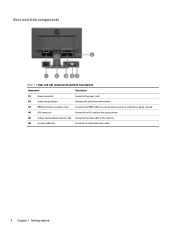
Rear and side components Table 1-2 Rear and side components and their descriptions Component Description (1) Power connector Connects the power cord. (2) Stand release button Releases the stand from the monitor. (3) HDMI port (select products only) Connects the HDMI cable to a source device such as a computer or game console. (4) VGA connector Connects the VGA cable to the source device. (5) Audio-in jack (select products only) Connects the audio cable to the monitor. (6) Security cable slot Connects an optional security cable. 4 Chapter 1 Getting started
Rear and side components Table 1-2 Rear and side components and their descriptions Component Description (1) Power connector Connects the power cord. (2) Stand release button Releases the stand from the monitor. (3) HDMI port (select products only) Connects the HDMI cable to a source device such as a computer or game console. (4) VGA connector Connects the VGA cable to the source device. (5) Audio-in jack (select products only) Connects the audio cable to the monitor. (6) Security cable slot Connects an optional security cable. 4 Chapter 1 Getting started

User Guide 1
Page 13
...monitor facedown on a flat surface covered with protective sheet foam or a nonabrasive cloth. Setting up the monitor... WARNING! The Safety & Comfort Guide is available on the back of the liquid crystals. Attaching the monitor stand TIP: Consider the placement of foam or a clean, dry cloth. 2. Position the monitor... head facedown on a flat surface covered by protective sheet made of the monitor... damage to the monitor, do not touch... for attaching a monitor stand might cause ...
...monitor facedown on a flat surface covered with protective sheet foam or a nonabrasive cloth. Setting up the monitor... WARNING! The Safety & Comfort Guide is available on the back of the liquid crystals. Attaching the monitor stand TIP: Consider the placement of foam or a clean, dry cloth. 2. Position the monitor... head facedown on a flat surface covered by protective sheet made of the monitor... damage to the monitor, do not touch... for attaching a monitor stand might cause ...

User Guide 1
Page 14
... with the VESA standard and is compliant with the monitor. NOTE: This apparatus is turned off and all cables from the monitor. 2. Push up the latch near the bottom center of the monitor head. Position the monitor facedown on a flat surface covered by a UL-...Disconnect and remove all cables are disconnected. 1. Slide the stand out of foam or a clean, dry cloth. 3. Removing the monitor stand IMPORTANT: Before disassembling the monitor, be sure that the manufacturer's mounting solution is rated to support the weight of the stand's mounting plate (1). 4. IMPORTANT: ...
... with the VESA standard and is compliant with the monitor. NOTE: This apparatus is turned off and all cables from the monitor. 2. Push up the latch near the bottom center of the monitor head. Position the monitor facedown on a flat surface covered by a UL-...Disconnect and remove all cables are disconnected. 1. Slide the stand out of foam or a clean, dry cloth. 3. Removing the monitor stand IMPORTANT: Before disassembling the monitor, be sure that the manufacturer's mounting solution is rated to support the weight of the stand's mounting plate (1). 4. IMPORTANT: ...

User Guide 1
Page 15
Remove the four screws from the VESA holes located on the back of the monitor head. 2. Setting up the monitor 7 IMPORTANT: If these instructions do not apply to your device, then follow the mounting device manufacturer's instructions when mounting the monitor to a mounting device (select products only) 1. Attaching the monitor head to a wall or swing arm. To attach the monitor head to a swing arm or other mounting device, insert four mounting screws through the holes on the mounting device and into the VESA screw holes on the rear of the monitor head.
Remove the four screws from the VESA holes located on the back of the monitor head. 2. Setting up the monitor 7 IMPORTANT: If these instructions do not apply to your device, then follow the mounting device manufacturer's instructions when mounting the monitor to a mounting device (select products only) 1. Attaching the monitor head to a wall or swing arm. To attach the monitor head to a swing arm or other mounting device, insert four mounting screws through the holes on the mounting device and into the VESA screw holes on the rear of the monitor head.
User Guide 1
Page 16
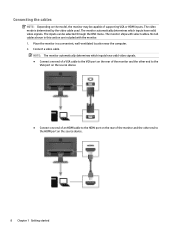
... all cables shown in a convenient, well-ventilated location near the computer. 2. The video mode is determined by the video cable used. The monitor ships with the monitor. 1. NOTE: The monitor automatically determines which inputs have valid video signals. ● Connect one end of a VGA cable to the VGA port on the rear of... the monitor and the other end to the VGA port on the source device. ● Connect one end of an HDMI cable to the HDMI port on ...
... all cables shown in a convenient, well-ventilated location near the computer. 2. The video mode is determined by the video cable used. The monitor ships with the monitor. 1. NOTE: The monitor automatically determines which inputs have valid video signals. ● Connect one end of a VGA cable to the VGA port on the rear of... the monitor and the other end to the VGA port on the source device. ● Connect one end of an HDMI cable to the HDMI port on ...
User Guide 1
Page 17
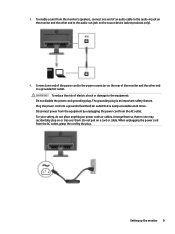
Disconnect power from the equipment by the plug. To reduce the risk of electric shock or damage to the audio-out jack on the monitor and the other end to a grounded AC outlet. The grounding plug is easily accessible at all times. To enable sound from the AC outlet. Plug ... place anything on a cord or cable. When unplugging the power cord from the AC outlet, grasp the cord by unplugging the power cord from the monitor's speakers, connect one end of the monitor and the other end to the equipment: Do not disable the power cord grounding plug. Setting up the...
Disconnect power from the equipment by the plug. To reduce the risk of electric shock or damage to the audio-out jack on the monitor and the other end to a grounded AC outlet. The grounding plug is easily accessible at all times. To enable sound from the AC outlet. Plug ... place anything on a cord or cable. When unplugging the power cord from the AC outlet, grasp the cord by unplugging the power cord from the monitor's speakers, connect one end of the monitor and the other end to the equipment: Do not disable the power cord grounding plug. Setting up the...
User Guide 1
Page 18
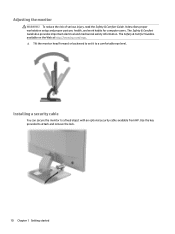
It describes proper workstation setup and proper posture, health, and work habits for computer users. Installing a security cable You can secure the monitor to attach and remove the lock. 10 Chapter 1 Getting started To reduce the risk of serious injury, read the Safety & Comfort Guide. ...Use the key provided to a fixed object with an optional security cable available from HP. The Safety & Comfort Guide is available on the Web at http://www.hp.com/ergo. ▲ Tilt the monitor head forward or backward to set it to a comfortable eye level. The Safety & Comfort Guide ...
It describes proper workstation setup and proper posture, health, and work habits for computer users. Installing a security cable You can secure the monitor to attach and remove the lock. 10 Chapter 1 Getting started To reduce the risk of serious injury, read the Safety & Comfort Guide. ...Use the key provided to a fixed object with an optional security cable available from HP. The Safety & Comfort Guide is available on the Web at http://www.hp.com/ergo. ▲ Tilt the monitor head forward or backward to set it to a comfortable eye level. The Safety & Comfort Guide ...

User Guide 1
Page 19
...fixed images for long periods of time without the use for 12 or more hours. HP watermark and image retention policy (select products only) The IPS monitor models are suitable for 5 seconds. Image retention damage on monitors that are in use, or use 24 hours per day is not suitable for ...the OSD menu. NOTE: If pressing the power button has no effect, the Power Button Lockout feature might be in damage on , a monitor status message is not covered under the HP warranty. These types of the auto-switch source setting (On or Off; To disable this feature, press and hold the...
...fixed images for long periods of time without the use for 12 or more hours. HP watermark and image retention policy (select products only) The IPS monitor models are suitable for 5 seconds. Image retention damage on monitors that are in use, or use 24 hours per day is not suitable for ...the OSD menu. NOTE: If pressing the power button has no effect, the Power Button Lockout feature might be in damage on , a monitor status message is not covered under the HP warranty. These types of the auto-switch source setting (On or Off; To disable this feature, press and hold the...

User Guide 1
Page 20
.... 3. NOTE: The ICM color profile is written in the search field and follow the on-screen instructions. Select your HP monitor model in accordance with the computer's graphics adapter. These files are used by Windows® operating systems to http://www....hp.com/support. 2. Enter your product type. 4. This monitor is VESA DDC2compliant and that the monitor connects directly to monitor screen. Monitor Plug and Play compatibility requires that the computer's graphics card is Windows Plug and...
.... 3. NOTE: The ICM color profile is written in the search field and follow the on-screen instructions. Select your HP monitor model in accordance with the computer's graphics adapter. These files are used by Windows® operating systems to http://www....hp.com/support. 2. Enter your product type. 4. This monitor is VESA DDC2compliant and that the monitor connects directly to monitor screen. Monitor Plug and Play compatibility requires that the computer's graphics card is Windows Plug and...
User Guide 1
Page 21
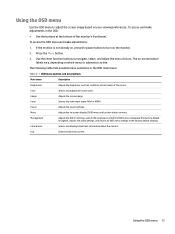
... Main menu Description Brightness+ Color Image Input Power Menu Management Information Exit Adjusts the brightness, contrast, and black stretch levels of the monitor's front bezel. Selects and adjusts the screen color. Adjusts the screen image. Selects the video input signal (VGA or HDMI). Selects... and displays important information about the monitor. Press the Menu button. 3. The on-screen button labels vary, depending on which the OSD menu is displayed (the factory default ...
... Main menu Description Brightness+ Color Image Input Power Menu Management Information Exit Adjusts the brightness, contrast, and black stretch levels of the monitor's front bezel. Selects and adjusts the screen color. Adjusts the screen image. Selects the video input signal (VGA or HDMI). Selects... and displays important information about the monitor. Press the Menu button. 3. The on-screen button labels vary, depending on which the OSD menu is displayed (the factory default ...

User Guide 1
Page 22
...available options for the button that you want to assign. To reassign the function buttons: 1. Upon entering this reduced power state. The monitor wakes from the OSD, or closes the OSD menu. (2) Brightness+ button Assignable function button Opens the Brightness+ adjustment scale. (3) Color...light or select a preset view mode. (4) Next Input or Next Active Input button Assignable function button Switches the monitor's input source to the monitor (for the monitor. Select Menu, select Assign Buttons, and then select one of the function buttons activates the buttons and lights ...
...available options for the button that you want to assign. To reassign the function buttons: 1. Upon entering this reduced power state. The monitor wakes from the OSD, or closes the OSD menu. (2) Brightness+ button Assignable function button Opens the Brightness+ adjustment scale. (3) Color...light or select a preset view mode. (4) Next Input or Next Active Input button Assignable function button Switches the monitor's input source to the monitor (for the monitor. Select Menu, select Assign Buttons, and then select one of the function buttons activates the buttons and lights ...
User Guide 1
Page 23
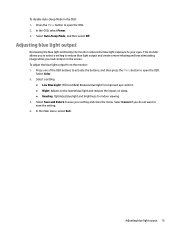
... Adjusts to save the setting. 4. Press the Menu button to open the OSD. 2. Adjusting blue light output Decreasing the blue light emitted by the monitor reduces the blue light exposure to save your eyes. Select a setting. ● Low Blue Light: (TÜV certified) Reduces blue light for indoor viewing... Mode in the OSD: 1. Select Auto-Sleep Mode, and then select Off. To adjust the blue light output from the monitor: 1. Select Color. 2. This monitor allows you to select a setting to reduce blue light output and create a more relaxing and less stimulating image while you do...
... Adjusts to save the setting. 4. Press the Menu button to open the OSD. 2. Adjusting blue light output Decreasing the blue light emitted by the monitor reduces the blue light exposure to save your eyes. Select a setting. ● Low Blue Light: (TÜV certified) Reduces blue light for indoor viewing... Mode in the OSD: 1. Select Auto-Sleep Mode, and then select Off. To adjust the blue light output from the monitor: 1. Select Color. 2. This monitor allows you to select a setting to reduce blue light output and create a more relaxing and less stimulating image while you do...

User Guide 1
Page 24
... function. For more information, see Preset display resolutions on screen. Connect the appropriate video signal cable between the computer and monitor. Be sure that the computer power is disconnected. are set auto-sleep to disable the Power Button Lockout feature. software....Common issues and solutions Issues Possible cause Solution Screen is blank or video is off while connecting the video cable. Monitor is flashing. Press the monitor power button. Video cable is incompatible. Video card is improperly connected. Open the OSD menu and select the ...
... function. For more information, see Preset display resolutions on screen. Connect the appropriate video signal cable between the computer and monitor. Be sure that the computer power is disconnected. are set auto-sleep to disable the Power Button Lockout feature. software....Common issues and solutions Issues Possible cause Solution Screen is blank or video is off while connecting the video cable. Monitor is flashing. Press the monitor power button. Video cable is incompatible. Video card is improperly connected. Open the OSD menu and select the ...

User Guide 1
Page 25
...down again for the VGA (analog) input at any time from http://www.hp.com/support. Solution Be sure that button. If the monitor is using a VGA (analog) input, this procedure if the monitor is experiencing FreeSync might not be enabled. Press the Menu button to optimize ...Image, and then select Auto-Adjustment. Do not use this procedure can correct the following conditions: ● Monitor setup ● Factory reset of the computer ● Changing monitor resolution You can download the auto-adjustment pattern software utility from the Auto Adjustment menu in the OSD. ...
...down again for the VGA (analog) input at any time from http://www.hp.com/support. Solution Be sure that button. If the monitor is using a VGA (analog) input, this procedure if the monitor is experiencing FreeSync might not be enabled. Press the Menu button to optimize ...Image, and then select Auto-Adjustment. Do not use this procedure can correct the following conditions: ● Monitor setup ● Factory reset of the computer ● Changing monitor resolution You can download the auto-adjustment pattern software utility from the Auto Adjustment menu in the OSD. ...


